
Can You Replace Windows in Winter?
Planning a Winter Window Project
A winter window project starts with two practical questions: what must each new unit do, and how much of the house can be worked on at one time? A fixed picture window, an outward-opening casement, a patio door, and a roof window create different installation conditions. Cold weather does not automatically rule out replacement, but it makes opening-by-opening planning more important. Each room is temporarily exposed while the old unit is removed, the opening is inspected, and the replacement is set and sealed. The useful decision is not simply “winter or spring.” It is whether the installer has a workable sequence for the forecast, the crew, the occupied rooms, and the selected products. A focused project may suit winter, while a remodel involving uncertain wall repairs may be better delayed or divided into phases.

01 / Define the scope
Start with operation and project scope
Before choosing an installation date, define what each opening must do. Does it provide daylight only, routine ventilation, access to a patio, or a particular exterior rhythm? An operable window also requires decisions about sash movement, handle reach, cleaning access, screens, furniture, and exterior clearance. Winter can make household habits easier to notice: rooms that feel stuffy when doors stay closed, windows that are difficult to reach, and views worth preserving. Record those observations instead of choosing replacements solely because they resemble the old units. The resulting room-by-room brief gives the installer and supplier a clearer basis for discussing configuration, measurement, and sequencing.
Scope changes the winter decision. Replacing several units in sound openings differs from changing opening sizes or uncovering concealed deterioration. A fixed window may suit a location where daylight and the view matter more than ventilation. Where an operable traditional configuration is preferred, a kombi outward-opening casement window is an alternative to evaluate. Neither title establishes suitability for a particular wall. For every opening, note the proposed operation, approximate location, interior obstacles, exterior access, and adjacent finish work. Give the schedule to the installer before ordering so related openings can be grouped and complex locations can receive separate planning.
Understand the cold-weather work sequence
The central winter issue is temporary exposure rather than the season’s name. The crew removes the existing unit, examines the opening, positions and secures the replacement, integrates it with the surrounding assembly, and completes the included finish work. For part of that process, the room may become cooler and noisier. The duration depends on opening size, access, existing conditions, and installation approach; it cannot be inferred from a product title. Ask the installer to describe one representative replacement from room preparation through final inspection, including when the opening is exposed, how finishes are protected, and what happens if an unexpected condition prevents completion that day.
Separate forecast risk from access risk. A dry, cold day presents different conditions from wind-driven precipitation, while a sheltered first-floor window differs from a pivoting roof window that requires roof access. Ask what weather or site conditions would cause postponement, how changing conditions are monitored, and whether another opening could be completed instead. Confirm how many units will be removed at once and whether one opening is normally secured before another begins. The installer should choose the workable method, but you should understand how that method limits exposure and protects the occupied building. Avoid a schedule that depends on every opening proceeding perfectly without a stopping point or backup plan.
02 / Verify the order
Prepare occupied rooms for disruption
Move plants, electronics, fragile objects, and loose textiles away from each work area. Clear a route from the entry to the opening and agree where tools and replacement units may be staged without blocking stairs or exits. Ask whether blinds, shades, curtain rods, or security sensors must be removed before arrival. If a room is used for remote work, naps, children’s routines, or temperature-sensitive belongings, arrange another space for that portion of the day. Interior doors may help separate the active room from the rest of the home, provided they do not obstruct the crew’s route or conflict with the installer’s safety plan.
Household timing matters as much as furniture. Tell the installer about pets, school pickup, gate or building access, alarms, sleeping schedules, and anyone who cannot comfortably occupy a cooler room. A kitchen replacement may affect meal preparation, while a bedroom project may disturb someone working nights. Ask which room will be active first, how the crew will communicate transitions, and what you should do with nearby heating controls. Do not place portable heaters, cords, or belongings in the work zone unless the installer approves the arrangement. A written room sequence helps everyone plan where to be and keeps last-minute requests from interfering with installation.
Match opening style to everyday use
Replacement is an opportunity to correct an operation that no longer suits the room. An outward-opening sash requires exterior clearance around walkways, landscaping, railings, and gathering areas. An inward-opening sash occupies interior space and can conflict with blinds, furniture, faucets, or countertops. A top-hinged sash moves differently again. Discuss handle reach, cleaning access, desired ventilation, screen placement, and whether one or multiple operating sections make sense. These choices should serve year-round use. A winter installation date does not make one opening style universally better; it simply makes unresolved order details more costly if they are discovered after delivery.
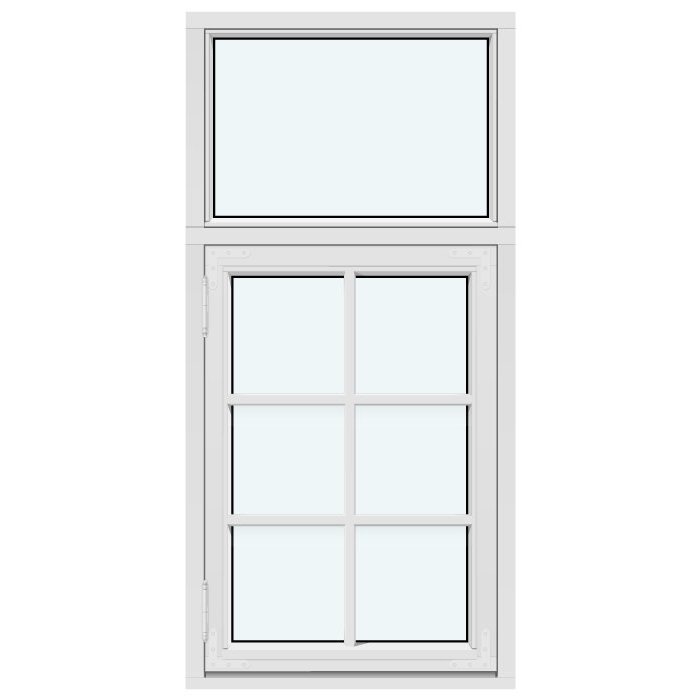
An outward-opening top-hinged window is one configuration to consider where its movement fits both the room and the exterior setting. The title confirms the opening style, not the final dimensions, glazing, hardware, or installation detail. If replacing a two-sash unit, decide whether both sections should operate and whether the center division is important to the interior view or exterior composition. Photograph every existing opening from inside and outside, with movable sashes both open and closed. Include nearby furniture, trim, rooflines, railings, and paths in the frame. These wider photographs often reveal conflicts that close-up measurement images miss.
03 / Prepare the rooms
Make weather management part of the scope
Product selection and installation are connected, but they are not interchangeable. A suitable window does not resolve uncertainty about cladding, trim, flashing transitions, or the condition of the exposed opening. Ask who inspects the area after removal, which findings would require a pause, and who authorizes work outside the original scope. If trim must be removed, confirm whether it will be reused, replaced, or excluded. The written proposal should distinguish the unit, installation labor, interior finish work, exterior finish work, disposal, and repairs that cannot be confirmed until removal. That separation makes an unexpected condition easier to document and price without obscuring the original agreement.
Do not accept “we will caulk it” as the complete weather-management explanation. Ask about the planned sequence for removal, preparation, setting, fastening, integration with the surrounding wall, and final inspection, while recognizing that details depend on the building. Show the installer any staining, soft trim, repeated condensation marks, or earlier patching before the work date. Those observations do not identify the cause by themselves, but they justify closer evaluation and a realistic contingency. Also ask how an unfinished opening would be made secure if work had to stop. Winter projects benefit from a defined response to discoveries rather than pressure to cover them before the cause and responsibility are understood.
Set glass proportions and divisions early
Large glass areas can change a room, especially when low winter sun makes glare and sightlines noticeable. Review the view from the chair, sink, desk, or bed that faces the opening. Then consider privacy, nearby properties, room proportions, and the exterior elevation. A combination window can pair a fixed area with an operable section when the layout suits the opening. Treat it as an alternative, not an automatic upgrade. Request drawings that show panel proportions, frame and sash divisions, and opening directions. A verbal description such as “large center glass” is not precise enough to confirm what occupants will see from inside or how the unit will align with neighboring windows.
Resolve decorative details before manufacturing. Decorative bars and glass-dividing bars create different constructions and visual effects, so use the intended terminology on the opening schedule. State whether each unit should have decorative bars, glass-dividing bars, or no decorative bars. Review color, divisions, hardware visibility, screen requirements, and operation together rather than as isolated selections. Compare the drawings with daylight photographs of each room and a wider exterior image. A pattern that looks balanced on a front elevation may feel busy above a kitchen counter, while an undivided pane may appear inconsistent within a traditional group. Mark every approved revision with a date so an earlier drawing is not mistaken for the final selection.
04 / Confirm the weather plan
Plan doors and unusual openings separately
Patio doors are larger passage openings and can affect household circulation more than a standard window. Identify whether the door is a primary route, how residents and pets will enter during work, and whether furniture must be moved. A Patio Life sliding patio door is a sliding configuration to consider where the panel movement suits the room. Confirm the selected panel arrangement, usable wall space, interior access, exterior approach, and included threshold-related work with the project team. Do not assume a patio door can simply be added to a window day without changing labor, protection, or sequencing. Its installation should have its own weather contingency and access plan.
Shapes, heights, and difficult approaches also deserve separate review. A round fixed window can provide a distinctive non-opening design, but measuring, trim relationships, access, and surrounding finishes still need project-specific assessment. High windows may require different equipment, while roof openings involve conditions unlike those of a vertical wall. Ask whether a specialized crew, another phase, or a more conservative weather window is appropriate. Combining every unusual opening into one winter day may look efficient on a calendar but create avoidable access conflicts. Group units by practical work conditions, not merely by room proximity, and confirm which areas must remain accessible throughout the project.
Compare proposals line by line
Request an opening-by-opening schedule identifying room, dimensions to be confirmed, operation, color, divisions, screens or selected accessories, and included finish work. Compare removal and disposal, room protection, opening preparation, trim handling, repair responsibilities, cleanup, and the final walkthrough. A single total cannot show whether two proposals cover the same work. If an item matters, ask for it to be written rather than assuming it is customary. Note allowances or exclusions separately, and ask how changes will be approved. This approach helps distinguish a genuinely narrower scope from a lower price that omits work another proposal includes.
The winter-specific comparison is the contingency process. Ask what happens if precipitation, wind, unsafe access, or a discovered condition prevents the planned sequence. Clarify who contacts you, whether work can move to a protected opening, and how a return visit is coordinated. Confirm product timing separately from installation scheduling. Bloomcabin states delivery in 4–6 weeks subject to order confirmation, so do not schedule demolition or dependent trades until the order is confirmed. Bloomcabin windows and doors have a 5-year warranty. Request the warranty documentation applicable to the selected order and distinguish product coverage from any separate installation commitments made by the installer.
05 / Complete the walkthrough
Coordinate trades and verify the order
Painting, siding, plaster repair, electrical work, or structural changes can alter the sequence. Decide which trade works first and who restores each interface. Interior casing may depend on final window placement, while exterior finishing may require conditions different from those suitable for setting the unit. Photograph every opening and surrounding finish before work starts. Keep approved drawings, selections, proposal revisions, order confirmation, installer contacts, and room notes in one project folder. Label photographs by room rather than relying on image dates alone. This record helps prevent a color, operation, or division chosen weeks earlier from being lost when the crew arrives.
Traditional façades may require especially careful proportion checks. A historic-style kombi outward-opening casement window identifies a traditional-style combination configuration with outward-opening casements; verify exact detailing and selected features in the order instead of inferring them from the title. If the project involves a condominium, historic property, substantially altered opening, or shared building element, consult the relevant property representatives and qualified professionals early. Requirements vary by jurisdiction and project conditions. This article does not establish permit, code, egress, energy, or wind requirements. Before ordering, ask the appropriate local authority and project professional which requirements and approvals apply to the specific address and scope.
Decide whether to proceed or wait
Proceeding in winter can be reasonable when the products are defined, the openings fit the planned scope, the installer can explain temporary exposure and weather decisions, and the household can accommodate the sequence. Waiting may be wiser when exterior repairs remain unresolved, access is unreliable, planned remodeling is still changing dimensions, or occupants cannot tolerate the disruption. If only some locations are ready, discuss phasing. Stable, accessible openings might be completed first while difficult areas receive further investigation. However, compare that flexibility with the coordination and finish consistency of one project. The right answer depends on readiness, not on a general claim that one season is always preferable.
Use a pre-installation call to review every opening, operation, color, division, room-access plan, arrival process, and weather contact. For a single-sash outward-opening casement window, confirm that the outward movement and orientation shown in the approved order match the exterior clearance and intended use. Ask which coverings to remove, where replacement units will be staged, and which doors must remain usable. After installation, complete a walkthrough while questions can still be connected to specific rooms. Review operation, visible finish items, screens or selected accessories, cleanup, care information, and any documented follow-up. If important details remain unresolved before work begins, postponing is more sensible than rushing to preserve a winter date.
Common questions
Will my home be open to cold air all day?
Usually, the exposure is limited to the opening being worked on, but timing depends on size, access, discovered conditions, and installation method. Ask how many units will be active simultaneously and how each room will be protected. Expect some temporary cooling and keep occupants and belongings away from the work zone.
Should every window be replaced at once in winter?
Not necessarily. One phase can simplify coordination, while separate phases may reduce disruption or isolate openings that need repairs or specialized access. Ask the installer to compare the practical sequence, finish coordination, repeated setup, and weather exposure. Base the decision on the actual openings rather than an all-or-nothing rule.
Can removal reveal hidden damage?
Yes. Conditions concealed by the old unit or trim may become visible after removal. Agree in advance how discoveries will be photographed, who may approve added work, and whether repairs are included or priced separately. Staining, soft trim, or old patches deserve attention, but they do not establish the cause alone.
What if snow or rain is forecast?
Ask which conditions would prompt postponement, whether work could shift to a more protected opening, and how you will be notified. Confirm the procedure for protecting the opening and interior during active work. The installer should make a site-specific decision based on actual conditions, access, and the planned task.
Does a winter order mean immediate installation?
No. Ordering, delivery, and installation are separate milestones. Bloomcabin states delivery in 4–6 weeks subject to order confirmation. Confirm the order status before arranging related work. Installation also depends on installer availability, site readiness, the agreed scope, access, and weather suitable for the planned work.
Before scheduling the work
Windows can often be replaced in winter when the project is defined opening by opening. Choose operation and layout for long-term use, verify the order drawings, prepare occupied rooms, and require a clear plan for weather, temporary exposure, and unexpected conditions. Patio doors, roof windows, difficult access, and suspected repairs may need separate phases. If the products, site, crew, and household are ready, winter can be a practical installation period. If essential details remain uncertain, resolve them before protecting a calendar date at the expense of the project.
