
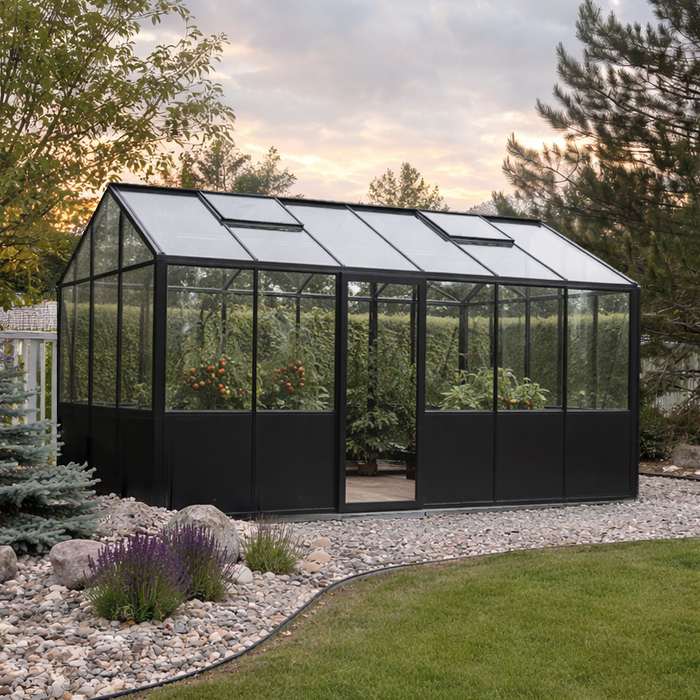
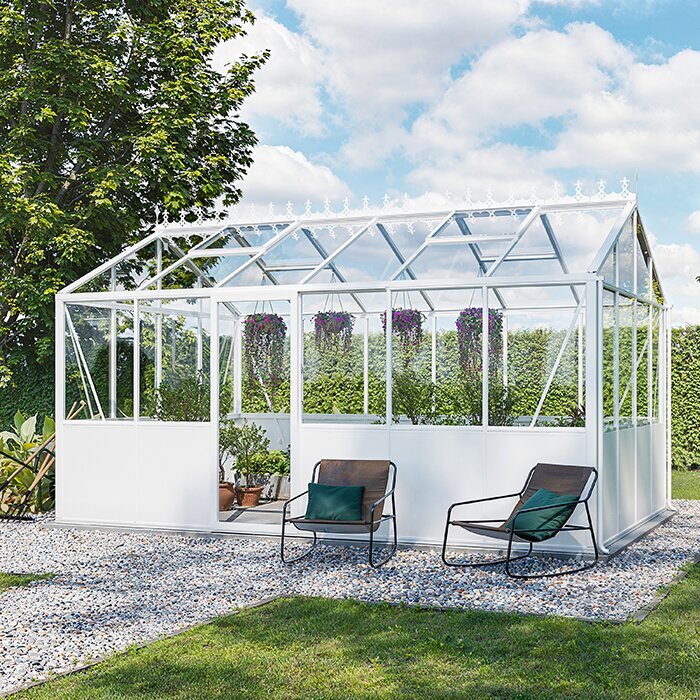
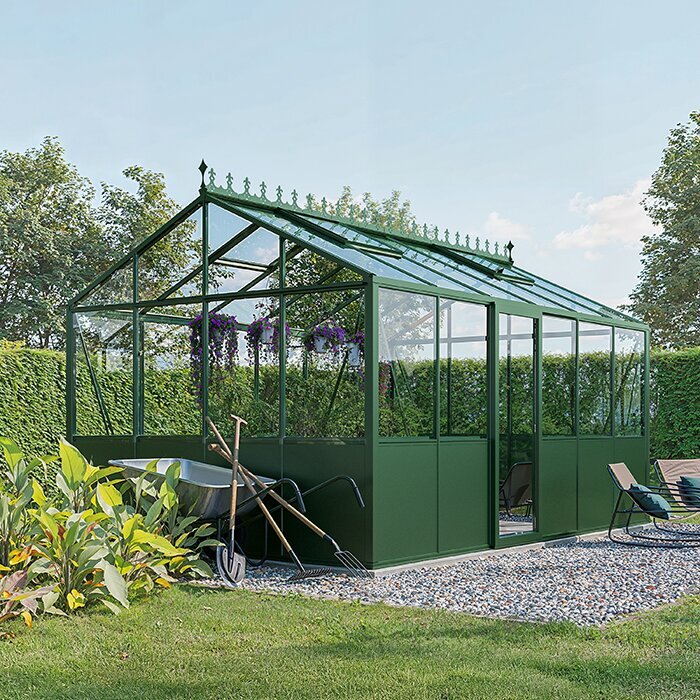








Bloomcabin Prestige Premium Greenhouse
Prestige Premium Greenhouse — solid lower panels, configurable glazing, and more privacy for your garden
The Bloomcabin Prestige Premium Greenhouse is designed for U.S. homeowners who want productive growing space and more screening along the lower walls than a fully glazed greenhouse provides.
It is available in compact and spacious layouts, all with solid lower aluminum panelsand a choice of frame widths, door arrangements, glazing, and finishes.
Before ordering, observe seasonal sunlight, prevailing wind, ground slope, drainage, and shade from nearby buildings or trees. Confirm how greenhouse components will reach the prepared foundation, and plan glazing, ventilation, utilities, and interior circulation before installation begins. Bloomcabin USA.
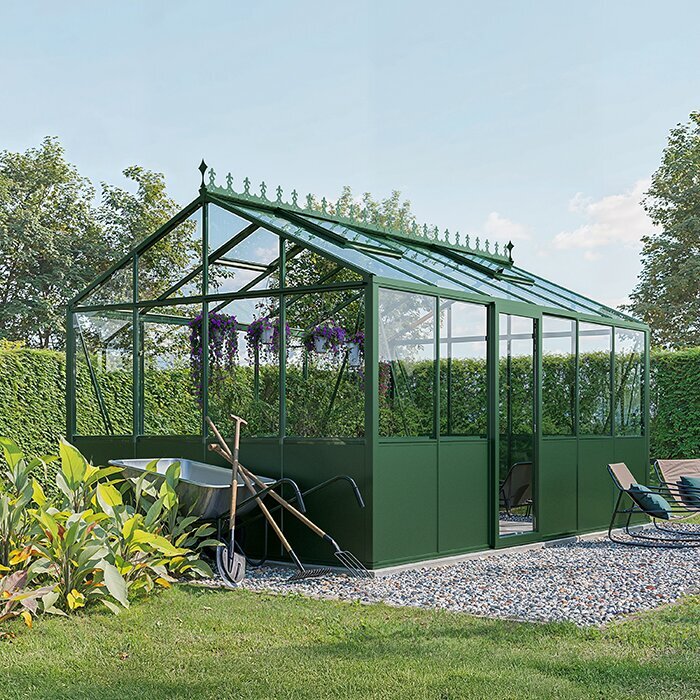
A more private lower section
Solid lower aluminum panels add privacy without blocking light from above
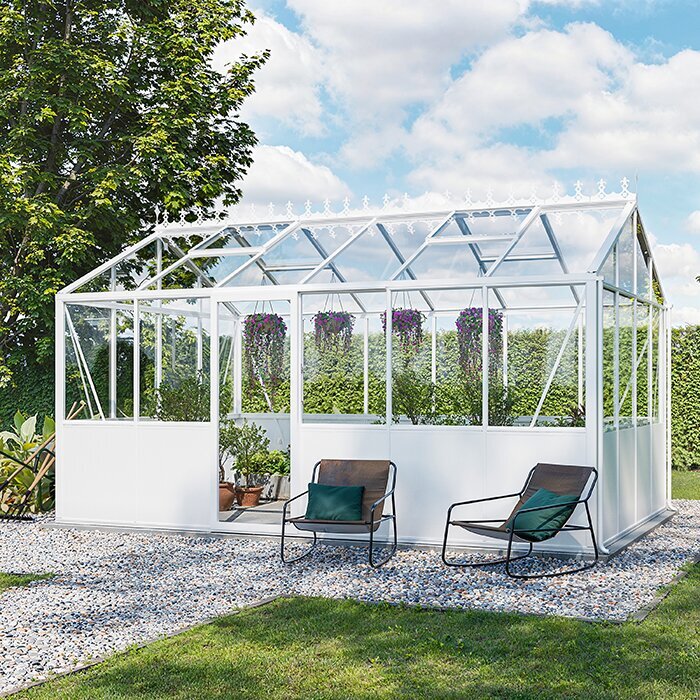
The Prestige differs from a fully glazed greenhouse by using solid aluminum panels around the lower perimeter. They reduce direct views of pots, storage, and the lower interior while preserving bright glazing above.
This design works especially well near a patio, home, or frequently used part of the yard, where an entirely transparent interior may feel too exposed.
The combination gives the structure a more grounded architectural look while preserving the glazed upper volume for plants and daylight.
Plan the working layout
Allow space for benches, aisles, large pots, and seating
Check key sightlines
Consider views from the house, patio, and neighboring properties
Map sun and shade
Note the strongest afternoon exposure on each roof slope and wall
Coordinate the finish
Choose a frame color that complements the home, patio, and garden
Configure natural light and privacy
Select glazing by area to balance plant light, heat control, and privacy
The Prestige is available with polycarbonate or 4 mm tempered safety glass, as well as selected specialty glazing such as self-cleaning, mirror-effect, solar-control, and frosted white glass.
Roof and sidewall glazing can be configured differently, allowing the roof to prioritize light while selected sides provide more privacy or solar control.
Give each part of the greenhouse a clear purpose. Identify where seedlings need strong light, where afternoon sun may cause excess heat, which walls face neighbors or busy outdoor areas, and whether seating would benefit from softer light. Planning the roof and walls separately is especially useful when the interior combines growing, display, and relaxation.
Prestige specifications
Dimensions and configuration options
Size options
22 configurations: 40.6–302.3 sq ft (3.77–28.08 m²)
Use the footprint—not floor area alone—to confirm site fit, installation access, and usable interior space
Narrower frame
93 in / 235 cm wide
Ridge height: 91 in; door height: 65 in
Wider frame
122 in / 310 cm wide
Ridge height: 105 in; door height: 73 in
Lower walls
31 in / 79 cm solid aluminum panels
Use the panel height when planning benches, storage, and seated sightlines
Glazing and doors
Configurable roof and sidewall glazing
Single sliding door, with double doors available on the wider frame
Built-in features and finish
Integrated gutters, built-in aluminum base, and 37 RAL colors
12-year warranty

Climate & ventilation
Coordinate roof vents, glazing, and optional heating for more consistent growing conditions
Every Prestige includes roof vents with manual openers. Automatic temperature-controlled openers are also available to reduce frequent adjustments as conditions change.
Sun exposure changes throughout the year, so consider both summer heat and lower winter sunlight when choosing glazing or shading. A hot, exposed site may benefit from solar-control glass on selected surfaces, while a cooler or partly shaded location may need to preserve as much clear light as possible. If heating is planned, choose its location and utility route before furnishing the greenhouse so equipment does not interfere with doors, vents, watering, or cleaning.
Integrated gutters collect roof runoff, but the outlets still need a suitable discharge route. Direct water away from the foundation and doorway rather than allowing it to pool beside the aluminum base or flow across a walkway. If runoff will be stored for irrigation, keep the route accessible for inspection and clearing, and make sure excess water can still drain away when storage is full or disconnected.
More than one purpose
Four ways to use the Prestige greenhouse
01
Vegetables and propagation
Organize benches and floor space for vegetables, seed trays, and young plants while keeping working routes clear as crops mature.
02
Garden retreat
Create a comfortable sitting area among plants, with less of the interior visible from outside.
03
Specialty plant collection
Configure light and ventilation for citrus plants, tropicals, or collector specimens.
04
Garden focal point
Use the RAL color palette and paneled lower walls to coordinate the greenhouse with the surrounding garden.
Site planning for different U.S. conditions
Prioritize the site conditions that cannot be changed easily: usable sunlight, drainage, wind exposure, and a practical approach from the house or driveway. Then assess shade, nearby structures, and existing water flow around the proposed footprint. The best position is not simply the sunniest one; it must also support safe installation, routine movement of soil and supplies, and future maintenance.
Hot and sunny regions
Conditions vary widely across Arizona, Texas, Florida, and inland California, so make decisions based on the actual property rather than the state alone. Note which roof slope and wall receive prolonged afternoon sun, whether paving or walls reflect additional heat, and how easily warm air can leave the site. These observations show where selective solar control, shading, or automatic vent operation may be most useful.
Translate those observations into a surface-by-surface glazing plan. Keep clear glazing where plants need useful light, and reserve solar-control glass or added shading for areas with the strongest solar exposure. Review the plan for both summer and winter because seasonal shade and sun angles can change which surfaces need protection.
Automatic vent openers work best when the roof area remains clear. Keep tall shelving, hanging baskets, trellis wires, and mature vines away from the vent path, and make sure added shading cannot interfere with movement. The openers should remain visible and reachable so their operation can be checked as plants grow.
Cold and freeze-thaw regions
Prestige greenhouses are rated for winds up to 67 mph and a snow load of 43 lb/ft². These ratings do not replace a foundation designed for the individual site or regular winter care. In freeze-thaw regions, the support should account for local frost depth, soil movement, drainage, and applicable building requirements. The selected footprint, anchoring points, finished floor height, and surrounding ground should be considered together.
The built-in aluminum base is part of the greenhouse, not a replacement for prepared ground or structural support. The supporting surface must be level, stable, correctly sized, and ready before assembly. Address sudden changes in slope, soft soil, buried obstructions, and drainage problems in advance. Accurate preparation helps keep the frame square, panels aligned, and sliding doors moving properly.
Seasonal ground movement can strain an otherwise accurately assembled frame. Shims or isolated corner adjustments are not a lasting solution for an unsuitable base. Uniform support helps the structure stay aligned as temperature and soil moisture change. After severe weather and seasonal changes, inspect the threshold, frame lines, and door movement for early signs of shifting.
Views from the home and patio
Mark the footprint and door position on the ground, then check the outline from the house, patio, main garden paths, and neighboring sightlines. This makes it easier to adjust the orientation before foundation work fixes the final view.
Place the door, potting bench, storage, and seating so the solid lower walls screen everyday clutter without hiding the plants you want to see through the upper glazing.
Where more privacy is needed above the solid panels, consider frosted or mirror-effect glass on the relevant wall rather than reducing light throughout the greenhouse.
Local requirements and utilities
Local rules may cover setbacks, height, stormwater, utility work, or permits, and requirements vary by municipality and community. Check the property requirements before committing to a footprint. If the property is governed by a homeowners association, review its approval process as well. Keep approvals and site records with the greenhouse documents for future electrical work, repairs, or property projects.
Measure the entire delivery and installation path, not only the finished foundation. Check gates, side yards, steps, overhead branches, roof overhangs, tight turns, and temporary storage space for components. The crew also needs safe working room around the perimeter. If fencing, planting, or outdoor furniture must be moved, schedule that work before materials arrive. Protect finished paving and lawns where repeated foot traffic or material handling could cause damage.
If water, power, lighting, or heating may be added, identify the routes before completing the floor and surrounding landscaping. Use qualified professionals where required, and choose equipment suitable for greenhouse conditions. Keep controls and shutoffs accessible without moving heavy benches. Plan for routine watering and floor cleaning so water does not collect around electrical equipment, cords, or connections.
Inside the greenhouse
Plan the interior around daily movement before lining the walls with benches. Walk the route from the door to the potting, watering, and storage areas while allowing for trays, bags of growing medium, and mature foliage. Then assign brighter and dimmer areas according to plant needs. This helps prevent a layout that looks efficient when empty from becoming difficult to use later.
Interior layout
The solid lower walls provide a clean background for work areas and hide much of the equipment below bench height. Because they also reduce light near floor level compared with glass-to-ground walls, place light-demanding plants where they can benefit from the upper glazing. Test bench depth before making storage permanent, and keep frequently used tools away from the doorway and central aisle.
Allow enough room for the tasks you expect to perform. Carrying seed trays, turning with a watering can, using a stool, or moving a large pot requires more space than simply walking through an empty greenhouse. Avoid tight spots beside the sliding door and at bench ends. In larger models, maintain a clear route to the far end for plant inspection and moving bulky materials.
Leave access to the inside face of the lower panels for cleaning, inspection, and retrieving items that fall behind benches.
Tall crops
The glazed upper section provides vertical growing space for tomatoes, vines, and specimen plants.
Place tall crops where their mature canopy will not cast unwanted shade over propagation areas or shorter plants. Follow the path of sunlight through the greenhouse, then arrange supports so foliage can be trained away from roof vents. Leave space beneath dense growth for air movement and inspection. Trellises and ties should not place weight on glazing, vent mechanisms, or frame members that are not intended as plant supports.
Group crops by mature height before installing supports so seasonal growth does not force repeated rearrangement.
Propagation area
Place seed trays where the upper glazing provides the light required by the crop.
Use movable trays or shelves so the area can change as young plants are transferred to larger containers.
Keep water and tools nearby without narrowing the aisle or obstructing the sliding door.
Specialty glazing
Match each specialty glass option to a defined need. Frosted white glass softens light and views; mirror-effect glass provides additional visual screening; solar-control glass helps manage intense exposure; and self-cleaning glass is designed to reduce exterior upkeep. Assign these options only where needed while preserving suitable light for plants and activities elsewhere in the greenhouse.
For a seating area, choose privacy glazing according to the view from outside without unnecessarily darkening nearby growing space.
For plant benches, begin with crop-light requirements and add solar control only where the site exposure warrants it.
Plan for long-term use
Decide permanent elements before arranging items that are likely to change. The foundation, drainage, utility entry points, and finished floor height require early commitment, while benches, shelves, pots, and seating should remain adaptable. This approach allows the greenhouse to evolve without repeatedly changing its core and keeps shutoffs, door tracks, gutters, and vent mechanisms accessible.
Flooring and work surfaces
Choose an interior surface based on drainage, traction, cleaning, and the weight of loaded benches or large containers. Water and spilled growing medium are routine, so a decorative finish that becomes slippery or difficult to sweep may be impractical. The floor should meet the doorway cleanly without obstructing the sliding door or creating a raised edge. Keep joints, edging, and drainage routes accessible after the greenhouse is furnished.
If pavers or gravel are used, detail the edges so loose material stays clear of the sliding-door track and water can move toward the intended drainage route.
Confirm how the chosen surface meets the threshold before running permanent irrigation lines or fixing benches in place.
Irrigation
Larger Prestige configurations benefit from a planned watering layout that reaches each growing area without obstructing circulation.
Drip irrigation can serve individual containers or growing rows while keeping hoses out of the aisle, but it still requires observation. Group plants with compatible watering needs, provide a way to isolate sections, and check emitters for blockage or displacement. Avoid routing lines across the door track or through vent mechanisms. During seasonal shutdowns, follow the irrigation equipment manufacturer’s instructions for draining and storage so trapped water does not damage the system.
Keep filters, shutoff valves, and water connections accessible for adjustment and maintenance.
Cleaning and service access
Establish a simple inspection routine based on the greenhouse’s moving parts and water paths. Keep door tracks free of grit, remove leaves from gutters and outlets, confirm vents open without interference, and look for loose debris after storms. Clean glazing with methods suitable for the selected material, since glass and polycarbonate may require different products or tools. Address algae, soil, or fertilizer residue before buildup makes surfaces harder to inspect.
Leave exterior clearance on every side for more than washing the glazing. Installers or service personnel may need to reach fasteners, gutters, glazing edges, and lower panels without leaning through shrubs or across fixed furniture. Allow for the mature spread of nearby landscaping, and keep aggressive vines, thorny plants, irrigation spray, and rigid landscape features away from service areas.
Use seasonal changeovers to inspect areas normally hidden by benches, including the lower panels, floor edges, and base. Clear the door track and gutter outlets while access is unobstructed.
Future flexibility
Plan for the collection you may have several seasons from now, not only the first set of trays. Young trees need increasing headroom, propagation can demand temporary tables, and a seating area may later return to cultivation. Modular furnishings make those transitions easier. Before buying a large fixed bench, mark its footprint on the floor and test door clearance, working reach, and access to the lower panels. This practical trial often reveals whether a narrower or movable arrangement will function better.
Reassess shelf height and open floor area as plants mature rather than assuming the first-season layout will remain suitable.
Identify protected off-season storage before choosing removable tables or seating; furnishings are only flexible if they can be moved out and kept ready for reuse.
Before you order
Finalize the foundation, orientation, and glazing before ordering
Confirm the selected model’s footprint against the prepared area and mark the door position at full scale. Walk the approach while carrying something similar in size to a planting tray or large pot, then check that gates and paths will work for everyday use. Allow exterior working space for installation, cleaning, and access to components.
Create a simple wall-by-wall plan showing north, the strongest summer afternoon sun, nearby shade, important views, and the intended interior zones. Record the selected glazing for each roof and wall area, along with roof vents and door movement, so the final choices remain compatible with airflow, furniture, and tall plants. Keep the plan with the order information for installation and future reference.
Before installation, compare the prepared foundation and component staging area with the final order documents. Verify the diagonals, level, finished height, and working clearance, then protect the sorting area from mud and unnecessary foot traffic. Keep the glazing plan available during assembly so roof and wall selections are placed correctly. Before furnishing the greenhouse, operate the doors and vents and inspect the gutters, glazing, and perimeter for installation issues.
Continue planning with Bloomcabin
U.S. resources for greenhouse selection, ordering, warranty details, and product information
Frequently asked questions
FAQ — Bloomcabin Prestige Premium Greenhouse
Which width is better for benches and a central aisle?
For benches on both sides with a central aisle, the 122 in / 310 cm frame offers more lateral room. The 93 in / 235 cm frame may suit a tighter site, but bench depth and mature plant spread must still leave a comfortable passage. Mark the interior width and door opening at full scale, and confirm that the chosen frame fits the foundation and installation route.
Can the built-in aluminum base sit directly on soil?
No. The aluminum base is part of the greenhouse structure, but it still needs level, stable, correctly prepared support suited to the site. Soil conditions, frost movement, drainage, anchoring, and local requirements must be addressed before installation because the support affects frame alignment, panel fit, and door movement.
Where should seating be placed in a mixed-use Prestige greenhouse?
Place seating beside a solid lower wall where it will leave the route from the door and the ventilation path clear. Choose a position that preserves the best-lit areas for plants. Movable furniture allows the space to return to growing use when plants expand or seasonal bench space is needed.
What should be ready when the greenhouse components arrive?
The foundation should be complete, accessible, correctly sized, level, and free of standing water. Confirm the delivery and carrying route, remove obstacles around the working perimeter, and provide a clean area for sorting components. Utility routes and gutter discharge should already be planned, and any required site approvals should be in place.
Can the roof and walls use different glazing?
Yes. The roof and sidewalls can be configured differently, allowing you to preserve clear plant light in one area while adding solar control or privacy where it is actually needed. Base the choice on direct sun, nearby shade, outside views, and the intended use of each interior zone.
How do the solid lower walls affect plant placement?
They reduce light near floor level compared with glazing that extends to the ground. Place light-demanding plants and propagation trays where they can use the upper glazing, and use the lower-wall area for suitable benches, storage, or plants that do not require the brightest position.
Where should gutter runoff be directed?
Direct runoff away from the foundation, aluminum base, doorway, and nearby walkways. Keep the outlet route accessible so leaves or debris can be cleared. If water is collected for irrigation, provide a separate path for excess runoff when the storage system is full or disconnected.
What records should I keep after installation?
Keep the order confirmation, final configuration, glazing plan, installation records, approvals, and maintenance information together. These documents make it easier to identify components, plan later utility work, follow care requirements, and provide the correct information if service is needed.
Bloomcabin Prestige Premium Greenhouse
Plan your Prestige around the site, plants, and daily routine
Use the completed site plan and checklist when requesting the final configuration from Bloomcabin USA. Sharing one coordinated record of the chosen model, options, and site preparation helps keep ordering and installation aligned and provides a practical reference as the interior layout evolves.
Final planning checklist
✓ confirm the exact model and outside footprint
✓ mark the door location on the prepared site
✓ record the glazing choice for every roof and wall section
✓ note the selected RAL frame color
✓ map vent, gutter outlet, and utility locations
✓ verify foundation level, diagonals, and drainage
