








Pyramid Greenhouse on a Masonry Base
A freestanding Pyramid greenhouse designed for a customer-built masonry base
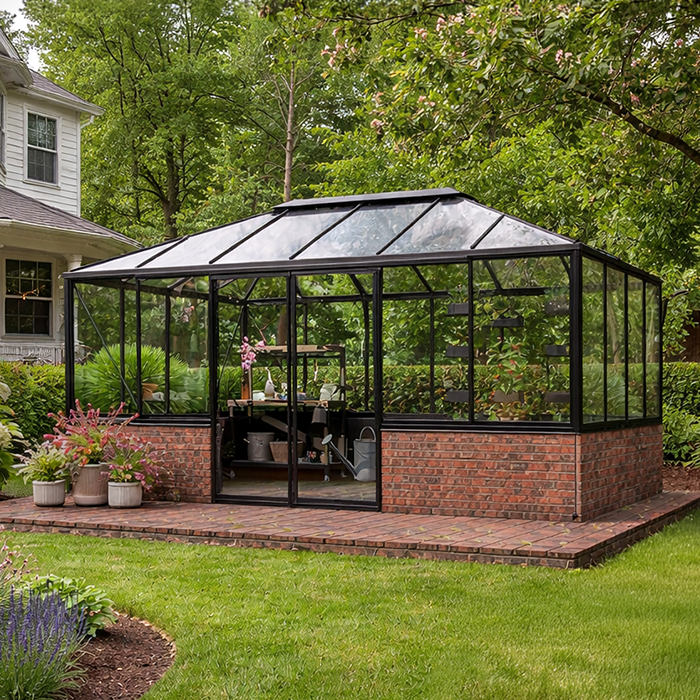
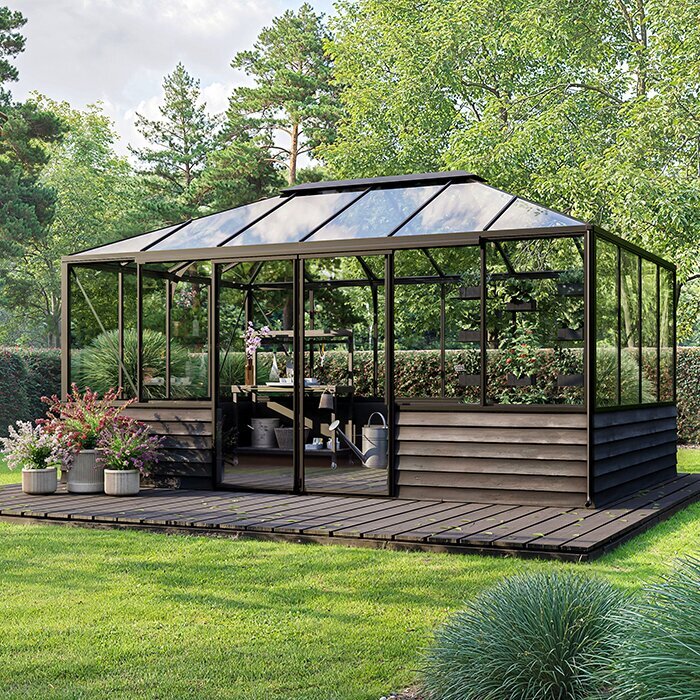
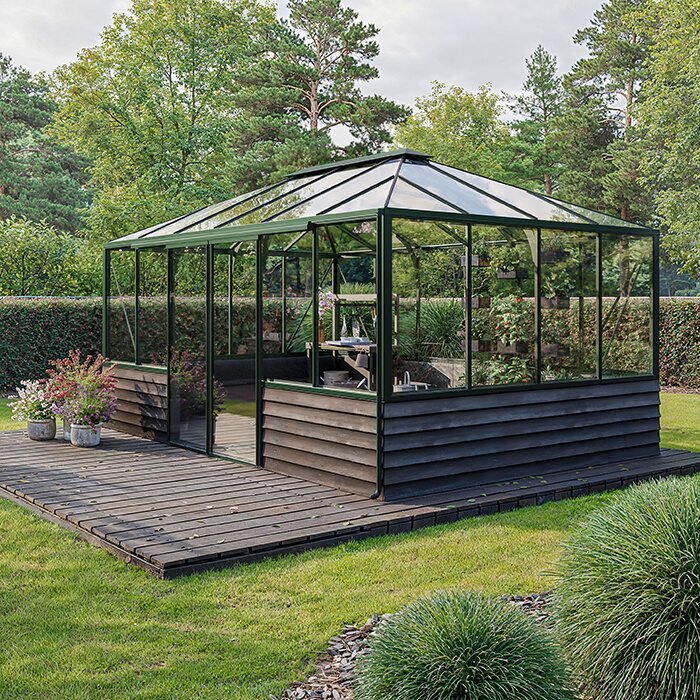
The Bloomcabin Pyramid Greenhouse on a Masonry Wall Base combines its distinctive multi-plane roof with a customer-built base of brick, stone, concrete, or another suitable masonry system. The solid lower wall gives the structure the presence of a traditional greenhouse while the greenhouse itself remains fully freestanding. Because the wall is permanent and must match the selected frame exactly, confirm the greenhouse configuration, doorway, foundation, and finished floor before masonry work begins.
The current U.S. range includes 6 sizes covering roughly 60–153 sq ft. The main footprints are 92.5 × 92.5 in, 122 × 122 in, 122 × 151.5 in, and 122 × 181 in. Above the wall, the greenhouse uses powder-coated aluminum profiles with a choice of polycarbonate or 0.16 in / 4 mm tempered safety glass. Choose the footprint according to the interior you want to create, not just the open space in the yard. Benches, beds, containers, seating, and a clear path from the door all require room.
The masonry forms a low perimeter base; it is not an existing building wall, and this model is not a Lean-To greenhouse. Visit Bloomcabin USA.
Freestanding design with a custom masonry base
A masonry base changes the look, not the freestanding design
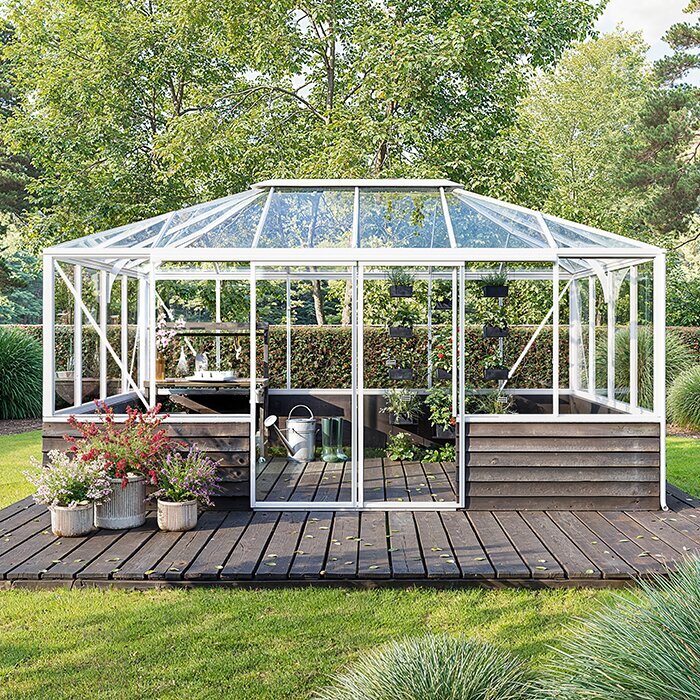
The upper frame encloses all four sides and retains the distinctive multi-plane roof. Because every side remains exposed, leave working room around the structure for assembly, panel cleaning, gutter access, and future maintenance.
Brick can complement the house, stone can connect with retaining walls and landscaping, and smooth concrete or stucco-finished masonry can create a more contemporary look. Consider joints, caps, corners, and doorway returns from close range as well as from the house. These details remain visible beneath the aluminum frame and have a major effect on the finished appearance.
The symmetrical roof remains the focal point, while the masonry creates a defined transition between the glazed structure and the surrounding garden.
Masonry base options
Brick, stone, concrete, or another structurally suitable masonry system
Tall central roof
Roof peak about 104–106 in depending on footprint
Glazing options
Polycarbonate or 0.16 in / 4 mm tempered safety glass
RAL frame color
Select a RAL frame color that works with both the masonry and the home exterior
The wall is part of the design
Choose the masonry, frame color, and floor as one coordinated palette
The customer builds the masonry base to the confirmed greenhouse dimensions, including the required doorway and upper mounting surface. This makes it possible to coordinate the finish with the home and landscape, but structural planning must come first. Confirm the selected model before the mason lays out the wall; approximate garden measurements are not a substitute for the greenhouse installation information.
Whatever material you choose, agree on the corner layout, joint finish, cap detail, and doorway returns before work begins. The masonry must be formed accurately, and decorative projections or irregular caps must not interfere with the surface that supports the greenhouse frame.
The top of the wall must be flat, level, dimensionally accurate, and structurally suitable for the aluminum greenhouse. Check the full perimeter rather than a few isolated points. A high spot, uneven cap, or out-of-square corner can cause alignment problems in the glazed structure above. The foundation and wall must also be appropriate for the site's soil, drainage, and frost conditions.
Masonry planning checklist
Four decisions to make before masonry work begins
Treat the masonry as an integral part of the greenhouse project, not as a decorative base added afterward. Once built, it fixes the footprint, door position, threshold height, and relationship between the frame and finished floor. Early planning also makes it possible to include conduit or water routes without cutting through completed finishes later.
01
Exact footprint
Build to the confirmed dimensions for the selected size. Before the frame arrives, measure every side, compare both diagonals, inspect the corners, and verify the doorway location. Keep a record of the finished measurements so any discrepancy can be corrected while masonry work is still practical.
02
Door opening
Coordinate the masonry opening, sliding door, threshold, exterior approach, and finished interior floor height. The route should accommodate the carts, trays, bags of potting mix, and larger containers you expect to move through it. Avoid an unintended step or raised edge that could hold water or make everyday access difficult.
03
Level wall top
Keep the entire wall top flat, continuous, and level, with no projecting blocks or uneven cap material beneath the frame. Protect the completed surface until installation, then remove loose mortar, grit, and debris so the greenhouse base can sit evenly around the perimeter.
04
Drainage
Grade the surrounding area and route gutter discharge so water moves away from the wall and foundation. Follow the likely path of runoff during heavy rain rather than considering only where each downspout ends. Keep water away from the doorway, erosion-prone beds, and low areas beside the masonry.
Core greenhouse specifications
The aluminum greenhouse depends on a level, accurately built masonry base
Current range
6 sizes, about 60–153 sq ft
Compact square footprint
92.5 × 92.5 in; peak 106 in; wall 76 in; door 73 in
Large square footprint
122 × 122 in; peak 104 in; wall 76 in; door 73 in
Extended footprints
122 × 151.5 in or 122 × 181 in; peak about 106 in; wall 76 in; door 73 in
Glazing: polycarbonate or 0.16 in / 4 mm tempered safety glass
Construction
Powder-coated aluminum, sliding doors, gutters, and an aluminum base connection. The greenhouse is rated for winds up to 67 mph and a snow load of 43 lb/ft². These ratings do not replace a suitable foundation, secure anchoring, accurate masonry, or routine removal of debris and excessive buildup.
Daylight and growing conditions
How the solid base affects light and interior layout
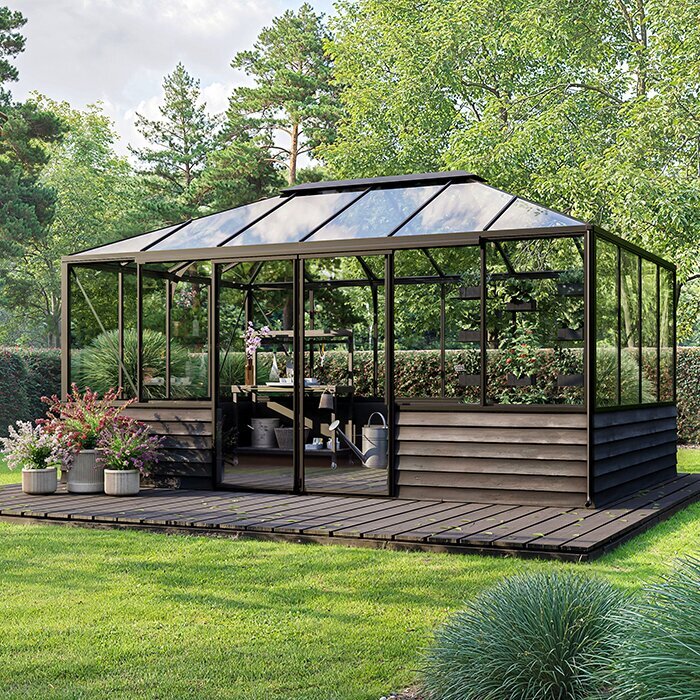
The masonry replaces transparent glazing near floor level, while the upper side panels and multiple roof planes continue to admit daylight. This creates a more enclosed feeling around benches and containers without turning the greenhouse into an insulated room. When choosing a location, observe the shadows cast by nearby buildings, fences, and mature trees at different times of day.
The masonry-base Pyramid works well with benches, raised beds, or low storage around the interior perimeter. Plan their depth before construction so the central path remains comfortable and the door can operate freely. Keep supplies clear of vents and panel edges, and reserve enough workspace for potting, watering, and moving plants.
Plan ventilation, shading, and plant placement around the site's actual sun exposure and seasonal conditions. Warm air can collect beneath the tall roof, so doors and vents need clear airflow paths. Tall shelving, dense foliage, or fabric shading should not block vent operation or create poorly ventilated pockets.
Interior planning ideas
Four practical layouts for the Pyramid
01
Kitchen garden workspace
Use brick or stone to connect the greenhouse to raised beds and paths, then organize the interior around frequent harvesting. A clear approach to the door makes it easier to carry produce and supplies, while perimeter benches can hold seedlings or herbs without consuming the central work route.
02
Flower greenhouse
Create a formal setting for changing seasonal displays, using the masonry as a simple backdrop for flowers and foliage. Tempered safety glass provides clear views into the collection, while polycarbonate creates a different overall look. Leave enough space between plants and the panels for grooming, cleaning, and inspection.
03
Tall-plant layout
Use the central roof volume for vines and taller plants, supporting them so they do not press against the panels or obstruct vents. Place shorter plants nearer the perimeter where appropriate, and preserve access to every side of large containers. Planning for mature plant size helps keep the layout workable as the greenhouse fills in.
04
Garden retreat
Add a small bench or table where the selected footprint still permits safe circulation and plant care. A retreat arrangement needs especially thoughtful shading and ventilation because comfort requirements may differ from those of heat-loving crops. Use furnishings that tolerate a humid, soil-handling environment and can be moved for cleaning.
Foundation, masonry, and interior planning
Coordinate the foundation, masonry, floor, and interior layout before construction begins. Draw the exact selected footprint and doorway, then add beds, benches, containers, and the space needed to move between them. This quickly reveals conflicts between permanent elements and helps identify useful routes for water, power, or irrigation.
Foundation planning for your site
Foundation requirements depend on local soil, drainage, and frost conditions. A project in Minnesota, Colorado, or New England may need a different approach from one in Florida or coastal California. Slope, disturbed or expansive soil, nearby roots, and runoff also matter, so region alone does not determine the right foundation.
The greenhouse dimensions remain unchanged, but the foundation beneath the masonry must suit the actual property. It should support the permanent wall and greenhouse without movement that could distort doors, frame joints, or glazing. Do not attempt to correct an unsuitable foundation by making the masonry cap thicker or by relying on the aluminum structure to bridge uneven support.
Have the foundation and masonry plan reviewed for the actual site before construction begins, and make sure the mason and greenhouse installer are working from the same confirmed dimensions.
Raised beds and benches
The masonry perimeter provides a practical backdrop for benches and raised beds while protecting the lower edge of the growing area from everyday garden activity. Decide whether beds will meet the wall or remain separate, considering moisture and future access. Keep liners, irrigation parts, and protective finishes clear of the greenhouse frame connection.
Set bed and bench depths according to the mature spread of the plants, not only the size of empty containers or seedling trays.
Allow clearance for cleaning, air circulation, and access to glazing, vents, and frame fasteners. A narrow inaccessible strip behind a fixed bench quickly collects leaves, spilled growing medium, and moisture. Removable shelving or a deliberate service gap can make seasonal cleaning easier without sacrificing the useful perimeter arrangement created by the masonry.
Flooring and interior drainage
A durable interior floor can make watering, potting, and cleaning easier, but it should support the intended use and manage water predictably. Consider traction when wet, movement of wheeled equipment, and how loose soil will be swept or rinsed away. If drainage is incorporated, establish its route and elevations before the wall and threshold are completed.
Stone, pavers, or another suitable finish can visually connect the floor with the masonry base. Choose and install the surface with maintenance in mind: deeply recessed joints can trap potting mix, while highly polished materials may provide poor traction when wet. The finished floor must not interfere with the level support required for the greenhouse.
Confirm the finished floor elevation before finalizing the doorway and threshold. Include the full build-up of base layers and surface material rather than estimating from unfinished ground. The interior and exterior approach should shed water appropriately while preserving convenient passage through the sliding door.
Exterior style and interior layout
Coordinate the permanent masonry and doorway with the way you plan to furnish and use the greenhouse.
Match the masonry to the property
Compare actual masonry samples beside the house, paving, and proposed frame color. Real outdoor light reveals texture, mortar contrast, and color relationships that are difficult to judge from a screen.
Choose the frame color alongside the masonry, house exterior, roof colors, paving, and surrounding plants. Review the available RAL colors outdoors rather than relying only on an on-screen sample. A dark frame creates a stronger outline against pale masonry, while similar tones can make the upper structure appear more understated.
Check the combination from the house and from the main garden approach, since the masonry and aluminum frame will usually be seen together.
Plan the doorway and threshold together
Finish the masonry returns, floor edges, and nearby beds so installers can reach the frame connections and the sliding door remains accessible for future care. Keep edging, downspout discharge, and loose gravel away from the entrance, especially where trays or loaded garden carts will pass.
Provide a firm, unobstructed landing on both sides of the doorway for moving plants and supplies.
Mark the confirmed door opening on the plan shared by the mason and greenhouse installer.
Plant height and roof volume
The center of the Pyramid accommodates climbing plants and taller specimens, but usable height decreases beneath the sloping roof planes. Place each plant according to the space above it, including supports and expected growth. Do not attach trellises or plant supports to greenhouse members unless the product instructions permit it.
Use movable supports where possible so the layout can adapt as plants grow.
Prune or relocate growth before it reaches doors, vents, walkways, or glazing.
Ventilation, drainage, and utilities
Plan ventilation, water management, and utilities for the site before finishing the masonry and floor. Identify where each service enters, how it will be protected, and whether it remains accessible for repair. A neat concealed route is useful only if future maintenance does not require dismantling the wall, damaging the floor, or disturbing the greenhouse attachment.
Managing heat
The tall Pyramid roof provides generous overhead space, but it does not prevent heat buildup. Judge conditions at plant and seating height as well as near the roof.
During hot periods, coordinate roof vents, door ventilation, and seasonal shading rather than relying on a single measure. Openings work best when air can travel through the occupied growing zone and warmer air can escape above. Check vent operation regularly, especially after plants have grown taller or hanging foliage has been introduced.
Seating areas may need more shade than heat-loving crops, so arrange the interior according to the most sensitive use. Apply shading in a way that does not hinder doors, gutters, or vents, and adjust it as the sun angle changes. Monitor plants after any layout change because masonry, benches, and dense foliage can alter airflow locally.
Gutters and rainwater
Keep gutter outlets clear of leaves, and inspect gutter joints during rain so small leaks can be addressed before repeated wetting stains the wall or saturates the nearby ground. Control splash beside the doorway and along frequently used paths.
A rain barrel can collect roof water for greenhouse irrigation where appropriate. Place it on suitable support, provide a controlled overflow route, and keep all connections accessible for cleaning. The collection equipment must not transfer its weight or movement to the greenhouse gutter.
Position the barrel so it does not narrow the path around the greenhouse or obstruct access to the wall and gutters.
Water, irrigation, and electrical service
Plan water lines, irrigation, lighting, and other services before completing the masonry and floor finishes. Locate controls where they can be reached without leaning across beds or wet surfaces. Consider how systems will be drained, isolated, or serviced when not in use, and protect greenhouse circulation space from hoses and cords that could create trip hazards.
Installing conduit or sleeves during construction can reduce exposed surface-mounted runs later, but their positions must be coordinated with the frame attachment and wall structure. Seal penetrations appropriately for the selected masonry system and exterior exposure. Do not drill an improvised route after installation without first confirming that it will not affect structural support or concealed services.
Qualified professionals should complete electrical, plumbing, and other regulated work as required.
Winter use and model choice
Plan winter use around outdoor temperatures, and consider whether the masonry-base or Standard Pyramid better suits the appearance you want.
Using the greenhouse in cold weather
Do not assume an unheated masonry-base Pyramid will stay frost-free. Clear upper glazing and a solid lower wall affect the interior environment, but nighttime temperature still depends on outdoor conditions, heat loss, ventilation, and any planned heating. Protect or relocate sensitive plants according to their needs rather than relying on daytime warmth.
Use temperature readings taken at plant height when deciding whether to ventilate, provide supplemental heat, or move sensitive plants overnight.
Base winter planting plans on the local climate and any heating system you intend to use. If supplemental heat is planned, account for safe equipment placement, ventilation, energy supply, moisture, and clearance from plants and furnishings. Electrical or fuel-fired installations should be selected and completed by qualified professionals where applicable.
Choosing between the masonry-base and Standard Pyramid
Choose the Standard Pyramid if you prefer the glazed aluminum structure to continue to ground level.
Choose the masonry-base Pyramid if a solid brick, stone, or concrete perimeter better suits the property.
Also consider the project scope: the masonry-base Pyramid requires a customer-built wall and supporting foundation, while the Standard Pyramid uses its ground-level base.
Seasonal use
In spring, more interior space may be dedicated to propagation and young plants. Arrange trays so they receive appropriate light without blocking door travel or vent controls, and avoid overcrowding that restricts airflow. As plants move outdoors, clean empty benches and reassess which fixtures should remain for the main growing season.
Summer operation typically places greater emphasis on ventilation, shading, watering access, and open circulation. Check the greenhouse early enough in the day to respond before excessive heat develops, and keep doors secured in their intended operating position. Remove fallen foliage from gutters and vents after storms or vigorous plant growth.
In fall, flexible floor space can accommodate tender container plants brought in for protection. Inspect plants before moving them inside, allow room between containers, and preserve access to glazing and controls. Clean the structure and drainage routes before colder weather, when shorter days and reduced ventilation can make persistent moisture more noticeable.
Before greenhouse installation
Inspect and document the completed masonry base
Before installation, compare the completed wall with the confirmed footprint, doorway, and base details for the selected greenhouse. The mason and installer should use the same information. Resolve any discrepancy before the aluminum frame is assembled rather than altering a finished opening or forcing components to fit.
Check the length, width, level, corners, and diagonals after all caps and finishes are complete, and verify that the finished floor has not obstructed the threshold or exterior approach. Clear and protect the wall top until greenhouse installation begins.
Local requirements for foundation depth, frost protection, drainage, setbacks, and permits can vary by state and municipality. Confirm them before permanent construction begins. Product dimensions define the greenhouse, but qualified local professionals must evaluate property-specific conditions that are not shown in the installation information.
Recommended project sequence
1
Confirm configuration
Choose the footprint, glazing, and door location, then confirm the installation dimensions.
2
Design the wall
Choose the masonry material and finalize the foundation, wall top, doorway, and finish details.
3
Coordinate services
Plan the floor, drainage, water, and any electrical service before finishes are completed.
4
Build then install
Complete the foundation, masonry, floor edges, and planned service penetrations, then verify the finished work against the selected greenhouse configuration. Protect the wall top until installation. Assemble and anchor the aluminum greenhouse only on a clean, accurate, structurally suitable base and follow the applicable product instructions.
Common questions
Pyramid Greenhouse on a Masonry Base: FAQs
Can I build the masonry before choosing the greenhouse configuration?
No. Select the exact footprint, glazing, and door arrangement first, then build the masonry to the corresponding installation dimensions. A generic wall or approximate garden footprint may not match the greenhouse frame or doorway.
Who is responsible for building the masonry wall?
The customer is responsible for completing the masonry wall and supporting foundation before greenhouse installation. The work must match the confirmed configuration and suit the actual site. Depending on the project, a foundation contractor, mason, designer, or another qualified professional may need to be involved.
Can I use an irregular stone or decorative cap on top of the wall?
Only if the finished mounting surface remains flat, level, continuous, and dimensionally accurate. Decorative stone, projecting blocks, and uneven cap details must stay clear of the area supporting the aluminum greenhouse base.
How do I choose the right greenhouse size?
Draw each candidate footprint with the door, beds, benches, containers, seating, and circulation space shown to scale. Select the size that fits the planned layout without crowding the path or door, rather than judging by open yard area alone.
What should I consider when choosing the glazing?
The two options are 0.16 in / 4 mm tempered safety glass and polycarbonate. Choose according to the appearance you want with the masonry and RAL frame color, and make sure the interior layout leaves room to reach the panels for cleaning and inspection.
Can benches or raised beds run along the masonry wall?
Yes, but plan their depth and position before construction. Leave access for cleaning, airflow, panel care, vents, and frame connections, and keep soil, liners, and irrigation components below the greenhouse mounting surface.
Are double sliding doors available?
Yes, for compatible walls at least 122 in wide.
What warranty applies to the greenhouse and masonry work?
The greenhouse is covered by a 12-year extended warranty, subject to the applicable warranty terms. Keep the order information, installation documents, and maintenance records. The customer-built masonry, foundation, floor, utilities, and related site work should be documented separately with the professionals responsible for them.
Bloomcabin Pyramid
Integrate the Pyramid greenhouse with your home and landscape
Treat the masonry as the fixed part of the project and the planting layout as the flexible part. Once the base, threshold, drainage, and service routes are coordinated with the selected Pyramid configuration, benches, containers, and seasonal displays can change without undoing permanent work. The result preserves the freestanding Pyramid form while connecting it visually with the property.
Information to share with your mason and installer
✓ the confirmed footprint, door arrangement, and installation information
✓ the foundation and masonry plan, including material and exterior finish
✓ the doorway, threshold, finished floor height, and exterior approach
✓ final measurements for all sides, corners, diagonals, and the wall-top level
✓ the grading, gutter discharge, drainage route, and site-appropriate frost protection
✓ the selected glazing and RAL frame color before permanent finishes are completed
