
DIY Greenhouse Assembly vs. Professional Installation
Greenhouse planning guide
DIY Greenhouse Assembly vs. Professional Installation
The right greenhouse installation method depends less on confidence alone than on the site, structure, schedule, and help available. Compare DIY greenhouse assembly vs professional installation carefully, then choose a route that lets you build accurately, safely, and with a clear plan for the finished space.
A greenhouse kit can make a major garden project feel achievable, but the work begins well before panels and framing are unpacked. Ground conditions, access, foundation preparation, local requirements, and the number of capable hands all influence whether self-assembly is sensible. A clear-eyed decision at the start can prevent a rushed build later.
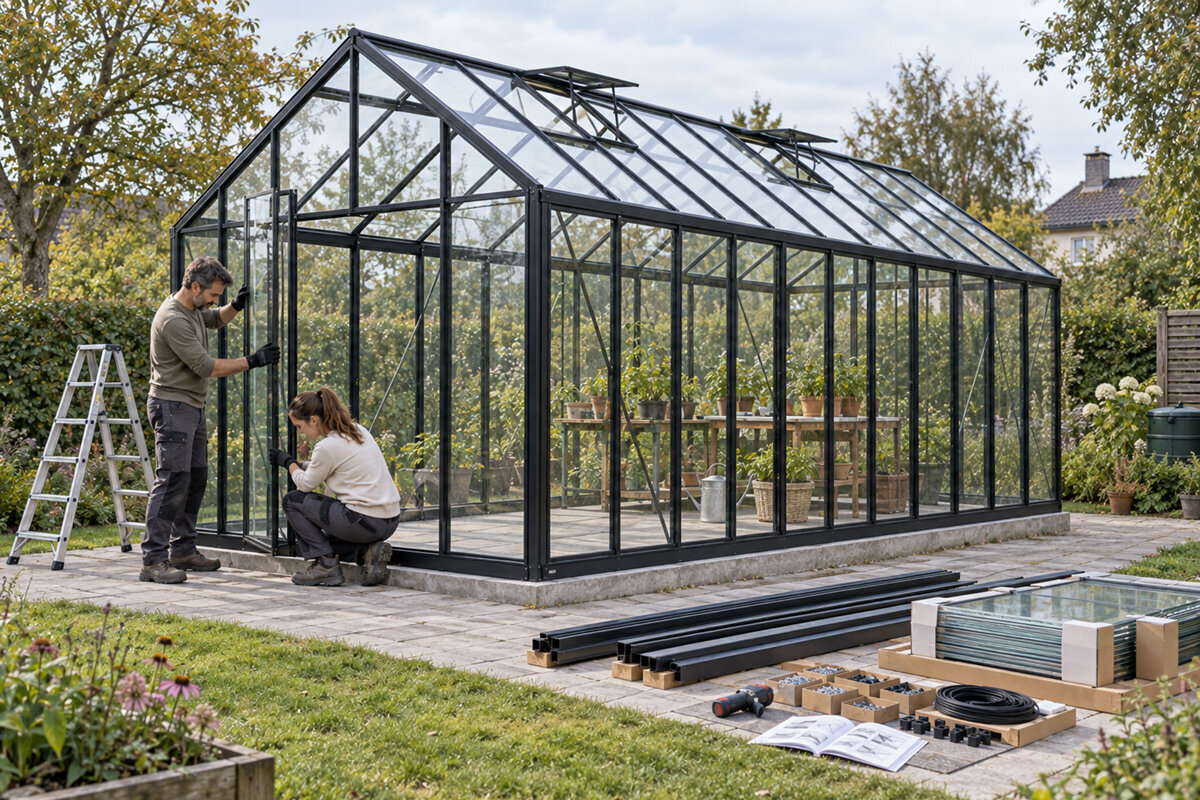
DIY greenhouse assembly appeals to owners who enjoy practical projects and want direct control over sequencing. It can also be a satisfying way to understand the structure you will maintain. Yet it requires more than a free weekend: measuring, leveling, lifting, checking instructions, and stopping when conditions are unsuitable are all part of responsible installation planning.
Professional installation can reduce the coordination burden, particularly where access is awkward or the structure is substantial. It is not automatically necessary for every project, however. The useful question is not which route is universally better, but which one matches your site, skills, availability, and willingness to manage the work from preparation through final checks.
01 · Start with the site
A sound site makes either route easier
The most important installation decision may be made before you choose who holds the tools. A greenhouse needs a location that can be measured accurately, approached safely, and prepared to suit its intended foundation. Look at grade, drainage patterns, overhead obstacles, pathways, delivery access, and the working room around the footprint. A seemingly simple backyard site can become difficult once long components, glass, tools, and helpers need space to move.
For a DIY builder, site readiness removes many avoidable variables. You should know where materials can be staged without damage and how waste, packaging, and tools will be managed during the build. For a professionally installed project, clear access and a completed base help the crew focus on assembly rather than solving unfinished site issues. Discuss constraints early, especially gates, narrow side yards, steps, soft ground, or shared access.
- Measure the proposed footprint and surrounding work area, not only the greenhouse itself; installers and DIY teams both need safe circulation space.
- Watch the site after rain if possible, since standing water and runoff can affect foundation choices, access, and long-term garden use.
For a freestanding starting point, explore a standard Classic greenhouse and evaluate its footprint against your prepared location.
02 · Foundation first
Base preparation is not a minor task
A greenhouse frame performs best when it begins on a foundation that is planned, square, level, and suited to the chosen model’s instructions. Building a base can involve excavation, formwork, compacting, concrete work, or other site-specific preparation, which may be more demanding than the kit assembly itself. This is where some owners sensibly split the project: arrange specialist groundwork, then decide whether the greenhouse assembly remains a DIY task.
Do not assume a visually flat patio or lawn is an adequate starting surface. Small variations can complicate alignment, door operation, panel fitting, and anchoring. DIY installers should be comfortable checking dimensions repeatedly rather than correcting errors after the frame has progressed. If hiring help, establish who is responsible for verifying the finished base and what information they need before arrival. Local authority requirements may also affect foundation or placement decisions.
- Use the current product documentation to confirm base dimensions, anchor locations, tolerances, and any required clearances before ordering materials or booking labor.
- Clarify whether drainage, edging, utilities, or paving will be completed before assembly, because later work can restrict access around the structure.
Where the garden layout favors a wall-side build, consider a full-size regular Lean-To greenhouse only after checking the wall and base arrangement.
03 · Tools and capability
DIY skill means more than basic carpentry
Assembling a greenhouse is a precision task with repeated small checks. You may be handling aluminum frame members, fasteners, glazing components, doors, vents, and seals while working from a specified sequence. Familiarity with measuring, leveling, fastening, and reading diagrams matters, but so does judgment: knowing when a part is not aligned, when a panel needs another person to handle it, and when to pause rather than force a fit.
A capable DIY team is usually organized before the first component is opened. Set out clean staging areas, protect vulnerable pieces, identify hardware, and keep the instructions accessible throughout. Think beyond the tool list: ladders or access equipment, personal protective gear, weather protection for materials, and a plan for controlled lifting may all be relevant. If those preparations feel unfamiliar, professional installation or experienced local help can be the calmer choice.
- Review the assembly sequence in advance and label groups of components so that searching for hardware does not interrupt a critical fitting step.
- Plan lifting tasks around people available on the day; never assume one person can safely manage long, awkward, or fragile components.
If you want a straightforward freestanding format to assess, start with a standard Classic greenhouse design and compare its instructions with your practical experience.
04 · Time and coordination
Schedule the whole project, not just assembly
DIY greenhouse assembly can fit around your own calendar, which is valuable when you prefer to work in stages. That flexibility comes with responsibility for coordinating every dependency: base completion, material arrival, weather, helpers, tools, and any related garden work. Estimate time for reading, layout, adjustment, cleanup, and final inspection—not only for putting the main frame together. A project rushed at the end of a weekend is more vulnerable to overlooked details.
Professional installation may simplify the assembly phase, but it still needs good scheduling. The site must be ready, access must be available, and decisions about placement or adjacent work should be settled before the appointment. If landscapers, electricians, or foundation contractors are involved, coordinate their order carefully. Ask potential installers how they handle site readiness checks, weather interruptions, and changes discovered on the day, without assuming a fixed timeline will apply to every project.
- Build a contingency window into a DIY schedule so rain, heat, missing tools, or unavailable helpers do not encourage unsafe shortcuts.
- Before hiring, write down completed and outstanding site tasks, then share that list when discussing the proposed installation scope.
A compact garden plan may benefit from reviewing a full-size regular Lean-To greenhouse layout alongside the wall, doors, and pathways before scheduling work.
05 · Budget decisions
Compare scope, not a single installation figure
The DIY versus professional question is often framed as labor cost, but the meaningful comparison is broader. DIY may require tool purchases or rental, base materials, transportation, protective equipment, disposal, and time away from other commitments. Professional installation may involve a quoted labor scope, travel considerations, site prerequisites, and exclusions. Neither route can be compared fairly until you list what is actually included and what remains your responsibility.
Avoid treating your own time as either worthless or automatically expensive. Some gardeners enjoy the build and value the familiarity it creates; others would rather devote their time to planting and site design. Request current, itemized information from any installer and review it against your realistic DIY list. Do not make decisions from a headline figure alone, particularly when groundwork, access improvements, or corrections to an unfinished base may be separate.
- Create two columns for DIY and professional work, covering foundation, tools, labor, access, cleanup, and any tasks that could require outside assistance.
- Ask whether a professional proposal covers only structure assembly or also includes checks, anchoring, glazing, site protection, and removal of packaging.
To compare freestanding options clearly, use a standard Classic greenhouse model as a reference point when listing the project scope.
06 · Safety and accountability
Know where the real risks sit
Greenhouse installation involves hazards that deserve deliberate planning: manual lifting, fragile glazing, sharp edges, ladders, uneven ground, and changing weather. DIY builders should work at a measured pace, use suitable protective equipment, keep children and pets away from the work zone, and avoid solo lifting where control is uncertain. Read the manufacturer’s safety guidance rather than relying on general construction habits, since the correct assembly order can support both accuracy and safe handling.
Professional installation transfers some physical work to trained hands, but the homeowner still has responsibilities. Provide clear access, disclose site conditions, protect nearby planting or property as agreed, and confirm who will be present to answer placement questions. If insurance is a concern, ask your insurer what documentation or notification may be relevant to your property and project. Do not assume coverage, responsibility, or exclusions without checking the applicable policy terms.
- Stop work when wind, rain, poor light, fatigue, or a missing helper makes controlled handling of components less reliable.
- Record site conditions and completed foundation details, then keep product instructions and relevant installation paperwork together for future reference.
For wall-side projects, inspect the setting around a full-size regular Lean-To greenhouse structure with particular attention to access and safe working clearances.
07 · Quality control
Assembly quality affects daily use
A completed greenhouse should be checked as a system rather than admired only as a finished outline. Frame alignment, secure fasteners, correctly positioned glazing components, door travel, vent operation, seals, and anchoring all deserve attention under the applicable instructions. DIY builders can make a final review more manageable by keeping a simple checklist and inspecting each stage before it becomes concealed or harder to reach. Photographs can also help document the build sequence for your own records.
A professional installer should not remove the need for handover attention. Walk around the greenhouse together, ask how components operate, and note any items that need follow-up. Confirm that you have the relevant instructions, care information, and details of the completed scope. This is also the time to understand routine maintenance rather than waiting for the growing season. A thoughtful inspection protects the value of either installation route.
- Check openings several times after assembly, since doors and vents reveal alignment issues that may be less visible elsewhere in the structure.
- Keep spare hardware, labels, and product documents in a dry, known location so future maintenance does not begin with a search.
A careful final walk-through is just as important for a standard Classic greenhouse installation as it is for any larger garden project.
08 · Making the decision
Choose the route you can manage well
DIY assembly is a strong option when the site is genuinely ready, you enjoy detail-oriented work, and you can arrange safe help without compressing the schedule. It gives you close familiarity with the greenhouse and allows you to control each stage. It becomes less attractive when groundwork remains uncertain, access is difficult, physical handling exceeds your comfort level, or the project must be coordinated with several other contractors.
Professional installation is worth exploring when certainty, specialist handling, or simplified coordination matters more than doing the build personally. Select based on a clear scope and open communication, not vague assumptions about what will happen on site. In either case, review the product’s written conditions and care guidance, retain project records, and check with the relevant local authority about any planning or permit questions that could apply to your location.
- Choose DIY because you are prepared for the full process, not merely because the kit arrives with instructions and appears manageable at first glance.
- Choose professional help because it solves a defined project need, then verify the agreed responsibilities before the work is scheduled.
When comparing wall-adjacent possibilities, a full-size regular Lean-To greenhouse option can help you frame the right questions about site and assembly.
Comparison
DIY assembly and professional installation compared
Both routes can lead to a well-planned greenhouse, provided the foundation, access, and instructions receive proper attention. Use this comparison to identify where your project carries the most uncertainty, then discuss details with any tradespeople or installers you may involve.
| Decision area | DIY greenhouse assembly | Professional installation |
|---|---|---|
| Control of the build | You set the pace, sequence, and daily checks. | You coordinate scope while others perform assembly. |
| Site preparation | You verify dimensions and readiness before starting. | You still provide the agreed prepared site. |
| Tools and handling | You supply suitable tools, protection, and capable helpers. | The installer may bring equipment; confirm the scope. |
| Schedule management | You allow for learning, weather, and interruptions. | You coordinate access, readiness, and appointment timing. |
| Complex conditions | Can be challenging with slopes, restricted access, or heavy handling. | May suit projects needing experienced coordination and handling. |
A practical installation decision process
Work through these steps before choosing a build route. They turn a broad DIY-versus-professional debate into a project-specific decision based on your actual garden, practical capacity, and desired level of coordination.
01
Inspect the proposed location
Measure the footprint and surrounding work zone. Note slope, drainage, walls, gates, overhead obstructions, surface changes, and routes for moving components safely into place.
02
Read the current instructions
Review foundation requirements, assembly order, tools, component handling, anchoring, and maintenance guidance. Identify steps that exceed your experience or require more people than you can reliably arrange.
03
Define the project boundary
Separate base work, assembly, utilities, landscaping, cleanup, and future accessories. Decide which tasks you will manage yourself and which may need a contractor or installer.
04
Test your DIY plan
List available tools, safe lifting help, working days, weather contingency, and staging space. If any essential item is uncertain, revise the plan before materials are unpacked.
05
Compare professional scopes
Seek current proposals that describe site assumptions, included tasks, exclusions, access needs, and handover. Compare them with your complete DIY list rather than a simplified labor-only estimate.
Before assembly day: essential checklist
Whether you build yourself or hire assistance, these checks make the workday more orderly and reduce the chance that an unresolved site issue interrupts the installation.
01. Confirm the greenhouse location, orientation, surrounding clearances, and access route before preparing or ordering the foundation materials.
02. Check the base against the current product instructions for dimensions, level, squareness, anchoring, and required preparation.
03. Clear a clean staging area for components, hardware, tools, packaging, and protected glazing away from foot traffic.
04. Review the weather outlook and keep a flexible plan for conditions that make lifting, ladder work, or glazing unsafe.
05. Gather the specified tools, measuring equipment, protective gear, and any access equipment before opening the first package.
06. Arrange enough capable help for tasks involving long, awkward, or fragile parts; never depend on last-minute availability.
07. Document the site and base with measurements and photographs, particularly if another party will complete the assembly.
08. Keep local authority, contractor, installer, and insurer questions resolved or in progress before work affects the site.
Frequently asked questions
Can one person assemble a greenhouse?
It depends on the selected greenhouse, the instructions, the site, and the person’s ability to handle components safely. Even if some stages can be completed alone, lifting, glazing, and alignment tasks may need additional hands. Plan for reliable help rather than treating it as an optional backup.
Is DIY greenhouse assembly less expensive?
It can reduce paid assembly labor, but it may also involve tools, equipment, base preparation, transportation, protective gear, and your own time. The result depends on what you already have and which tasks the site requires. Make a full project list before comparing DIY with current professional proposals.
Should I hire someone for the foundation only?
That can be a practical middle path when groundwork is outside your experience but you are comfortable following the greenhouse assembly instructions. First confirm the required base details with the product documentation. Agree clearly on finished dimensions, level, squareness, drainage, and who verifies the completed work.
Do I need a permit for greenhouse installation?
Requirements can vary by location, size, placement, foundation, setbacks, homeowner association rules, and other site factors. Check with the relevant local authority and any applicable association before work begins. An installer’s involvement does not remove your need to understand local requirements for your property.
What should I ask a greenhouse installer?
Ask what work is included, what the site must provide, how access limitations are handled, and which items are excluded. Also ask about foundation readiness, anchoring, glazing, cleanup, handover, and documentation. Request a current written scope so assumptions can be reviewed before scheduling.
How do I know whether my site is too difficult for DIY?
Warning signs include a sloping or poorly drained location, narrow access, unfinished groundwork, limited lifting help, complex coordination with other trades, or discomfort working with fragile components. None automatically rules out DIY, but together they may make professional support or a phased approach more sensible.
Plan your greenhouse project
Build confidence before you build the greenhouse
DIY greenhouse assembly vs professional installation is ultimately a question of readiness. A prepared site, clear instructions, safe handling plan, and realistic schedule can make self-assembly rewarding. Where those conditions are not in place, professional help may offer a more manageable route—especially when groundwork, access, or coordination is complex.
Begin by defining the site and project scope, then decide who is best placed to carry out each task. Bloomcabin can help you compare greenhouse formats as you plan, while local professionals and authorities can clarify the location-specific questions that belong to your property.
Explore greenhouse styles with your site, foundation, and preferred assembly route in mind.
