
How to grow peas in a greenhouse
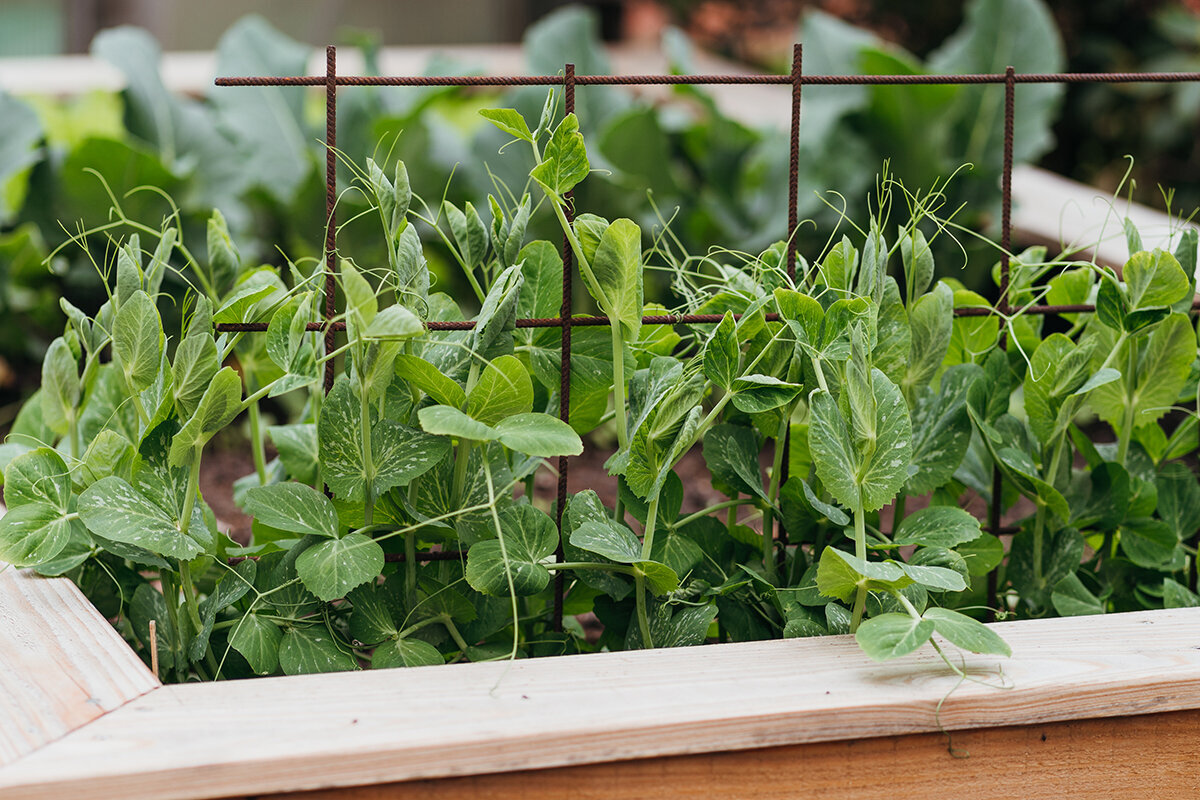
Greenhouse growing / cool-season edition
How to grow peasin a greenhouse
A greenhouse does not make peas a summer crop. It gives this cool-weather vegetable an earlier opening, a more orderly stage, and just enough shelter to turn the shoulder seasons into a long, sweet harvest.
I. Cool-season overture
The best greenhouse pea crop is not forced into abundance by warmth. It is composed around restraint: a cool root run, moist but aerated soil, early support, moving air, and a prompt harvest. Get those notes in order and peas become one of the most elegant ways to use a greenhouse when tomatoes and peppers are still waiting in the wings.
Use the house as a season extender
Across much of the United States, peas are a spring and fall proposition. Under glass, sowing can begin while outdoor beds are cold, rain-soaked, or inconveniently late to prepare. The aim is not a tropical interior. It is a protected, workable growing bay where the crop can establish early and finish before persistent high heat takes over.
An unheated greenhouse can be particularly useful. It moderates wind and rain, protects young seedlings from sharp weather, and gives the gardener a dry place to prepare soil and install support. On bright days, however, it can become warm surprisingly quickly, which is why ventilation matters from the first true leaves onward.
Direct sow for a cleaner start
Peas generally resent root disturbance. A deep greenhouse bed, or a generous trough with excellent drainage, is a better choice than small plug trays. Direct seed lets roots establish where they will crop, while a trellis or twiggy support can be installed before the first tendrils begin to search.
If you must start seeds in containers because the greenhouse bed is being renovated, use roomy biodegradable pots or deep cells and transplant while plants are very young. Even then, avoid letting roots circle or dry out. Direct sowing remains the simplest route when conditions permit.
Design around a brief season
Think of peas as a deliberate cool-season interlude, not a permanent occupant. A well-planned greenhouse can move from peas to warm-season fruiting crops without confusion. For planting layout and practical bed-versus-bench thinking, see Bloomcabin’s greenhouse setup guide.
Reserve the cooler edge of the structure for peas and greens. The sunniest central places can then be cleared for tomatoes, peppers, eggplants, or cucumbers as the season changes.
II. Select the voice
Shelling, snap, snow, and dwarf peas each ask for a different place on the score.
All are forms of Pisum sativum, but they deliver different harvests and occupy the greenhouse differently. Choose for the moment you want at the table, then make sure the habit fits the available headroom, support system, and picking access.
Shelling peasGrow the pod for the peas inside. Pick when pods are rounded and well-filled but still bright and tender; shell promptly for the sweetest result.
Snow peasHarvest flat, before peas visibly swell. Their open habit, quick picking rhythm, and crisp edible pods suit stir-fries, salads, and raw platters.
Sugar snapsHarvest when pods are plump yet glossy and succulent. These are often the most satisfying greenhouse choice for grazing, salads, and frequent picking.
Dwarf typesCompact plants, commonly 2 to 3 feet tall, that crop in a shorter, more concentrated window. They are useful in a low bay or in a greenhouse that needs a fast turnover.
III. Sowing cadence
Plant into soil that is cool, workable, and quietly draining.
Pea seed can germinate at about 40°F, although emergence becomes faster as the medium warms. For greenhouse gardening, do not confuse a sunny afternoon with suitable root conditions: soil that stays cold and wet encourages poor emergence and damping-off. A cultivated bed that can be squeezed without smearing, or a deep container filled with fresh, free-draining mix, is the proper opening cue.
Clear debris and confirm drainage.
Sow 1 inch deep and water in.
Keep soil evenly moist.
Finish support and vent early.
Optional short second sowing.
Prepare without overfeeding. Remove old roots and fallen foliage, correct obvious drainage problems, and work in a modest amount of finished compost if the bed needs organic matter. A greenhouse bed that previously carried heavy-feeding summer crops may already contain substantial fertility, so avoid treating each pea sowing as a reason to add a complete fertilizer.
Sow directly and consistently. Plant seed about 1 inch deep. Space seeds roughly 1½ to 3 inches apart in a row, or follow the packet recommendation for the chosen cultivar. Firm the soil gently after sowing so seed has close contact with moisture, then water the bed rather than repeatedly soaking it.
Let cool weather set the pace. Germination can take longer in a cool greenhouse. Resist digging for seed after a few days unless there is an obvious issue such as flooding, animal damage, or a severe fungus gnat problem. The goal is a damp, oxygenated root zone, never a waterlogged one.
Install support before plants demand it. Tendrils begin looking for something fine to catch soon after seedlings establish. Completing the support system early prevents later disturbance to roots and lets you keep the greenhouse orderly from the start.
Repeat modestly. Two or three short sowings, spaced 7 to 14 days apart, can extend harvest more gracefully than one oversized planting. Stop repeating sowings once the coming weather is likely to bring sustained greenhouse heat before the newest vines can flower well.
pea rootactive nodulesplant sugars
Root sugars support compatible rhizobia; active nodules help serve the pea plant.
IV. Root exchange
Peas are legumes, but they are not a free fertilizer factory.
Pea roots can form nodules with compatible Rhizobium bacteria. In that partnership, the plant supplies carbohydrates and the bacteria help convert atmospheric nitrogen into a form the pea can use. If peas have not grown in the bed before, a fresh pea-specific inoculant can be a sensible, low-cost insurance policy. It is particularly useful in new imported soil, freshly filled raised beds, or ground with no history of peas and related legumes.
The useful correction: nodulation feeds the living pea first. Do not assume that a row of peas will automatically fertilize its neighbors during the same season.
Overfeeding nitrogen can produce lush foliage at the expense of the balanced crop you want. Start with a soil test where practical. Add compost for structure and modest baseline fertility, then address phosphorus, potassium, and pH only when the soil or a test result calls for it. In a long-used greenhouse bed, repeated compost, manure, and complete fertilizers can create excess nutrients surprisingly quickly.
After a few weeks, lift one expendable plant gently and look for nodules. Healthy active nodules are often pink to tan inside. Their absence is not a reason to pour on nitrogen; instead, check drainage, soil acidity, cultivar health, inoculant freshness, and whether the correct bacterial group was used. Healthy roots, suitable soil moisture, and an appropriate inoculant matter more than a heavy feed.
V. Support duet
Give tendrils something fine enough to answer.
Peas climb with tendrils, not thick twining stems. A coarse post alone is not an invitation. Netting, pea brush, narrow twigs, or tightly spaced strings give the plant the small edges it can actually grasp.
Compact
Dwarf peas
2–3 feet. Low brush, twine, or mesh.
Support
Install at sowing.
Use 4–6 inch mesh.
Keep one hand-width from glass.
Climbing
Tall peas
5 feet or more. Vertical mesh with picking access.
Dwarf or bush peas
Compact plants can look self-supporting until a heavy pod set, watering, or their reach for light pulls the stand open. A low ring of twiggy brush, 2- to 3-foot mesh, or two lines of stout twine is usually enough. The goal is not to force a formal wall of foliage; it is to hold plants upright, keep pods clean, and allow air to travel through the crop.
- Reserve a front bed or lower greenhouse wall.
- Keep paths clear for rapid harvest.
- Plant in a block only if airflow remains generous.
Central specification
Secure mesh to a bed frame, ground stakes, or a suitable structural rail rather than glazing. Use a system that can be removed with the vines at crop end. Leave enough room between the vine plane and the greenhouse wall for cleaning, airflow, and the occasional reach behind a plant.
Tall indeterminate peas
For 5-foot vines, use vertical mesh or a double-sided pea fence. Position the trellis so you can harvest from at least one side without brushing foliage against wet glass or squeezing through the crop. The cooler north or east side is often a sensible placement, provided it still receives useful spring light.
- Keep foliage below roof vents and automatic opener mechanisms.
- Choose removable support for a clean crop exit.
- Do not let an exuberant vine turn a greenhouse aisle into a dead end.
A greenhouse with roof vents and a clean, strong frame makes seasonal staging easier. The Classic Aluminum Greenhouse offers roof-window ventilation and a refined aluminum structure for a carefully planned cool-season growing bay.
Water deeply enough to reach the roots. Vent early enough that leaves can stay dry.
Pea plants want consistent moisture, especially as they flower and fill pods. In a greenhouse, rain no longer supplies that consistency, so watch the root zone rather than the calendar. Push a finger a couple of inches into the soil or use a simple moisture meter; water when it is drying below the surface, then soak thoroughly rather than offering frequent, shallow splashes.
Drip lines, a slow hose at soil level, or a watering can directed beneath the canopy are better than overhead watering. Wet foliage paired with stagnant air invites disease. Open roof vents on bright mornings, and use the door strategically when weather permits. A small circulating fan can help prevent pockets of damp air, but it should move air gently rather than blast vines.
Mulch is useful in an in-ground bed once seedlings are established. A light layer of clean straw or other weed-free organic material moderates evaporation and keeps soil splash off lower leaves. Keep mulch slightly back from stems. In containers, the equivalent is a larger soil volume, reliable drainage holes, and a saucer that is emptied rather than allowed to hold standing water.
For broader siting, ventilation, and seasonal-care principles, Bloomcabin’s USA greenhouse gardening guide is a useful companion before the first tray or trellis goes in.
VI. Flower-to-pod nocturne
Flowers are usually self-fertile. The real greenhouse question is climate.
Peas do not depend on bee traffic in the way many fruiting crops do; they are self-fertile. That makes a greenhouse an excellent place to grow them, provided the atmosphere remains cool and the roots never swing between drought and saturation. When flowers appear, resist the urge to fertilize heavily or fuss with hand pollination. Instead, protect the conditions that let flowers hold and pods extend.
Long, cool days favor flowering. A greenhouse that climbs rapidly on sunny late-spring afternoons can shift the crop out of its comfort zone just as it reaches its most promising stage. Vent before the temperature surges, shade lightly if solar gain is severe, and water the root zone before it becomes dry enough to stress vines.
Good airflow still has a role, even in a self-fertile crop. It reduces persistent leaf wetness, moderates humidity around dense foliage, and makes it easier to spot the first signs of mildew before the crop becomes crowded.
The edible progression
1. Flower
Cool air and even moisture.
Cool air and even moisture.
2. Set pod
Narrow pod starts to lengthen.
Narrow pod starts to lengthen.
3. Flat pod
Snow-pea harvest stage.
Snow-pea harvest stage.
4. Filled pod
Snap or shelling stage.
Snap or shelling stage.
Harvest decisions are not cosmetic. Snow peas become fibrous when left to fill; snap peas lose crisp sweetness when pods dull and strings toughen; shelling peas become starchy as seeds enlarge. Frequent picking tells the plant to keep producing while temperatures remain favorable.
Check plants every day or two at peak production. Pods can move from ideal to overmature quickly, especially after a warm, bright stretch. The best harvest habit is regular and calm: pick what is ready, cool it quickly, and leave immature pods to continue their work.
VII. Heat crescendo
When the greenhouse warms, peas tell you to change the plan.
50–70°FSteady growth and tender pods.
70–80°FVent early and watch moisture.
80°F+Prepare for a seasonal exit.
At 50°F to 70°F, peas generally grow steadily, flowers are more comfortable, and pods remain tender when moisture is even. Once afternoons repeatedly rise into the 70s, be more deliberate: open vents earlier, water before the root zone becomes dry, and harvest often. The crop may still produce well, but its margin for stress narrows.
Above 80°F, flower drop and toughening pods become more likely. Shade cloth can soften solar gain, ventilation can prevent the sharpest spikes, and a thorough watering can reduce drought stress, but none of these measures turns peas into a true hot-weather crop. If the greenhouse is regularly hot, treating the crop as finished is better gardening than trying to force an encore.
VIII. Harvest encore
Pick on the pod’s terms, not yours.
Peas are at their most generous when picked repeatedly and cooled quickly. Take a small bowl into the greenhouse every day or two during peak production. Hold the stem with one hand and remove the pod with the other; pulling with one hand can uproot a shallow-rooted plant or tear a tendril from its support.
Pick in the morning when possible, especially if the day is expected to become warm. Pod sugars begin converting after harvest, so refrigerate peas promptly if they are not being eaten immediately. The difference is particularly noticeable with shelling peas.
Snow peasPick long, flat, glossy pods before seeds round out. They should snap cleanly and remain tender through the seam.
Sugar snapsPick when pods are plump and crisp but before they become dull, bulging, or stringy. The best stage is often earlier than gardeners expect.
Shelling peasPick when pods are full and rounded, then shell immediately. If the pod begins to pale or wrinkle, the peas inside are moving toward starchiness.
Pea shootsWhere plants are vigorous, take only a few tender tips early in growth. Do not keep cutting shoots from plants intended for a heavy pod crop.
Succession strip: Sow a short second run 7 to 14 days after the first only while the coming weather still promises cool growing conditions. When regular greenhouse afternoons approach 80°F, shift the bay to basil, cucumbers, tomatoes, peppers, or another warm-season crop rather than asking peas for an encore they cannot deliver.
IX. End-of-season crop exit
Finish cleanly, then make room for the next movement.
When harvest slows and heat is winning, cut vines at soil level rather than wrenching out the entire root system. This disturbs the bed less and lets fine roots decompose in place. Remove foliage and trellis debris promptly, especially if there has been mildew or root disease. Diseased material belongs in the trash or a managed system that reaches disease-killing temperatures, not a casual cold compost pile.
Inspect the support, sweep old petals and leaves from corners, and flush drip lines before warm-season planting begins. If peas were repeatedly unwell in the same greenhouse bed, rotate away from legumes and refresh the plan with a soil test rather than simply adding more compost or fertilizer.
Questions from the potting bench
Greenhouse pea FAQ
Can peas grow in an unheated greenhouse?
Yes. An unheated greenhouse is often ideal for peas because it offers shelter and earlier workable soil without the sustained warmth peas dislike. Direct sow once the soil is workable and roughly 40°F or warmer. Young plants tolerate light frost better than flowering plants, but watch severe forecasts once blooms have appeared.
Do greenhouse peas need pollinators?
Usually no. Peas are self-fertile, so the priority is not bringing insects indoors but maintaining cool, stable conditions. Gentle airflow helps keep the canopy dry; it is not a substitute for pollination in this crop.
How often should I water peas in a greenhouse?
There is no fixed schedule because sunlight, container size, soil, and ventilation vary. Check below the soil surface and water deeply when the root zone is drying. Increase attention during flowering and pod fill, but do not keep soil continuously saturated.
Should I fertilize peas with a high-nitrogen feed?
Not as a default. Peas can form nitrogen-fixing nodules with compatible rhizobia, and excessive nitrogen may encourage leafy growth rather than a balanced crop. Use a soil test where possible, rely on modest compost for organic matter, and address specific deficiencies rather than applying a routine high-nitrogen feed.
What is the best support for sugar snap peas in a greenhouse?
Use vertical mesh with 4- to 6-inch openings, narrow twigs, or strings arranged close enough for tendrils to catch. Install support at sowing. It should be stable, removable at crop end, and positioned so you can pick without leaning foliage against the glass.
Why are my pea pods tough?
Tough pods can result from heat stress, uneven watering, or delayed picking. Harvest snow peas while flat, snap peas while glossy and crisp, and shelling peas while pods are filled but still fresh green. Frequent picking is part of quality control, not merely a way to collect more produce.
Sources and further reading
Grounded in extension guidance
- University of Minnesota Extension — Growing peas in home gardens: pea types, spacing, temperature range, soil pH, harvest, and water guidance.
- University of Maryland Extension — Growing Green Peas in a Home Garden: planting depth, spacing, growth habit, flowering conditions, and harvest stages.
- Colorado State University Extension — Growing Vegetables in a Hobby Greenhouse: practical cool-season greenhouse temperature guidance.
- Utah State University Extension — How to Grow Peas in Your Garden: heat and water stress, flower drop, succession timing, and soil preparation.
- University of Minnesota Extension — Fertilizing peas in Minnesota: pea-rhizobium relationships, inoculation, soil pH, and supplemental nitrogen context.
- Penn State Extension — A Gardener’s Guide to Peas: direct sowing, support placement, watering, airflow, damping-off, and powdery mildew.
- Illinois Extension — Peas: harvest quality, inoculation in new ground, and pea root-disease rotation advice.
Finale
Reserve a cool bay for spring’s sweetest crop.
A pea crop asks for less drama than a summer greenhouse and rewards good timing with pods worth eating before they ever reach the kitchen. Create an airy shoulder-season growing space with a structure designed for light, roof ventilation, and long-term garden use.
Explore the Bloomcabin Classic Aluminum Greenhouse
Practical note: plan peas along the cooler edge, leave clear access for daily picking, and preserve the warmest central space for crops that truly need it.
