
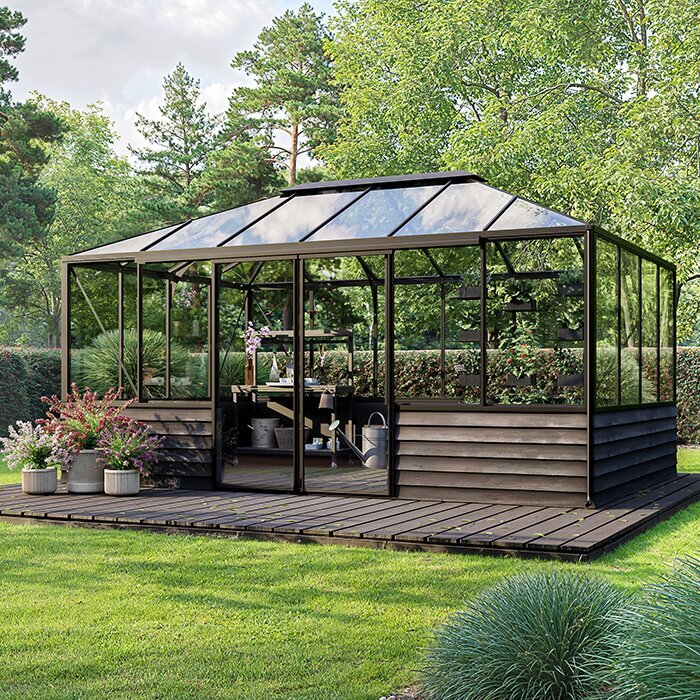
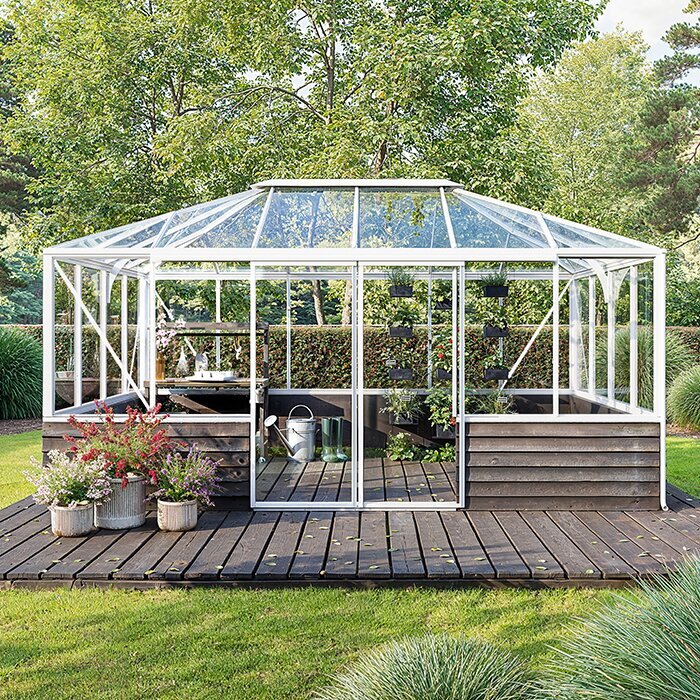
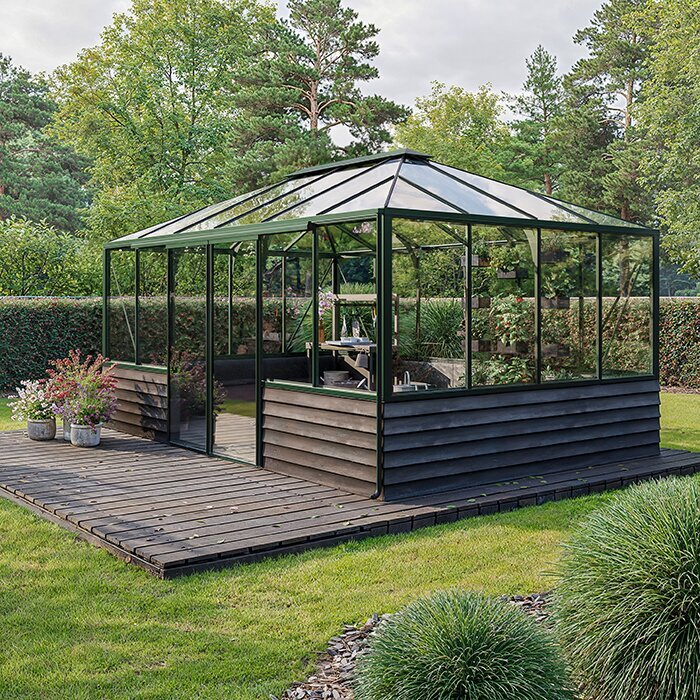



Bloomcabin Pyramid Greenhouse on a Masonry Dwarf Wall
Pyramid Greenhouse on a Dwarf Wall – a freestanding design for a brick, stone or rendered masonry base
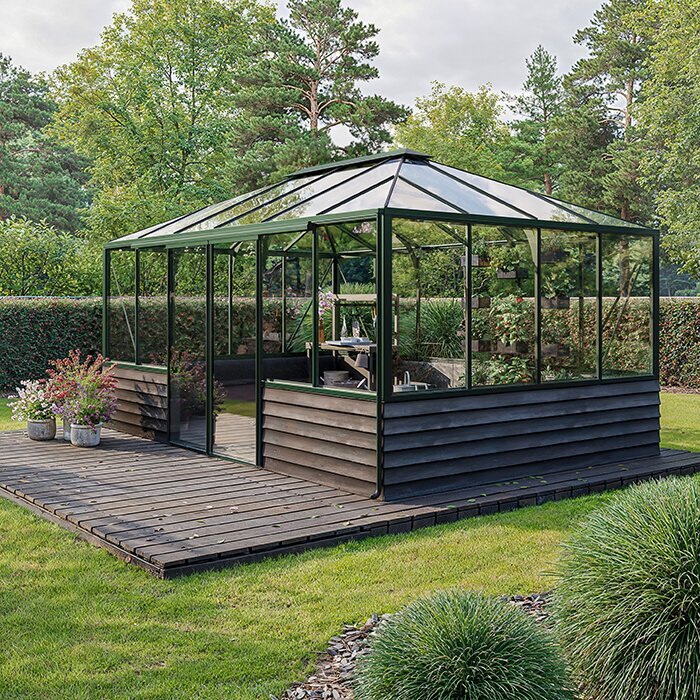
The Bloomcabin Pyramid Greenhouse on a masonry dwarf wall combines the complete Pyramid roof and upper frame with a low perimeter wall built by the customer. In a UK garden, matching or complementary brick, natural stone or render can tie the greenhouse in with the house, terrace or existing garden walls. The solid base gives the interior a more sheltered feel while the glazing above keeps it bright and open.
Choose from 6 sizes with floor areas of approximately 5.6–14.2 m². The principal footprints are approximately 2.35 × 2.35 m, 3.10 × 3.10 m, 3.10 × 3.85 m and 3.10 × 4.60 m. The upper structure is made from powder-coated aluminium and is available with polycarbonate or 4 mm toughened safety glass.
Unlike a lean-to, the Pyramid does not use an existing building wall as part of its structure. It stands independently on its own perimeter dwarf wall. Visit Bloomcabin UK.
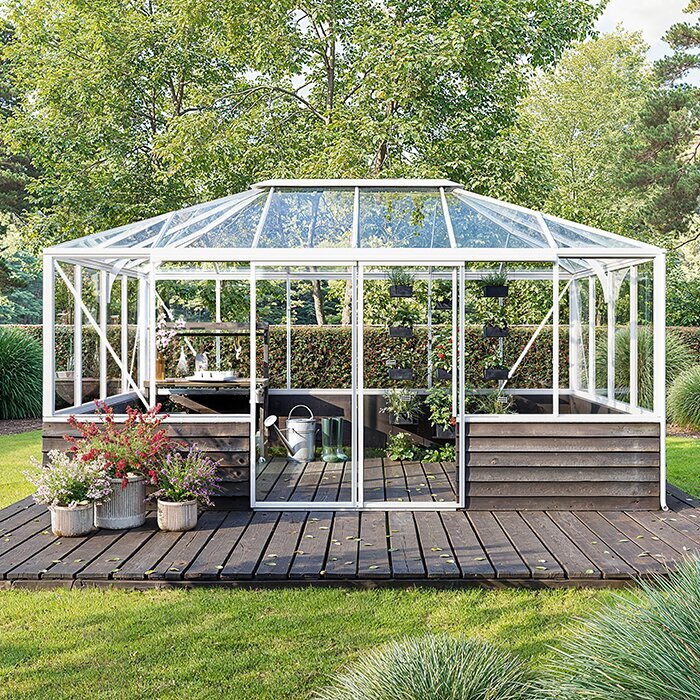
Freestanding Pyramid design
A dwarf wall adds permanence while the greenhouse remains freestanding
The complete upper frame, faceted roof and glazing stand independently of nearby buildings. This preserves the balanced Pyramid shape from every direction and allows the greenhouse to be positioned in an open part of the garden rather than against the house.
The masonry offers plenty of design choice. Brick can echo the house or a traditional kitchen garden, natural stone can complement established boundary walls, and smooth render can create a cleaner contrast with the powder-coated aluminium frame. Mortar colour, coping and nearby paving will also affect the finished appearance.
The result combines the utility of a working greenhouse with the established architectural character created by a masonry base.
Dwarf-wall design
Built in brick, stone, blockwork or rendered masonry
Tall central roof
Apex height of about 2.64–2.69 m, depending on the footprint
Glazing choice
Polycarbonate or 4 mm toughened safety glass
Colour coordination
Choose a RAL frame finish that works with the house and dwarf wall
Masonry planning
Plan the dwarf wall as part of the greenhouse build
The customer is responsible for building the wall to the confirmed dimensions of the chosen Pyramid. Select the exact model, glazing and door arrangement before setting out the masonry. Do not substitute dimensions from another Pyramid version or rely on an assumed nominal footprint.
Choose the masonry for its practical suitability as well as its appearance. Consider how it will meet the foundation, how the finished top will connect with the aluminium base and whether the surface will withstand regular exposure to rain and garden soil. A competent masonry contractor can build the wall accurately from the confirmed greenhouse drawings.
Accuracy matters because the upper frame must sit evenly around the full perimeter. The finished wall top must be flat, level and correctly sized, with square corners and the doorway in the specified position. Small errors in the masonry can make frame alignment, glazing and smooth door operation more difficult.
Four decisions before the first course
The footprint, doorway, wall top and drainage determine the final fit
The dwarf wall is both a prominent design feature and the connection between the prepared site and the aluminium greenhouse. Its shape and dimensions determine how accurately the frame can be assembled, while the foundation beneath must suit the ground and the completed structure. Plan the wall, floor, drainage and greenhouse together from the outset.
01
Footprint
Mark out the exact external footprint from the confirmed drawings. Measure every side and compare the diagonals before building above foundation level. Keep clear reference lines throughout the work so the finished masonry—not the trench or unfinished blockwork—matches the required greenhouse dimensions.
02
Door opening
Build the opening for the specified sliding-door arrangement and coordinate it with the finished levels inside and outside. Allow for the confirmed threshold height rather than assuming the paving can be adjusted later. Keep the approach convenient for carrying trays, compost, tools and watering equipment.
03
Wall top
Provide a continuous, stable surface for the aluminium base. Check the level along every side and across opposite corners, not just over short sections. Agree any coping, cap or weathering detail before construction so it does not obstruct the mounting surface or alter the required wall dimensions.
04
Drainage
Decide where water from the integrated gutters will discharge and shape nearby surfaces so rain runs away from the masonry. Avoid low spots beside the wall or entrance. If rainwater will be collected, include an overflow route that continues to work when the storage container is full.
Product specification
Dimensions and materials for the upper greenhouse structure
Available range
6 sizes, about 5.6–14.2 m²
Approx. 2.35 × 2.35 m footprint
Peak height 2.69 m; side height 1.93 m; door height 1.85 m
Approx. 3.10 × 3.10 m footprint
Dimensions: 2.64 m at the peak, 1.93 m along the sides and 1.85 m at the door
Approx. 3.10 × 3.85 m or 3.10 × 4.60 m footprint
On these larger models, the apex reaches 2.69 m; the side height is 1.93 m and the door is 1.85 m high
Glazing: polycarbonate or 4 mm toughened safety glass
Construction
Powder-coated aluminium frame with sliding doors, integrated gutters and an aluminium base section
Light and interior feel
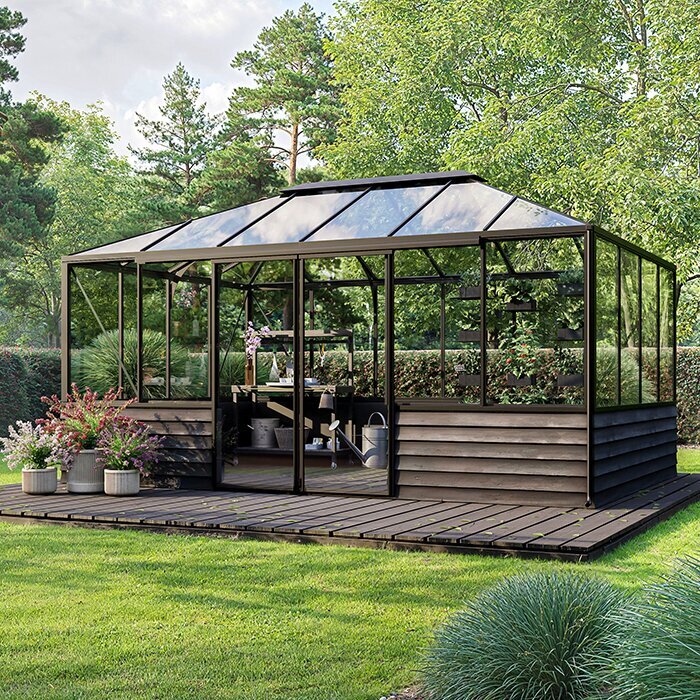
The solid lower wall gives the interior a more sheltered, room-like feel
The dwarf wall replaces the lowest band of transparent glazing, while the upper sides and faceted roof continue to bring light into the growing area. From outside, the solid perimeter also screens pots, compost bags and irrigation equipment, helping a working greenhouse sit more neatly in a formal garden.
Inside, the masonry provides a robust backdrop for benches, containers and raised growing areas. It handles everyday soil and water splashes better than low-level glazing. Use freestanding furniture and leave enough space to clean and inspect the wall and the connection with the aluminium frame.
Because the wall blocks light at the lowest level, plan bench and plant heights carefully. Seedlings and compact plants can be raised on benches where they receive more light, while larger containers and storage can occupy lower positions without crowding the glazed sides.
Typical uses
A productive greenhouse with the character of a small orangery
01
Kitchen garden
Use the perimeter for productive beds or benches while keeping a direct central route from the entrance. Coordinating nearby paths with the dwarf-wall material can connect the greenhouse to the vegetable garden. Leave enough working space to tend, harvest and clear crops without stepping into the beds.
02
Flower house
The symmetrical roof and solid base suit organised displays of flowering pots and seasonal collections. Plan the display by mature plant height so that smaller specimens are not shaded, and leave working access for turning containers, removing faded growth and cleaning the glazing behind them.
03
Tall plants
Use the taller central part of the Pyramid for climbers and taller crops. Position supports so foliage does not obstruct the doors or roof vents, and retain enough room to inspect stems and harvest produce without pressing plants against the glazing or frame.
04
Small garden room
Where the chosen footprint allows, a modest bench or table can provide a place for planning, potting or pausing between garden tasks. Keep furniture secondary to ventilation, growing and circulation needs, and use materials suited to a humid environment where watering, compost and condensation are part of normal use.
Dwarf wall & garden design
Plan the dwarf wall, frame finish and nearby landscaping together. The materials do not need to match exactly, but their colours, textures and proportions should work comfortably with one another. View the proposed position from the house and main garden paths before deciding between a subtle match and a deliberate contrast.
Matching house brick
Brick that relates to the house can make the greenhouse look established within the property, especially where nearby paths or walls use similar tones. Compare samples outdoors, as texture, weathering and mortar joints influence the overall effect as much as the brick colour itself.
If an exact match is unavailable or unsuitable, choose a complementary finish rather than a poor imitation. Natural stone, understated render or carefully selected brick can respect the setting while allowing the Pyramid to retain its own character as a garden structure.
Choose the RAL frame finish as part of the complete palette. Darker or more muted tones can emphasise the roof shape, while a closer match between frame and masonry creates a more unified appearance. Consider the gutters, door frames and other visible aluminium parts rather than judging the colour from a single profile.
Position, boundaries and access
As the Pyramid is freestanding, leave a practical route around all four sides. You will need access for cleaning the external glazing, clearing leaves from the gutters and inspecting the upper frame. Avoid thorny planting or permanent obstacles that would make future maintenance difficult.
Check the proposed position against boundaries, neighbouring property, existing services and any local requirements. Complete these checks before committing to foundations or ordering masonry materials, and make sure the access needed during construction has also been considered.
Check gate widths, tight turns and overhead obstructions along the route from the delivery point to the greenhouse site.
Flooring and internal levels
Choose an internal surface that can cope with regular watering, tracked-in soil and repeated cleaning. It should provide firm footing and support the intended benches and containers without awkward changes of level. The finished surface should also direct water predictably rather than leaving it beneath pots and furniture.
Paving or stone can visually continue the masonry into the greenhouse and create a firm working floor. Alternatively, the growing plan may call for defined planting areas beside a central hard path. Whichever arrangement is selected, separate wet growing zones from the main circulation line and retain access to the wall perimeter.
Set the finished internal floor height during the design stage. The doorway, threshold and outside approach must meet without an unintended step or a fall towards the greenhouse. Resolving these junctions before the final masonry courses are laid is much easier than altering the paving after installation.
Site, foundation & drainage
The foundation, dwarf wall, drainage and finished ground levels must work together. The greenhouse is rated for wind speeds of 30 m/s and a snow load of 210 kg/m², but these product ratings do not replace a suitable site-specific foundation or an accurately built masonry base.
Drainage on wet ground
If the ground remains wet after rain, first establish how water reaches and leaves the proposed site. The drainage plan should prevent persistent puddles at the entrance, saturated ground beside the dwarf wall and gutter water being discharged onto an already wet area.
Lay surrounding hard surfaces with a fall away from the greenhouse. Keep drainage routes accessible for clearing rather than relying on narrow gaps that can fill with leaves or soil. Pay particular attention to the entrance, where foot traffic and paving joints can create local low spots.
Ground conditions vary, so the foundation and below-ground drainage must suit the actual site and masonry construction. Seek appropriate professional advice where slopes, unstable soil, existing drains or nearby structures create uncertainty. The completed foundation must still provide the dimensions and level required for the greenhouse.
Entrance and paving levels
Plan the entrance as one continuous route. The masonry opening, sliding door, aluminium threshold, internal floor and approach path need to align so trays, watering cans and bags of compost can be carried through without an awkward step or obstruction.
External paving should drain rain away from the opening and remain firm underfoot when wet. Do not let later landscaping rise above the planned threshold relationship, as this can direct runoff inside. A defined edge also helps prevent gravel, mulch or soil from entering the sliding-door track.
Establish a fixed reference level so the masonry, internal floor and external paving are all set out consistently.
Using the central roof height
The high central roof is one of the Pyramid’s most useful features. It gives climbers, cordon-trained crops and taller ornamental plants room to grow above lower planting around the perimeter. Use this height selectively so the central route retains comfortable headroom and remains easy to use.
Arrange plants by their mature height, with taller growth towards the centre and lower crops on benches or in beds nearer the dwarf wall. Consider the sun’s path across the site so large leaves and support structures do not cast unnecessary shade over seedlings or compact plants.
Keep doors, vents and glazing accessible as plants mature through the season.
Interior planning & growing
Develop the interior plan around daily movements: entering with supplies, reaching every crop, watering without dragging hoses across fragile plants and operating the vents. Reserve locations for rainwater collection or services before filling the perimeter with benches. An orderly central route makes the changing seasonal layout easier to manage.
Humidity
Warm air rises and can escape through the roof vents at the highest part of the Pyramid. Adjust the vents to suit conditions inside rather than relying on the calendar alone, and combine ventilation with sensible plant spacing. During changeable weather, check the greenhouse regularly instead of leaving dense planting enclosed for long periods.
Condensation often increases when damp compost, wet floors and dense foliage release moisture into enclosed air. Reduce persistent moisture before it affects plants or stored items: avoid standing water, water carefully and remove decaying leaves promptly.
Keep gaps between foliage, benches and the solid lower perimeter so air can move through the planted zone. As summer crops expand, prune and reposition them before they block the central aisle. Good access also makes it easier to notice pests, damaged glazing seals or maintenance needs at an early stage.
Rainwater collection
The integrated gutters provide a convenient starting point for collecting rainwater. Position the water butt where it remains easy to use and maintain without narrowing the entrance or the route around the greenhouse. Place it on a firm, level base that can support it when full.
Direct the overflow away from the dwarf wall and foundation so water does not collect beside the masonry.
Choose storage to suit the roof catchment area, available position and intended garden use. Capacity is only part of the decision: the container should be easy to clean, have a controlled overflow and avoid placing constant dampness directly against the dwarf wall.
Water and electrical services
If a water supply, irrigation controls or lighting are intended, decide their routes before the floor and masonry finishes are closed. Place outlets and controls where they remain reachable after benches and plants are installed. Equipment should be suitable for the greenhouse environment and should not obstruct the frame or glazing.
Planned conduit or protected service routes can prevent the need to drill finished masonry or trail cables across wet floors later. Record concealed routes before they are covered so they can be found during future maintenance. Keep services away from gutter discharge and areas regularly reached by tools, barrows or movable furniture.
Use suitably qualified professionals for plumbing or electrical work where required.
Layout & year-round care
A successful layout leaves enough room to care for both crops and structure. Test the proposed bench depths against the central walkway and doorway before purchasing furniture. Removable or modular items offer flexibility when seed trays give way to taller summer plants or tender containers move indoors for autumn protection.
Benches beside the dwarf wall
The solid perimeter provides a calm backdrop for benches, large pots and raised beds. Choose furniture that stands securely on the finished floor without relying on the wall for support. Keep containers movable enough to allow cleaning, plant rotation and inspection behind them.
Masonry protects the lowest part of the greenhouse from routine splashes and light contact during potting, but it still needs care. Sweep away compost lodged at its base, treat algae or staining with a method suitable for the chosen finish, and investigate persistent damp rather than hiding it behind storage.
Keep glazing bars, door tracks, gutters and opening mechanisms accessible throughout the year. Benches fitted too tightly may look neat at first but can obstruct cleaning and repairs. Leave enough clearance to move loose items before carrying out work higher on the frame.
Pyramid or lean-to?
A lean-to uses an existing building wall as one side of the enclosure, which determines its roof shape, access and position. It can suit a site where direct proximity to the house is essential, but it is structurally and spatially different from the complete Pyramid.
The dwarf-wall Pyramid has glazing and an aluminium upper frame on every side above its own masonry perimeter. It can therefore be viewed and approached as an independent garden building. The customer-built wall gives it a more architectural base without turning it into an attached greenhouse.
Choose between the two designs according to the site and intended use, not appearance alone. Consider whether you want independent placement, a balanced roof and access around every side, or whether connection to an existing building is the priority. Garden routes, maintenance access and the proposed interior layout should all inform the decision.
Seasonal use
In spring, use benches for seed trays and young plants, placing each crop according to its warmth and light requirements. Keep frequently handled trays close to the main route and avoid filling the greenhouse too early, as plants will need more room when they are potted on or must remain under cover for longer than expected.
During summer, vigorous growth changes both airflow and circulation. Tie in climbers before they reach the roof openings, remove foliage that blocks the door, and monitor watering demands across different container sizes. Shading from mature crops should be considered when deciding where later sowings will stand.
In autumn, clean vacated growing areas before bringing tender containers under cover. Inspect incoming plants so problems are not introduced to the greenhouse, and arrange them with winter access in mind. Keep vents operable and avoid packing pots so closely that damp air remains trapped between leaves.
Build accurately
Inspect the completed dwarf wall before greenhouse installation
Before the greenhouse arrives, compare the completed masonry with the confirmed drawings for the selected Pyramid model and door arrangement. Make sure every measurement has been taken from the specified finished face or level, rather than from unfinished blockwork beneath facing materials.
Before installation, check every completed wall length, both diagonals, all corners and the level of the entire top surface. The faceted Pyramid roof relies on accurate alignment below, so an error at the base can become more obvious where the roof sections meet towards the centre.
Follow the product instructions in the stated assembly sequence. Glazing and work above ground level require suitable handling methods, access equipment and protection for the people carrying out the installation.
From order to installation
1
Confirm the order
Record the selected footprint, glazing, frame finish and door arrangement in one project brief. Give the same confirmed information to everyone responsible for the dwarf wall, floor and greenhouse installation.
2
Brief the masonry contractor
Provide the confirmed drawings, including the finished footprint, doorway and wall-top level. Agree the masonry finish and any coping detail before work starts so the required aluminium mounting surface remains unobstructed.
3
Coordinate the groundworks
Make sure the foundation, drainage, internal floor and outside approach are based on the same agreed levels. The work should leave an accurately dimensioned dwarf wall and a suitable surface for the upper greenhouse.
4
Prepare for installation
Agree how the team and greenhouse components will reach the site, and make sure the completed wall can be inspected before assembly begins. Resolve any discrepancy in the masonry rather than expecting the aluminium frame to compensate for it.
Frequently asked questions
FAQ – Pyramid Greenhouse on a Dwarf Wall
Can I combine planting beds with a paved floor?
Yes. Defined planting areas can be arranged beside a firm central path. Plan the floor, beds and drainage together, keep the entrance clear and retain access to the dwarf wall for cleaning and inspection.
Who builds the dwarf wall?
The customer arranges construction of the dwarf wall and its foundation. The masonry contractor should work from the confirmed drawings for the selected model, including the doorway and finished wall-top level. Bloomcabin supplies the greenhouse structure, not the site-specific masonry base.
Can the dwarf wall have coping stones?
Yes, provided the coping detail is agreed before construction and does not obstruct the required mounting surface or alter the confirmed wall dimensions. The finished top must still provide a flat, level and stable base for the aluminium greenhouse.
When should the floor and paving levels be decided?
Decide them before the final masonry courses are laid. The internal floor, threshold and outside approach must meet at practical levels, with external surfaces directing rain away from the entrance.
When should I choose the glazing?
Choose between polycarbonate and 4 mm toughened safety glass before the wall is set out. Confirm the complete greenhouse configuration before permanent site work begins.
Will the dwarf wall reduce light at plant level?
The masonry shades only the lowest part of the enclosure; daylight continues to enter through the glazed upper sides and roof. Use benches to lift seedlings and compact plants above the solid perimeter where appropriate, then position taller plants to avoid shading the rest of the growing area.
Can it have double sliding doors?
Yes, double sliding doors are available on compatible wall widths of around 3.10 m or wider. Confirm compatibility for the chosen configuration before building the doorway. The opening, threshold and approach should be planned together so both leaves can operate freely and the entrance remains practical.
What warranty applies?
The greenhouse structure is covered by a 12-year warranty, subject to the applicable terms.
Bloomcabin Pyramid
Create a Pyramid greenhouse that feels at home in the garden
Choose the footprint, glazing and frame finish before briefing the masonry contractor with the confirmed drawings. Careful coordination gives the Pyramid the intended fit and finish while preserving practical access for growing and maintenance.
After installation
✓ Test the sliding doors over their full travel
✓ Check that each roof vent opens and closes freely
✓ Clear assembly debris from the door tracks
✓ Confirm that the gutter outlets discharge as planned
✓ Record any concealed water or electrical service routes
✓ Keep the care instructions with the greenhouse paperwork
