Siekiant pagerinti šios svetainės turinio kokybę ir pritaikyti ją vartotojų poreikiams, naudojami slapukai – įskaitant trečiųjų šalių slapukus. Tęsdami naršymą svetainėje, sutinkate su slapukų naudojimu ir galimu susisiekimu, kai į vieną iš svetainės formų įvedate savo kontaktinę informaciją.

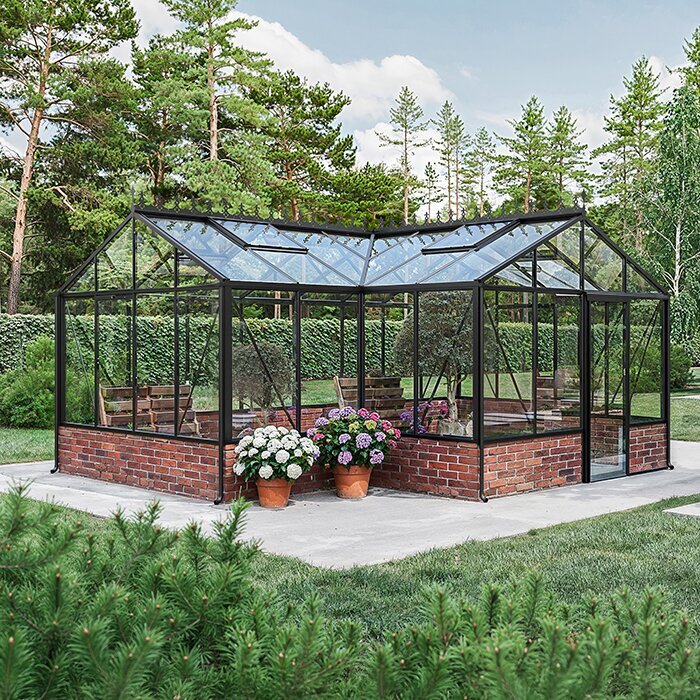
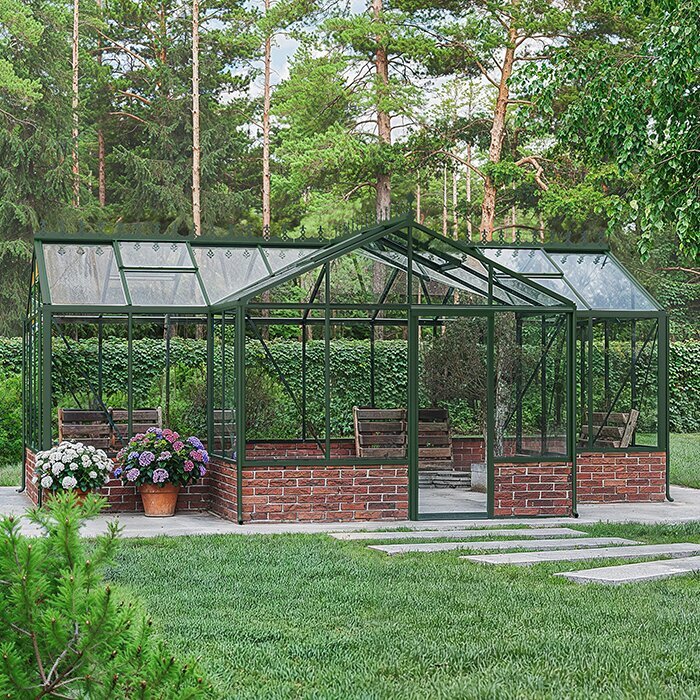
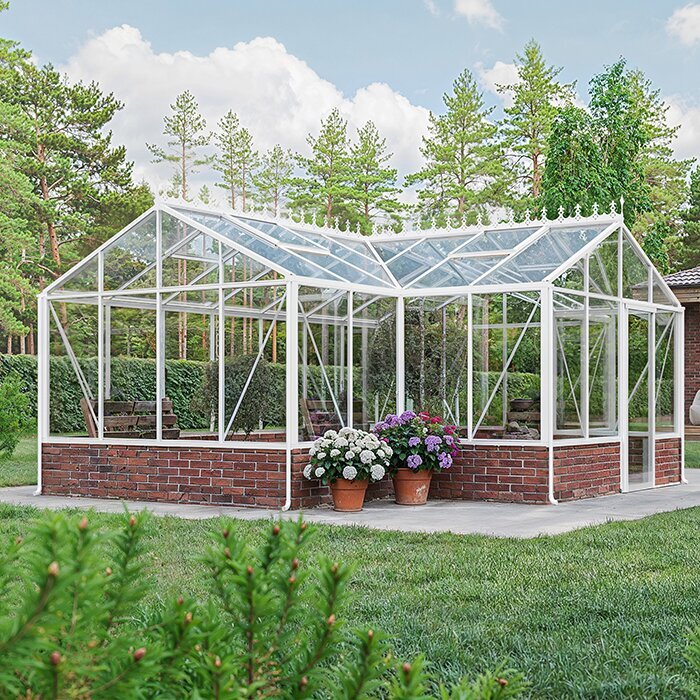
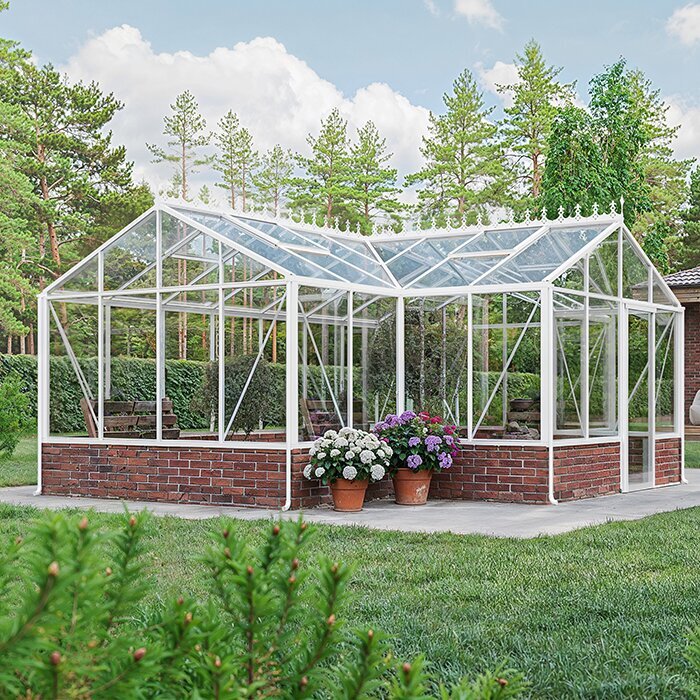
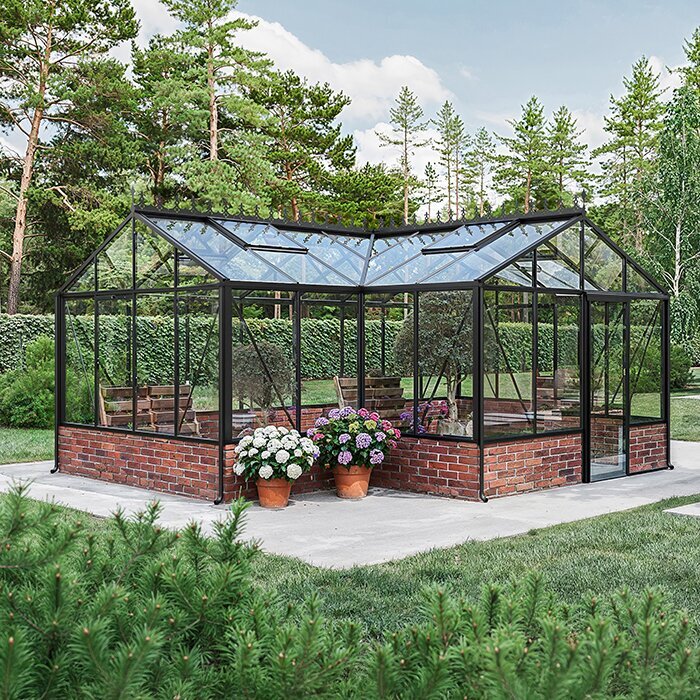
T formos šiltnamis, montuojamas ant mūrinio pagrindo

T formos šiltnamis, montuojamas ant mūrinio pagrindo

  • Unikalus T formos dizainas
  • Erdvi ir praktiška
  • Tvirtos ir ilgaamžės medžiagos
  • Lengvas montavimas savo jėgomis
Kuo didesnis pirkinys, tuo daugiau dovanų
Numatomas pristatymas:
Siūlome galimybę PASIRINKTI PATOGIAUSIĄ PRISTATYMO SAVAITĘ, kurią rasite paskutiniame krepšelio žingsnyje.
Kuo didesnis pirkinys, tuo daugiau dovanų

T formos šiltnamis – montuojamas ant mūro

Bloomcabin T formos šiltnamis, skirtas montuoti ant mūrinio pagrindo, yra išskirtinis ir daugiafunkcis sodo statinys, kuriame elegancija dera su praktiškumu. T formos konstrukcija leidžia sukurti unikaliai suskirstytas erdves – vieną augalams, kitą poilsiui. Montavimas ant mūro suteikia šiltnamiui prabangos, stabilumo ir išskirtinę architektūrinę estetiką.

Kodėl verta rinktis T formos šiltnamį?

Efektyvus erdvės išplanavimas
T formos struktūra leidžia logiškai padalinti vidaus erdvę. Viena dalis gali būti skirta sodinimui ir auginimui, o kita – poilsio zonai, darbo vietai ar net jaukiam arbatos kampeliui.

Išskirtinė estetika
Šis šiltnamis yra ne tik funkcionalus, bet ir vizualiai įspūdingas sodo akcentas. Mūrinis pagrindas, simetriškos linijos, elegantiški kampai ir klasikinės oranžerijos stiliaus detalės suteikia ypatingo žavesio bet kuriai lauko erdvei.

Tinkamas visiems metų laikams
Šiltnamis komplektuojamas su stogo ventiliacijos langais, efektyvia lietaus vandens nutekėjimo sistema ir galimybe įrengti kaminą šildymui. Tai užtikrina komfortą ir funkcionalumą visais sezonais.

Paprastas užsakymas ir montavimas
Kiekvienas Bloomcabin modelis pristatomas kaip DIY rinkinys su aiškiomis instrukcijomis. Jį galima surinkti namų sąlygomis, be specialių įrankių ar profesionalų pagalbos.

Asmeninis pritaikymas
Galite rinktis mėgstamą RAL spalvą, durų tipą (viengubos arba dvigubos stumdomos durys) ir ventiliacijos sprendimus. Prisitaikykite šiltnamį pagal savo poreikius ir gyvenimo būdą.

Įtrauktos savybės:

  • 3 dydžiai: 16,52 m², 23,45 m², 30 m²

  • Durų aukštis: 185 cm

  • Kraigo aukštis: 267 cm

  • 4 mm grūdintas saugos stiklas

  • Integruotas aliuminio pagrindas ir lietaus vandens nuvedimo sistema

  • 12 metų garantija

Klientų atsiliepimai 

„Ideali forma ir kokybė – šiltnamis tapo pagrindiniu mūsų sodo akcentu.“ – Jolanta Petrauskienė
„Pats surinkau per savaitgalį. Labai lengvai montuojamas ir puikiai atrodo.“ – Tomas Rimkus
„Galimybė pasirinkti spalvą ir dizainą buvo nuostabi. Mūsų sodas atrodo prabangiai.“ – Austėja Žilinskaitė

Saugūs ir patogūs mokėjimai

Užsisakykite internetu pasirinkdami jums patogiausią mokėjimo būdą. Bloomcabin užtikrina kokybę, saugumą ir patikimą pristatymą.

Bloomcabin T formos šiltnamis – jūsų sodas nusipelno daugiau.

Daugiau informacijos
Specifikacijos

Pieejamie izmēri: 16,52 m² ir 23,45 m²
Durų aukštis: 185 cm
Kraigo aukštis: 267 cm
Rėmas: Aukštos kokybės aliuminis
Įstiklinimas: 4 mm grūdintas saugos stiklas
Durys: Viengubos arba dvigubos stumdomos durys (nuo 310 cm pločio)

Ypatybės:

  • Tvirta ir patvari profilių konstrukcija

  • Integruota lietaus vandens nutekėjimo sistema

  • Integruotas aliuminio pagrindas lengvam montavimui

  • Stogo vėdinimo langai įtraukti į komplektą

Garantija:
12 metų garantija konstrukcijai ir medžiagoms.

Privalumai:

Patvarumas: Grūdintas stiklas ir aliuminio rėmas užtikrina ilgaamžiškumą.
Saugumas: Grūdintas stiklas sumažina traumų riziką.
Pritaikomumas: Galimos įvairios spalvos ir konfigūracijos.
Funkcionalumas: Tinka darbui ir poilsiui bet kokiomis oro sąlygomis.

T-Shaped Orangery on a Masonry Base

Combine productive growing space with a wider garden-room wing

The Bloomcabin T-Shaped Orangery on a Masonry Base combines a freestanding aluminium-and-glass frame with a low plinth built in brick, stone, block or concrete to the confirmed project dimensions. Unlike a greenhouse supplied with a complete base, this model relies on separately built masonry that is level, square and accurately set out to the T-shaped footprint. The dwarf wall is both a prominent design feature and the support for the glazed frame, so its material, wall top, openings and relationship with the finished floor must be planned as part of the greenhouse installation rather than as a later landscaping detail.

The range includes several footprints to suit different sites and growing requirements. When choosing a configuration, compare the usable wall runs, the width of the cross-wing and the approach to the doors; total floor area alone does not show how effectively the interior will work.

The T-shaped plan has a long stem and a wider cross-wing, allowing productive growing space and a genuine garden-room area to sit within one open structure. Benches and crop containers can run along the stem, while the broader wing can accommodate furniture, specimen pots or a display. With no internal partition to interrupt views, the greenhouse feels spacious, but routes, door access and ventilation must still work when plants are mature and chairs are in use. Explore Bloomcabin greenhouses in the United Kingdom to compare the available options.

T-Shaped Orangery Greenhouse on a Masonry Base United Kingdom
A glasshouse with room to grow and relax

Use the cross-wing for dining or seating while keeping the long stem productive

The long section can be dedicated to tomatoes, citrus, propagation benches or container growing, while the cross-wing accommodates a table, chairs or decorative plants. Decide which use needs the most direct route from the entrance and which needs an uninterrupted run beside the wall or glazing. Compost, watering cans and trays should reach the growing area without being carried through the seating arrangement, while people using the wider wing should not obstruct regular plant care. Plan these routes before ordering furniture or benches.

The more complex footprint requires greater care with available site space, setting out and drainage than a simple rectangular greenhouse.

Choose the T-model when the wider wing has a clear everyday purpose, not simply to gain more floor area.

Why choose a T-shaped greenhouse?

A greenhouse plan for both cultivation and garden-room use

The aluminium frame and glazing rise from the masonry plinth, giving the T-shaped greenhouse the established appearance associated with an orangery.

Distinct areas

One connected interior for cultivation, potting and seating

Dwarf-wall base

Brick, stone or other suitable masonry

4 mm toughened glass

Bright safety glazing

Integrated drainage

Rainwater channelled through the integrated drainage system

Dwarf wall and design

Plan the dwarf wall as part of the greenhouse, not as a landscaping feature

Build the masonry to the confirmed greenhouse drawings, as the aluminium frame, doors and finished floor all depend on its accuracy. Give the builder the approved footprint rather than asking them to work from the nominal floor area. The T-shaped plan has several corners and returns, so check wall lengths, corner positions, levels and opening widths as construction proceeds. It is far easier to correct the masonry before the glazed frame is installed.

Matching brick can connect the orangery visually with a house, while contrasting stone, render or smooth concrete can give it a more individual character. Consider the finish from inside as well as from the garden: the dwarf wall will sit behind pots and furniture and form the lower edge of every view. Whatever material you choose, the wall top must still be level, accurate and suitable for the greenhouse frame.

Agree the door thresholds, internal and external floor levels, drainage and wall-top details before masonry work begins. Decide how paving, lawn or beds will meet the plinth and where any planned electrical supply or other services will run. Early coordination avoids cutting into completed masonry or adding untidy surface-mounted routes later.

T-shaped orangery greenhouse on a masonry dwarf-wall base in the United Kingdom
Core specification

T-Shaped Orangery dimensions and features

Area: approximately 16.5–30.0 m².

Main width: approximately 3.10 m.

Ridge height: approximately 2.67 m.

Door height: approximately 1.85 m.

Frame: powder-coated aluminium. The greenhouse is rated for winds of 30 m/s and a snow load of 210 kg/m². These ratings apply to the complete, correctly installed structure and do not replace the need for accurate foundations, masonry and assembly.

Glazing: 4 mm toughened safety glass.

Doors: single or double sliding doors, depending on the chosen configuration.

Ventilation & drainage: roof vents with integrated rainwater drainage.

Warranty: 12 years, subject to terms.

T-Shaped Orangery Greenhouse on a Masonry Base glass orangery United Kingdom
Site drainage

Plan drainage carefully around every corner of the T

The dwarf wall should not sit in a low point where paving or lawn directs water towards it. Set surrounding levels so that runoff moves away from the base without creating an awkward approach to the doors. Observe the site after rain before finalising the work: standing water, saturated edges and runoff from nearby paving can reveal problems that are easy to miss in dry weather. Existing drainage routes should remain open and effective.

A T-shaped footprint has more internal and external corners where water and debris can collect than a simple rectangle. Pay particular attention to the inner returns, where adjoining surfaces may direct runoff into a confined, shaded area. Avoid narrow pockets that cannot be inspected or cleared of leaves, and make sure later planting does not block drainage outlets or access around the wall.

Record the agreed falls and rainwater routes so that the greenhouse installer and landscaper work to the same drainage plan.

Setting out the masonry

Use one datum for the whole T-shaped footprint

Mark out the complete T shape before foundations or brickwork begin. Check every return, diagonal and door opening from the same datum, and retain that reference until the masonry has been verified. Setting out each wing separately can produce correct local measurements while allowing the overall shape to drift out of alignment. Follow the installation drawings and confirm which measurements apply to the masonry rather than assuming that all stated dimensions are interchangeable.

Record the verified wall measurements and resolve any discrepancy with the installation drawings before arranging assembly of the aluminium frame.

Include finished floor levels and sliding-door thresholds in the original setting-out work. Calculate each floor build-up from its supporting layer to its final surface, particularly if the growing stem and furnished wing will use different materials. Keep the main route as even and easy to clean as possible, and coordinate the external approach so that a well-planned internal threshold does not lead immediately to an awkward step outside.

Ventilation in cool, damp weather

Use roof ventilation on mild, damp days as well as in summer

Greenhouse management in Britain often involves moisture as much as heat. Plants, damp compost and cool glass can produce substantial condensation, especially when a busy growing area shares air with a furnished wing. Persistent humidity may affect plant health and leave soft furnishings feeling damp. Water carefully, remove unnecessary standing water and ventilate according to the conditions inside rather than relying on a fixed schedule.

Inspect sheltered corners and the areas behind furniture after cool nights or wet spells, as moisture can remain there after the main glazing has cleared.

Keep the junction between the stem and cross-wing open so air can move past furniture and foliage. Roof vents release warm, humid air, while the doors provide a larger opening when conditions allow. Do not let tall plants form a continuous screen across the T or block access to the vents. In warmer weather, observe which part heats first and adjust ventilation and shading to suit the actual pattern inside.

Masonry colours and finishes

Brick colour and mortar joints strongly influence the finished orangery

A brick plinth can help the T-model sit comfortably beside a traditional British house or within a walled garden. The brick does not have to match exactly, but the choice should be deliberate. Compare samples outdoors beside the intended frame colour, as brick, mortar and coated aluminium can look very different in daylight. Because the T shape exposes several elevations and corners, agree the brick bond, joint finish and treatment of cut bricks before work reaches the more complex returns.

Decide whether the mortar joints should blend quietly with the brick or provide a stronger contrast, as this choice will affect every elevation of the orangery.

Check the selected masonry in direct sunlight and shade, particularly if different sides of the T receive noticeably different light during the day.

Flooring for growing and garden-room use

The cross-wing can have a more domestic finish than the growing stem

Stone or tile can make the sitting area comfortable for coffee or dining, while the growing zone may benefit from a tougher surface that copes well with water and soil. Consider cleaning, damp conditions, chair legs and regular foot traffic rather than choosing on appearance alone. If two materials meet, place the transition where it follows the T-shaped layout naturally and does not create a raised or dirt-catching edge. Confirm the full construction depth of both floors before setting the final levels.

In the growing area, favour a finish that provides secure footing when damp and can withstand the repeated movement of pots and benches.

Keep any change of material away from the sliding-door track and principal route wherever the layout allows.

Furniture layout

Allow for chairs in use and keep a clear working route

A table may fit on plan but still block the room when the chairs are pulled out. Mark the occupied area, including space to pass behind a seated person, and compare it with the doorway, the T junction and access to nearby plants. Lightweight furniture is easier to move when trays or large pots need to pass through. Avoid filling every edge with storage; some open floor around the main seating arrangement makes the glasshouse easier to use.

Reserve clear standing space for trays, watering cans or newly delivered plants so that the dining table does not become the default work surface.

Choose furniture proportions that preserve sightlines through the T junction and leave sufficient room for plants as they mature.

Planting and views

Use specimen plants without blocking doors or ventilation

Large citrus or climbing plants can give the cross-wing the character of an orangery rather than a bare glazed room. Plan for each plant’s mature canopy, container and care requirements instead of judging only by its size when purchased. Give heavy pots a stable position where frequent movement is unnecessary, and support climbers without interfering with the glazing, vents or frame. Group plants with similar watering and seasonal needs where practical, while leaving enough room to inspect and turn their containers.

Arrange the tallest specimens so that they frame views from the entrance and seating wing rather than dominating the centre of the orangery.

Lower pots work better beside main paths, where visibility and access are more important than maximum plant height.

Rainwater storage

The roof can contribute to irrigation rather than simply shedding water

A water butt or larger tank can collect controlled runoff from the orangery for use on pots and greenhouse crops. Position it according to the actual drainage route, not simply where it is least visible. It should remain accessible for checking connections, drawing water and cleaning, with a suitable base and surrounding surface. Keep hoses and watering cans clear of the principal doorway and do not run pipes across the maintenance strip beside the wall and glazing.

Keep the overflow route clear and direct it away from the dwarf wall.

Keep collection pipework visible and straightforward to inspect, avoiding hidden sections that would be difficult to reach once planting is established.

Seasonal use

Make room for spring propagation, summer dining and autumn plant protection

In spring, the glasshouse can support young plants; in summer, the cross-wing may be used more socially; and in autumn, it can protect tender pots for longer. Each use places different demands on the floor area. Propagation needs organised bench space, social use needs open circulation, and autumn storage needs allocated positions for containers. Use movable elements so that each seasonal change does not require the interior to be rebuilt, and clear away equipment that is no longer needed.

Without a separate heating solution, the orangery should not be expected to maintain house-like temperatures in winter.

Store off-season furniture only where it will not restrict light, airflow or access for routine plant care.

Preparing for optional heating

Plan any chimney provision or heat source before furnishing the room

If the chosen configuration includes chimney provision, coordinate the intended heater, clearances and wall detail before fixing furniture or placing tall plants. The provision in the greenhouse design does not determine which appliance is suitable or how it should be installed. Follow the appliance manufacturer’s instructions and account for ventilation, the flue route, nearby materials and access for operation and servicing. Integrate any specialist work with the masonry and frame planning so that completed surfaces do not need to be altered later.

Obtain specialist advice before purchasing an appliance or making alterations to the masonry for a proposed heating installation.

Subject to the appliance instructions, keep the proposed heater position away from the principal circulation route and everyday plant-care workspace.

Maintenance access

Leave working space around the glazing and frame

Gutters, glass, roof vents and frame joints will need future access. A hedge planted close to the aluminium may become difficult to work around as it matures, even if the initial gap looks generous. Allow for the eventual spread of shrubs and the space needed for cleaning and inspection. Avoid permanent objects beneath roof edges or around rainwater components, and pay particular attention to the inner returns of the T, which can easily become enclosed by planting.

Where space is limited, use low or movable planting around the inner returns rather than allowing permanent growth to enclose these tighter areas.

Keep the approach routes wide enough for the equipment needed to clean the glazing and inspect the roof vents and drainage fittings.

T-shaped or rectangular glasshouse?

Choose the extra wing for a clear reason

If the main aim is to grow long, uninterrupted rows of vegetables, a rectangular greenhouse may be the simpler and more efficient choice. The T-model suits a project where the broader wing has a defined purpose that justifies the more involved footprint and masonry. Compare bench runs, walking routes and turning space rather than judging only by total floor area. The T is most useful when one activity needs a wider room while cultivation continues along the stem.

Allow for the additional internal and external corners when comparing the installation work and future access requirements with those of a rectangular greenhouse.

The dwarf wall also gives furniture and pots a solid lower backdrop and reduces the amount of glazing at floor level.

Installation sequence

Coordinate the masonry, aluminium frame and finished interior

Do not treat the dwarf wall as a separate project to be completed before door positions, floor depths, power and drainage have been decided. Prepare a sequence covering site measurement, foundations and masonry, planned service routes, floor construction, greenhouse assembly and surrounding landscaping. Each trade should know which dimensions and levels must remain unchanged for the next stage. Protect wall tops and openings while other work continues, verify the completed base before frame installation, and finish landscaping only after drainage and maintenance access are clear.

Issue the same approved drawing set to every contractor and maintain a shared record of any agreed changes to dimensions, levels or service positions.

Record the final drainage and service routes before floors or landscaping conceal them, so they can be located during future work.

Common questions

Frequently asked questions about the T-Shaped Orangery

What should the masonry contractor receive before starting?

Give the contractor the confirmed installation dimensions and complete T-shaped setting-out information, including door openings and the intended finished floor levels. Do not ask them to work from the stated floor area or approximate headline dimensions. Agree the datum, wall-top requirements and who will check the completed base before the aluminium frame is assembled.

When should the surrounding paving be completed?

Plan the paving early, but complete it only after the wall geometry, doorway levels and rainwater routes are confirmed. The finished surface should direct water away from the base, preserve cleaning access and avoid trapping outlets or creating wet pockets at the inner corners. Finishing too soon can restrict installation and make corrections more disruptive.

How should different interior uses be arranged?

Use the long stem for plant care and other tasks that benefit from a clear working route, then give the wider cross-wing to the activity requiring more room. Test the layout with chairs pulled out, mature plants represented and the doors open. Keep the junction between the two sections clear for movement and airflow.

Can different floor finishes be used within the T?

Yes. Resolve the construction depth, junction and cleaning needs of both finishes before fixing the wall and threshold levels. A water-tolerant surface may suit the growing area, while the cross-wing can use a finish chosen for furniture and regular foot traffic. Avoid a raised transition across the main route.

What should remain accessible after landscaping?

Keep practical access to the glazing, roof vents, frame joints, rainwater components and the full dwarf-wall perimeter, including the inner returns. Allow for the mature spread of planting, and position tanks, permanent furniture and decorative features so they do not prevent inspection or cleaning.

How should condensation be managed?

Open the roof vents and doors according to the conditions inside, keep all openings unobstructed and avoid planting so densely that air cannot move through the T junction. Water carefully and remove standing water where practical. Condensation is often more noticeable after cool nights or watering, so check the glazing regularly rather than ventilating only in hot weather.

Will the orangery stay as warm as a room in the house during winter?

No, not without an appropriate heating solution. If the chosen configuration includes chimney provision, the appliance and installation still require separate planning. Protecting plants through part of the colder season and creating a room with house-like winter comfort are different objectives.

What should be checked before frame installation?

Check the complete footprint, wall lengths, returns, diagonals, door openings, wall-top level and relationship with the proposed floors. Also confirm that drainage work or planned service routes have not altered the required masonry dimensions.

Bloomcabin T-Model

Create an orangery that is practical as well as attractive

Review how the selected footprint will look from the house, the main garden approach and the intended seating position before completing the surrounding landscaping.

Keep the installation drawings and records of drainage and service routes available for future maintenance.

Before first use

✓ Confirm that the sliding doors travel freely

✓ Open and close every roof vent

✓ Check that runoff follows the planned route

✓ Keep rainwater fittings accessible and outlets clear

✓ Walk the maintenance route around every outer wing and inner return

✓ Test the main internal route with furniture and pots in place

Explore Bloomcabin greenhouses in the United Kingdom
Uždaryti x
10 metų garantija
Bloomcabin didžiuojasi savo aukščiausios kokybės produktais ir kasdien juos prižiūri, taikydama įvairius gamybos ir kontrolės procesus. Tai patvirtina 12 metų garantija mūsų šiltnamiams.
45 % pigiau apsiperkant internetu
Patogūs ir pelningi pirkimai internetu
Paklauskite mūsų
Susisiekite su mumis
Telefonas:
El. paštas:
Šis el.pašto adresas yra apsaugotas nuo šiukšlių. Jums reikia įgalinti JavaScript, kad peržiūrėti jį.
Registracijos numeris:
38944924
Adresas:
Thriges Plads 6, 5000 Odense C, Denmark
Socialiniai tinklai
Sekite mus Instagram, Facebook ir Twitter, kad gautumėte naujienas ir geriausius pasiūlymus iš Bloomcabin.
X
Turite klausimų ir norite, kad jums paskambintume?
+370
−
✖