
How Level Does a Garden Shed Base Need to Be?
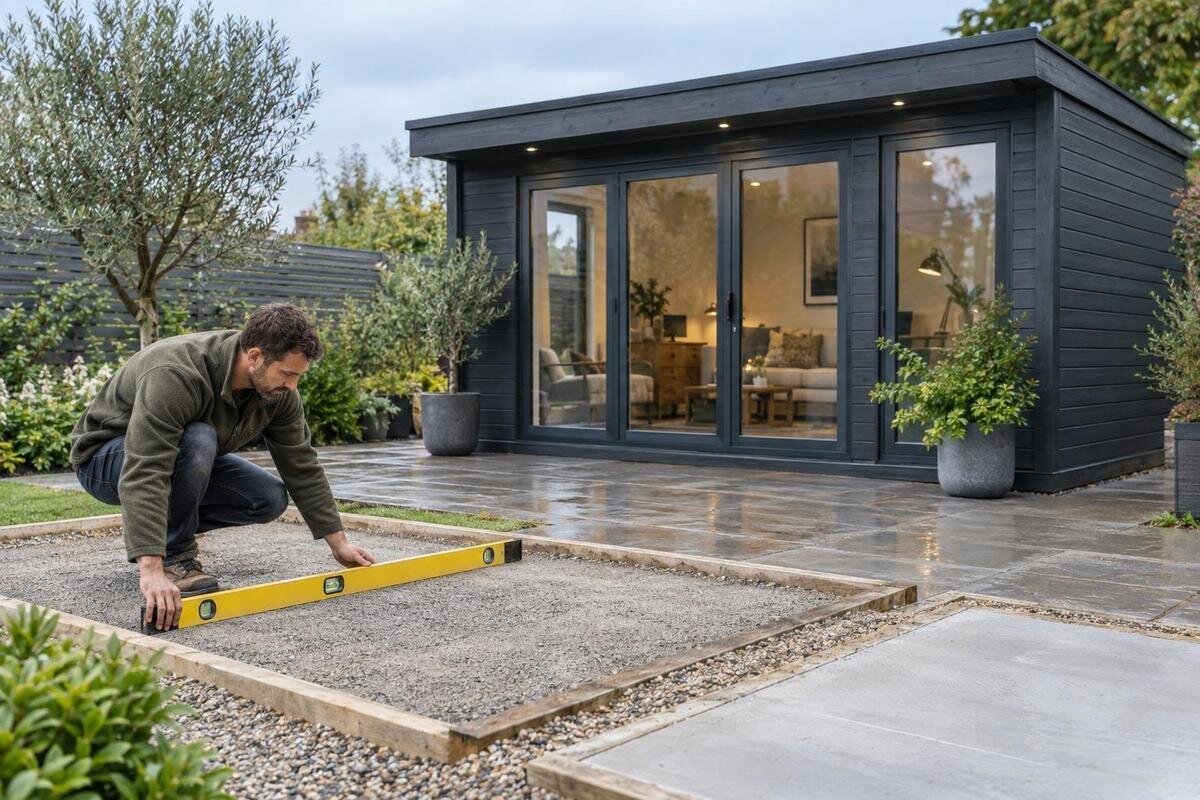
Garden shed planning
Whether you are ordering a garden shed or preparing a site for installation, its base needs to provide the support plane specified for that model. “Level” is not just a centred bubble at one point: the whole footprint needs to be even, stable and suitable for the planned support points. There is no single millimetre tolerance that applies to every shed. Check the instructions for the exact model and resolve uncertainty before assembly, rather than trying to pull an out-of-square frame into place.

Level, flat and stable are separate checks
Level, flat and stable describe different things. Level means horizontal relative to gravity; a spirit level checks the line beneath it. Flat means the surface forms a consistent plane, without a local hump or hollow. A base can be flat but tilted, or read level along one edge while rising across its width. Stability is different again: the base should not rock, shift or sink under the shed. Passing one check does not prove the others, so do not treat a single bubble reading as approval for the whole base. A short level checks only a short run, and a reading in one direction says little about the rest of the footprint.
The practical target is the support arrangement specified for the shed sitting on an even, level plane. That does not necessarily mean every point under the floor must touch the base; some designs have particular bearing edges or support points. It does mean those points need to meet the instructions, rather than leaving an intended support suspended or using the shed frame to bridge a hollow. Check the outline, too. A base may be level but too small, wrongly positioned or out of square. A spirit level will not reveal those problems, so use the shed's footprint information as well as checking its level. Before preparation starts, mark the proposed corners and compare the shape with the plan. Measuring the diagonals between opposite corners can help identify whether a rectangular layout has been set out square, while the model documentation remains the authority on the required base shape and dimensions.
There is no universal tolerance for every shed
There is no single useful tolerance that applies to every garden shed. The permitted variation depends on the design, how it is supported and how it is assembled. A figure from another supplier's guide, or from a different model, is not automatically suitable. Nor does the general instruction to provide a level base tell you how many millimetres of variation are allowed. If the instructions give a tolerance, follow the whole requirement: note where to measure, what area it covers and whether it applies to the base surface or to particular support points.
Ask for the requirement for the exact model you are considering, such as the Verdana 1 garden shed. If the instructions are unclear or do not give a figure, ask the supplier or manufacturer what variation is acceptable and how to check it. It is also worth asking whether the requirement applies in both directions across the footprint and what they recommend if the base falls outside it. Keep the reply with the installation information. That way, you are not relying on an informal rule of thumb or a measurement intended for a different shed.
Use the shed's footprint and support plan
Plan the base from the shed's actual footprint and support arrangement, not just the visible dimensions. The outer walls or roof projections may not show exactly where the shed is intended to bear on the base. Before setting out the area, get the model's base plan or installation information and identify the required edges, lines or points of support. Mark the footprint so you can check its position and dimensions against the plan. A level reading cannot tell you whether the base is the right size or whether the shed will sit in the intended place.
Request a plan for the exact model; the name the Verdana 2 garden shed alone does not tell you where it should be supported. Check that the base layout matches the drawing before you measure its level. If the plan distinguishes between the outside footprint and the bearing area, use the stated bearing area for the relevant checks. Do not guess that a base should be wider, narrower or centred in a particular way. If dimensions or support positions are missing, ask before the base is built or the shed is ordered.
Check the whole surface in several directions
Use a clean spirit level that is long enough to check a meaningful section of the base, following the tool's instructions. Take readings along each edge and across the width and depth, rather than checking only one side or the centre. Include the corners and points between them; a high or low area in the middle can be missed by measuring only the perimeter. For a large footprint, a longer level or laser level can help compare points across the area, but several readings are still needed to understand the whole surface. Work to a simple grid or sketch so that each result can be tied to a location, rather than relying on memory. Repeat any unexpected reading from the same position and, where practical, from the opposite direction. This helps distinguish a local surface issue from a level that was not seated properly.
Use a straightedge to check flatness along the intended support areas. If it rocks on a high spot or leaves a visible gap over a hollow, mark the location and check again after clearing away loose grit or debris. Do not rely on one reading taken on a small stone, a temporary board or an unfinished section of the base. If the Durano garden shed is on your shortlist, record where you took each reading against its base plan. Measurements are more useful to an installer or supplier when both parties can see which parts of the footprint they describe.

How high and low spots can affect support
When the surface varies, the shed may bear more heavily on high points and sit unevenly at its intended supports. A low area can leave a gap where the plan calls for support; the floor or frame may then rock or feel uneven. The effect depends on the shed's design, but the reason for an even base is consistent support, not simply a tidy appearance. A surface that looks fine from standing height can still have a local dip or raised patch that matters at the points where the shed rests. Look closely at transitions between materials or sections of the base, as these can be places where a straightedge reveals a change in height. Note whether an irregularity falls under an intended support line, at an edge or outside the bearing area, then discuss it using the model plan rather than judging it by appearance alone.
Do not try to correct an uneven base by forcing the shed parts together or tightening fixings to pull the frame into place. That can hide the underlying issue rather than make the support plane correct. Avoid loose offcuts, gravel or improvised wedges unless the model's instructions specifically allow a suitable method. For the Veltor 1 garden shed or any other model, follow its written support requirements instead of assuming a small gap is acceptable because the frame can be assembled over it.
An uneven base can complicate assembly
A shed assembled on a twisted or uneven support plane may be harder to put together as intended. Fixing holes can be difficult to align, panels may not meet evenly, or an opening can end up out of position. These are possible effects, not a way to measure the base: assembly issues can also come from the sequence, incorrect components or damage. If a part seems not to fit, pause and compare the work with the instructions rather than assuming the base is the only cause or forcing the part into place.
Use the assembly guide for the exact model, such as the Orello 1 model, and follow its sequence and adjustment guidance. Do not borrow a fix from a different shed, since its support arrangement and assembly may differ. If the base meets the stated requirements but parts still will not align, check that the structure has been assembled as directed and contact the supplier or installer for advice. Confirming the base before assembly helps separate a site issue from a problem with the assembly or components.
Ask about the base before ordering
Base requirements are easier to address before the shed is ordered or an installation date is arranged. If a product page does not set out the requirements, ask for the installation information and base plan for the model you are considering. Find out what tolerance applies, which parts of the footprint must be supported and whether any specific measurement method is required. If you are considering the Modano garden shed, for example, put those questions in your pre-order notes rather than relying on a general description of the product.
Confirm who is responsible for preparing the base and who will decide whether it is ready for assembly. If an installer is involved, ask what information they need before attending and whether they will check the finished base. Also clarify whether any base components are included or need to be arranged separately; do not assume either way from the shed's name. Knowing the requirements early can help you coordinate preparation and delivery, and may prevent a delay if the completed base needs further work. If the site is still being planned, share the proposed base dimensions and location with the person preparing it, together with the model documentation. This can prevent a base being completed to an approximate size before the required footprint, bearing areas or orientation have been confirmed. Keep any answers in writing so the same information is available to everyone involved.
Give the supplier or installer useful measurements
If you need advice, report more than “the base is level”. Record the locations you checked, the directions of the readings and any gaps or high spots found with a straightedge. Photos with the level or straightedge in place can make the location clearer. Say whether the surface is finished or still temporary, and include the footprint plan if you have one. Avoid presenting a measurement as a pass or fail when you do not have the model's tolerance to compare it with. It can also help to note the date of the measurements and any work completed afterwards, such as surface finishing or moving materials across the site. A clear sketch with corners and support lines labelled lets another person understand the readings without having to infer where each photograph was taken.
Ask direct questions: what variation is acceptable for this model, where should it be measured, and what should happen if the base does not meet that requirement? For a named option such as Timber Garden Shed M, include the full model name so advice is not confused with instructions for another version. Keep the answer with your measurements and installation documents. Clear written information gives you and the installer a shared reference before assembly begins.
Pause if the base does not meet the instructions
If readings differ, first check that the level is sitting cleanly and correctly, remove loose debris and repeat the measurements. Compare the results with the requirements for the exact shed, not with an assumed tolerance. If the variation is outside the stated limit, or no limit is available and you cannot confirm the base is acceptable, pause before assembly. It is generally easier to resolve a base concern while the area is clear than after the shed has been built on it. Identify whether the issue is localised or affects a wider support line, but do not decide on a remedy from that observation alone. Marking the affected area and retaining the readings will help a qualified person assess the condition without relying on a verbal description. Do not cover a questionable area with loose material simply to make it look even before it has been assessed.
If the surface moves, sinks or cannot be brought into line with the instructions, ask a suitably experienced installer or other qualified professional to assess it. Do not use the frame to test whether the base is acceptable, and avoid improvised changes that are not approved for the model. Whether you have chosen Wooden Garden Shed S or another design, ask what correction is appropriate before continuing. Reschedule installation if needed rather than treating a poor fit as something to force during assembly.
A final base check before installation
Once the base is complete, compare its position and dimensions with the shed's plan, then check level in several directions and flatness along the specified support areas. Confirm that the intended support points are firm and that the surface is clear of loose debris. Check the shape and orientation as well as the readings: a level base can still be out of square or positioned incorrectly. Record the final measurements and take a few photos, particularly if an installer or supplier has reviewed the site remotely. Make the final check after any nearby digging, compaction or access work has finished, as activity around the site can leave material on the surface or affect an unfinished area. If the base is covered before installation, uncover the bearing areas and inspect them again so the final assessment reflects the surface the shed will actually sit on.
Use the model's instructions as the decision point. If the base meets the stated requirements and has not changed since it was checked, it is ready for the installation to proceed. If you have altered it, or if rain, site work or foot traffic may have disturbed it, check it again before assembly. Where the requirements are missing or the result is uncertain, get an answer before proceeding. This is more reliable than discovering during assembly that the shed does not sit as intended.
Frequently asked questions
How level does a garden shed base need to be?
It needs to meet the tolerance and support requirements for the exact shed model. There is no single figure that applies to every design, so check its installation instructions or ask the supplier before assembly.
Can a base be flat but not level?
Yes. A flat base has an even surface, but that surface can still slope. Check both the plane of the base and whether it is level across its full footprint.
Is one spirit-level reading enough?
No. A reading only checks the line where the level sits. Take readings in several directions and locations, including across the footprint, and check for high or low spots with a straightedge.
Could an uneven base make a shed door hard to align?
It could contribute to misalignment, but it is not the only possible cause. Check the base and follow the model's assembly instructions before deciding what needs correcting.
What if the instructions do not give a level tolerance?
Ask the supplier or manufacturer for the requirement for that exact model, including where and how to measure it. Do not assume a tolerance from another shed applies.
The right benchmark is not an arbitrary measurement or a single spirit-level reading. It is a firm, even base that meets the support and level requirements for the exact shed you have chosen. Check the whole footprint, confirm any unclear tolerance before installation and deal with unevenness before assembly. That gives the shed a sound starting point without relying on force or guesswork to make its parts fit.
