
Planning a front door with a sidelight and fanlight
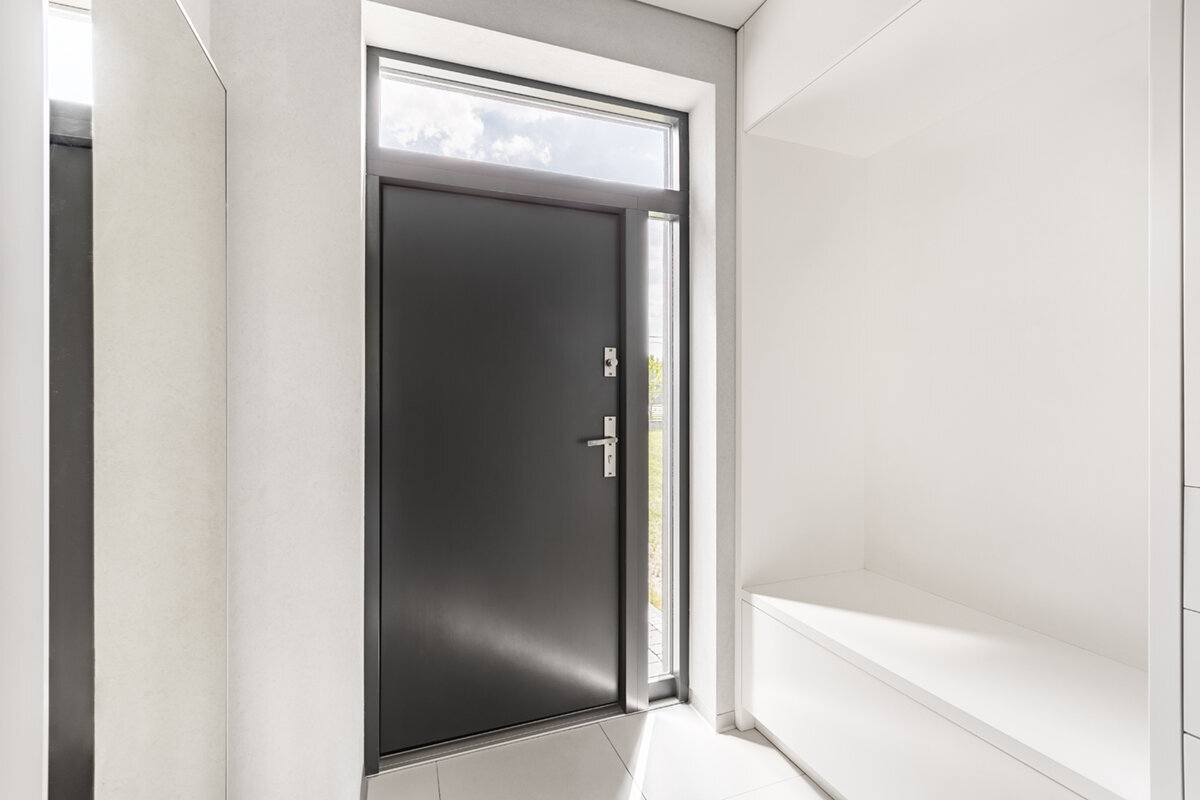
Planning guide for your entrance
Replacing a front door or planning a new entrance involves more than choosing the door leaf. A sidelight and a fanlight change how much daylight reaches the hall, how clearly visitors find the entrance and how private the area feels from the street. In a narrow, dark hallway, glazed additions may be more useful than a wider door; where an entrance is highly visible, limited, carefully positioned glazing may be the better solution. A successful design considers the door, glazing, wall opening, shading and interior together. This guide sets out the key decisions, from measuring through to ordering, and the questions to resolve before configuration.
Consider the entrance as one complete opening
A front door with a sidelight and a fanlight is not simply a door with glass panels added later. It is a single entrance assembly within a wall opening. Begin with a site survey: where are the finished outdoor and indoor floor levels? What are the actual width and height of the existing opening? Are a downpipe, light fitting, doorbell, letterbox or canopy within the assembly area? Record the wall build-up and façade plane too. For a new build, this information helps coordinate the opening with the structure early; in a renovation, it avoids discovering that the desired elevation does not fit the existing dimensions. Photos from inside and outside, with measurements taken at several points, make discussions with an installer and supplier much more specific.
The key design choice is not “as much glass as possible”, but what each area should do. The door leaf is the moving passage. A sidelight can bring daylight into the hall from the side and visually widen the entrance. A fanlight uses the area above the door without changing the clear passage width. A tall opening need not be glazed throughout: an understated solid section can anchor a busy façade. Conversely, a restrained door with a slim glazed panel can give a deep hallway a clearer focal point. Draw the entire opening to scale, including the house number, exterior light and any visible internal walls. This lets you assess proportion before colour and details dominate the decision.
Bring width, height and divisions into balance
For the horizontal division, first establish the required clear door passage width, then decide on the sidelight width. Circulation space in the hallway matters as much as room for bags, prams or furniture during a move. A narrow glass panel can already bring in light without making the door too narrow. A wider panel has a greater effect on the façade and can deliberately shift the door away from the centre. Always check the elevation against the actual front of the house: does the division relate to window axes, an eave line, a recess or the plinth? A symmetrical assembly is not automatically appropriate where other façade elements are arranged asymmetrically.
The vertical division shapes the impression of height. A fanlight can divide a tall wall opening, make the door assembly feel less squat and carry light further into the entrance. Its height should not be chosen independently of the door leaf, sidelight and neighbouring windows. A horizontal division with no relationship to other façade lines can prove more distracting than a smaller glazed format. Where height is limited, a sidelight is often the clearer solution; where width is limited, a fanlight can provide the daylight. State clearly in your enquiry whether division joints should sit at a particular height. The internal view also matters: a joint at eye level, a coat cupboard or a mirror can alter the effect more than the exterior perspective suggests.
Plan the complete opening
Direct daylight purposefully into the hall
For daylight planning, it is not enough to add up the glazed area. What matters is where light falls through the day and which internal surfaces it reaches. A side glass panel can carry light along a wall, while a fanlight tends to diffuse it from above. In an entrance hall with a closed coat cupboard opposite the door, the gain will feel different from that in an open hall with a sightline to the living area. Observe the entrance on an overcast day and in low sun. Note dark areas, switch locations and where keys or post are placed. This prevents a bright-looking door elevation from being planned while the hall behind it remains dark.
Not all glazing needs to open. For a light panel in an entrance assembly, a fixed-glazed window is a practical option when no opening function is needed. It can simplify the design because no opening zone or use around a handle needs consideration. If a separate small window above or beside the entrance is part of a wider façade scheme, coordinate frame views and division lines together. Also consider how the interior looks at night: hall light may be visible outside through clear glazing. Good daylight planning therefore always considers the view from outside to inside, not only daytime brightness.
Choose privacy by sightlines, not instinct
The right privacy treatment depends on the actual sightlines. When a front door stands directly beside a footpath, a passer-by sees it from a different angle than at a recessed entrance behind a front garden and steps. Look at the door from the street, neighbouring property and your own approach. Then check from inside: what can be seen through the sidelight—only a hallway, a coat area or a view into further rooms? A simple sketch with eye heights and distances helps. It can show whether all glazing should be transparent, whether only an upper section should admit light, or whether a different division provides the desired screening.
Privacy does not have to mean giving up daylight. A graduated approach can, for example, keep the lower section more sheltered while bringing light in higher up. A more solid door leaf with deliberately limited glazing can also be more suitable than a large panel that is permanently covered later. For an assembly with one fixed glass element beside the door, a single glazed door sidelight is a useful starting point. The product title describes the single-panel configuration; specify the glass type, dimensions, frame view and connection to the door separately for the exact design. Always discuss privacy together with internal lighting, curtains or screening solutions and the actual furnishing layout.
Check opening direction and daily movement before ordering
The opening direction of a front door affects far more than the hinge position. Imagine arriving with shopping bags, a parcel or a pram: where is the doorbell, where does a visitor stand, and what space does the door leaf need to open? Indoors, the leaf must not clash with a coat cupboard, bench, radiator or another door. Outdoors, check steps, the landing, canopy posts, planters and circulation space in front of the entrance. Mark the swing area with tape or a cardboard template as a trial. This simple check reveals conflicts that a front elevation cannot show and that a different glass panel cannot solve later.
A outward-opening front door with infill panel is one possible configuration where the door is to open outwards. As a broader alternative, consider an outward-opening exterior door if the design of the door leaf has not yet been decided. Compare not only the front elevation, but also the fully open leaf on the floor plan and the position of a waiting visitor. Whether this opening direction is sensible and practical for your project must be decided from the on-site situation. The sidelight and fanlight remain fixed, so they do not reduce the door leaf’s swing area. On a narrow landing, it is particularly worthwhile to draw the opening at full width and include the routes used by household members and visitors. State the exterior view, hinge side and opening direction clearly in the order. Terms such as left and right are ambiguous without an agreed viewpoint; a labelled drawing prevents misunderstandings.
Treat frames, joints and glazing bars as part of the design
The more panels an entrance assembly has, the more strongly frames and joints shape its appearance. A sidelight and fanlight add further lines; these can organise the façade or visually fragment it. Compare not only glass sizes, but also the linework in relation to the front door and neighbouring windows. If the assembly should look calm and restrained, fewer divisions may be advantageous. On a house with clearly defined window axes, coordinated glazing bars can strengthen the visual connection. Distinguish decorative glazing bars from bars that divide the glass: they do not create the same appearance and should be named clearly in the drawing and quotation.
One clear brief might be: fanlight without glazing bars, sidelight with one vertical line relating to the adjacent window, and a door leaf with a calm infill panel. Such instructions are more useful than asking for a “classic” or “modern” door because they can be checked. For a historic character, use views of outward-opening historic-style “Kombi” casement windows as a comparison for proportion and glazing-bar effect, without treating them as technically equivalent to the entrance assembly. Here, the window design is a visual reference, not a specification for the front door. Ask for a dimensioned elevation of your assembly that clearly shows every glass-dividing line, visible face and the positions of the handle and lock area.
Plan the complete opening
Coordinate façade, canopy and interior
A front door is used close up but seen from further away as part of the house elevation. Include façade colour, plinth, roof overhang, canopy and exterior light in your choice. A dark door leaf beside extensive glazing can form a clear focal point; a light door leaf can make a wide assembly appear lighter. The deciding factor is not a general colour rule, but the contrast with walls, window frames and shadowed areas. Create a material board from photographs or samples and view it in daylight. Consider seasonal changes too: planting, wet paths and low sun can noticeably alter the impression of the entrance.
Inside, the assembly should suit the hall without requiring both sides to look identical. Check the locations of the coat cupboard, shoe storage, mirror, switches and lights. A fanlight can visually lift the ceiling, while a sidelight draws more attention to the area beside the door. A wall intended for tall cupboards may benefit more from light above than from side glazing. Conversely, a strip of side light can make a narrow hall more welcoming. Also decide which side of the assembly visitors see first when approaching from the street. This sequence helps position the house number, doorbell and handle so the entrance is easy to understand without searching.
Let the architecture determine special shapes
Not every tall or unusual wall opening needs a rectangular standard grid. In gables, along sloping rooflines or within arched existing openings, a special shape can reflect the available geometry. The starting point should always be the architecture, not the desire for a striking detail. For sloping openings, measure several heights and angles, and have the feasibility of integrating the shape into the existing construction assessed. An inaccurately transferred angle or incorrect reference height is immediately noticeable in glazing. A measurement survey by a suitable professional is therefore especially important before a special shape is ordered definitively.
For a sloping or triangular area, consider fixed-glazed triangular and angled windows as an option. They are alternatives for fixed-glazed façade panels, not an automatic component of every front-door assembly. Above a straight door section with a curved opening, a fixed-glazed semicircular window can serve as a shape reference. In either case, ask to see the divisions with the door and sidelight in the overall elevation. A special shape succeeds when it follows an existing line; without that relationship, it can look like an added decoration. Ask specifically about the required existing dimensions, drawings of connection areas and coordination with installation planning.
Secure the order with a complete measurement list
A useful enquiry needs more than width and height. Record the overall assembly dimensions; dimensions of the door, sidelight and fanlight; the desired internal and external views; opening direction; hinge side; handle side; positions of division joints; intended floor levels; and the wall or façade plane. Add photographs of the opening from both sides and a sketch showing adjacent building elements. State expressly whether dimensions are structural, opening or finished dimensions. If the information is still provisional, make that clear rather than presenting it as final order dimensions. Especially in renovations, uneven reveals, existing finishes and concealed connections may only become apparent during an accurate survey.
Alongside dimensions, the order needs decisions about finishes, glass appearance, glazing bars, hardware and accessories. State for each item whether it is fixed or still open. One useful clarifying question is: “How will the division between the door and sidelight appear in the exterior elevation, and what dimensions are required?” Questions about the sequence of measuring, approval and installation are equally worthwhile. Before ordering, check with the relevant council whether building or resource consent is required and which Building Code requirements apply to the actual work. Bloomcabin offers a five-year commercial warranty for windows and doors, subject to its terms. This does not replace any statutory consumer remedies that apply to the purchase. Delivery is stated as four to six weeks, subject to order confirmation. Schedule floor work, plastering, façade work and installation only after the order has been confirmed, and coordinate the interfaces with the relevant trades.
Move from concept to a confident decision
Compare options against the same criteria, not only from a front elevation. A useful comparison table lists for each option: passage width and opening direction, the light path into the hall, views in from outside, division lines, relationship to the façade, and effects on the coat area and connections. This shows whether a wider sidelight provides real practical value or simply a different look. It can help to select two designs: a restrained assembly with one clear light panel and a more highly glazed version with a fanlight. Assess both using house photographs and a floor plan of the hall. Decide on colours and finer details only once the fundamental arrangement is convincing.
Where other façade openings are planned beside the entrance door, keep the entrance assembly coordinated with them. A fixed-glazed round window can, for example, be an independent design feature elsewhere on the façade, but its shape should not compete accidentally with the rectangular door assembly. If needed, an architect or qualified professional can prepare an overall elevation and check the connection situation for the particular building. For your own decision, a final check is often enough: is the entrance easy to understand by day? Does the hall remain private enough? Does using the door work in everyday situations? Are all dimensions and views clearly recorded in writing? Once these questions are answered, the configuration is ready to order.
Frequently asked questions
Is a sidelight or fanlight better for a dark hall?
That depends on the opening and the room. A sidelight brings light into the entrance from the side, while a fanlight uses height without adding width. Check where dark areas lie in the hall and how much outside visibility is acceptable. A scale internal elevation makes the difference easier to judge.
Can a sidelight sit on both sides of the front door?
A sidelight on each side changes the width, symmetry and the role of the door within the façade. Whether this arrangement fits your existing opening needs to be established from the site survey. Draw the door leaf and both panels with every division dimension, then assess the exterior effect and the internal light distribution.
How can I avoid misunderstandings about opening direction?
Specify the view from which the hinge side and opening direction are described, and add a sketch with a swing arrow. Draw in obstacles such as steps, a coat cupboard and other doors. Do not rely only on the words left or right, because they can be understood differently without a stated viewpoint.
Are glazing bars useful in sidelights and fanlights?
Glazing bars can echo lines from existing windows or divide a wide glass panel. However, they also make the assembly appear more detailed. Distinguish decorative bars from glass-dividing bars and ask to see both elevations. Choose the division for its relationship to the façade, not as an added isolated feature.
When should final dimensions for the entrance assembly be set?
Final dimensions should be set only after the opening, floor levels, façade plane and connection situation have been clarified. In a renovation, irregularities in the existing construction can be decisive. Coordinate the timing of the site survey with the qualified installer and check all elevations, divisions and opening details in writing before approval.
Next steps
A front door with sidelights and a fanlight is most convincing when it makes the entrance not only brighter, but also clearer and more practical for everyday use. Start with the overall opening and the routes in front of and behind the door. Then decide which panel should provide light, privacy or height. A simple scale sketch, façade photographs and a complete measurement list create a sound basis for a quotation and site survey. Coordinate special shapes, connections and installation planning early with the responsible professionals. This turns an attractive idea into an entrance assembly suited to the architecture and daily use.
