
Attaching a Pergola to a Wall With Exterior Insulation
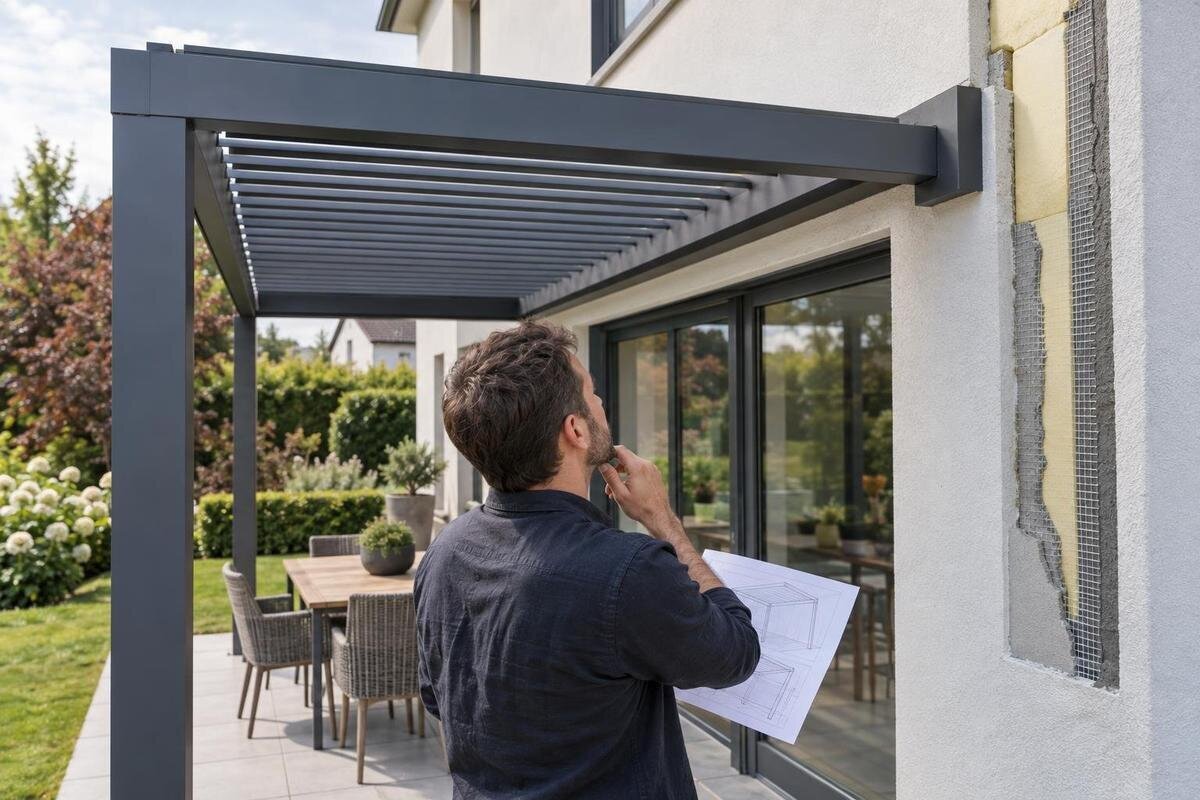
Pergola installation guide
Attaching a pergola to an exterior-insulated wall is not simply a matter of choosing a longer fastener and drilling through the finish. The insulation and cladding sit outside the structural wall, so the connection must bridge those layers without relying on soft materials to carry the pergola. The right detail depends on what the wall is made of, how its water-control layers are arranged, and how the selected pergola is designed to be supported. Before installation begins, identify the substrate, obtain the applicable model information, and have the proposed connection assessed for the actual wall assembly. This guide explains what to document and which questions to resolve before attachment work starts.

How exterior insulation changes the wall connection
An externally insulated wall is not a single solid surface. Depending on its original construction and later renovations, the exterior may have an exterior insulation and finish system (EIFS), insulation beneath siding or other cladding, a drained cavity, or several layers over framing, masonry, concrete, or another structural assembly. Stucco, siding, trim, and insulation describe exterior layers; they do not, by themselves, identify the part that can carry a pergola connection. Insulation is intended to limit heat flow, not automatically to serve as structural anchorage. Unless a documented system specifically establishes otherwise, the finish and insulation should not be treated as the load-bearing part of an attachment.
A designed connection transfers forces from the pergola into a suitable part of the building structure while crossing the exterior layers. The distance between the outer face and that structure matters: the connection has to account for its offset and transfer forces without relying on soft layers to hold a bracket in place. The wall assembly also needs to remain protected against weather. A generic attachment detail cannot address all these conditions. Until the pergola, supporting wall, and intervening layers are identified, drilling through the exterior only creates an opening; it does not show that the connection is structurally sound or compatible with the wall’s weather protection.
Identify the structural substrate behind the finish
The structure intended to receive the connection might be wood or steel framing with sheathing, masonry, concrete, or a combination of materials. On a framed wall, the framing locations and the structural role of the sheathing matter. On masonry, the type and condition of the units, and whether an outer layer is veneer or structural backing, need to be understood. Siding, stucco, trim, and insulation may cover those parts without revealing them. A visible board or panel is not automatically suitable backing just because it feels firm, and walls that look alike can have different construction behind the finish.
Original plans, renovation records, and documents for the wall system can help identify likely construction, but they may not reflect later repairs or changes. Have a qualified professional confirm what is actually present and decide whether further investigation is needed. When requesting pergola information, name the model precisely—for example, the Bloomcabin Lean-To Pergola listing—and keep that separate from verifying the house. A product name helps identify what is being considered; it does not establish that the wall has suitable backing or that a connection detail for one wall assembly will fit another.
Document the full wall assembly
Record the known layers from the exterior surface back to the structural substrate. Relevant details can include the finish or cladding type, insulation type and thickness if known, any drainage space, sheathing, and the underlying structure. Note how each detail was confirmed and mark estimates or unknowns clearly. For example, distinguish a thickness shown on renovation drawings from one verified during a professional inspection. Keep document dates and identify the part of the house they describe. The proposed attachment location matters too: a wall can include different construction around openings, additions, or transitions. A marked elevation or photograph can help relate the records to the intended connection area without implying that a photograph reveals concealed construction. A useful record gives the designer more than a single insulation measurement; it describes the layers the connection must cross and where it is intended to meet the structure.
Also note known repairs, changes to the façade, and visible conditions that may need professional assessment. Identify where the wall’s water-resistive barrier, drainage paths, and flashing details are documented, since a connection can interact with those layers. Do not fill gaps in the record by assuming a typical wall detail applies to this house. If records conflict with observed conditions, or the layers cannot be verified, list that as an unresolved item. The professional assessing the project can then decide what additional evidence is needed before a connection detail is selected.
Match pergola support details to the design loads
A pergola connection may be subject to more than downward weight. The design needs to account for the product’s own weight and applicable forces from the site, which can include wind uplift and lateral force and, where relevant to the product and location, snow. The required design information cannot be inferred from a product photo or from a pergola that looks similar. Nor should you assume that a particular roof or support arrangement has a particular capacity. The model’s current technical information and a site-specific assessment need to establish what forces the connection and the rest of the support system must address.
The wall connection may work together with ground posts, but the intended load path and the role of each support must come from the design. If the Bloomcabin Pergola product page is the model under consideration, request the support drawings and design information for the proposed configuration. Ask the structural professional to identify the information needed to assess the forces at the wall attachment and other supports. Overall product dimensions alone do not answer that question. Any planned accessories or changes to the pergola should also be disclosed so the professional can determine whether they affect the assessment. The relevant drawings should clarify which parts connect to the wall, where other supports are intended to sit, and which building or ground structures receive the forces.

Account for the bracket’s distance from the wall
Insulation creates a stand-off between the exterior face and the structural wall. A pergola bracket connected back to the structure therefore sits away from its supporting substrate, and the connection has to be designed for that offset. If pressure at the bracket is transferred into the insulation, the material may be compressed or the finish may be damaged. The connection also needs to transfer forces appropriately to the structure behind the insulation. Simply choosing a longer fastener does not resolve those questions: reach alone says nothing about suitable backing, bracket support, or the condition of the wall layers.
The connection drawings should specify the components and geometry needed for the actual wall assembly, including how the stand-off is handled and how the bracket is supported. Do not substitute a convenient spacer or assume that a detail for a different insulation thickness will work. The design may also need to address thermal continuity as well as structural support. For the Bloomcabin Bioclimatic Aluminum Pergola listing, request the applicable connection information and provide the documented distance to the structural substrate. Ask how the proposed detail accommodates the exterior layers and whether any special components require separate sourcing. If the assembly is outside the conditions covered by the available detail, that needs design review rather than an improvised extension of the fasteners. Clarifying component availability at this stage also helps avoid substitutions during installation.
Protect the wall’s water-management layers
Exterior walls rely on layers and details that manage rainwater. A connection through siding, render, or other cladding may also intersect a water-resistive barrier, drainage space, or flashing. Its location and treatment need to work with the wall’s water-management approach and must not obstruct a drainage path. An exterior bead of sealant is not, by itself, evidence that concealed layers are protected. Poorly coordinated penetrations can create a route for water behind the cladding, so the relevant detail needs to be resolved before work begins.
Ask who is responsible for specifying the interface between the pergola connection and the wall system, including any required flashing, sealing, or repair of exterior layers. That may involve coordination between the pergola provider, the structural professional, and someone familiar with the wall assembly. When requesting connection guidance for the Lean-To Pergola model, include the known exterior layers and ask which details apply to that specific construction. Establish who will restore any disturbed finish and who will inspect the completed interface before concealed work is covered. If the wall has a documented maintenance plan or warranty, ask its provider whether the proposed work affects those terms; do not assume coverage either continues or ends. A pergola drawing and a wall-system detail need to describe a compatible connection, with responsibility for the work clearly assigned.
Coordinate wall attachment, posts, and foundations
The wall connection is one part of the pergola’s overall support system. Where the approved design includes ground posts, their locations and foundations may work together with the wall attachment to carry forces. Do not assume that the wall carries most of the load, or that posts carry all of it, without drawings showing the intended arrangement. The design should make clear where each support transfers forces. An existing patio, deck, or finished surface also cannot be assumed to provide suitable support simply because it is convenient to build on; its structure and condition need separate consideration.
Post positions can affect the planned wall connection and the usable space around doors, windows, and drainage features. Resolve those locations together rather than treating the wall bracket as an isolated detail. For a proposal involving the Bloomcabin Pergola model listing, have the project drawings show support positions in relation to the house and finished terrace. Include door swings, window operation, steps, and access to wall-mounted equipment where relevant. These dimensions help reveal conflicts before a support location is finalized; they do not establish structural adequacy. If moving a post would improve access, ask whether that change is permitted by the design instead of assuming supports can be relocated freely. Foundation requirements depend on the site and support arrangement, so an existing patio surface or a standard footing sketch is not enough to confirm the proposed foundation.
What the connection drawings should show
Request drawings and connection information that apply to the exact pergola model and the wall construction at the proposed location. The documentation should identify its assumptions about the substrate and wall layers, the connection components, the stand-off from the structural wall, and the required attachment locations. A section through the wall can show how those components relate to the concealed layers, while an elevation can locate the attachment relative to openings and other features. Ask the designer which views are needed for this project. The documents should distinguish confirmed conditions from items requiring verification and identify the relevant component specifications. Keep the drawing date or revision number with the project records so the installer is not working from an outdated version. A generic diagram showing a bracket against a solid wall may not address an insulated exterior wall with a different assembly.
Have a qualified structural professional assess whether the proposed connection is appropriate for the verified substrate and project conditions. Coordinate any exterior-layer details with someone familiar with the wall system, and make sure the installer receives the same coordinated information. If the selected product is the wall-mounted Bloomcabin Lean-To Pergola, the connection documentation should identify that exact model and the relevant wall condition, rather than simply referring to a generic pergola anchor. If actual construction differs from the documented assumptions, pause and resolve the mismatch before installation.

What a site assessment should confirm
A useful site assessment checks both the proposed connection area and whether it can be accessed for investigation and installation. Provide an overview photograph of the wall, closer views of the intended attachment zone, and records of known repairs or additions. Photos of cracks, staining, damaged finishes, or previous penetrations can help the assessor plan the visit, but they do not diagnose the cause or confirm concealed structural conditions. Note landscaping, narrow passages, roof overhangs, and other obstructions that may limit access. The professional should decide what inspection methods are appropriate and whether any opening of the exterior is necessary. If investigation will disturb the wall, agree in advance on who will protect and restore that area. This makes the assessment more useful than an informal visit that leaves the substrate unknown or creates an unplanned repair.
Ask for a clear record of the assessment findings and the decisions they support. Sharing the Bioclimatic Aluminum Pergola product page helps identify the proposed product; the assessment record should also identify the intended attachment area and the wall evidence reviewed. Separate confirmed conditions, design assumptions, and outstanding questions. Assign each outstanding question to the person or provider responsible for resolving it, such as the structural professional, wall-system specialist, or pergola supplier. Record whether the next requirement is additional investigation, revised drawings, or a repair assessment. This avoids treating a preliminary visit as final approval and gives everyone a common basis for the installation plan. If the assessment excludes part of the wall or another support location, make that limitation explicit rather than extending its conclusions to the whole project.
When to pause or revise the support plan
Pause the attachment plan if the structural substrate is unknown, the available drawings describe a different wall, or the proposed connection relies on the insulation or finish to support the pergola. The same applies if no one has addressed how the connection interacts with the wall’s water-control layers, or if the observed façade condition raises questions that have not been assessed. These are reasons to obtain more information, not to compensate by choosing a longer fixing or changing the connection position on site without design review.
If a suitable wall connection cannot be confirmed, ask whether the design can be revised or whether another support arrangement is documented for the exact product. An independently supported option still needs an appropriate site-specific support plan; it is not automatically suitable simply because it avoids a wall attachment. If you are comparing another model, use the Bloomcabin Pergola listing to request information about its permitted configurations, not as evidence that it can stand independently. Compare alternatives by the work each would require, including foundations, clearance from the house, access for maintenance, and any remaining wall-interface details. Ask for a revised scope that includes design work, investigation, and exterior repairs where needed, rather than comparing only the pergola purchase. Keep any change to the support arrangement within the model documentation and professional review.
Frequently asked questions
Can a pergola be attached through EIFS or stucco?
Possibly, but not by relying on the finish or insulation to hold the connection. Stucco alone does not identify the wall assembly or establish whether exterior insulation is present. A suitable design must transfer forces to verified structural backing, account for the distance across the exterior layers, and protect the wall’s weather-management details. Whether that is feasible depends on the actual wall and pergola.
How can I find out what is behind the insulation?
Start with original plans, renovation records, and documents for the exterior wall system, then have a qualified professional assess whether they match the house as built. Surface appearance alone is not reliable evidence. If more investigation is needed, the professional should determine what is appropriate.
Is a longer fastener enough to reach the structure?
No. Length alone does not confirm that a fastener reaches suitable backing or that the bracket is supported correctly across the insulation. The connection also needs an appropriate stand-off and a compatible way to protect the wall layers. Follow a design for the actual assembly rather than choosing a fastener by reach.
Does the wall carry all of the pergola’s weight?
Not necessarily. The support arrangement depends on the specific pergola design. Where posts are part of the approved configuration, they may form part of the load path, but their role and the wall connection need to be shown in the design. Do not assume how the loads are shared from appearance alone.
Who should review the connection?
Ask the pergola manufacturer for the applicable model information and connection drawings. A qualified structural engineer or design professional should assess whether the proposed connection suits the verified wall structure and site. A building-envelope professional or the wall-system provider can help resolve how the connection interacts with the exterior layers.
With exterior insulation, the finish can hide the very layer that needs to receive the pergola connection. Treat the project as a coordinated design for one specific pergola and one documented wall assembly: verify the substrate, resolve the bracket’s stand-off, and protect the wall’s water-management details. Use drawings that match the actual conditions, and pause if an assumption cannot be confirmed. The result should be a documented connection between the pergola and the building structure, with the exterior layers properly accounted for.
