
Can Pergola Rainwater Be Collected in a Garden Tank?
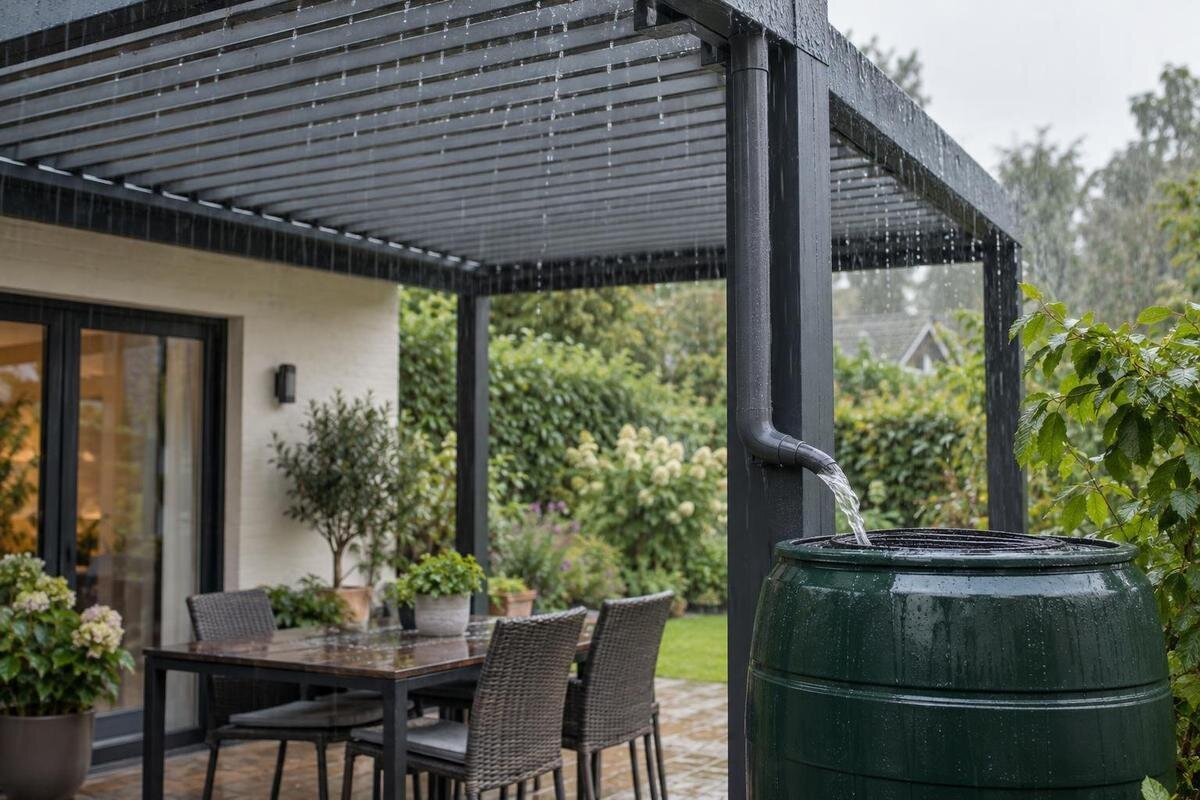
Pergola rainwater collection
A garden tank can collect rainwater from a pergola, but only when the roof has a defined drainage path that can be connected without compromising its intended operation. Roof configuration, outlet location, tank capacity, and overflow destination all matter. This guide explains what to confirm before buying a tank or adapting a pergola outlet—and why collected water should be matched to a suitable use.

Can pergola rainwater go into a garden tank?
Yes, in principle: the roof must catch rain and direct it to an outlet that can be connected to the tank. A pergola frame by itself is not a catchment. Open slats, retractable shade, and other roof arrangements can let rain pass through or shed it at the edges rather than into a controlled drain. For a louvered roof, confirm which position is intended for rainfall and where water exits in that position. A model name alone, including Bloomcabin Bioclimatic Aluminum Pergola, does not establish the outlet layout, required connection, or rain performance.
Water collection and weather protection are separate questions. A channel may guide runoff toward a tank while wind-driven rain still reaches the area below; adding a tank does not make a pergola watertight. Read the exact model’s drainage diagram and operating instructions for channel and outlet locations, plus any stated conditions or observations. Confirm whether collection depends on a particular roof position and whether the proposed connection is approved. Do not assume every configuration captures every drop or drill into a frame to create an outlet without an approved detail.
Estimate the roof’s rainwater yield
Start with the projected catchment area: the horizontal area over which rain falls, not the patio area beneath the pergola. As a rough conversion, each inch of rain on one square foot represents about 0.623 gallons before losses. Multiply the catchment area in square feet by rainfall in inches and by 0.623. For example, a 200-square-foot catchment receiving one inch of rain has a theoretical input of about 125 gallons. Treat this as a planning estimate, not a promise of how much water will reach a tank.
Actual recovery varies because some rain misses the collecting surface, remains on it, or leaves by another route; screens and diverters can also send water elsewhere. Use local rainfall records to understand both individual storms and seasonal supply, then check how much empty tank capacity will be available when rain arrives. For the Bloomcabin Pergola model, obtain the model-specific roof plan or measure the projected catchment area. Do not assume a floor footprint, listed area, or catalog image establishes how much roof feeds an outlet. If only one of several outlets will feed the tank, the estimate should reflect the area draining to that outlet, not the entire roof. Annual rainfall totals can help estimate long-term supply, but they do not size storage for an individual storm. Monthly patterns are also useful: a wet season may provide plenty of runoff when the garden needs little irrigation, while a dry season may leave the tank empty when demand is greatest.
Check whether the outlet can connect to a tank
Compatibility begins at the roof. Find out whether runoff enters an integrated channel, a separate gutter, or an open edge, and identify every discharge point. The drainage drawing should show outlet locations, direction, and any specified dimensions or matching components. For a configuration such as Bloomcabin Lean-To Pergola, ask for the drawing for the exact model rather than assuming a downspout or barrel adapter is included. Product photos may show a finished space without revealing how the roof drains.
Compare the outlet details with the tank’s inlet and the connector you plan to use. Check whether one tank can receive the intended outlets, whether separate lines are needed, and whether the connection leaves the pergola drain unobstructed. Do not cap a secondary outlet or improvise an adapter that narrows the flow path. If making the connection would change a gutter, channel, frame, or wall attachment, get manufacturer-approved instructions or advice from a qualified installer before altering it.
Plan the route from pergola outlet to tank
Draw the route from each outlet to the proposed tank, noting distance, turns, elevation changes, and obstacles. A gravity-fed line generally needs a continuous downward path; the required slope and pipe diameter should come from the pergola and tank instructions rather than guesswork. Compare the outlet height with the tank’s inlet height, not just the top of the tank. A tank that fits beside the pergola may still have an inlet too high for the proposed connection. Include any inlet screen or diverter in this comparison because it may change the space needed between the outlet and tank. A route with a rise, dip, or tight squeeze around a railing may slow flow or hold water. If the site cannot accommodate the specified route, ask a qualified installer about a compatible alternative. Do not assume a flexible hose solves an elevation problem simply because it reaches both connection points.
With a wall-mounted configuration such as the wall-mounted Bloomcabin option, verify the actual discharge side before placing a tank against a wall or beneath an assumed downspout. Plan around doors, steps, walkways, and gates so a pipe does not create a trip hazard or get damaged in normal use. Keep joints accessible for inspection and route leaks away from places where water could collect against a building or under paving. If the only possible route requires an unapproved change, pause and resolve that issue before buying fittings.

Match tank capacity to rainfall and use
Choose tank capacity by considering both event inflow and how quickly you will use stored water. Compare the estimated rain from a storm with the tank’s empty space when that storm arrives. A tank that holds enough for one round of garden watering may already be full before the next shower; when there is no storage space left, more runoff must go to overflow. A larger tank cannot fix a restricted outlet or a roof that sends water somewhere else. When evaluating the regular Bloomcabin pergola, establish its actual catchment and drainage path before estimating tank volume.
Think about how often you expect to use the water between rain events and whether demand changes through the year. Record how many watering cans you typically fill or how much water your intended irrigation method uses; this gives you a more useful demand estimate than garden size alone. Compare that demand with the tank’s usable storage, which may differ from its nominal capacity if some water remains below the outlet. Also check whether the outlet position will let you fill a watering can comfortably. A pump or connection to irrigation equipment introduces separate compatibility requirements that should be considered before choosing the tank. If stored water is rarely used, buying more capacity may simply leave more water sitting in storage. Also account for the tank’s location and base. A full tank is much heavier than an empty one, so follow the tank manufacturer’s support requirements and ask a qualified professional if the supporting surface is uncertain. Do not assume a pergola post or deck is designed to carry the tank.
Plan a safe overflow route
Overflow is part of the collection system, not an afterthought. Use the tank’s specified overflow fitting and plan where the water will go once the tank is full. The discharge should not leave persistent ponding beside a foundation, wash across a walkway, or flow into a place where it could cause a problem. Check site conditions and any relevant local stormwater guidance rather than assuming that a loose hose or an outlet at ground level is suitable.
Keep the tank overflow and the pergola outlet in view as separate parts of the plan. When considering Bloomcabin’s regular pergola, request the drainage details for the exact configuration so an installer can assess the proposed connection alongside the tank’s overflow requirements. A tank overflow handles water that has entered a full tank; it cannot solve a blockage upstream that prevents water from entering. Ask how the proposed system will let runoff continue draining if the tank inlet or connecting line is obstructed, and whether an approved bypass arrangement is needed. The answer should not depend on someone disconnecting a hose during a storm. Have the tank manufacturer or a qualified installer assess any uncertain capacity or discharge destination. Leave the overflow outlet accessible for inspection, and consider whether planting, stored garden equipment, or a kinked hose could obstruct its discharge after installation.
Choose a suitable use for collected water
Treat roof runoff as nonpotable unless treatment and testing support another use under applicable public-health guidance. Water can pick up dust, droppings, pollen, and other debris on its way to the tank. The roof surface and any coatings or treatments may also be relevant, so verify the exact product information and intended-use guidance for the surfaces in your setup. For a model such as the bioclimatic Bloomcabin model, the name alone does not establish what the collected water is suitable for.
For garden use, decide where the water will be applied and whether it could contact edible portions of crops. Consult local extension or public-health guidance for advice on edible-crop irrigation and application methods; do not treat clear-looking water as proof of suitability. Keep a tank clearly identified as nonpotable and do not connect it to drinking-water plumbing as a do-it-yourself shortcut. Any connection to building plumbing needs a qualified professional to address treatment and the applicable connection requirements.
Account for screens, first-flush devices, and access
A coarse screen can keep leaves and larger debris out of a tank, but it is not a water-treatment system. A first-flush diverter sends an initial portion of runoff elsewhere before later flow enters storage; it can reduce the volume collected and does not make the water potable. Whether that device or another filter suits the setup depends on the roof, debris exposure, and manufacturer guidance. For the lean-to pergola option, ask which collection or filtering details are approved for the exact configuration rather than assuming a screen or diverter is included.
Place screens and filters where they can be inspected and cleared without blocking the pergola’s designed outlet. A covered tank with screened openings can help keep debris and insects out, but it still needs practical access for inspection and cleaning. Check that the inlet, filter, tank outlet, and overflow remain reachable after the tank is in position. Allow room to remove a screen or filter element, rather than checking only whether you can see it. If a first-flush device is used, confirm where its diverted water goes and how it is emptied or reset under its instructions. That discharge needs a suitable destination just as tank overflow does. Ask how sediment is removed from the tank and how cleaning water will be handled without entering the pergola drain. These access needs may rule out a narrow gap that otherwise seems like a convenient place to hide the tank.

Check how weather and roof position affect collection
The amount and direction of runoff can change with roof position and weather. A louvered or movable roof may have a specific position for rain, while an open arrangement may let water pass through rather than send it to a tank. Wind-driven rain can also behave differently from a controlled observation in calm conditions. Review the model-specific drainage information and operating instructions for the conditions they describe; do not treat a normal shower or a product image as proof of performance in every storm.
Tank volume is not the same as roof-drain capacity. During heavy rain, an outlet, connector, or tank inlet may become the limiting part of the route even when the tank has room. Ask whether the manufacturer provides relevant drainage diagrams or controlled observations, and what operating position is required. Follow the instructions for adjusting the roof in changing weather rather than holding it in an unapproved position. If capacity or intended operation is not documented, do not infer a storm guarantee from the fact that water reaches the tank in lighter rain.
Questions to resolve before buying or installing
Ask for information that matches the exact pergola model and configuration: a drainage drawing, the number and location of outlets, specified connection dimensions, and the roof position intended for rain. Also ask whether the proposed tank connection or any required change is approved. For the tank, confirm inlet compatibility, overflow fittings, maintenance access, and any use restrictions. A clear answer to each question is more useful than a general statement that the pergola is designed for outdoor use.
Before installation, put the agreed details in one simple plan showing the selected tank, connection parts, overflow destination, and intended water use. Keep the pergola and tank instructions together so future maintenance does not depend on remembering how the system was assembled. After installation, ask the installer to explain how to recognize normal flow, where excess water should discharge, and which components need routine attention. During ordinary rain, observations from a safe, accessible location can help reveal leaks, unexpected discharge points, or water missing the inlet. Record the roof position and whether the tank was already full so those observations have useful context. They are not proof of storm capacity or a reason to climb onto the structure during rain. If no compatible collection outlet is available, choose a different catchment rather than forcing a connection. A workable alternative is better than a tank whose installation compromises the pergola’s drainage.
Frequently asked questions
Can I connect a garden tank directly to a pergola drain?
Only if the pergola outlet and tank inlet are compatible and the connection leaves the designed drainage path unobstructed. Check the model-specific drainage drawing for outlet locations and specified connection parts, then compare them with the tank’s inlet. If the route requires a new opening, a modified gutter, or a different outlet arrangement, get manufacturer-approved guidance or ask a qualified installer before making changes.
How much rainwater can a pergola collect from one inch of rain?
As a theoretical estimate, multiply the roof’s projected catchment area in square feet by the rainfall depth in inches and by 0.623. For example, 200 square feet receiving one inch of rain represents about 125 gallons before losses. The amount reaching a tank will usually be lower or may vary, so account for the actual drainage route, roof configuration, filters, and how much empty tank space is available.
Will a louvered pergola collect rain when the louvers are open?
There is no universal answer. The roof position can change where water goes, and a position intended for shade or ventilation may not route rain to the same outlets as a rain-ready position. Check the operating instructions and drainage diagram for the exact model. Do not assume a closed-looking roof is watertight or that every louver position will direct runoff into a tank.
Is pergola rainwater safe to drink or use on vegetables?
Treat roof runoff as nonpotable unless a suitable treatment and testing plan supports the intended use under applicable public-health guidance. Dust, droppings, and other debris can enter collected water, and roof-surface details may matter. If water could contact edible portions of crops, consult local extension or public-health guidance about the water source and application method. Keep the system separate from potable plumbing unless a qualified professional designs an appropriate connection.
What should happen when the rain tank is full?
Incoming water needs a planned overflow route that follows the tank manufacturer’s instructions and suits the site. Direct overflow so it does not pond near a foundation, create a slippery walkway, or flow somewhere it should not. Check local stormwater guidance where relevant. Keep the overflow clear and consider what happens if an inlet screen or connecting line becomes blocked; a full tank should not force water back into the pergola’s drainage system.
A pergola rainwater setup is more than a tank placed beneath a roof edge. It works when rain can be captured, routed through a compatible outlet, stored with room for the next event, and safely directed elsewhere when the tank fills. Start with the model-specific drainage information and trace the complete route through the yard. That makes it easier to tell whether a tank fits the pergola and intended use, or whether another collection point is the better choice.
