
Matching a Pergola to a Traditional Brick House
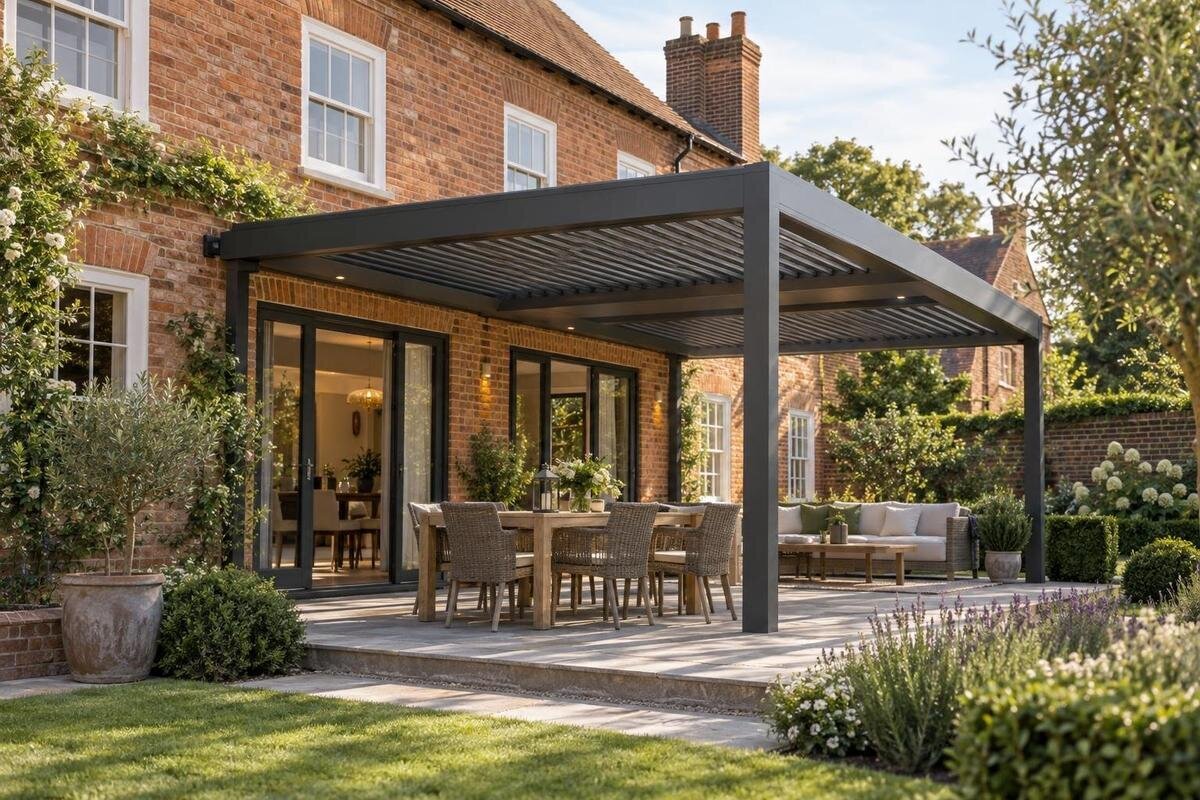
Pergola design
On a traditional brick house, a pergola can feel at home without copying the brickwork or its trim. The strongest matches usually come from scale, alignment, profile, and the way the structure meets the patio and wall; color is only one part of the composition. This guide develops a hypothetical rear-elevation concept, then shows how to test its proportions, materials, and junctions on a dimensioned landscape drawing.

Read the brick facade before sizing the pergola
Brick already supplies a strong visual rhythm: horizontal courses, mortar joints, window heads, sills, and corners set up lines across a facade. Traditional brick houses differ in their openings, trim, roof shapes, and additions, so read the actual elevation instead of relying on a style label. Note the width and spacing of doors and windows, where the wall steps in or out, how the eaves meet the brick, and whether the pergola will be seen against more than one wall. Photograph the patio and rear wall from nearby and from farther into the garden. Those views show whether a proposed frame relates to one opening group or tries to span the entire house.
Before choosing a color, make a simple elevation sketch and mark the door and window centerlines, roof edge, trim, and patio boundary. Select one or two relationships for the pergola to echo: its width might relate to a group of openings, while a restrained beam profile allows the brick’s texture to remain prominent. If an addition or porch changes the outline, include it rather than drawing only the original-looking wall. Copying every arch, bracket, or molding can make the new structure feel like a replica rather than a garden element. A good visual match keeps the house recognizable and gives the pergola its own clear outline; it does not require a claim to historical accuracy.
A worked concept for a brick rear elevation
Consider a hypothetical rear wall 24 feet wide, with a central double door, a window on either side, and a rectangular patio. For the first sketch, draw a pergola footprint 16 feet wide and 12 feet deep, centered on the door. These are illustrative design dimensions, not specifications for a catalog model or recommended structural spans. On the elevation, that width leaves 4 feet of wall visible at each end; on the plan, the depth establishes a space to test with furniture. Draw the door’s actual movement, steps, and a route to the lawn. If posts or chairs interfere with that route, shift the frame or revise its size rather than preserving symmetry at the expense of use.
In this concept, use a simple rectangular frame, retain a visible strip of brick above it, and repeat one existing trim color rather than copying decorative window details. Draw the posts, furniture, and patio border together so their relationships are visible. Compare this version with a narrower frame: does it still contain the seating area, and does it better frame the door? The Bloomcabin Pergola listing gives an area range of 97–258 square feet, which provides a starting point for a size shortlist. The illustrative 192-square-foot footprint falls within that range, but that does not establish an available 16-by-12-foot configuration. Match the concept to an actual listed width and depth before developing the drawing.
Relate width and height to doors and windows
Width should be tested against more than the brick wall’s total length. Measure the opening or opening group the pergola is meant to frame, the usable patio, and the paths that must remain clear. Include door swing, steps, railings, and wall-mounted items in the plan, then draw actual post locations rather than only an outer rectangle. A frame that is too narrow can appear detached from the house; one that is too broad can compete with windows and roof geometry. These are visual effects to judge on the drawing, not fixed ratios: a deep patio, a side door, or an uneven rear elevation may lead to a different balance.
Depth and height matter just as much. On the plan, include chairs pulled back from the table, planters, and the route between house and garden; in elevation, compare the upper frame with window heads, eaves, gutters, and any nearby porch roof. Where openings are asymmetric, compare centering on the door group with centering on the patio rather than assuming the facade’s midpoint is right. When reviewing Bloomcabin Bioclimatic Aluminum Pergola, record the outside dimensions, post spacing, and height for the configuration under consideration. Distinguish the overall footprint from the usable space between posts. Two layouts with similar areas can accommodate furniture differently, especially where a dining table must share the space with a path.
Choose materials and profiles for visual balance
Material choice changes how strongly the frame reads against masonry. Brick has a textured, repeated surface; a smooth finish makes a cleaner outline, while pronounced grain or shaped trim adds another layer of texture. Wood, painted surfaces, and metal products each bring different visual qualities, but broad labels alone do not settle the choice: profile, finish, joint lines, and the amount of visible structure matter. A broad beam and thick post carry more visual weight than a narrow profile, even when the finishes are similar. Look at a full elevation and decide whether the frame should quietly recede or make a deliberate contrast.
Draw a post and beam at a consistent scale, including end shapes, visible connectors, and the transition from each post to the patio. Avoid adding decorative features just because the house is traditional; relate them to a specific feature of the house, or keep the frame plain. For the regular Bloomcabin Pergola model, request detail views and material information that let you assess those junctions, not just an overall garden photograph. Compare the apparent width of a post with nearby door trim and brickwork. Review the specified cleaning and finish-care requirements as well: accessible surfaces and a finish you are prepared to maintain belong in the selection, alongside appearance.

Set the pergola’s top line against the house roofline
The house roofline is often the largest line above the patio, but a pergola does not need to imitate its pitch, gables, or cornice. Compare the pergola’s upper edge with the eaves, porch roof, and tops of nearby openings in a side and rear elevation. A nearby porch or projecting bay may set a more useful reference than the main roof’s highest point. A taller or more ornate outline can compete with the house; a low, thin line may disappear against a busy wall. What feels balanced depends on the actual height, distance, and view, so draw more than one option instead of treating one alignment as a rule.
Also show how the overhead members appear from the room, from the yard, and along the patio. Their spacing and depth create a pattern that can complement the brick courses or introduce too many competing lines. When considering the Bloomcabin bioclimatic model, obtain drawings of the proposed configuration so the elevation and underside view show its actual overhead arrangement. Do not sketch a generic open frame if the selected configuration has a different outline. Include any visible projection above or beyond the main frame, since a simplified rectangle can understate its visual weight. Keep the relationship to the house roofline separate from questions about shade or weather protection; those require their own product information and site assessment.
Plan the junction between brick and pergola
The wall junction is a design decision as well as a technical one. A wall-mounted layout can make the pergola read as an extension of the house, while a freestanding frame can leave a visible gap and act as a separate garden space. For either look, show the distance from brick to frame, its alignment with the door or window group, and any nearby trim or eave. A deliberate gap can read as a clean separation when it is clearly drawn; avoid leaving the transition out of the view. Don’t let a beam or post obscure a downspout, vent, window operation, or access point.
Appearance alone cannot establish whether a masonry wall is suitable for an attachment. The visible brick does not reveal the complete wall construction, so have a qualified building professional assess the proposed connection, water-management details, and nearby services. For a Bloomcabin Lean-To Pergola concept, provide that professional with the selected product’s connection requirements and an elevation locating the proposed junction relative to doors, windows, and trim. Resolve the technical detail before treating the wall line as fixed in the design. The resulting drawing should also show any visible connection components, so a technically resolved junction does not become an unexpected interruption in the brick facade.
Use a finish palette drawn from the whole elevation
Build a finish palette from several parts of the setting, not brick color alone. Compare the mortar, window trim, doors, fascia, paving, and existing outdoor furniture. A close tonal match can make the pergola less prominent; a strong contrast makes its outline more noticeable. Neither is automatically better. The useful question is whether the frame should read as a quiet continuation of the trim or as a separate garden element. Include the mortar and patio surface in the comparison, especially if the brick itself has several tones, and limit competing finishes when the house already has several accent colors.
Test a generous sample beside the brick and trim in outdoor light, then view it from the patio, the garden, and through the nearest windows. Sun and shade can change how a finish looks beside mortar and paving, so a small indoor sample may not tell the whole story. Keep the decision tied to the chosen profile: a dark, narrow frame and a pale, broad one will have different visual weight even when both colors seem compatible. For a shortlist that includes Bloomcabin’s bioclimatic pergola, request the available finish information and a sample if one is offered. Record the selected finish in the concept drawing alongside the existing trim color, rather than relying on a screen image.
Coordinate the pergola with paving and planting
A dimensioned landscape plan links the house elevation to the ground. Draw the brick wall, patio edge, pergola footprint and post positions, door approach, seating, paths, garden beds, and changes in paving direction. Show where paving joints or borders meet the proposed posts so the composition can be reviewed before the surface is finalized; a qualified installer or designer can confirm construction details. If the patio is not yet finished, mark its intended edges and transitions on the plan. Include sightlines from the house and garden, not just a top-down outline, to see whether the pergola frames a usable area or leaves circulation awkward.
Treat planting as part of the composition rather than as a way to disguise a poor junction. Note existing plants, expected mature spread, access needed for care, and each new plant’s documented requirements for light, water, spacing, and support. Verify those needs from reliable plant-specific information. Position beds to soften the patio edge without covering a window, blocking a path, or hiding brick details you want to retain. Leave room to reach the posts and wall for maintenance. When comparing sizes on Bloomcabin’s regular pergola product page, transfer the selected configuration’s footprint onto this planting plan. A larger frame may require moving a bed, while a smaller one may leave an awkward strip between the seating area and border.

Choose between a freestanding and wall-mounted layout
Compare what each layout does to the relationship between house and yard. A freestanding pergola can sit over a patio or elsewhere in the garden, creating a separate outline; its position should still relate to a door, path, or garden axis so it does not feel stranded. A wall-mounted option sits closer to the masonry and may visually extend an opening into the patio. That closer relationship makes the wall connection and height relative to windows especially visible. Neither arrangement is inherently more traditional, and neither should be selected on appearance alone.
Draw both arrangements with the same patio, furniture, planting, and viewing points. Compare how the posts frame the opening, how much brick remains visible, and whether the route from the door stays direct. In the freestanding version, draw the house-side posts rather than hiding them behind furniture; they can change the view through a door or window. Use the Bloomcabin Lean-To Pergola listing as the wall-mounted candidate and obtain its configuration drawing for the comparison. Evaluate whether the closer relationship to the house improves the composition enough to favor that layout. If a separate frame better preserves the facade’s proportions, it can still belong to the setting through alignment with the patio and path.
Review the drawing from several viewpoints
Before ordering, put the preferred option into a final plan and elevation with dimensions, rather than relying on a catalog image or a rough patio outline. Check the proposed outside width, depth, height, post locations, and separation from the house against actual site measurements and clearances. A removable outline on the ground can show where posts and edges will fall; a photo overlay can help assess the upper frame. Keep their purposes distinct, since a ground outline cannot demonstrate overhead clearance. Review the result from the room, the patio, and a farther garden viewpoint, looking specifically for interrupted window views, a crowded door approach, or posts that sit awkwardly against the paving pattern.
Keep the decisions in one drawing set: selected profile and finish, relationship to windows and roof edge, wall junction or freestanding gap, paving layout, furniture zone, and documented planting requirements. Ask the relevant qualified professional to resolve structural attachment, support, and site-specific installation questions; style alone cannot establish performance. Check current product dimensions and requirements against the drawings before purchase. If the design still looks balanced in the elevation, plan, and everyday views, the pergola can complement the brick while remaining clearly its own garden structure.
Frequently asked questions
Does a pergola need to match the brick color?
No. A close color match is only one option. Relating the pergola’s width, height, profile, and finish to the openings, trim, and patio often matters more. A deliberate contrast can work too; test a finish sample beside the brick and mortar outdoors.
Should a pergola be attached to a brick house?
Not necessarily. A freestanding layout can create a separate garden space, while a wall-mounted layout can read as an extension of the house. Have a qualified building professional assess the actual wall and proposed connection before choosing an attachment.
How wide should the pergola be?
There is no universal ratio. Compare its proposed width with the door or window group it frames, the usable patio, and the paths that need to stay clear. A dimensioned plan and elevation make those relationships easier to judge.
Which materials suit a traditional brick house?
Several can work, depending on the profile, finish, and visual weight you want. Compare smooth and textured surfaces against the brick, trim, and paving. Check the actual material and finish information for any product rather than relying on its name or a photograph.
Can any brick wall support a wall-mounted pergola?
You cannot tell from appearance alone. Have a qualified building professional assess the house construction and proposed connection, along with nearby openings, services, and water-management details. A stylistic match does not establish that an attachment is suitable.
A pergola that suits a brick house does not need faux-historic trim or a perfect color match. It needs a clear relationship to the openings, a profile that sits comfortably alongside the house, a finish that respects the brick and trim, and an intentional connection—or gap—at the wall. When the elevation and landscape plan show those decisions together, the pergola can feel at home while remaining its own garden structure. That coherence comes from proportion and detail, not styling alone.
