
Can You Install a Pergola Beside a Retaining Wall?
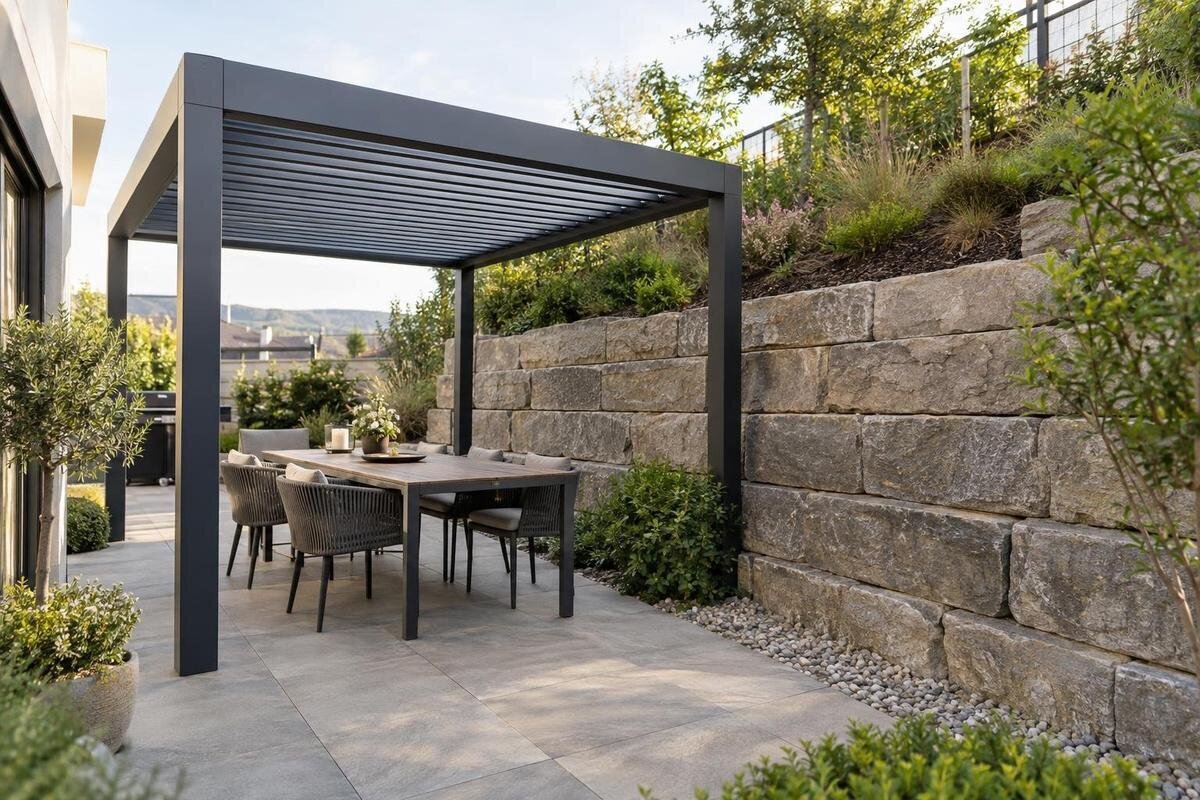
Pergola site planning
Installing a pergola beside a retaining wall can be possible, but the wall turns a routine-looking patio layout into a foundation question. The pergola’s posts, any proposed anchors, the soil retained by the wall, and the wall’s own drainage and footing can influence one another even when the structures do not touch. A visible gap alone does not show whether the wall or nearby ground can accommodate new footings. Before choosing post locations or excavating, gather the wall and pergola information for a site-specific review. The answer depends on the actual wall, soil, and approved pergola anchoring—not on a universal setback.

Can a pergola go beside a retaining wall?
A nearby retaining wall does not automatically rule out a pergola. The word “beside” can mean on the uphill side, downhill side, near a wall end or return, or close to a change in grade; each position relates differently to the wall’s soil and foundation. Retaining walls hold back ground and depend on support around their bases. Pergola posts transfer loads into the ground too, so a post can affect the wall without touching it. Conversely, soil behind the wall may not be a verified base for a pergola footing. The visible gap shows the separation above ground, not the relationship between buried foundations and surrounding soil.
A workable layout generally treats the pergola and wall as separate structures, with pergola loads carried by approved supports and the wall left stable and able to drain. This is a planning principle, not a guarantee that the proposed gap or footing will work: wall construction, footing location, soil, and the exact post arrangement must be assessed together. A qualified professional may accept a location, require a revised post position, or advise moving the structure. Decide before finalizing a fixed layout or excavating. Installing first and asking afterward whether the wall was affected can leave costly work that has to be changed.
How pergola footings interact with the wall
Each pergola post transfers load into the ground through its approved base and footing detail. The design review may also need to account for wind and other site-specific conditions, as well as any roof or cover components included in the selected model. A retaining wall already resists pressure from the soil it holds; nearby loads, changes in ground level, or excavation can alter conditions around it. If a pergola footing is behind the wall, distance alone does not show whether it is outside the area that matters. If it is in front of the wall, the wall’s toe and foundation may still be relevant.
That is why there is no responsible one-size-fits-all setback or footing dimension for a pergola beside a retaining wall. The wall’s height and foundation geometry, site slope, soil, drainage, post positions, and design loads all affect the decision. For a candidate such as the Bloomcabin Pergola, request the model-specific post layout and approved anchoring drawings, then have a professional compare them with actual site information. A catalog name or a patio’s apparent firmness cannot confirm that a footing is adequate or that it will not affect the wall.
What to learn about the retaining wall
Start by identifying the wall’s owner and maintenance contact. It may be yours, shared with a neighbor, maintained by an association, or part of a larger site; the person approving access may not be the person who can evaluate its structure. Ask for plans, engineering details, repair history, drainage records, and notes about earlier movement or changes in grade. These records may show where the foundation and drains are, but don’t fill gaps by guessing. If drawings are unavailable, tell the installer and assessor. Confirm access and responsibility before scheduling work so no one opens or alters the wall area without the appropriate owner’s knowledge.
Walk around the visible wall and record its present condition before new work. Note leaning, bulges, recently opened or widening cracks, separated joints, settlement, washed-out soil, unusual wet patches, or blocked outlets. These observations don’t diagnose a cause or prove the wall is failing, but they give the professional useful context. If movement or damage is apparent, postpone nearby excavation and added loads until the wall is assessed. Photograph the wall and surrounding grade, including both sides if accessible; a single front-facing image may not explain the foundation or drainage conditions that aren’t visible.
How soil conditions and excavation affect the wall
Ground beside a wall may be native soil, placed backfill, compacted fill, or material altered by earlier projects. Surface paving or a firm-looking top layer does not establish what lies at footing depth or how the ground behaves when wet. Prior trenches, poor drainage, erosion, slope, and moisture can all matter. If you are considering the Bloomcabin Bioclimatic Aluminum Pergola, request the model-specific post layout and anchoring information so the reviewer can compare it with actual site conditions. A structural or geotechnical professional can decide whether the available records are enough or whether more investigation is warranted.
Excavation can affect the wall before the pergola is assembled. Digging near or behind a retaining structure may remove supporting material, expose drainage components, or create a temporary condition that is less stable than the finished design. Don’t assume a shallow hole is harmless or that a deeper footing is safer; neither is a universal solution. Have the qualified installer explain the planned excavation and confirm buried utility locations through the appropriate local process before work begins. If the ground, water, or wall differs from the information reviewed, pause and ask the project professional to reassess rather than improvising around an obstruction.

How to map pergola post positions
Put the wall and proposed pergola on a measured site plan rather than estimating the gap by eye. Mark the wall’s ends and returns, visible face and top, grade changes on both sides, existing paving, and each proposed post center. Use the model’s approved layout to show the footprint needed for its supports, but don’t infer footing depth or size from a surface drawing. Include nearby steps, doors, gates, and walking routes, since they can constrain which approved post positions are practical. A clear plan lets the assessor compare proposed bases with wall geometry, drains, and access needs, and can reveal when an apparently open patio has little room for foundations.
Mark visible drainage outlets, cleanouts, utilities, and areas where the wall may need future repair. A post base should not conceal a drain or leave too little room to inspect or service the wall; whether a particular clearance works depends on the site and maintenance needs, not just on the space for walking past. For a proposed regular Bloomcabin pergola, compare the exact post arrangement with measured conditions before choosing a final location. If a standard pattern conflicts with an outlet or wall return, ask whether an alternative is approved for that model. Moving a post on site without design review could change its support or anchoring.
When can a retaining wall serve as an anchor?
Anchors must match the pergola’s approved detail and the actual material receiving them. A paved patio, concrete slab, masonry cap, facing panel, and structural retaining wall are not interchangeable just because each presents a hard surface. A cap may be decorative; the visible facing may not be the structural element; paving may cover a substrate whose thickness or condition is unknown. Drilling or fastening without a designed connection can damage the wall, interfere with drainage, or introduce loads into parts never reviewed for that purpose. Don’t choose generic fasteners or copy another installation’s detail when the substrate and wall construction differ.
Keep “beside the wall” distinct from “supported by the wall.” The name Bloomcabin Lean-To Pergola does not prove that a retaining wall is an approved anchor surface or that it can accept a connection. If the design proposes a wall connection, the assessor needs to identify the structural element receiving it, the connection detail, and the supporting evidence. A retaining-wall cap or face alone is not that evidence. If the approved layout is independent, its posts still need the specified anchoring detail and a verified base; a nearby wall should not quietly become a brace just because the gap is tight.
How drainage and maintenance affect placement
Water management should be considered alongside the footings. Retaining walls may rely on drains, outlets, or free-draining zones to manage water behind them; keep known outlets and inspection points visible and accessible. Don’t route a post, base, planting bed, or surface change through a drainage feature unless the reviewed design addresses it. Where a pergola configuration includes a roof or cover, determine where its runoff will go rather than allowing concentrated discharge against the wall or at its base. Irrigation and patio wash-down can also send water toward the wall, so discuss grading and drainage with the people responsible for both structures.
Think beyond installation day. The wall may need inspection, outlet clearing, repairs, or equipment access later, and a pergola post can make that work harder even if it is structurally acceptable. Check whether a person and tools can reach the area, and note features that must stay accessible. For the bioclimatic aluminum model, request any water-handling details available for your exact configuration. The reviewer needs to know where water leaves the structure and whether that location conflicts with wall drainage or maintenance access. Record the agreed water route on the site plan, including any existing outlets that must remain unobstructed.
What documents should be ready for review?
Give the assessor a useful package: a dimensioned plan of the wall and proposed post centers, the grade on both sides, nearby paving, drainage points, and known utility routes. Include clear photos of the wall’s condition and available construction, repair, or drainage records. For the selected pergola, obtain the model-specific layout and approved anchoring details, plus structural information needed to identify how loads reach the substrate. A sales image, generic product description, or estimate based on the wall face cannot establish hidden footing geometry. The reviewer should be able to match the intended model and actual post positions to the site, not to a drawing for a different configuration.
Ask the professional to identify assumptions, missing information, recommended changes, and documents needed before installation. A structural engineer familiar with retaining structures can assess the wall and proposed load path; a geotechnical professional may be needed if ground behavior is uncertain. The installer should confirm that the model being supplied matches the approved layout and base detail. For the Bloomcabin lean-to model, request information for the exact configuration under consideration rather than assuming related models use the same supports. Check applicable permits and property approvals with the relevant local authority or owner; requirements depend on the location and property.

Who needs to coordinate the installation?
Coordinate wall, site, and pergola responsibilities before anyone starts. The pergola supplier or installer can provide product-specific drawings and explain the proposed support arrangement, but cannot infer the wall’s buried foundation from a catalog page. The wall owner or manager can supply records and arrange access. The professional reviewing the site needs both, and should state whether the wall remains independent, whether any connection is allowed, and what limits apply to excavation or drainage changes. If the installer is not conducting the structural review, identify who will do it; don’t assume a standard installation quote includes an assessment of the retaining wall.
Keep the agreed documents together for the work crew: exact model and configuration, post locations, substrate, approved anchors, excavation plan, drainage provisions, and access limits. Identify the current drawing revision so an earlier layout is not used by mistake. If you select the bioclimatic aluminum pergola, include its matching installation documents in that package. Agree on who can authorize changes and whom the crew should contact if unexpected ground, a drain, or an obstruction is exposed. After installation, retain the final drawings and a record of any approved changes with the wall’s maintenance information. That record helps future contractors understand the arrangement without relying on the original crew’s memory.
When to proceed or revise the plan
Proceed only when the proposed support and location have been reviewed for this wall and this site. The wall’s condition and ownership should be clear, drainage and maintenance access accounted for, and pergola drawings matched to the selected model, post layout, and substrate. The footing arrangement should be based on verified ground information rather than guesses about what lies below paving or behind the wall. Resolve any local permit or property approvals that apply before work starts. Under those conditions, proximity itself is not necessarily a barrier; the question is whether both structures can perform their jobs without one compromising the other.
Revise the plan when the assessment identifies a conflict that cannot be resolved within the proposed layout. Compare alternatives by the work each would require: shifting the whole pergola, selecting a different approved configuration, or choosing another part of the patio. Moving the structure may be more practical than altering a wall or relocating its drainage, but the revised location still needs review. When comparing the regular Bloomcabin pergola with your available space, use its actual layout information to assess each option. Consider whether the alternative preserves usable seating space, circulation, and wall access as well as structural support. If none does, another location is a better outcome than forcing the original plan.
Frequently asked questions
How far should a pergola be from a retaining wall?
There is no universal minimum distance. The right separation depends on the wall’s foundation and geometry, soil, slope, drainage, pergola post positions, and design loads. Have a qualified professional review the actual wall and proposed footing plan; a visible gap alone cannot establish whether the location is suitable.
Can I attach a pergola to the top of a retaining wall?
Only if a project-specific design verifies that the wall’s structural elements and connections can carry the pergola loads. A capstone, facing, or masonry surface does not by itself prove that capacity. Don’t drill or anchor into the wall based on generic hardware advice.
Can I use my existing patio slab for the pergola posts?
Possibly, but first verify the slab’s construction, condition, support, and the approved anchor detail, including how the slab relates to the retaining wall. Pavers or a finished surface alone are not evidence of a suitable structural base. Ask the installer or project professional to review it.
What if I don’t know how the retaining wall was built?
Tell the installer and assessor before choosing a layout. Look for plans and repair records and provide photos, but don’t guess at buried footing geometry or soil conditions. A professional can determine whether the available information is enough or whether further investigation is needed.
Which signs mean I should pause the project?
Recent movement, leaning, bulging, widening cracks, settlement, washed-out soil, or unusual water around the wall warrant a qualified assessment before nearby digging or added loads. These signs aren’t a diagnosis, but they are reasons not to assume the wall’s condition is unchanged.
A retaining wall is more than a boundary beside a pergola: its foundation, retained soil, and drainage can share the space a new footing would affect. The useful answer comes from an approved pergola anchoring layout reviewed against real wall and ground information. When that review confirms support and preserves drainage and access, a nearby installation may be possible. When it cannot, changing the layout or choosing another location is the better design outcome.
