
Build a greenhouse yourself or hire an installer?
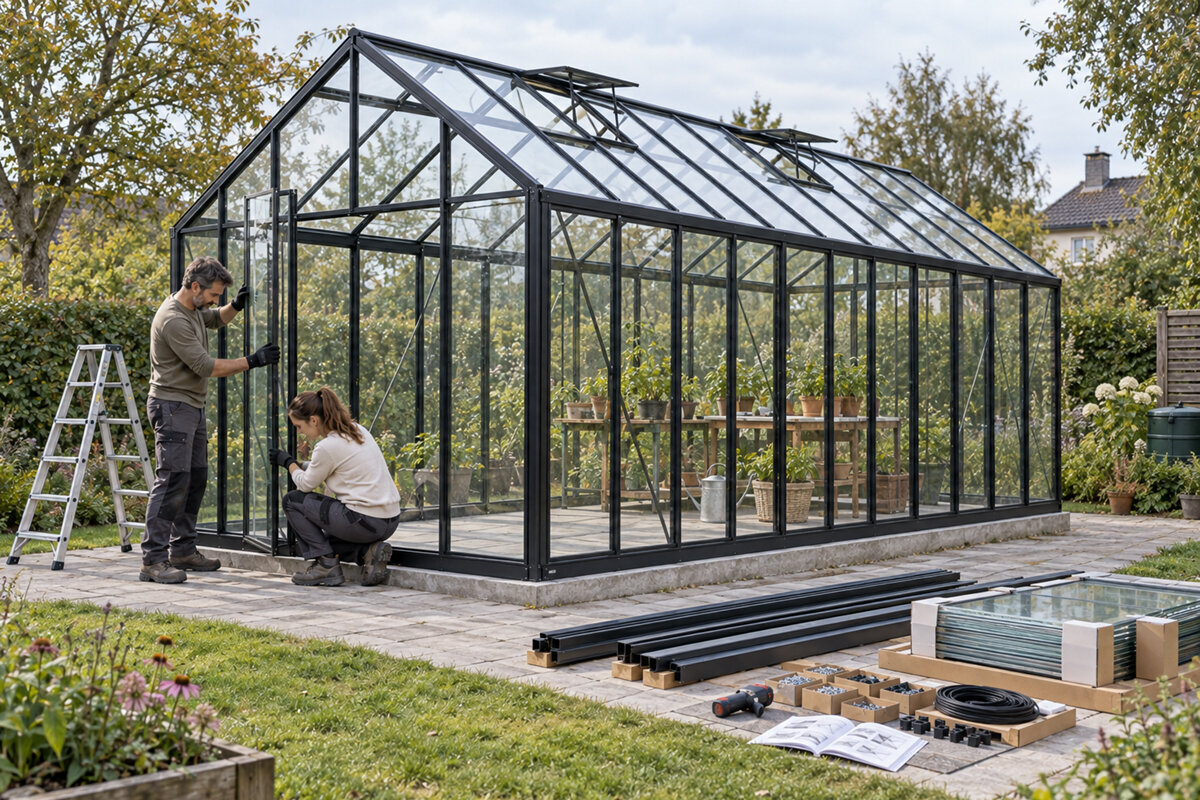
Scale is not the sole deciding factor. Access, ground conditions, available assistance, practical capability and scheduling expectations also count. This comparison shows how those considerations shape a realistic choice between self-assembly and an installer.
Although a greenhouse may look like a straightforward garden job, many linked tasks lie between unpacking and first planting. Foundations, orientation, frames, glazing, doors and sealing each need care. Considering them at the beginning gives you a firmer basis for deciding how the greenhouse should be assembled.
DIY assembly can be very rewarding if you enjoy accurate work, can set aside enough time and arrange assistance. Professional installation can ease the burden where conditions are complex or the project needs to proceed without lengthy interruptions. Neither route is inherently better; the right one suits your property and resources.
Make installation part of greenhouse planning from the outset, not a later add-on. Before purchase, assess garden access, soil conditions, your preferred build date and arrangements for delivery and temporary storage. Seek timely advice from the appropriate authorities about local requirements and insurance matters.
Decision basis · 01
Assess the project scope honestly
Being able to use a screwdriver is not the main test. Consider whether you can control the whole process: interpret the instructions, inspect every component, set out accurately and spot deviations. DIY assembly needs enough uninterrupted time for careful work. Delays caused by weather, employment or missing help can change the project considerably.
An open site generally makes a freestanding greenhouse simpler to organise than a narrow garden, restricted entry or a design with several connections. List who can help lift, where vulnerable parts can stay protected and what tools you already have. This stocktake prevents an economical DIY project from descending into costly improvisation.
Allow for the actual work zone around the structure, rather than measuring only its footprint. Clear routes are needed for sorting, passing and safely manoeuvring profiles and panes. Check whether outdoor furniture, garden beds or fencing will obstruct access while the greenhouse is being assembled.
Make sure the wall can still be reached later for cleaning, upkeep and repairs if required. Thoughtful access planning keeps nearby plants and permanent fixtures from turning routine future work into a difficult task.
- Assess not only your experience, but also time, helpers, tool quality and a dry, orderly workspace.
- Set aside a margin for checking measurements, organising parts and making corrections; none is incidental when assembling a kit.
For an accessible reference point, review the different Classic greenhouses in standard designs by footprint and assembly principle.
Site and connection · 02
Prepare a lean-to greenhouse carefully
A greenhouse placed against a wall adds interfaces beyond the usual assembly work. The wall surface, foundation height and connection area must work together precisely. Check early, particularly where façades are uneven or downpipes are present. Correcting matters later at the frame is no substitute for proper preparation and can make assembly unnecessarily difficult.
How you intend to use the area also affects the choice. Paths, doors, water points or established planting nearby call for a deliberate work order. DIY builders should verify every dimension against the physical site and keep the wall zone clear. Where construction details remain uncertain, obtain suitable advice before work starts rather than attempting corrections midway.
For a lean-to design, give the wall junction the same attention as the main frame. Confirm continued access to the wall, and identify any pipes, windows, services or roof-water systems crossing the proposed position. Resolving these matters first makes the sequence of work easier to plan and follow.
Review drainage around the proposed footprint before concrete or fixings are placed. Ponding water, unstable soil and poorly resolved joins with adjacent paths can add substantial difficulty both during preparation and once the greenhouse is in use.
- Before ordering, check the wall line, clear door areas, rainwater drainage and actual height of the prepared base.
- Record measurements and obstacles in sketches; this helps DIY work and later installation discussions.
For projects against a house wall, regular full-size lean-to greenhouses offer a suitable category for site-specific selection.
Foundation as the key · 03
A reliable base governs the build
Controlled assembly starts with a foundation that is level, load-bearing and dimensionally accurate. It allows profiles to line up, doors to function correctly and glazing to be installed without strain. Because it comes before the visible build, this stage is frequently underestimated in DIY projects. Verify product requirements thoroughly before accepting the prepared area.
Earthworks, drainage and preparation of a suitable base can require separate expertise, depending on the property. When arranging installation, establish whether foundation preparation forms part of the agreed work or is needed beforehand. A temporary DIY base seldom saves time if alignment, remedial work or removing components is required later.
Record what you find during the foundation inspection before construction starts. Sketch the outer dimensions, reference heights and intended anchor points so discrepancies can be noticed promptly. The drawing also gives helpers or an installation provider a shared reference when they take part in the preparation.
- Recheck diagonals, levels and edges; an area that appears flat may still fall outside the accuracy required.
- Confirm product-specific fixing requirements before starting and keep access clear for materials and equipment.
When planning a foundation, use the dimensions of Classic standard greenhouses as a practical basis for your site sketch.
Work sequence · 04
Organise assembly into practical stages
Begin by checking the delivered items against both the parts list and manual. Sort profiles and connectors under cover rather than spreading them over the lawn. A typical sequence progresses through the base frame, main structure, roof sections, glazing and movable components. Verify each completed stage before continuing so that mistakes remain traceable and can be corrected promptly.
Installers use an ordered process too, supported by repeated experience and familiar working methods. That experience can help with accurate alignment and controlled placement of fragile components. Before accepting a quote, establish the preparation expected from you, how restricted access will be managed and what the final handover covers. A written scope reduces uncertainty for everyone.
Decide before work begins how unfinished components will be protected at the end of each day. Bad weather or the loss of a helper may halt progress. Orderly storage of glazing, profiles and fasteners allows an easier restart and lowers the chance of selecting the wrong part.
Keep fragile components stored until their turn in the sequence, then inspect each one before fitting. A well-arranged holding area limits searching and makes it easier to work through the manual in the intended order.
- Keep the assembly documentation at hand throughout and mark completed steps clearly.
- Tighten connections fully only after checking alignment and squareness at each construction level.
If the wall side forms part of your sequence, view large regular lean-to greenhouses with particular attention to access and connection.
Safety and materials · 05
Plan helpers, tools and safety realistically
Some greenhouse tasks are awkward to perform safely without assistance. Roof sections, long profiles and glass panels require room, steady handling and commonly another person. Prepare appropriate gloves, secure access gear and an uncluttered work area. Do not let a schedule push the job ahead in high winds, rain or poor light, when the risk is greater.
Safety includes preventing damage to the greenhouse components. Avoid placing pieces across sharp or rigid edges, and do not distort a frame through uneven lifting. Follow the manual’s tool recommendations and fastening sequence. If dependable helpers or safe equipment are unavailable, using an installer is a practical response to the conditions rather than a failure of DIY ambition.
Agree on signals, carrying roles and safe resting places with everyone helping. Coordinated movements are especially important for broad or fragile components and reduce the temptation to rush. Keep children and pets at a safe distance whenever the work involves lifting, glazing or other critical stages.
- For lifting and glazing, arrange at least one reliable second person with clearly agreed duties.
- Stop when conditions become unsuitable, then protect completed sections as directed by the product’s assembly guidance.
For material and space planning, include Classic greenhouses as standard models early in your garden organisation.
Understand the cost factors · 06
Compare more than installation charges
A dependable total requires actual quotations, although the underlying cost categories can still be mapped. For DIY, include foundation supplies, tools, hired equipment, handling aids and the value of your time alongside the kit. Installer pricing may reflect travel, access, preparation, scope and optional work. Compare itemised descriptions instead of relying on broad package labels.
Ask prospective installers to identify both the work supplied and the site conditions they expect. An initially cheaper figure may leave excavation, foundation preparation or difficult access outside the price. Apply comparable discipline to self-assembly by listing every anticipated task and marking any stage where skilled external assistance could be worthwhile.
Prepare a single project schedule and apply it to both choices. Include the completed base, entry route, storage, helpers and probable remedial tasks. Comparing the same responsibilities reveals more than separate charges: it shows exactly which parts of the project will still rest with you.
A simple allocation of responsibility is valuable: identify who will ready the site, coordinate materials and review the finished handover. Defined roles limit confusion whether the greenhouse is assembled by you or with contracted assistance.
- Compare quotes by scope, prerequisites, possible extra work and the proposed approach to on-site discrepancies.
- For DIY work, allow realistically for helpers, equipment and remedial work rather than counting materials alone.
For projects close to a wall, assess regular full-size lean-to greenhouses together with all necessary preparatory work.
Requirements and protection · 07
Check local requirements early
Treat approval as a site-specific question. In NSW, an exempt-development pathway avoids planning and building approval only when every applicable standard is satisfied. Do not apply that pathway nationally or rely on another council’s experience. Before ordering, ask the relevant state or territory authority and local council about your structure, boundaries, site constraints and any strata or community-scheme requirements.
Reviewing your insurance documents can also be worthwhile if you want suitable protection during and after construction. Whether damage, installation faults or accessories are covered depends on the individual policy wording. Ask the insurer to explain the position for your property and proposed use, and retain an orderly record of the groundwork and assembly.
Store the manual, photographs of the completed groundwork and written arrangements where they can be retrieved easily. Good records help discussions with installers, helpers, insurers or authorities and let you reconstruct earlier steps. They are not a substitute for advice tailored to the project, but they make unresolved questions easier to address.
- Before ordering, check possible requirements with your council or relevant building authority, especially near boundaries or on unusual sites.
- Review insurance terms individually and keep photographs, documents and foundation and assembly details organised.
When explaining the proposed project to other people, standard-range Classic greenhouses provide an easy-to-understand planning starting point.
The right choice · 08
Decide around risk and everyday life
DIY assembly is appropriate when you can see the project through reliably, not merely get it underway. Preparation, precise work, adjustment skills and enough allowance for unexpected interruptions are all required. Taking control of the project is rewarding only when your experience and the actual garden conditions are a good match.
Professional installation may suit you if reducing complexity and handing over practical work are priorities. Product information and written agreements still deserve close reading, as the site and prepared base remain your concern. Review the conditions and precise extent of any warranty or guarantee service, so the choice becomes sound project planning rather than a convenience decision.
Personal capacity deserves a place in the decision. Someone who enjoys methodical hands-on work may prefer to treat assembly as a planned project. Where available time is unpredictable or coordinating the build creates extra strain, delegating the physical installation may be the option that works better in daily life.
- Base your choice on the preparation and risks actually involved, not on a general expectation to do everything yourself.
- Once other people are engaged, document who handles preparation, construction and handover so that every responsibility is understood.
If a wall-based solution supports your use, compare large regular lean-to greenhouses with the real conditions at your house.
Comparison
Comparing self-assembly with an installed build
A sound greenhouse can result from either approach. Use this overview to sort the differences relevant to your site. It cannot replace the product manual or scrutiny of an actual quote; instead, it identifies the practical questions that should be settled before you commit.
| Criterion | DIY assembly | Professional installation |
|---|---|---|
| Time organisation | You manage dates, helpers and work stages yourself. | The process follows the agreed date and prepared conditions. |
| Practical requirements | Alignment, fastening and glazing require care and safe working. | Practical work is undertaken; site preparation remains vital. |
| Foundation check | You check dimensions, level and fixing requirements before assembly. | Confirm beforehand whether and how the prepared base will be checked. |
| Cost review | Include tools, assistance, time and possible remedial work. | Check scope, access conditions and excluded preparatory work carefully. |
| Flexibility | You set pauses and sequence around your own schedule. | The appointment structures the project but needs timely site readiness. |
DIY assembly suits you when
you can interpret the manual, measure accurately, organise assistance and allow enough time for tasks requiring suitable weather.
Arrange installation when
the entry route, base, slope or timetable adds complexity and you want skilled hands to perform the construction work.
Confirm before committing
Check foundation requirements, access, storage space, local controls and the scope of any installation quote before deciding.
Prepare the installation decision in five steps
Writing down a brief preliminary assessment quickly exposes the practical differences between the two approaches. Complete these checks before settling on a model, accessories or assembly method.
01
Record the site
Measure the usable area, then note entry routes, paths, gradients and obstructions. For a lean-to, take photographs from several useful viewpoints.
02
Define the foundation
Read the product-specific requirements and plan the base separately from the visible structure. Check dimensions, heights and the intended fixing.
03
List resources
Note tools, safety equipment, storage space and reliable helpers. Add realistic time windows, including allowances for weather and checks.
04
Match the installation scope
For external assistance, identify supplied tasks, required groundwork and handover arrangements. Assess each quotation against one consistent written outline of the project.
05
Check approvals
Discuss unresolved local controls, neighbour considerations and insurance matters with the appropriate bodies. Make a firm construction plan only after receiving the necessary answers.
Checklist before assembly
Treat this list as your final readiness review. It can expose preventable delays whether the work will be completed personally or through an installation provider.
01. The selected model’s latest manual, component schedule and product dimensions are ready for use.
02. Measurements are complete, access is clear, and doors, paths and how the area will later function have been considered.
03. The foundation follows the product instructions, with its dimensions, level and available anchoring positions already verified.
04. A sheltered, dry sorting area is ready for components without obstructing garden access or working routes.
05. The required tools, protective gear and secure access equipment are ready before work commences.
06. Dependable assistance is arranged for moving long components and positioning the greenhouse glazing safely.
07. Forecast conditions and available hours permit unhurried, controlled work without unsafe shortcuts or avoidable haste.
08. Local matters, insurance aspects and, for professional installation, the precise scope are individually clarified.
Frequently asked questions about greenhouse installation
Is prior experience essential for assembling a greenhouse yourself?
Overall readiness matters more than any single measure of experience. Self-assembly may be realistic when you can interpret the manual accurately, check measurements, supply the correct tools and arrange assistance. If the base, glazing process or safe working method remains uncertain, obtaining suitable professional help is generally the more prudent choice.
What is most often underestimated with DIY assembly?
Most oversights occur before construction: the foundation must be accurate, storage must be sufficient, components need organising and helpers require coordination. Inspection between stages consumes time as well. A schedule based only on fastening the structure is too narrow and makes preventable rework more likely.
Must professional installation include the foundation?
No. Service inclusions vary and should be recorded unambiguously in the written agreement. Ask whether the quote covers preparing the area, inspecting the foundation, anchoring the greenhouse, removing waste and completing a handover. The answers show which activities remain yours and which may need a separate contractor.
When is a lean-to greenhouse particularly demanding?
Difficulty increases when the wall, foundation and junction have not been coordinated precisely. Irregular surfaces, downpipes, restricted paths and mismatched heights can disrupt the sequence. Inspect the actual position thoroughly, and refer unresolved construction details to an appropriately qualified person before any assembly work begins.
Should I clarify approval or insurance questions before purchase?
Yes, where the site or intended use raises questions. Requirements can differ locally, so obtain binding advice from the appropriate authority. Insurance terms are also individual. Ask your insurer what information is needed for your project rather than relying on general assumptions.
What makes installation quotations genuinely comparable?
Compare more than the total amount; focus on the work described. Important points include property prerequisites, included steps, treatment of access difficulties and possible extra work. Give every enquiry the same measurements and information. Differences in scope then become much easier to identify.
Explore greenhouses
Choose your installation route with foresight
Self-assembly can turn a greenhouse into a satisfying garden project when the foundation, work area and available people are properly organised. Specialist installation may simplify coordination where access is difficult or time is scarce. Whichever route you favour, judge it against the full sequence of preparation and construction rather than the visible frame alone.
Set aside time before placing an order to review dimensions, the foundation and responsibilities. Select models with your particular site in mind and write down any unresolved matters. Proper preparation supports a suitable installation decision and a dependable basis for using the greenhouse later.
Choose a greenhouse form suited to your garden, physical site and preferred approach to assembly.
