
Plan Your Greenhouse: Layout, Crops & Care | Bloomcabin
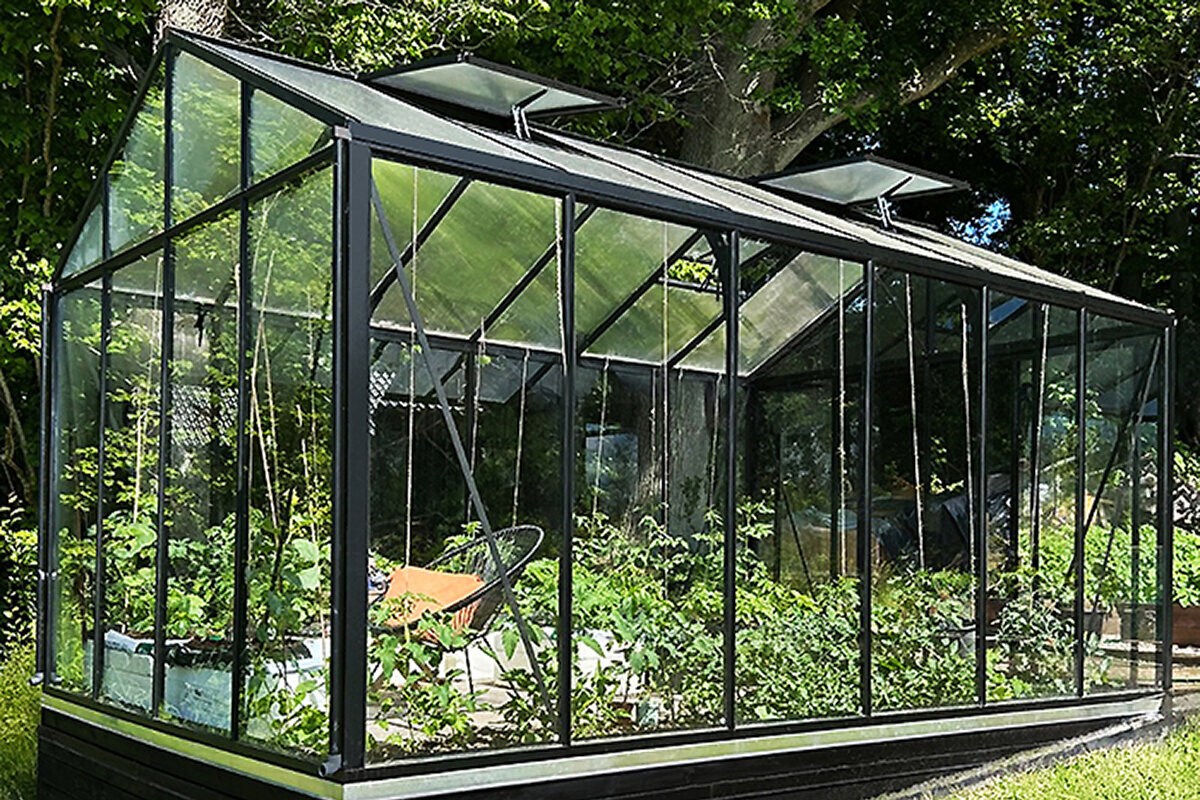
Planning your greenhouse after assembly: first steps towards an effective Bloomcabin growing space in Australia
Your Bloomcabin greenhouse stands ready: frame, glazing and door installed, sunlight entering. Now turn that completed structure into a dependable daily growing space through layout, planning and care. Beyond its appearance, it lets you manage light, air, water and temperature together for productive growing across an extended season.
That control is particularly useful across Australia. Southern districts may have cool springs and frosty nights, while inland areas face dry heat and tropical regions combine warmth with high humidity. Wind and sudden temperature shifts add further variation. A well-made aluminium greenhouse provides a stable growing environment, lengthens useful growing periods and makes vegetables, fruit, herbs and flowers easier to plan.
In this practical guide, you will learn what to do once assembly is complete and how to create a well-organised greenhouse interior for a Bloomcabin aluminium greenhouse in Australian conditions. The advice goes well beyond placing benches on one side and beds on the other. It covers usable pathways, distinct microclimates, sensible starter crops, irrigation choices, ventilation, low-stress cleaning and maintenance that supports a long service life. The result should be a greenhouse that is both productive and pleasant to use.
You can also compare models, dimensions and Australian catalogue categories here: Bloomcabin Australia – Greenhouses & Conservatories.
1) Why the interior plan matters after assembly
Construction provides potential, not an automatically functioning greenhouse. Your layout and routines make it a system where plants thrive, work becomes efficient and time inside remains enjoyable long after setup.
A keen new owner may soon encounter misted glazing, awkward access, endless watering and tomatoes suffering in still air. Those frustrations are seldom mere bad luck. They usually point to choices made during the fit-out, including:
- Insufficient movement of air (condensation and stagnant air encourage fungi)
- Overcrowded plant positions (access becomes awkward, hygiene suffers and cleaning takes more effort)
- Poorly timed watering (watering too frequently, late in the day or directly over leaves)
- Undefined activity zones (propagation, growing, storage and workspace become mixed)
- Waiting for visible grime before cleaning (algae, dirt, reduced light and pests)
Fortunately, careful planning prevents most of these frustrations. A high-quality Bloomcabin aluminium greenhouse then has room to show its advantages: durable construction, accurate workmanship, modern styling and materials selected for extended use. An orderly interior makes those qualities more noticeable whenever you water, tend or harvest.
2) Use the first week to observe and measure
Before filling beds or adding benches, observe the empty greenhouse through its first week. Learning its conditions now reduces later rearrangement and rebuilding.
2.1 Check operation on days 1–2
- Door and running tracks: Check smooth door travel and rubbing; clear sand and soil from tracks.
- Opening roof vents: Operate each vent completely in both directions and examine the end stops.
- Junctions and sealing: Inspect connections for reliable, neat fit, not perfect airtightness.
- Response to wind: Use a breezy day to identify stronger draughts around the doorway, roofline and corners.
2.2 Observe light and climate on days 3–5
- Map moving sunlight: Photograph morning, midday and afternoon shade from trees, buildings and hedges.
- Record temperature swings: Record minimum and maximum temperatures for 2–3 days initially.
- Monitor surface moisture: Note when condensation forms and clears: both reveal humidity and air exchange.
2.3 Rain and ground conditions (days 6–7)
- Water drainage: If puddles remain beside the base, consider a tidy perimeter treatment or a strip of gravel.
- Mud splash: Soil marks on the glazing cut available light. Early prevention saves substantial washing later.
- Approach path: Check whether entry stays convenient during rain. Shelter is most valuable in unpleasant weather when you can reach it without difficulty.
By the end of this week, you should know which section becomes hottest, which corner retains humidity, where a workbench belongs and where a bed can sit without obstructing later cleaning.
3) Decide what your greenhouse should achieve
Begin your greenhouse plan with its purpose rather than its furniture. Ask yourself: How will you use the space most often? Seed raising needs different surfaces from tomato production, while a relaxing garden room cannot be arranged exactly like an interior designed for the largest possible harvest.
3.1 Nominate one main purpose
- Seeds and young plants: ample benches, organised supplies, hygiene and light/temperature monitoring.
- Protected vegetable crops: beds, supports, irrigation, airflow and nutrition planning.
- A longer growing calendar: thermal mass, insulation, winter crops and condensation control.
- Flowers and overwintering: display space, pest checks, airflow and dry areas.
- An inviting garden retreat: an attractive, tidy, welcoming space with clear paths and a work surface.
3.2 Select one achievable secondary purpose
- Gradually acclimatise seedlings to outdoor conditions
- Begin basil, tomato and capsicum crops earlier
- Almost year-round herbs
- Trial unusual varieties that perform poorly outdoors
A simple arrangement is usually the best starting point because you can comfortably manage it. Premium construction brings little benefit if daily tasks become overwhelming. A Bloomcabin greenhouse should make gardening more straightforward, not add needless complexity.
4) Recognise warm, cool, airy and humid zones
Think of the greenhouse as a compact ecosystem. Conditions vary even inside a smaller model, creating several useful zones. Deliberately matching plants to those differences can reduce recurring problems and may also improve the harvest.
4.1 Understand the main zones
- Upper warm area: warm air rises, making the roof and ridge warmest.
- Lower cool area: floor and doorway areas are often cooler and draughtier.
- Still, humid corners: moisture remains longer wherever circulation is weak.
- Moving-air corridor: the route linking an open door with roof vents frequently has the freshest conditions.
4.2 Match planting positions to conditions
- Warmer section: place tomatoes, capsicum, chilli, eggplant, basil and cucumbers here, while preserving adequate airflow.
- Cooler section: try lettuce, spinach, rocket, coriander and seedlings that are being hardened off.
- Persistently damp corner: leave clear or plant sparsely to limit mildew and botrytis risk.
- Well-aired section: use it for rosemary, thyme, robust young plants and varieties that carry thick foliage.
When each zone has an appropriate purpose, you spend less time fighting the greenhouse climate. Dependable door and window operation in a quality aluminium structure makes regular ventilation and climate adjustments much easier.
5) Map pathways, beds, benches and working areas
Your layout must serve the gardener as well as the plants. Every visit involves walking, watering, tying stems, pruning, harvesting, repotting or washing surfaces. An uncomfortably narrow route discourages frequent visits, often without you noticing, and that can diminish both enjoyment and crop performance.
5.1 Give the main path enough width
If the available dimensions permit, plan a central walkway measuring about 60–75 cm. That allowance may initially appear generous, yet it distinguishes relaxed working from continually brushing against plants and equipment. In a slim model, retain access to every area and ensure cleaning never requires awkward stretching or climbing.
5.2 Keep every bed within reach
Arrange bed widths so no one needs to step onto the growing soil. Foot pressure compacts it, impairs drainage, removes useful air spaces and leaves roots more vulnerable. A wider bed needs access along both sides; otherwise, choose a narrower form.
5.3 Consider three practical floor plans
Plan A: prioritise crop volume
- a bed on either side of one central path
- a rear bench or shelf for propagation and tools
- overhead support lines positioned above tomato and cucumber beds
Plan B: divide the space between uses
- one side: benches or shelves for seedlings, herbs and pots
- on the other, use a bed for warm-season cucumbers, tomatoes and capsicum
- reserve the walkway for comfortable access, transport and quick cleaning
Plan C: create a practical garden room
- run slender planted strips beside the walls
- lay a clean paved or gravel route that keeps shoes dry and maintenance simple
- include a compact worktop with a stool
- flowers and hanging pots add atmosphere
Do not judge a plan by the number of containers squeezed inside. A healthier arrangement is one you can keep orderly, open to air and clean throughout many months of growth.
6) Choose beds, benches, containers or a mixed system
Once construction is finished, decide how the plants will actually be grown. No single method suits every gardener. Your best option will accommodate the crops you genuinely intend to raise and the amount of attention you can routinely provide.
6.1 Growing directly in beds
Beds suit crops needing steady moisture and nutrition, particularly tomatoes and cucumbers. Drip irrigation fits neatly into an orderly, productive bed system.
- Good choices include: tomatoes, cucumber, capsicum, chilli, basil, lettuce, spinach and silverbeet
- Main advantages: steadier moisture, less daily watering pressure and high yields
- Ongoing task: soil care, crop rotation, annual compost and hygiene
6.2 Using benches and shelves
Benches organise seedlings and potted herbs. Elevating plants can reduce algae and fungus gnats, improve circulation and provide a comfortable working height.
- Good choices include: seed trays, cuttings, potted herbs and flower boxes
- Main advantages: easy rearrangement, cleaner working, flexibility and a clear overview
- Ongoing task: watch fast-drying summer pots and supply nutrients on a regular schedule
6.3 Growing in movable containers
Pots provide considerable flexibility. They let you relocate plants, isolate a suspect specimen, change the visual arrangement and experiment with specialist crops without altering a permanent bed.
6.4 Combining several methods
A mixed arrangement captures the strengths of each approach: one productive bed for summer crops, a propagation bench that keeps equipment organised and several supplementary containers. Many Bloomcabin owners will find this balance productive, attractive and manageable.
7) Prepare soil, compost and hygienic growing media
Growing medium powers the greenhouse. Good soil supports strong roots, steady moisture, less stress and better harvests. Poor soil causes problems regardless of the structure's quality.
7.1 In beds, favour structure over excessive richness
- Maintain open texture: roots need oxygen, while dense, heavy soil becomes especially troublesome under cover.
- Build with mature compost: a crumbly, well-finished compost improves both soil structure and nutrient availability.
- Refresh it each year: applying compost over the surface is an uncomplicated annual habit.
- Apply mulch with care: it can slow evaporation, but should never produce saturated, swamp-like conditions.
7.2 In containers, combine quality with consistency
- Choose sound potting mix: free drainage and stable structure that resists compaction.
- Replenish nutrients regularly: potting medium loses nutrients faster than bed soil.
- Wash trays and pots: hygiene reduces seedling damping-off.
7.3 Treat soil hygiene as routine work
Planting under cover is usually denser and more intensive than planting outdoors. Fallen foliage, crop remnants and spilled potting mix are therefore more than visual clutter: they create shelter for mould, disease and fungus gnats. Weekly removal and a wiped workbench provide valuable everyday protection.
8) Select starter vegetables, fruit, herbs and flowers
For the first season, prioritise crops that deliver encouraging results while teaching you how the new environment behaves. Notice drying speed, responses to intense sun, the right moment to open vents and any corner where humidity persists.
8.1 Straightforward crops for beginners
- Lettuce varieties: loose-leaf, oakleaf and Batavia forms mature quickly and suit repeated sowing.
- Rocket leaves: fast, robust and full of flavour.
- Leaf spinach: a particularly useful choice during cooler weather.
- Quick radishes: a short crop cycle provides early encouragement.
- Spring onion crops: compact, uncomplicated and economical with space.
- Culinary herbs: keep parsley and coriander cooler, while giving basil warmth and bright sun.
8.2 Familiar greenhouse mainstays
- Tomato plants: a classic crop that performs reliably with support, side-shoot removal and steady airflow.
- Climbing cucumbers: warmth produces abundant growth, but moving air is important for limiting mildew.
- Capsicum and chilli plants: warmth-loving, often more productive under cover.
- Eggplant crops: needs experience, sustained warmth and consistent care.
8.3 Fruit crops with realistic expectations
- Container strawberries: an approachable option that also works in hanging baskets.
- Container-grown figs: worth trialling if you can provide disciplined watering and regular pruning.
- Grapevines for advanced growers: possible, but a project for experienced growers.
8.4 Flowers and useful companion planting
- Marigold plants: bright, easy and useful as colourful companions.
- Nasturtium plants: quick-growing, cheerful and edible.
- Calendula flowers: robust, attractive and potentially helpful to beneficial insects.
- Fragrant flowering plants: a pleasant addition when the greenhouse doubles as an enjoyable garden room.
For a reassuring first season, combine quick lettuce and radish crops with longer-term tomatoes and cucumbers. Early pickings continue as the main crops develop.
9) Follow a flexible Australian seasonal calendar
Use this temperate calendar as a starting point. Adapt it to your Australian region, altitude and urban microclimate; tropical, subtropical, arid and cool districts need different timings.
July–August: prepare and begin propagation
- inspect the structure, clear the tracks, test the vents and organise equipment
- undertake the main clean when conditions allow, improving light for early growth
- sow locally appropriate cool-season crops according to available warmth and light
- manage winter condensation through short periods of controlled ventilation
September: expand seed raising
- start tomato, capsicum and chilli plants when that timing suits the local climate
- quick interim crops: lettuce, spinach and radish
- practise timely venting because sunny interiors warm quickly while nights remain cool
October: manage the spring transition
- adjust ventilation between warm days and potentially frosty nights
- use the protected space to harden young plants gradually
- prepare growing beds and install climbing supports
November: establish warm-season crops
- set out tomatoes, cucumbers and capsicum only when local temperatures are suitable
- apply mulch where useful and complete adjustments to drip lines
- preserve generous air movement as foliage becomes denser
December–February: tend productive summer growth
- remove tomato side shoots and excess leaves for light and airflow
- supply water consistently and keep feeding even
- shade during heatwaves to limit stress and flower drop
- clear all discarded plant material without delay
March–April: change over to autumn crops
- remove finished summer plants progressively and reopen growing space
- sow autumn lettuce, spinach and suitable Asian greens
- divide cleaning into small sections instead of attempting the whole structure at once
May–June: organise, maintain and rest or harvest
- harvest winter crops gradually because low light slows their growth
- control condensation with brief ventilation rather than trapped steam
- review the layout, gather materials and plan improvements for the next cycle
Following a repeating rhythm makes a Bloomcabin greenhouse useful across the year instead of treating it solely as summer equipment.
10) Match watering and irrigation to your routine
Water management can make greenhouse growing rewarding or frustrating. Often the problem is not too little water, but in uneven amounts or at unsuitable times. Overwatering is particularly easy when the available light is low.
10.1 Apply these widely useful principles
- Irrigate early in the day: daytime drying reduces fungal risk.
- Aim at the root area: wet foliage combined with still air encourages botrytis and mildew.
- Keep moisture changes moderate: steady moisture supports healthier plants.
- Respond to the forecast: water less in dull conditions; in heat, start earlier and increase frequency only as needed.
10.2 Compare simple and convenient methods
Method A: watering by hand
Hand watering helps beginners observe plants daily. Use a can with a rose or a gently fitted hose nozzle, directing water to plant bases.
Method B: drip lines in beds
A drip system limits wet foliage, delivers water consistently and saves routine effort. Once adjusted correctly, it can be one of the most useful improvements made after construction.
Method C: porous soaker hose
This uncomplicated option is dependable along an extended bed. Use a gentle flow for longer rather than delivering a short flood.
Method D: capillary matting for seedlings
On a propagation bench, capillary material can distribute moisture evenly among trays and young plants without leaving the upper surface continuously saturated.
10.3 Signs that moisture is excessive
- Condensed water remains on the glazing for long periods
- The upper layer of soil never appears to dry
- Adult fungus gnats become noticeable
- Grey mould develops around flowers or leaves
When several symptoms appear together, reduce irrigation, water earlier, open the vents more, thin crowded foliage and remove debris from corners.
11) Move air effectively to limit mould and protect crops
Fresh-air exchange is fundamental to greenhouse health rather than an optional extra. Humid weather and changing temperatures can combine warm days, cooler nights and heavy condensation into favourable conditions for fungi. A consistent ventilation habit can substantially reduce those difficulties.
11.1 Create an effective flow path
- Release air from above: open roof vents so heated, moisture-laden air can escape.
- Admit air from below: doors or low openings admit fresh air.
- Encourage gentle crossflow: a mild, sustained through-breeze is preferable to one short and violent blast.
- Circulate still pockets: a compact fan can move air through dead corners, especially when foliage is dense.
11.2 Establish a weather-based routine
- During sunny weather: begin exchanging air early, because enclosed heat can rise surprisingly fast.
- During overcast weather: use brief, purposeful ventilation if moisture is collecting heavily.
- Towards evening: shut openings early enough to retain warmth, except when the interior remains dripping wet.
11.3 Let the layout assist ventilation
Airflow needs more than open windows: space plants, clear corners and paths, and train stems upwards. A considered layout improves ventilation without extra daily work.
12) Manage heat, stored warmth and frost
Depending on the day and region, an Australian greenhouse may capture welcome warmth or become dangerously hot. Complete temperature stability is neither realistic nor necessary. Instead, aim to keep plants growing steadily and prevent repeated episodes of avoidable stress.
12.1 Add shade during intense heat
- Install shade cloth: it moderates extreme temperature peaks and protects sensitive foliage from sunburn.
- Leave walkways unobstructed: to let air circulate.
- Maintain even soil moisture: irregular water availability makes plants more vulnerable to heat.
12.2 Use thermal mass thoughtfully
Thermal mass absorbs daytime heat and releases it overnight, especially useful in transitional seasons. Water containers, stone or existing paving can help. Keep access and cleaning unobstructed.
12.3 Prepare for frosty spring nights
In Australia's cooler districts, pleasant spring days can still lead into freezing nights. Preparation is more useful than panic:
- keep horticultural fleece available for vulnerable young plants
- close vents overnight; ventilate carefully by day
- avoid leaving tender seedlings permanently exposed before conditions are suitable
13) Train plants upwards with strings, nets and supports
Train upwards to use height, improve airflow, simplify harvesting and keep the layout tidy. Tomatoes, cucumbers and suitable bean or pea varieties particularly benefit.
13.1 Select an appropriate support method
- Suspended strings with clips: a practical choice for cucumber vines and tomatoes
- Flexible climbing mesh: useful for peas, cucumbers and many ornamental climbers
- Individual stakes: quick to install and convenient for supporting a single plant
13.2 Keep tomatoes under control
- pinch out unwanted side shoots at regular intervals
- as the plant develops, remove lower foliage to improve air movement and reduce leaf disease
- respect planting distances, because moving air is just as important as fertiliser
An orderly upright crop is visually appealing and also simpler to inspect, clean and pick. That combination complements Bloomcabin through refined design, high standards and practical everyday function.
14) Maintain an aluminium greenhouse for lasting use
Bloomcabin aluminium greenhouses are built for long use, supported by regular care. Small weekly tasks protect appearance, function and the growing climate better than one deferred annual effort.
14.1 Daily check lasting 5–10 minutes
- check plants for wilting and pests
- adjust doors and vents to suit current conditions
- pick up leaves that have fallen
14.2 Weekly work lasting 20–40 minutes
- sweep the walkway and look into each corner
- remove debris from the doorway and tracks
- examine plant ties and climbing supports
- clean down the workbench
14.3 Monthly work lasting 30–60 minutes
- wash marked sections of glazing to preserve useful light
- inspect moving parts, window mechanisms and door guides
- discard packaging, empty pots and worn trays so clutter cannot create damp pockets
Bloomcabin uses quality materials and careful workmanship, making modest preventive care worthwhile. Regular attention helps the greenhouse remain as elegant and functional in later years as it appeared when first completed.
15) Build an achievable cleaning routine
Cleaning improves more than appearance. Clear glass admits light; clean surfaces reduce pests; tidy paths discourage algae and fungus gnats. Routine care supports better harvests.
15.1 Use a manageable schedule
- Every week: sweep the floor, collect leaves and remove spilled growing medium
- Each month: wipe benches, inspect corners and wash visibly marked glazing
- Once or twice annually: thorough cleaning, often in late winter/spring or autumn
15.2 Complete the major clean in stages
- group plants or move them outside when weather permits
- begin without water by sweeping beneath benches and removing dry dirt from corners
- wash glazing and other surfaces using mild soap, lukewarm water and a non-abrasive cloth
- follow with clean water until no soapy film is left
- ventilate well and let surfaces dry
- wash propagation pots and trays separately before starting the next seedlings
15.3 Avoid damaging cleaning methods
- avoid abrasive pads and harsh cleaners that damage finishes
- avoid pressure-washing tracks or joints; it can force water and grit inside
- never close a damp interior without airflow, because retained moisture encourages mould
16) Prevent pests and plant diseases early
The sheltered warmth that benefits crops can also favour unwanted insects. Early prevention is generally easier and more successful than waiting for a serious infestation, and the required habits are straightforward.
16.1 Watch for common protected-crop pests
- Aphid colonies: often gather on soft spring growth and new shoots
- Whitefly adults: prefer warm interiors with crowded foliage
- Spider-mite activity: becomes more likely when air is hot and dry
- Fungus-gnat activity: frequently points to saturated potting mix or algae
- Slugs and snails: can enter through an open door and thrive where soil remains damp
16.2 Recognise frequent diseases and disorders
- Powdery mildew growth: often linked to stress, stagnant air and crowded foliage
- Grey mould or botrytis: favoured by humidity and poor airflow
- Seedling damping-off: commonly follows conditions that are overly wet, cold or lacking fresh air
16.3 Practise dependable prevention
- exchange some air every day (even a short period helps)
- allow enough room between neighbouring plants
- remove fallen leaves and plant debris promptly
- complete watering during the morning, rather than wetting foliage late in the evening
- inspect plants once each week (check leaf undersides!)
- control interior clutter (untidy corners provide shelter for pests)
These habits keep most problems manageable. A premium greenhouse should be easy to keep healthy as well as attractive.
17) Keep work zones orderly and productive
A tidy greenhouse invites frequent visits. That means noticing problems sooner, responding faster and harvesting at the right moment: order contributes directly to success.
17.1 Assign a purpose to each area
- Seed-raising area: bench or shelf, trays, labels and optional capillary matting
- Main growing area: beds and climbing supports for main crops
- Clear work area: a clear workspace for pruning and repotting
- Limited storage area: limited, clean storage rather than a clutter corner
17.2 Keep order without chasing perfection
- sort labels, plant ties and clips into boxes or small crates
- hang gloves, secateurs and string from hooks
- move rarely used objects elsewhere, remembering that this is a managed growing environment
- regard an unobstructed path as essential space for access, hygiene and plant care
18) Answers to frequent post-assembly questions
When is it safe to begin planting?
Plant when the structure and growing system are ready. Observe sunshine, wind and condensation for 3–7 days to guide the layout.
Which factor has the greatest effect on success?
Start with ventilation and airflow: they quickly reduce mildew, botrytis and unhealthy humidity.
What cleaning frequency is appropriate?
Tidy weekly, spot-clean monthly and clean thoroughly 1–2 times yearly. Clear glass improves light, especially in darker months.
What causes fungus gnats to appear?
Persistent wetness, algae or organic debris commonly attract them. Water less or earlier, let the surface dry, clean the floor and improve airflow.
How can excessive summer growth be controlled?
Train vertically, remove tomato side shoots and excess foliage, and leave clear paths and spacing. An orderly layout prevents about 80% of later problems.
19) Final thoughts: choose a setup you will maintain
An effective greenhouse interior need not be complicated. It should remain workable : comfortable to enter, straightforward to water, quick to ventilate and uncomplicated to clean. When all four tasks feel manageable, you are more likely to visit regularly, and consistent attention is the strongest foundation for success.
A Bloomcabin aluminium greenhouse supplies a premium starting point through quality materials, high standards, carefully considered construction and elegant garden design. Combine that foundation with an accessible plan, dependable airflow, even irrigation, scheduled cleaning and modest maintenance. The finished space can then become one of the most rewarding parts of the garden through season after season.
Browse relevant Australian models and catalogue categories: Bloomcabin Australia – Greenhouses & Conservatories.
Enjoy arranging the space, tending the plants and bringing in each harvest.
