
Greenhouse Hydroponics: Beginner’s Guide
Bloomcabin Journal · Greenhouse growing in Canada
Hydroponics
in the greenhouse
Beginner’s guide
The crop is visible above the water. Beneath it, success depends on a managed relationship among moisture, oxygen, nutrients and regular observation. This guide turns that relationship into a practical first project.
Chapter 01 · Understand the growing method
Hydroponics removes soil from cultivation, but it does not remove the need for attentive care.
What the term really means
A hydroponic root system receives moisture and dissolved mineral nutrition through a controlled solution. Healthy growth still depends on oxygen, suitable warmth, physical support, light, moving air, clean equipment and frequent observation.
A greenhouse can bring the crop, reservoir and maintenance area into one sheltered workspace. That convenience does not prevent overheating, excessive humidity or equipment trouble. Leave breathing room around the first setup and include comfortable paths before adding plants. Explore the Classic Aluminium Greenhouse as you map ventilation, crop space and maintenance access.
Reservoir A covered container that excludes light while holding water and dissolved nutrients.
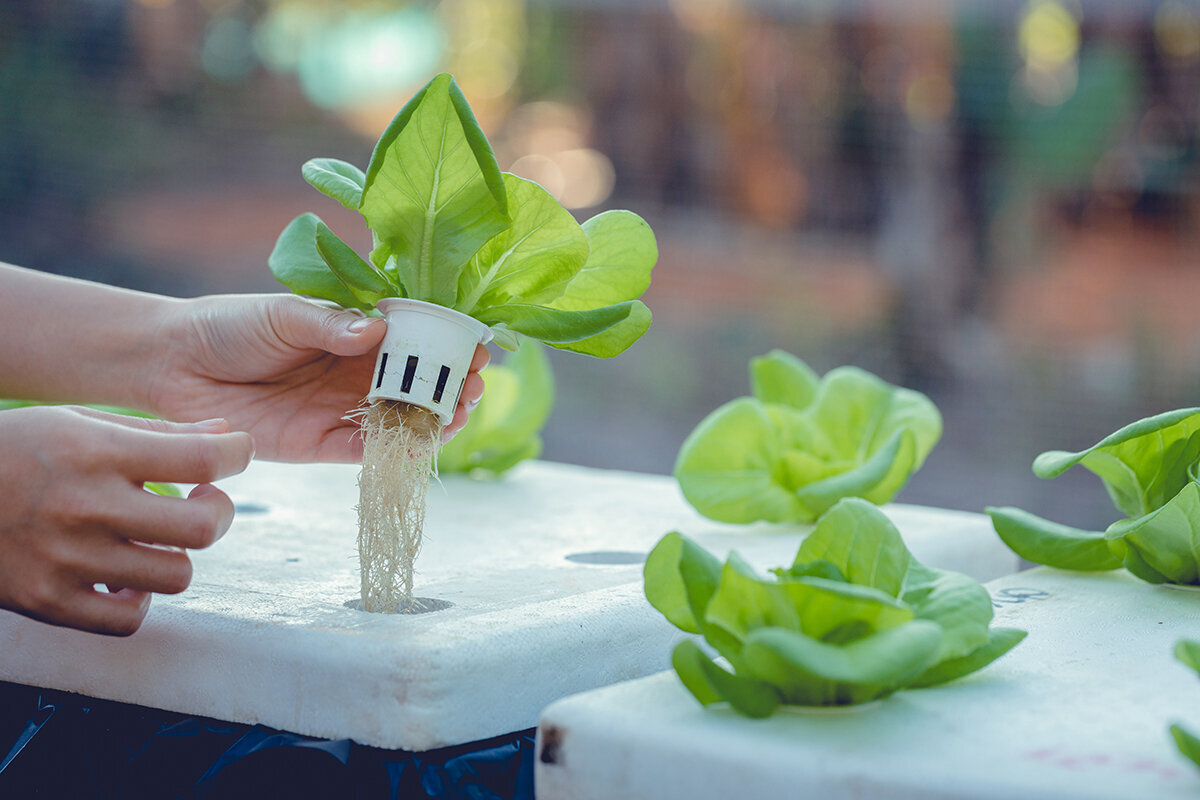
Net pot A slotted container that steadies the plant while exposing its roots to solution and air.
EC Electrical conductivity, used here as an indication of the combined dissolved-salt level in the solution.
Root zone Everything surrounding the roots, including solution, oxygen, temperature, support material, equipment surfaces and sanitation.
Chapter 02 · Pick a crop that teaches clearly
Make the first harvest a lesson in how the setup behaves.
A smart opening crop: Loose-leaf lettuce matures quickly, takes little room and shows environmental stress visibly. Basil is another approachable choice where the greenhouse is bright and warm. Either crop lets you learn measurement and harvesting without a lengthy production cycle, complicated supports or pollination work.
Stock the opening reservoir with a single crop and, if possible, a single variety. Changes in leafy vegetables and herbs are relatively easy to notice: new leaves may pale, roots may slow, the waterline may drop or the pump may sound different. Pak choi and Asian greens can be useful choices during cooler spring and fall periods.
Hydroponic tomatoes, cucumbers and peppers can perform very well, but they make more demanding follow-up projects. Their roots need more capacity, while the plants require sturdy support, additional room and light, longer management, pruning and dependable climate control. Begin with a crop that sharpens observation rather than stretching your workload.
Choose compact, healthy transplants or germinate seed in clean hydroponic propagation plugs. Do not fill net pots with garden soil; its fine particles, organic matter and possible pathogens can contaminate the circulating solution. A few plants of similar size will reveal more than an overcrowded experimental planting.
Chapter 03 · Trace the solution route
Four approaches, each answering the same question: how will the roots receive oxygen?
No single hydroponic design is ideal for every grower. A suitable beginner system is one whose flow route, likely trouble spots and cleaning tasks are easy to identify. The summaries below explain where the liquid is held, how it travels and where inspection should begin after a fault.
Stationary · oxygenated
Deep-water culture (DWC)
Tank + diffuser stoneThin flowing layer
NFT
Pump + inclined channelControlled application
Drip irrigation
Drippers + soilless mediumTemporary flood · full drainage
Flood-and-drain
Growing table + scheduled returnDWC, or deep-water culture: The plants are supported over a tank, with the roots extending into nutrient solution. A pump supplies air through a diffuser stone, keeping the liquid moving and oxygenated. DWC is approachable for lettuce and herbs because it uses relatively few joins, leaves the waterline and roots open to view, and does not require a long channel network for maintenance.
NFT, or nutrient-film technique: A pump moves a thin layer of solution along channels set on a gentle incline. The root mat touches the moving liquid while much of it remains exposed to air. NFT can serve leafy crops efficiently, provided the slope is even, return routes remain open and channels stay clean. A blockage or stopped pump may affect the crop rapidly.
Drip-fed systems: Individual drippers meter solution onto plants held in clay pebbles, coco coir, rockwool or another soil-free medium. Runoff may be discarded or collected back in the tank. The medium retains some moisture between watering events and can support larger plants, but every dripper, tube and drainage point needs routine inspection.
Flood-and-drain systems: The growing table fills for a period and then empties. As the liquid recedes, air is drawn into the pores around the roots. This method accommodates plugs and containers, although dependable timing, level support, unrestricted drains and good sanitation are essential. A modest oxygenated DWC tank is still easier for many home growers to interpret at first.
Whatever the design, build the habit of looking carefully before changing anything. Select a layout that provides enough working room and time for checks, cleanup and adjustments you can document.
Building your opening DWC system
The 4 parts you should be able to see
01Light-excluding tank
02Slotted pots and starter plugs
03Aeration pump and diffuser
04Plant food and testing instruments
Keeping light out is as important as choosing adequate capacity because a fitted cover and opaque walls discourage algae. Clean plugs and net pots hold each plant without trapping the base too deeply. The aeration pump, tubing and stone establish a steady oxygen source below. Calibrated instruments for pH and EC provide readings that can be repeated instead of relying on guesswork.
Chapter 04 · Equip the project thoughtfully
Buy the core tools now; consider automation after experience.
Required at the outset Use a suitable opaque tank and lid, net pots, an air pump with diffuser stone, hydroponic plant food, pH and EC instruments, the necessary calibration and cleaning fluids, and an accurate measuring vessel reserved for this project.
Helpful additions Keep replacement tubing and a spare diffuser stone on hand, along with a solution thermometer, labelled refill jug, plant markers, record book and shallow catch tray for any joint that could drip.
Equipment to postpone The opening crop does not need automated dosing, remote dashboards, large recirculating arrays, elaborate vertical towers, CO₂ equipment or automatic refill controls. Add advanced equipment only when your basic records expose a genuine safety concern or recurring waste of time.
Over time, a greenhouse can accommodate a carefully planned expansion. The Classic Aluminium Greenhouse offers a durable, orderly location for a small tank beside a work surface and unobstructed aisle. Extra space is not a reason to turn the first lettuce planting into an equipment laboratory.
Chapter 05 · Test everything before planting
Assemble it empty, add water gradually and run it without a crop.
Initial testing may feel uneventful, yet it can prevent major trouble during the first crop. Put the equipment on a flat, sturdy surface that can be washed easily. Arrange outlets, plugs, power supplies and power bars above any likely spill, while keeping them dry and reachable; include drip loops in the cords. Leave one side of every tank open for service without having to climb across plants.
01Choose the location
Keep the tank away from uninterrupted direct sun and identify a controlled, hazard-free route for draining it.
Keep the tank away from uninterrupted direct sun and identify a controlled, hazard-free route for draining it.
02Add test water
Circulate clear water through the assembled equipment while checking each connection, tube, cover and outlet.
Circulate clear water through the assembled equipment while checking each connection, tube, cover and outlet.
03Check the sound
Listen for steady pump operation and confirm that bubbles are distributed throughout the tank.
Listen for steady pump operation and confirm that bubbles are distributed throughout the tank.
04Set a reference line
Indicate the usual operating depth. That reference simplifies refilling and helps reveal an unexpected loss of water.
Indicate the usual operating depth. That reference simplifies refilling and helps reveal an unexpected loss of water.
For a layout that separates crop care, equipment and comfortable work routes, consider the Classic Aluminium Greenhouse. Keep every testing, inspection and cleaning task within convenient reach.
Chapter 06 · Manage what happens below
Water transports the minerals; your log explains how the mixture changes.
Nutrient solution is more complex than fertilizer added to water. Its performance reflects the original water, crop, development stage, tank capacity, temperature, plant uptake and specific products. Consult current data from the utility serving your property, then take your own readings. Potable water may still carry hardness, alkalinity and minerals that influence hydroponic management.
An EC reading represents total conductivity and offers a picture of all dissolved salts together. It may reveal concentration caused by repeated refilling or changes associated with plant water use, but it cannot identify a particular mineral. Because pH influences availability, use instructions written for the crop and growth stage rather than imposing one target on every plant.
pH 5.4–6.2Typical mildly acidic operating reference
about 20–24 °CPractical temperature guidance, not a fixed rule
EC ≠ recipeInterpret it for the crop and growth stage
Treat these figures as working guidance rather than universal targets. The source water, crop and product directions take priority. Record an initial reading, then note the date, crop, liquid level, EC, pH, solution temperature and each intervention. Individual results become informative when viewed as a sequence.
Chapter 07 · Healthy roots stay firm, light-coloured and oxygenated
Treat the submerged environment and the greenhouse air as connected conditions.
Moisture alone is not enough for roots; they also require oxygen. In DWC, aeration circulates solution along their surfaces. NFT exposes much of the root mass to air while a narrow layer of liquid flows below. Systems that use a growing medium rely on free drainage so air can return to its pores after irrigation.
Healthy, oxygen-rich conditions
- Tank closed to light
- Solution kept moderately cool
- Reliable aeration or movement
- Firm, pale roots with branching growth
Overheated, poorly moving conditions
- Light reaching the liquid
- Heat gained from direct sun
- Inadequate movement
- Soft, dark roots or a musty odour
Managing the air around the crop
A greenhouse does not isolate hydroponics from outdoor weather. Sunlight can raise indoor and reservoir temperatures quickly when the tank lacks shade or is poorly placed. Canadian growing conditions differ greatly among regions, and many locations experience sharp shifts between chilly nights and bright days. Ventilation must carry heat and moisture away from leaves without holding young plants in a cold draught.
- Light Place the opening crop where illumination is bright and reasonably even. Shade the tank itself and block every route by which sunlight could enter the solution.
- Heat Open doors and roof vents, provide shade and encourage air exchange before temperatures climb. Prevent the liquid from heating in the sun instead of waiting for wilting foliage or inactive roots.
- Humidity Allow room between plants so condensation dries promptly and you can examine lower leaf surfaces, plant bases and root openings.
- Air movement A modest circulation fan may break up still pockets of air. During hot conditions, it remains a supplement rather than a substitute for shade and effective venting.
Chapter 08 · Use observation to keep the work manageable
Give each day one simple inspection purpose.
Mon Look
Tue Listen
Wed Test
Thu Scout
Fri Refill
Sat Pick
Sun Assess
- Monday: Look over the foliage, root condition, marked liquid level and bubble pattern.
- Tuesday: Listen to the pump and inspect its lines, keeping the surrounding space unobstructed and dry.
- Wednesday: Test pH, EC and liquid temperature, then enter the results in your log.
- Thursday: Inspect for algae, insects and subtle indications of stress.
- Friday: Restore the liquid level when required, let it circulate fully and take a follow-up reading.
- Saturday: Pick mature outside leaves, clear away plant remnants and dry any splashes.
- Sunday: Compare the week’s observations and intervene only when the pattern supports a specific change.
The appropriate schedule varies with crop size, local weather and tank capacity. Water demand may climb sharply during a hot Canadian summer spell, while dim, cool conditions can slow both growth and uptake. Avoid constant adjustment; instead, become familiar with small day-to-day changes.
Chapter 09 · Read the whole system before blaming a leaf
Beginner difficulties usually provide clues when the surroundings are examined carefully.
When clean-looking equipment still produces weak growth
Pale young leaves or stalled development may reflect incorrect solution strength, shifting pH, inadequate illumination, low temperatures or plants outgrowing the available tank. Take readings, compare the greenhouse conditions with what the crop requires and inspect the newest leaves before selecting one evidence-based response.
Unexpected wilting requires prompt inspection of the equipment. With NFT or drip irrigation, examine the pump, tubes, delivery pattern, return route and liquid depth. DWC needs uninterrupted aeration, and its roots should not remain in hot solution depleted of oxygen. A fault affecting flow may cause damage sooner than a nutritional shortage.
Damaged margins on leaves do not necessarily call for additional fertilizer. First review EC, liquid temperature, moisture availability and air movement. Excess dissolved salts can worsen root damage and magnify stress caused by water or greenhouse conditions.
When heat or contamination reaches the root area
Algae develops where light and moisture persist. Seal gaps around pots and tubing, keep the tank covered, remove visible growth and wash surfaces before another crop. Stop the light at its entry point before considering a chemical treatment.
Brown, slimy or musty roots suggest that conditions below require attention. Possible causes include excessive liquid temperature, poor oxygen supply, stagnant areas, inadequate sanitation or disease. Separate badly affected plants, restore appropriate aeration, circulation, depth and temperature, and sanitize the equipment before planting again.
Leaks that keep returning often reveal poor routing or inaccessible joins. Arrange tubing so it can be seen without being stretched, and place catch trays beneath connections that could fail. Even a minor spill must not be able to reach electrical equipment, untreated timber, a doorway threshold or a walking route.
A particularly disruptive habit: altering the pH, mineral strength, liquid depth and lighting together. Change only one factor that your observations justify, then wait long enough to interpret the crop’s response.
Chapter 10 · Finish the crop before increasing capacity
Develop a reliable process before adding more pipework.
Pick loose-leaf lettuce over time by removing mature outside leaves and leaving the growing centre, or harvest complete heads at the preferred size. Once the crop is finished, pause before refilling. Drain and wash the equipment, study the roots and deposits, and compare the season’s records. A dependable baseline for the next planting is the most useful result of the first.
Continue with the same tank
Alter a single factor
Keep the work route open
Repeat the crop with a smoother and cleaner routine before installing another type of system.
Experiment with either another variety, increased tank capacity or a new season, rather than introducing all 3 changes together.
Only expand while all plants, outlets, tubing, electrical joins and washable surfaces can still be reached safely for maintenance.
If you want lasting materials, planned ventilation choices and an orderly garden structure, read about the Classic Aluminium Greenhouse. A well-planned hydroponic space should feel pleasant to enter while remaining open enough for routine upkeep.
Practical questions for Canadian growers
Beginning greenhouse hydroponics: FAQ
Will ordinary tap water work in my setup?
It often can, but its characteristics should be checked first. Read the latest report from the utility serving the property and test the original water for pH and EC. Hardness, alkalinity and existing minerals mean that water is not an empty base for a nutrient mix, even when it is safe to drink. Softened water may contain salts that make it no better for this purpose.
What is an approachable first system for greenhouse growing?
For herbs and leafy vegetables, consider a compact DWC tank that excludes light and receives continuous aeration. Its main parts and roots remain visible, while the design has fewer drippers and lengthy channels that could become blocked. Shade the tank, watch its liquid depth and aeration, and keep powered connections beyond the reach of spills.
Are heat and grow lights necessary in every season?
A lettuce or herb trial running from spring through fall may not require either one. Continuous production depends on the region, crop, glazing, insulation, available daylight and degree of temperature control. In many Canadian regions, winter daylight may not sustain demanding production, while summer brings a risk of excessive heat. Begin with a suitable local season, then add heating, artificial light or shade only when your records show a defined need.
When does the entire nutrient mixture need renewal?
No one schedule suits every tank. The decision depends on plant uptake, system capacity, the original water, temperature, crop stage and whether readings remain stable. At the end of each crop, renew the solution and perform a thorough cleaning. Replace it sooner if contamination appears, results become difficult to control or the crop continues to struggle after environmental causes have been checked. Good records make the timing increasingly specific to your setup.
Does soil-free growing guarantee organic or pesticide-free produce?
No. Hydroponics identifies the way roots obtain moisture and minerals; it does not establish organic status or dictate pest control. Careful sanitation and monitoring can reduce some problems associated with soil, but the crop still needs regular inspection and appropriate care. Before applying a pest-control product, search Health Canada’s current product and label databases, follow the approved label, and check any provincial or municipal restrictions at the destination.
References for continued learning
Background reading for planning another crop
Continue exploring Bloomcabin: planning an aluminium greenhouse with care · Bloomcabin greenhouse curtains · aluminium-greenhouse sliding-door choices
Planning your opening hydroponic season
Begin with a single tank rather than filling the entire greenhouse.
A single crop, an easily understood setup and an unobstructed maintenance aisle provide the foundation for a garden you can monitor, enjoy and enlarge only when experience supports it.
A single crop
Become familiar with its foliage, roots and pace of growth.
Become familiar with its foliage, roots and pace of growth.
A single setup
Arrange its liquid route so every part can be seen, understood and washed.
Arrange its liquid route so every part can be seen, understood and washed.
A dedicated maintenance aisle
Leave enough room to test, clean, ventilate and gather the crop safely.
Leave enough room to test, clean, ventilate and gather the crop safely.
