
Grey mould usually starts with one overlooked spot.
Greenhouse plant health / Canada
Grey mould usually starts with one overlooked spot.
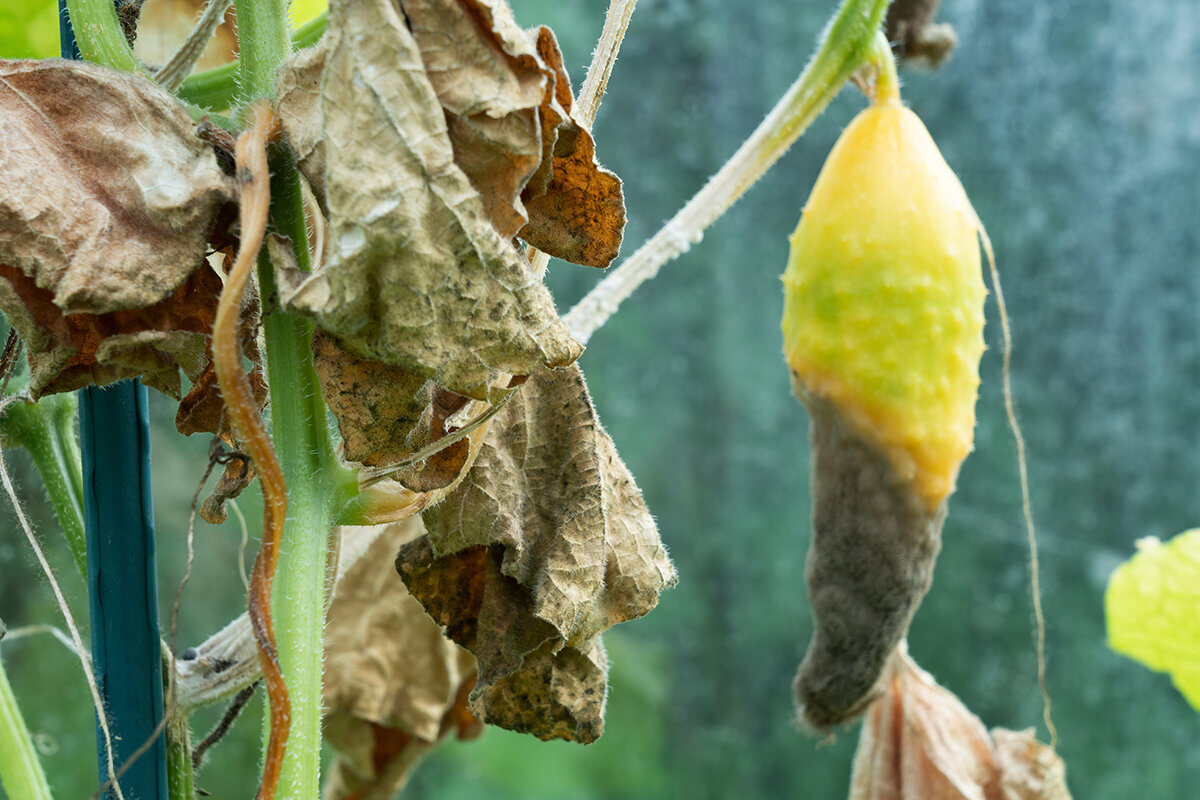
The first foothold is often easy to miss: a spent blossom lodged in a leaf axil, a damaged stem, two wet leaves pressed together or the decaying end of a fruit. Cool, humid nights make these small trouble spots especially worth checking.
Botrytis cinerea occurs widely. Susceptible tissue can soon develop its familiar grey growth when spores arrive and the surface stays wet. Resist the urge to spray immediately. First examine the symptom, contain the affected area, remove damaged material, help the plants dry and then strengthen the routine that prevents recurrence.
A useful task before night: As temperatures fall, clear away anything dead, injured or wet that is caught among the plants.
Immediate response / contain first, diagnose carefully
Work gently and remove only what is needed.
Fuzz alone does not confirm Botrytis. Even so, grey sporulation, softened tissue or a lesion that is enlarging should be handled cautiously. Shaking the plant, using an uncovered basket or rinsing it with a hose can scatter spores and fragments around the growing space.
- 01
Stop the current task.
Before pruning, picking or reaching through adjacent foliage again, deal with the questionable tissue. - 02
Contain it where you find it.
Set a sealable bag or container beside the plant before cutting, then move the removed material only after it has been enclosed. - 03
Take out all visibly affected tissue.
With a clean, sharp implement, carefully remove the flower, fruit or leaf together with any attached area that is visibly soft or collapsing. - 04
Check the conditions around the symptom.
Inspect the bench and floor for debris, and look within the crop for condensation, wet foliage, touching leaves and pockets where air barely moves.
The Classic Aluminium Greenhouse offers practical access to ventilation and uncluttered working routes. Good day-to-day care remains essential: you need to be able to examine the crop, wipe down surfaces and respond to changing weather without repeatedly shifting every plant.
Identifying the problem / fuzz is not a diagnosis
Consider the whole pattern before deciding what it is.
Typical grey mould produces a dusty or downy grey-to-brownish-grey covering on affected blossoms, foliage, stems or fruit. From several steps away, natural ageing, a different fungus, cold damage or wilt caused by root trouble can appear much the same. Judge the type of tissue, where the symptom began and the greenhouse conditions over the preceding days.
Signs that fit grey mould more closely
Look for a fine, grey, dust-like growth on dead or softened tissue; flowers turning brown; damage spreading outward from an old blossom, wound or injured fruit; or a stem mark where a petal, support clip or leaf remained damp against the surface.
Visible grey spores provide useful evidence, particularly after prolonged dampness and when the problem starts in ageing tissue. Confirm the conclusion against the plant’s other symptoms and recent conditions.
Soft tissue with no visible spores
Botrytis may be present before it produces obvious fuzz, leaving tissue water-soaked, brown or tan. The same appearance can result from another decay organism, impact damage, cold exposure, root trouble or a bacterial infection. Determine whether the change starts at the crown, roots, leaf edge or only at an isolated injury.
For seedlings, edible crops or valuable plants, separate the questionable plant from the rest. If the symptoms return or cannot be identified confidently, consult a plant-health professional or diagnostic service.
Ordinary plant ageing
A faded, dry blossom or a lower leaf yellowing evenly is not necessarily diseased. It becomes useful material for Botrytis only when it stays lodged in shaded, humid foliage or clings to a leaf or fruit.
Treat the two situations differently. Routine grooming is enough for dry, normally ageing growth; soft, marked or fuzzy material should be enclosed, removed and discarded hygienically.
Map of vulnerable sites — each marker identifies a risk, not a confirmed infection.
1 / Finished blossoms Old petals can trap dampness beside developing fruit, foliage or stems.
2 / Overlapping foliage Leaves pressed closely together receive less light and take longer to dry after irrigation or condensation.
3 / Recent cuts Handle new wounds cleanly and let them dry promptly instead of leaving them damp.
4 / Injured fruit Splits, feeding marks and bruises expose vulnerable tissue, particularly during humid weather.
5 / Fallen material Dropped fruit, petals and foliage left on staging or the floor may produce spores close to healthy plants.
6 / Marks on stems Promptly examine tan or brown areas beside wounds, clips and dying foliage.
The openings Botrytis exploits
The likely entry points are already part of a thorough greenhouse inspection.
Ageing, wounded and dying tissue is readily colonized by Botrytis, but that does not make the fungus benign. After it takes hold on a spent blossom, damaged stem or soft fruit, movement of air or water can carry spores elsewhere, as can tools, clothing and hands.
Many warning sites can be seen in a home greenhouse before symptoms develop. Tomato petals lodge in leaf joints, while cucumber leaves overlap. Pelargoniums, fuchsias and begonias may hold onto wilted flowers, and strawberry petals can sit beside ripening berries in a humid pocket. Each situation raises the opportunity for disease without making infection certain.
- Make an extra inspection after cool, overcast days. By noon everything may look dry, even though blossoms and leaves remained wet throughout much of the night and morning.
- Begin with unaffected plants that are dry. Attend to questionable areas at the end of the session. Afterwards, wash your hands and clean your equipment before returning to unaffected growth.
- Do not let benches or floors disappear beneath clutter. A clear surface makes dropped leaves, petals and decaying fruit much easier to find.
The critical window / cooling greenhouse to dry crop
Humidity is a clue; wet plant surfaces are the closer concern.
A relative-humidity reading is informative but cannot establish the disease risk by itself. As the greenhouse cools, flowers, stems and leaves may reach the dew point and stay wet. Moisture on the glazing is therefore a signal to inspect the plants too, not merely a cosmetic cleaning issue.
Late afternoon
Sunset
Night
Early morning
After sunrise
Allow drying time after watering
Irrigate early enough for stray water and damp surfaces to dry before the evening temperature falls. Deliver water to the growing medium around the roots rather than across flowers and foliage.
The greenhouse begins to cool
Metal, glazing and plants lose heat rapidly. Air exchange and warmth often decline first inside thick foliage and sheltered corners.
Conditions favour condensation
When humid air reaches a colder surface, foliage can become damp without conspicuous drops or unusually high daytime readings on the hygrometer.
Shorten the time plants stay wet
According to the weather, crop and installed equipment, balance modest warmth with managed venting and gentle circulation so moisture can leave plant surfaces.
Inspect, then refine the routine
Look among the leaves rather than judging only by the panes. Persistent dampness means reconsidering irrigation timing, plant spacing, circulation or the way heat and ventilation are coordinated.
A fixed infection threshold based on wet hours would not suit every plant, cultivar and temperature. Instead, use the evening-to-morning period as an observation window and avoid prolonged cool moisture on susceptible growth. Cornell’s horticultural guidance also identifies keeping condensation off plant surfaces as an important part of Botrytis management.
Convenient roof ventilation can make daily moisture control easier. The Classic Aluminium Greenhouse includes roof windows, and automatic openers may help the vents respond more consistently during ordinary use. They do not replace checking the forecast and inspecting the crop.
Spacing
Leave working channels for air, not gaps that only look tidy.
Position containers and grow bags so their leaves are not continually tangled. Support cucumbers and tomatoes before growth becomes dense, remove diseased or very low foliage and open up flowering plants before they form an unbroken wall. A compact circulation fan may lessen humid dead spots, but aim for quiet movement throughout the crop rather than a constant strong stream on one plant.
Watering
Direct irrigation below the foliage and preserve a dry evening.
Drip lines, a gently used watering can aimed at the container edge and similar near-soil methods reduce wet foliage. Morning irrigation leaves time for accidental splashes to evaporate, whereas a late session may keep plants damp all night. Adjust the amount to both crop demand and current weather; a gloomy, humid week should not follow the pattern used in warm, sunny conditions.
Pruning
Choose a dry time for clean pruning work.
Whenever possible, harvest, remove side shoots and prune while foliage is dry, using sharp and clean equipment. Keep wounds no larger than necessary. Clear yellow leaves and old flowers before undertaking heavier pruning. If several plant groups need attention, begin in the healthiest section and end where symptoms are suspected.
Season
Be more watchful as available light and natural drying decline.
Canada’s growing conditions differ sharply among regions and through the year. Extended cloudy spring weather, rainy summer stretches and the transition from late summer into autumn can all prolong dampness. Bright summer conditions may call for venting and, when appropriate, shade; cooler periods require a careful mix of air exchange, circulation and modest heat that does not chill the plants.
For a layout that supports proactive climate care, consider the Classic Aluminium Greenhouse. Its accessible roof windows make it practical to include door use and low-speed air circulation in a regular greenhouse routine.
Sanitation / plan the path out
Keep suspect material from travelling among healthy plants.
Containment should begin where the symptom is discovered. The safest route is brief and direct—from the plant into closed waste—rather than a trip around the structure with clippings exposed in a harvesting container.
Do not leave spent blossoms, infected leaves or decaying fruit below staging, just outside the entrance or in an uncovered compost pail near the crop. Deteriorating material may remain a source of spores.
Find→
Clip→
Seal→
Carry out→
Clean up
Before cutting
Take a sealable container or bag directly to the symptomatic plant before removing anything.
This reduces unnecessary movement and helps keep the clippings away from unaffected foliage.
Making the cut
Use sanitized, sharp equipment to take off tissue that is diseased, softened or producing visible spores.
A controlled cut avoids tearing a larger injury and leaves a clearer surface to inspect.
Sealing the material
Transfer every clipping directly to the container and seal it while still in that part of the greenhouse.
Avoid shaking the material, laying it on staging or transporting it uncovered among the plants.
Taking it away
Remove the waste without delay, then follow the household- or green-waste route available in your municipality.
Keep decaying piles away from entrances, roof openings, windows and other vents.
Preparing to resume work
Scrape or wipe all plant fragments from shears and worktops first. Next, use an appropriate cleaning product exactly as directed. Wash hands or gloves as well before returning to unaffected plants.
The initial removal of debris matters because organic residue may block a cleaning or disinfecting product from contacting the tool or surface.
Use this process during ordinary weekly maintenance instead of waiting for a serious outbreak. Open paths, uncluttered worktops and robust components make close inspection and cleaning easier. Take a look at the Classic Aluminium Greenhouse when choosing a structure around the way you prefer to tend plants, monitor conditions, operate vents and clean.
Treatment / support prevention after cleanup
A product may play a supporting role, but it cannot compensate for persistent moisture and poor sanitation.
For active Botrytis, begin by cutting out affected growth and changing the conditions that encouraged it. A registered fungicide or biological pest-control product may form one part of a broader plan for protecting healthy tissue. Nothing applied to the plant will restore material that has already rotted or been destroyed.
Priority A
Correct the growing conditions before reaching for a product.
- Promptly clear old blossoms, diseased fruit, dead foliage and all other crop debris.
- Limit wet surfaces by irrigating sooner, managing vents, applying suitable modest heat and maintaining quiet air circulation.
- Give the plants more room and separate compressed, humid foliage.
- Examine the surrounding plants, staging and floor near the original symptom.
Priority B
Match any pest-control product to its Canadian registration and label.
- Search Health Canada’s current product and label records. Confirm that the registration and directions cover the particular plant, Botrytis, greenhouse location and intended type of user.
- Read and obey the entire label, including the application method and rate, protective equipment, ventilation instructions, waiting periods and maximum number of applications.
- If the label permits repeated use, include resistance management in the plan rather than repeatedly depending on the same mode of action.
- Registration for a different vegetable, ornamental plant or outdoor site is not permission to use the product in this situation.
Biological products: useful only in the right preventive program
In some crops and production methods, biological pest-control products or antagonists may contribute to management. Performance varies with formulation, plant, timing, temperature, disease pressure and correct handling. They tend to be most valuable before Botrytis is well established and when moisture control and sanitation are already in place. A biological origin does not establish that a product is registered or suitable for every greenhouse, ornamental, vegetable or home-garden use.
Conventional fungicides: make a crop-specific, informed choice
Where persistent pressure and crop value warrant a registered fungicide, product selection should also address Botrytis resistance. Do not improvise mixtures, change label rates or spray on a calendar without an identified need. Severe stem symptoms, recurring disease or several separate infection sites call for qualified advice focused on the crop concerned.
Registration requirements in Canada: Start with Health Canada’s current pesticide and label information. Pesticides sold or used in Canada—including synthetic, natural and biological products—require Canadian registration, and the approved label must cover the crop, pest, location and user involved. Observe every direction concerning application rate, safety measures, ventilation, waiting periods and permitted application count. An old recommendation list is not a substitute for a current label check.
Treat glazing, vent access, walkways and space for circulation as connected parts of the growing plan. The Classic Aluminium Greenhouse combines roof-level ventilation with an orderly frame, helping create a greenhouse that is straightforward to enter, inspect and keep clean.
Recovery / look for evidence of improvement
Improvement is visible when new susceptible growth remains unmarked, moisture clears reliably after irrigation and dropped blossoms, leaves and fruit no longer accumulate on working surfaces.
For the coming 72 hours
Inspect both the original location and nearby plants once each day. Enclose and remove any newly questionable material immediately. Check under leaves and inside thick growth rather than viewing only the side facing the walkway.
During the following week
Record when moisture first forms and when it clears. If plants are still damp on repeated mornings, alter a single manageable factor—irrigation time, spacing, circulation or the balance between ventilation and heat—and observe the result.
Before planting the next crop
Select plants and varieties that fit the available room, reserve time each week for grooming, and clean the bench, floor and worktop whenever you harvest or prune.
For a growing area arranged around easy access, see the Classic Aluminium Greenhouse. In everyday use, a straightforward habit that is followed consistently usually outperforms an elaborate system that is difficult to maintain.
FAQ
Practical answers for a greenhouse where grey mould has appeared.
Is a plant with Botrytis still salvageable?
Often it is, provided the affected area is limited and addressed promptly. Cut away damaged portions with some clearance from what is visibly unhealthy, clean the immediate surroundings, improve drying and inspect frequently. Isolation or disposal may be wiser when stems are badly affected, several sites are involved or spores are widespread. Diseased tissue will not become healthy again.
Will reducing humidity by itself stop Botrytis?
No. Humidity reduction may help, but condensation, wet surfaces, stagnant air, spent blossoms, wounds, dense foliage and crop debris interact. Focus on shortening the cool, damp intervals experienced by susceptible tissue.
Can I rinse grey mould from the plant?
No. Rinsing may disperse spores while keeping foliage wet for longer. Enclose and remove affected growth, then correct irrigation and environmental control. Apply a pest-control product only when its Canadian registration and label cover the crop, Botrytis, greenhouse use and intended user.
Should diseased material be added to a backyard compost pile?
Sealed household- or green-waste disposal is the cautious option for material that is visibly fungal or producing spores, subject to local disposal rules. A home pile may not heat uniformly enough to destroy plant pathogens dependably. Keep the waste enclosed while passing through the greenhouse and do not store it beside the structure.
How can mould follow a cold, dry-watering night?
Falling temperatures may cool glazing and plant tissue to the dew point. Water vapour in the greenhouse can then form droplets on blossoms, stems and foliage even when no irrigation occurred. Inspect the middle of dense plants in the morning and refine irrigation timing, venting, circulation and modest heating as appropriate.
References and additional reading
Starting points for sound identification and plant-specific decisions.
Effective Botrytis management varies with the plant, production method, weather and current product registration. For Canadian pest-control decisions, begin with Health Canada’s registry and approved labels. The university resources that follow provide further detail about symptoms, moisture, sanitation and integrated greenhouse management.
Continue with Bloomcabin: made-to-measure greenhouses · intelligent greenhouse ideas · premium aluminium greenhouses and conservatories
- Health Canada — pesticide product and label databases
- Health Canada — pesticide registry information
- Government of British Columbia — pesticide labels
- Cornell University Greenhouse Horticulture — Botrytis Blight
- UMass Amherst — Botrytis in greenhouse crops
- UConn Integrated Pest Management — Botrytis in the greenhouse
- Penn State Extension — grey mould in bedding plants
Before the greenhouse cools for the night
Clear vulnerable growth ahead of dusk.
A strong end-of-day habit is uncomplicated: leave the plants as dry and open to air as conditions allow, with ageing material removed before it can become the next site for grey mould.
Classic Aluminium Greenhouse- 01
Gather old blossoms.
Pick up wilted flowers and loose petals before they lodge on fruit or in leaf joints. - 02
Inspect the humid interior of the crop.
Check beneath foliage, inside thick crowns and beside cool glazing instead of relying on the view from the central walkway. - 03
Reopen passages for air.
Move touching pots apart, support long shoots and preserve clear routes for inspection and circulation. - 04
Seal waste before carrying it outside.
Enclose questionable material where it is discovered, and leave no exposed pile within or immediately beside the greenhouse.
