
Managing Spider Mites in a Greenhouse.
Greenhouse field note 41 · Diagnosis and crop management
Managing Spider Mites in a Greenhouse.
Good control begins by slowing down and examining the plant closely. Webbing is often a late clue, not the first one. Pale pinpricks, stressed foliage and a few mites established in a warm, sheltered pocket are more typical early warnings.
Your first inspection
Look beyond the injured tissue.
Because spider mites pierce individual cells rather than chewing through a leaf, their feeding usually produces many tiny cream or yellow marks instead of a distinct hole. This stippled appearance may be mistaken for dust, nutrition trouble, ageing, heat injury or thrips. Resist the urge to treat everything immediately. First assess the plant as a whole, examine both leaf surfaces and look for organisms that are still active.
Read the pattern across the entire plant first. An outbreak may begin beside hot glazing, in an under-watered container, at one end of a cucumber row or inside mature foliage that is rarely handled. Note whether the marks cluster around veins, low on the plant, on its sunny side or across several adjoining pots. Next, turn over a selection of leaves. Two-spotted spider mites, Tetranychus urticae, commonly shelter below, where eggs, shed skins, mites and wisps of silk are easier to detect.
Magnification makes the search easier. If no hand lens is available, place white paper below a questionable leaf and tap the leaf lightly. Any specks that crawl deserve further investigation, although this test cannot identify a species by itself. Sample different heights and microclimates rather than relying on one damaged leaf. Establishing where living mites occur can spare unaffected parts of the greenhouse from unnecessary treatment.
The layout of the growing space influences how early problems are found. Paths, bench heights and plant spacing should let you turn leaves over, clean beneath staging and reach the centre of a crop without forcing pots together. A Classic Aluminium Greenhouse can provide the orderly access, ventilation choices and working room needed for routine crop care and pest surveillance.
01 · Whole-plant clues
Map where symptoms occur.
02 · Leaf clues
Compare the markings.
03 · Active clues
Verify the population.
Whole-plant clues. A dull grey-green cast, marked lower foliage or one struggling plant may identify the original hotspot. Record or tag its position so the next inspection covers the same place.
Leaf clues. Scattered pale points may run together into mottling and eventually a flat bronze colour. Review several leaves from above and below instead of judging the outbreak by its worst-looking leaf.
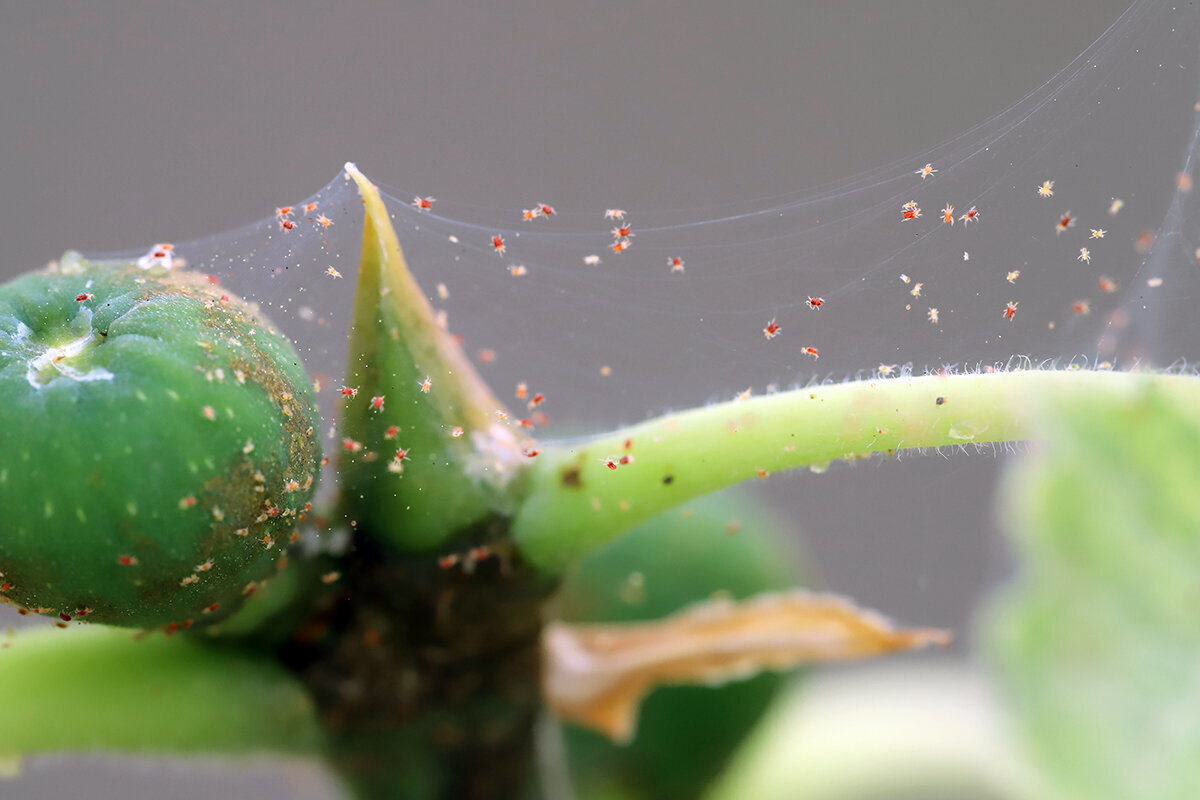
Active clues. Check veins and leaf junctions for crawling specks, rounded eggs, whitish shed skins and nearly invisible strands. Their presence helps distinguish ongoing feeding from damage left by an earlier population.
A guide to visible injury
How stippling progresses toward bronzing.
Use symptom severity to decide which plants need attention first, not as a direct count of living mites. Extensive bronze tissue may remain after a population has fallen, while a mostly green plant can harbour new eggs and feeding stages. Pair the permanent pattern on the leaf with a fresh search underneath for present activity.
Spider mites belong to the arachnid group rather than the insects. Adults are so small that an unaided observer may see only a crawling point. Their appearance varies with stage and colour and can include green, yellow or red tones. Tetranychus urticae is an important protected-crop pest and often shows two darker patches, but identification and management should be based on the full set of plant evidence, not colour by itself.
Scattered stipples
Joined mottling
Bronze tissue
First silk
Declining leaf
Confirm the cause
Separating spider mites from similar problems.
Many disorders can create pale marks, so stippling alone is not conclusive. Ask whether the distribution matches cell-feeding mites and whether you can locate mites, eggs, silk or shed skins. Compare upper and lower surfaces, mature and emerging leaves, symptom locations, dark droppings and tissue texture. Recent heat, uneven irrigation and foliar sprays can also explain a sudden change.
Thrips often leave silvery or pale scratches rather than an even field of points. Slender insects and dark fecal specks in blossoms, folds or surface crevices provide additional clues. By contrast, hard-water marks and dried spray deposits remain on top of the leaf and will often lift with a damp wipe; mite stippling is damaged tissue and cannot be wiped off. An imbalanced water supply can cause oedema, which tends to look corky, raised or blistered. Natural senescence is usually steadier and more uniform than fresh stippling spreading through one warm pocket.
Wilting, curling and irregular growth can also arise from root or environmental stress. Without crawling mites, eggs, silk or the characteristic fine points below the leaf, examine irrigation, the root area and recent greenhouse conditions first. If the symptoms continue or remain difficult to explain, obtain advice from a qualified plant-health professional rather than applying a pesticide speculatively.
How a few mites turn into a greenhouse outbreak
Warm pockets, dry roots and missed inspections increase risk.
Conditions inside the structure influence both mite reproduction and the plant’s ability to tolerate feeding. Warmth can favour faster population growth, while recurring root-zone dryness adds stress. Dust, packed containers, hidden leaf surfaces and delayed detection make management harder. No single development schedule applies to every situation because host, species, temperature and microclimate all interact. Regular scouting is therefore more useful than counting on a fixed number of days.
Area oneSun-warmed foliage
Area twoMoisture-stressed roots
Area threeCrowded growth
Area fourA population found late
Sun-warmed foliage: Foliage close to glass, containers facing the sun and stagnant air near the roof may experience greater heat than the reading taken beside an open entrance.
Moisture-stressed roots: Frequent shortages of water compound leaf loss and leave the plant less able to withstand feeding that began as a limited patch.
Crowded growth: Overlapping foliage gives mites protected routes to adjacent plants. It also obstructs visual checks and prevents water or a registered contact product from reaching leaf undersides evenly.
A population found late: Adults, young stages and eggs may all be present together. If a response affects only the exposed stages, activity can resume unless the plants are examined again.
Prevention does not mean driving greenhouse humidity as high as possible. A better approach combines steady plant care, timely shade and ventilation, clean accessible benches and frequent observation. The aim is to notice a small cluster before tangled foliage gives it a protected, silk-covered refuge.
Design conditions for prevention
Keep every crop within view and reach.
Inspect purchases before placing them among established plants and, when space allows, observe them separately at first. Herbs, vegetable seedlings, annual flowers and overwintered containers may carry a small population without conspicuous damage. Keep a simple log with the crop, position, date, symptoms, organisms found and response taken. Over time, those notes reveal recurring hot pockets and vulnerable plants more clearly than recollection alone.
Irrigate to support consistent growth, not to rescue a repeatedly wilted plant. Saturating a dry root ball will not make spider mites vanish, and wetting leaves does not replace appropriate root-zone watering. Use container weight or medium moisture as a guide and meet each crop’s needs as evenly as practical. A planned growing room such as the Classic Aluminium Greenhouse gives routine watering and inspection a clearer physical route.
Judge ventilation and shade by conditions around the foliage. Roof vents, open doors and suitable shade can reduce severe heat pockets, but observation remains essential. Across Canada, outside weather and seasonal patterns differ greatly; even a cool outdoor day can produce strong solar heating behind glazing. Leave enough working space to reach each crop. The Classic Aluminium Greenhouse can be planned with unobstructed aisles, comfortable working heights and adequate separation between plants.
Clean glazing, floors, bench bottoms and container rims often enough that debris does not hide a developing problem. Dust may favour mite pressure, and abandoned foliage makes careful inspection difficult. Remove leaves that are badly damaged when the plant can spare them, seal infested waste and carry it away from the structure. Avoid placing a badly infested plant or fresh prunings in an uncovered compost heap immediately beside the greenhouse.
- New plants: hold them apart, examine the lower leaf surfaces and repeat the check before adding them to the collection.
- Plant spacing: leave breaks between canopies rather than allowing foliage to form continuous routes from pot to pot.
- Watering: maintain suitable root moisture without swinging from drought to permanently waterlogged medium.
- Heat: check the environment where the leaves sit on bright afternoons instead of relying solely on an earlier forecast.
- Scouting frequency: inspect no less than once a week, with extra checks in hot conditions, after new plants arrive and while mites remain active.
Successful treatment depends on access
Direct the response below the leaves and return to assess it.
For an early, contained infestation on a manageable plant, a gentle, well-directed stream of water may remove some mites and silk. Protect delicate tissue and avoid working under intense midday sun. Before using any pest-control product, confirm that it has current Canadian registration and that its label covers the intended crop and setting. Contact-based options cannot affect a colony they never touch, so careful placement matters more than extra concentration or indiscriminate spraying.
Poor coverage
Treating only from above
Planned coverage
Create access first
An excessive response
A larger dose is not a better dose
Treating only from above. Moisture may coat the tops of the leaves while mites remain sheltered below. The crop then appears to have been treated even though the principal feeding area was missed.
Create access first. Separate containers and gently reposition foliage so each section can be approached according to the pesticide label or beneficial-organism directions. Return later to verify the result; one application may not encounter every developmental stage.
A larger dose is not a better dose. Excess product, an unsuitable treatment or application to overheated foliage can damage the crop and beneficial organisms. Observe every label direction, including precautions, temperature limits, intervals and restrictions.
A few mites on one accessible plant may be managed through separation, careful rinsing, selective removal of ruined foliage and close reassessment. A broader outbreak needs a coordinated plan that includes sanitation, less plant stress and an appropriate control method. Phytoseiulus persimilis and other predatory mites may be used against spider mites under cover, but the right species, release quantity and method depend on the crop, climate, infestation and earlier treatments. Ask the supplier about compatibility because broad-spectrum pesticides can disrupt biological control.
Using pest-control products in Canada: Confirm a product’s Canadian registration in Health Canada’s current registry before use, then read and follow its current label. The label identifies authorized uses, directions, precautions and restrictions; general garden marketing is not a substitute for that verification. Also ask whether the destination province or municipality places additional conditions on the intended use.
Measure recovery through repeated evidence
Use emerging foliage to judge progress.
Old stipples and bronze areas are permanent, so their colour does not show whether management succeeded. Instead, watch for declining live activity, an end to new feeding marks, no additional silk and healthy emerging leaves that remain clear at later checks. Retain some functional marked leaves as reference points. Removing all of them at once erases the comparison between historical injury and new feeding.
Day 0Verify and limit the hotspot.Tag affected plants, move them apart where feasible, examine adjacent crops and note any active mites, eggs or silk.
First reassessmentInspect the concealed areas again.Return to lower surfaces, leaf junctions and crowded centres. Determine whether rinsing, beneficials or another treatment reached the places where mites were originally found.
Second reassessmentCompare permanent marks with new injury.Review tagged foliage beside the latest growth. Newly formed stipples, fresh eggs, crawling mites or additional strands mean the infestation is still active.
Once activity has stoppedResume regular greenhouse scouting.Retain your notes, address recurring irrigation or heat problems and preserve enough space around each crop to find the next hotspot promptly.
The structure can make this process easier. A Classic Aluminium Greenhouse can function as an organized growing room rather than an overfilled storage area. Preserve an aisle for inspections, keep vulnerable crops close enough to examine and adjust shade and ventilation for the site. For long-term accessibility, review the configuration choices available for the Classic Aluminium Greenhouse.
Questions greenhouse growers often ask
Practical answers for evidence-based scouting.
Is webbing always present when a plant has spider mites?
No. Delicate silk becomes easier to notice as numbers rise. At an earlier stage, the only clues may be stippling above and small mites, eggs or shed skins below. Treat webs as corroborating evidence rather than a prerequisite for diagnosis.
Do I need to remove every plant that has mites?
No. A lightly affected plant, especially one that can be reached easily, may respond to isolation, gentle washing or another appropriate method followed by careful monitoring. Removal becomes more reasonable when badly damaged, tangled growth cannot be examined or managed and continues to threaten neighbouring plants.
Can humidity by itself eradicate spider mites?
No. Consistent moisture suited to the crop helps avoid drought stress and is preferable to extreme heat and dryness, but raising humidity is not a complete management method. Constant dampness and persistently wet foliage may instead favour fungal problems.
May predatory mites be released after a spray treatment?
Sometimes, but the answer depends on the specific product and how long its effects remain. Some pesticides harm beneficial organisms more severely or for longer than expected. Review the registration and label, then consult the biological-control supplier about timing, predator choice, release method and environmental requirements.
What scouting interval is appropriate during an outbreak?
Shorten the ordinary weekly interval. How soon to return depends on the crop, temperature, population and response used. Revisit the same lower leaf surfaces early enough to detect mites emerging from missed eggs or colonies that remained sheltered.
Are these mites a type of spider?
They are tiny plant-feeding arachnids related to spiders and ticks, but they are not spiders. Heavy populations may cover plant surfaces with fine silk; this does not resemble the large radial web made by many spiders.
References and additional reading
Technical sources for diagnosis, prevention and product checks.
The German horticultural references below provide clearly attributed technical information about spider-mite diagnosis and biological management. For any pesticide decision in Canada, verify the current Health Canada registration and label and obtain qualified advice for the crop and destination.
Related Bloomcabin reading: Greenhouse curtains and shade planning · Planning the inside of a greenhouse · Weather and pest protection for an aluminium greenhouse
- North Rhine-Westphalia Chamber of Agriculture: Spider mites on greenhouse fruiting vegetables
- North Rhine-Westphalia Chamber of Agriculture: Spider mites and biological crop protection
- North Rhine-Westphalia Chamber of Agriculture: Predatory mites as spider-mite enemies
- Health Canada: Search registered pest-control products
- Health Canada: Current pesticide labels and regulatory information
- Julius Kühn Institute and German Environment Agency: Commercially available beneficial organisms
- North Rhine-Westphalia Chamber of Agriculture: Diagnosing and managing spider mites on fruiting vegetables
- North Rhine-Westphalia Chamber of Agriculture: Spider-mite biology and biological management
