
How level does a garden shed base need to be?
Garden shed planning
An uneven garden shed base can affect how the structure goes together, so check it before assembly rather than trying to correct the frame as you build. The aim is a level, flat, stable surface across the full support footprint—not simply ground that looks even from a distance. There is no single tolerance that can safely be applied to every model: use the chosen shed’s assembly guidance and ask for clarification if it does not state what variation is allowed.

How level should a garden shed base be?
Set the target using the garden shed manufacturer’s assembly guidance: the base should be level throughout the specified support area, and the model’s instructions take precedence over any general rule. A reading at one corner, or a surface that looks horizontal by eye, cannot confirm the whole footprint. The surface may rise along its length while appearing level across its width, so check more than one direction. Any permitted variation depends on the product and its support arrangement; do not invent a millimetre allowance or assume a small-looking fall is harmless. Aim for even support wherever the instructions require it, without abrupt ridges, hollows or unsupported gaps. If the instructions state a tolerance, check how it is measured rather than applying it by eye.
Before choosing or preparing a base, find the required footprint and any statement about level, flatness or support. If you are considering the Verdana 1 garden house listing, treat it as a model to investigate: do not infer dimensions or tolerance from its name or photograph. Check the model-specific instructions or ask the seller for them. If guidance is missing or unclear, have the supplier or installer explain what condition is acceptable before ordering materials or beginning assembly. Keep any reply with the instructions so everyone preparing the base works to the same requirement. The target should come from the shed you intend to buy, not from a threshold guessed from another building.
Level, flat and stable are different checks
Level describes whether a surface is horizontal; flat describes whether it has local bumps, hollows or a twist. A smooth plane can be flat while sloping, so flatness alone does not make it suitable. Conversely, a horizontal reading between two distant points can miss a dip or raised strip between them. A gentle overall fall and a local hollow are different conditions, even if both look uneven from the side. Check the whole supporting plane, not only whether the base looks tidy: the shed’s instructions may require a horizontal surface and an even contact area. When you report what you find, say whether the issue is a slope, a bump or a hollow.
Stability is a third quality: it means the base remains supported rather than shifting or settling under the conditions it is meant to handle. A top can be level and flat at the time you inspect it while the support beneath is unreliable. Separate the checks: is the top horizontal, is it free from local high and low spots, and is the support firm? A straightedge helps reveal surface shape; a spirit level checks horizontal. Neither tool proves what is happening below the surface. If someone uses these terms loosely, ask which specific base condition the chosen shed requires.
Why uneven support can affect assembly
Uneven support can change the way parts meet as a shed is assembled. The frame may sit out of square; joints, panels or pre-drilled fixing points can then be harder to line up, and an opening can be awkward to fit or use. The exact effect depends on the design, so these signs are not a measuring tool: a sticking door does not prove that the base is at fault. They are reasons to check the prepared surface and assembly steps against the instructions, rather than treating gaps or misalignment as purely cosmetic. Note whether a mismatch first appears at the base, a joint or an opening; that detail can help identify what needs checking.
If components do not meet as shown, pause rather than pulling them together or using fixings to disguise a mismatch. Forcing parts can hide an unresolved support problem and complicate later checks. The Verdana 2 garden house listing identifies a candidate model, but its acceptable base condition must come from model-specific guidance. Before purchase, locate the relevant instructions; during assembly, compare any mismatch with them and contact the supplier or installer if the cause is unclear. Record where the parts fail to align, and do not continue on the assumption that the structure will settle into place by itself.
Check the full footprint, not just one point
Begin with the shed’s specified base footprint, not an arbitrary rectangle in the garden. Use its assembly guidance or product documentation to mark the corners and edges on the prepared surface. If the instructions identify internal support lines or particular contact points, include them in the check; do not assume that the roof outline, external wall measurements and supporting area are identical. Measuring only one diagonal can miss a local change elsewhere. Where the required footprint is not clear, ask before setting out the base. Checking the wrong area can leave a level-looking surface that does not support the places the model is designed to rest. Removable marks or a simple sketch can help you return to the same points.
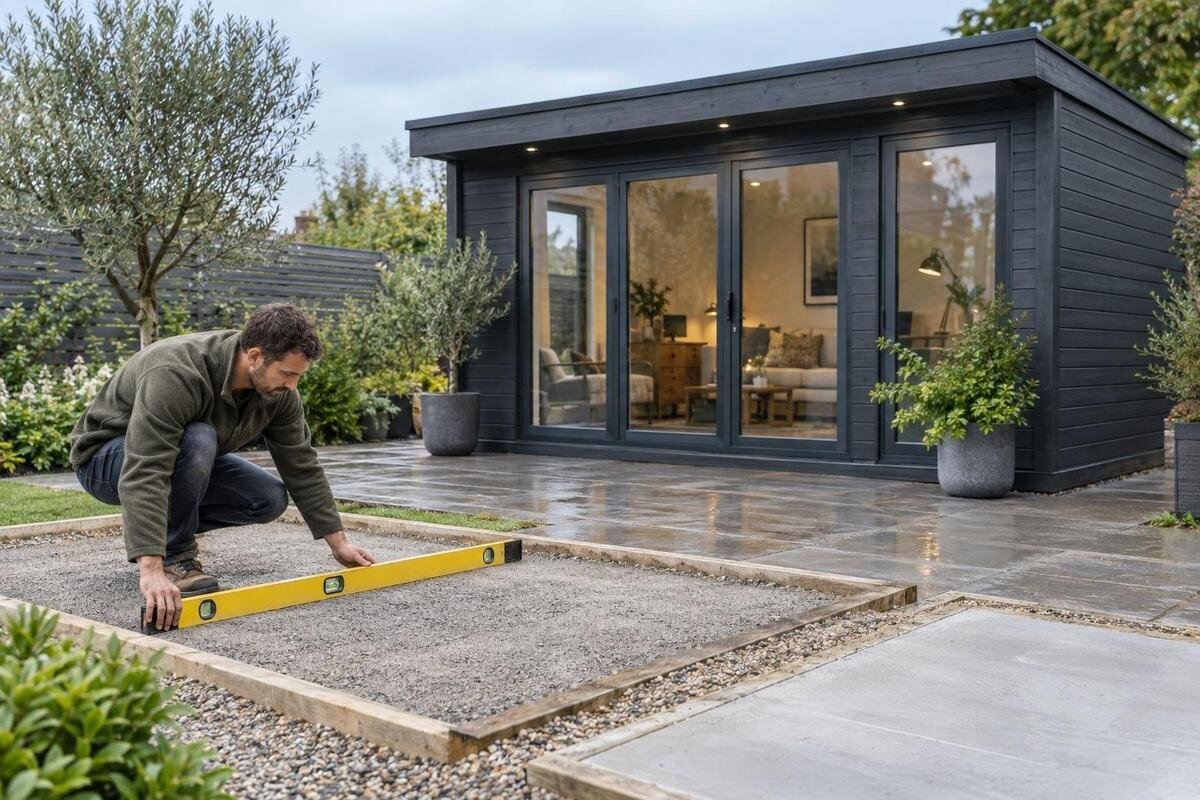
Check along the length and width, then across diagonal lines and between ends; include corners, edges and points through the centre. A spirit level helps determine horizontal, while a long straightedge can reveal a hump or gap. A short tool may miss changes over a wider span, so take readings in overlapping lengths and keep the straightedge aligned consistently. Note the location of each reading rather than recording one overall result. If the footprint is too large or awkward to measure reliably with the tools you have, ask an installer to check it instead of relying on your eye. Use the same points if you recheck after work, so the results can be compared.

Find dips, ridges and high spots
Inspect the prepared surface from several angles and in good light, but treat sight as a screening check rather than proof. A straightedge that rocks may indicate a high spot; a visible gap beneath it can point to a hollow. A twist may show up only when you compare the surface in another direction. Grass, debris or loose material can hide the actual top that will carry the shed, so do not assess a nearby patch and assume it tells you about the support area. Check the edges as well as the centre: a neat-looking border does not confirm that the whole surface is even. Mark suspected spots for a closer reading.
Record whether a variation is at a corner, along an edge or near the centre, and whether it repeats along a line or is isolated. That description is more useful than saying only that the base looks uneven; it helps an installer compare the condition with the manufacturer’s requirements. For the Durano spacious garden shed listing, request or locate the exact support footprint before marking out the site: the descriptive name does not establish where the base should be. An overall average can hide a local high or low point, so record individual readings. Do not guess that a variation is within tolerance; check the model-specific guidance before continuing.
Follow the chosen shed’s base requirements
Read the base section of the chosen shed’s assembly instructions before deciding how the site will be prepared. The guidance may specify the footprint, which parts need support, the permitted surface condition and any stated tolerance. It may also distinguish between the type of foundation and the level required at its top; these are related but not interchangeable decisions. Do not copy a layout or tolerance from another model, even if two products appear similar in a photograph. Make sure the document matches the exact model you plan to order; a guide for a different variant may not answer the question. If dimensions are given but acceptable unevenness is not, treat that as an open question rather than filling in the gap yourself.
Before committing to base preparation, ask the seller or installer for any missing model-specific information: which area must be supported, whether support is continuous or at identified points, how level is assessed, and whether a tolerance is stated. If the Veltor 1 garden-house listing is on your shortlist, use the exact model identity when requesting those details; do not infer a base design from the name. Keep the reply with the assembly instructions so the person preparing or inspecting the base can work to the same requirements. Clarify uncertainty before assembly, not after parts are laid out.
Check whether the support will stay stable
A level check measures the top surface at the time you inspect it; it does not show whether the underlying support will remain firm. Notice signs that deserve closer assessment, such as soft or disturbed ground, visible settling, a base that rocks, or water that repeatedly collects around the footprint. These observations do not diagnose the cause, and a level cannot tell you what foundation is suitable. They do mean that a good reading should not be treated as the whole answer. If the site changes after wet weather or previous work, mention that when arranging an assessment. Note when you first saw any movement and whether it has changed.
Where stability is uncertain, ask a qualified base installer or relevant building professional to assess the site and proposed support arrangement. Explain what has been prepared and what the shed instructions require, then ask whether the finished base can be checked against those requirements. When considering a model such as the Orello 1 garden-house listing, keep the site question separate from the product comparison: a listing or image cannot establish whether the ground at your chosen position will stay stable. Avoid adding arbitrary packing pieces or changing support points to compensate unless the model’s instructions specifically allow it.
Plan drainage and access around the shed
Level and drainage are separate checks. A surface can be horizontal while rainwater gathers beside it or runs towards it from the surrounding garden. Before fixing the position, notice where water collects after rain and whether the route around the footprint is likely to leave standing water. How to manage runoff depends on the site and base design, so ask the base installer if the proposed arrangement is unclear. Avoid an unplanned change that directs water beneath the support or leaves the base exposed to repeated pooling. If possible, consider what happens during wet conditions as well as on a dry inspection; one visit does not show every drainage issue.
Plan access as well as the support surface: installers need room to bring components into position, and the finished shed needs a usable route to its entrance. Check how the chosen model opens and what clearance its instructions call for, rather than guessing from a photograph. For the Modano 1 listing, confirm the actual entry arrangement in model-specific information if it is on your shortlist; do not assume a particular door type from its name. Consider the adjoining path and threshold too, so you can discuss access and rainwater with the installer without changing the shed’s base requirements.
When to ask an installer to assess the base
Pause before assembly if the instructions give no acceptable variation, readings across the footprint differ noticeably, or the prepared base rocks, settles or has areas you cannot check properly. The same applies when you cannot identify the support footprint or the site condition raises questions beyond levelling. These are not reasons to guess at a larger tolerance or alter the structure to fit. Ask the shed supplier or an experienced base installer to interpret the model’s requirements for the actual site. If a mismatch appears during assembly, stop and check before fitting more parts rather than hoping it will disappear as work continues.
Make the request concrete: give the exact model, point to the relevant instruction, describe the base dimensions and readings, and show where any dip or ridge appears. Ask whether the surface is within the stated requirements and what needs to be addressed if it is not; do not ask only whether it looks level. When discussing the wooden garden tool shed M listing, identify that exact candidate and share measurements from its intended footprint. Clear information lets an installer assess the issue instead of answering for a generic shed, and gives you a record to refer to before assembly resumes.
Record the checks before assembly
Keep a brief base record with the purchase and assembly information. Note the exact shed model, where its footprint or base requirements are stated, when the surface was checked, which points and directions were measured, and any areas that need clarification. Add photographs of the marked footprint and measurement locations, but do not use images alone as proof of level. A note such as “low area near rear edge” is more useful than a general comment that the base is uneven. This record helps you compare the site with the instructions and explain the issue if a supplier or installer needs to review it.
Carry out a final visual and level check after the base is fully prepared and before shed assembly begins, because site work can change the finished surface. Confirm that you are checking the actual support area, that there are no obvious local high or low spots, and that the result matches the model’s stated conditions. If you are also comparing the wooden garden shed S listing, keep a separate set of measurements rather than reusing dimensions or tolerances from another model. Leave any unresolved movement or mismatch for an installer to assess before fitting the building.
Frequently asked questions
How much unevenness is acceptable?
It depends on the garden shed and its support arrangement. Follow the model’s instructions for any stated tolerance; do not assume that a small-looking difference is acceptable. If the instructions do not explain how level the base must be, ask the supplier or installer to clarify before assembly.
How can I check whether the base is level?
Mark the specified support footprint, then check along its length, across its width and between points in the middle. Use a spirit level to check whether the surface is horizontal and a straightedge to reveal high or low spots. Note where readings differ; ask an installer to assess the surface if you cannot measure it reliably.
Is a flat base the same as a level base?
No. A smooth surface can slope and still be flat; level means horizontal. A surface can also read level between two points but have a hollow or raised area between them. Check the surface shape and horizontal level separately across the whole support footprint.
Can I correct an uneven base during assembly?
Do not force the frame or use fixings to pull components into alignment unless the shed’s instructions specifically allow an adjustment. Pause, compare the base with the model’s requirements and contact the supplier or installer if the cause is unclear. Resolve the issue before continuing.
What if the base is level but the ground seems soft?
A level reading describes the top surface at the time you check it; it does not confirm that the support beneath will remain firm. If the ground seems soft, has settled or has been disturbed, ask a qualified installer or relevant building professional to assess the site and proposed support before assembly.
There is no universal millimetre figure that defines a suitable base for every garden shed. The useful standard is whether the full support footprint meets the chosen model’s requirements and remains stable. Check the surface in more than one direction, record anything uncertain and resolve it before assembly, while the base is still accessible. That makes levelling a preparation decision rather than a problem discovered as the shed takes shape.
