
How Level Does a Garden Shed Base Need to Be?
Garden Sheds
An uneven garden-shed base can make assembly harder: panels may not meet squarely, fixings may be difficult to align and doors can bind. The right target is not a made-up millimetre figure that suits every shed. It is a base that is level and even across the complete footprint, with support arranged as the chosen model’s instructions require. Before ordering groundwork or beginning assembly, identify the exact footprint, check the surface in more than one direction and resolve high or low spots rather than forcing the shed into place.

Level and flat are not the same
Level and flat describe related but different things. Level means horizontal; flat means there are no unintended high spots, hollows or twists across the surface that supports the shed. A surface can be flat but sloping, while one that gives a level reading along an edge may still dip across its width. For assembly, a single bubble reading is not enough: check that the planned support area is level in both directions and even across its full extent. The assembly drawing matters too, because it shows where the shed is intended to bear on the base. Check at the planned support positions, rather than assuming that a satisfactory perimeter reading represents the centre of the base.
Use the top of the prepared base as your reference, not a nearby path or the general lie of the garden; those may slope differently. The measurement must cover the area that carries the shed, not just the space beside it. A level placed along one edge says little about a dip elsewhere, and a flat but tilted surface is not level. These distinctions help you describe what needs checking when speaking with the shed supplier or the person preparing the groundwork.
Why an even base helps during assembly
The shed’s floor or base, walls and openings need to meet in the positions assumed by its assembly instructions. If the supporting plane is twisted, corners can sit at different heights; joints and pre-drilled fixing points may then be harder to align. A wall line pulled out of square can leave an opening misaligned, and a door may rub or show an uneven gap. Such a problem can have other causes, so it does not prove the base is at fault. Checking levelness beforehand removes an avoidable source of assembly difficulty and helps prevent the panels being used to pull a poor base into shape. It also gives you a clear point at which to address a groundwork problem, before components are unpacked and positioned.
Whether you are considering the Verdana 1 garden shed or another model, use its current assembly material to see how the frame or floor is meant to sit on the base. That is part of choosing a shed, not a detail to leave until the kit is on site: the required footprint and support arrangement affect the groundwork you need to arrange. If someone else will prepare or inspect the base, share the instructions before work is agreed. A description such as ‘more or less level’ does not replace the model’s stated requirements.
Is there a universal levelness tolerance?
There is no reliable all-purpose figure in millimetres that can be applied to every garden shed. The permitted variation, if one is stated, depends on the exact model and how its base or floor is supported. A rule of thumb from a different shed, an online discussion or a previous installation may not apply to the one you have chosen. Look for the model’s base-preparation details, any maximum deviation and the span over which it is measured. If the instructions do not say, ask the supplier or manufacturer before you finalise the groundwork rather than guessing. A tolerance only has meaning when its measurement method is known, including the points between which the variation is assessed.
For a candidate such as the Verdana 2 garden shed, ask how much variation is acceptable across the specified footprint and where the measurement should be taken. Clarify whether the requirement refers to horizontal level, flatness or both, and which positions need support. Those answers help the person preparing the base work to the same standard as the person assembling the shed. Keep the response with the model documents, and do not treat another model in a similar range as confirmation of the tolerance.
How to check the whole base
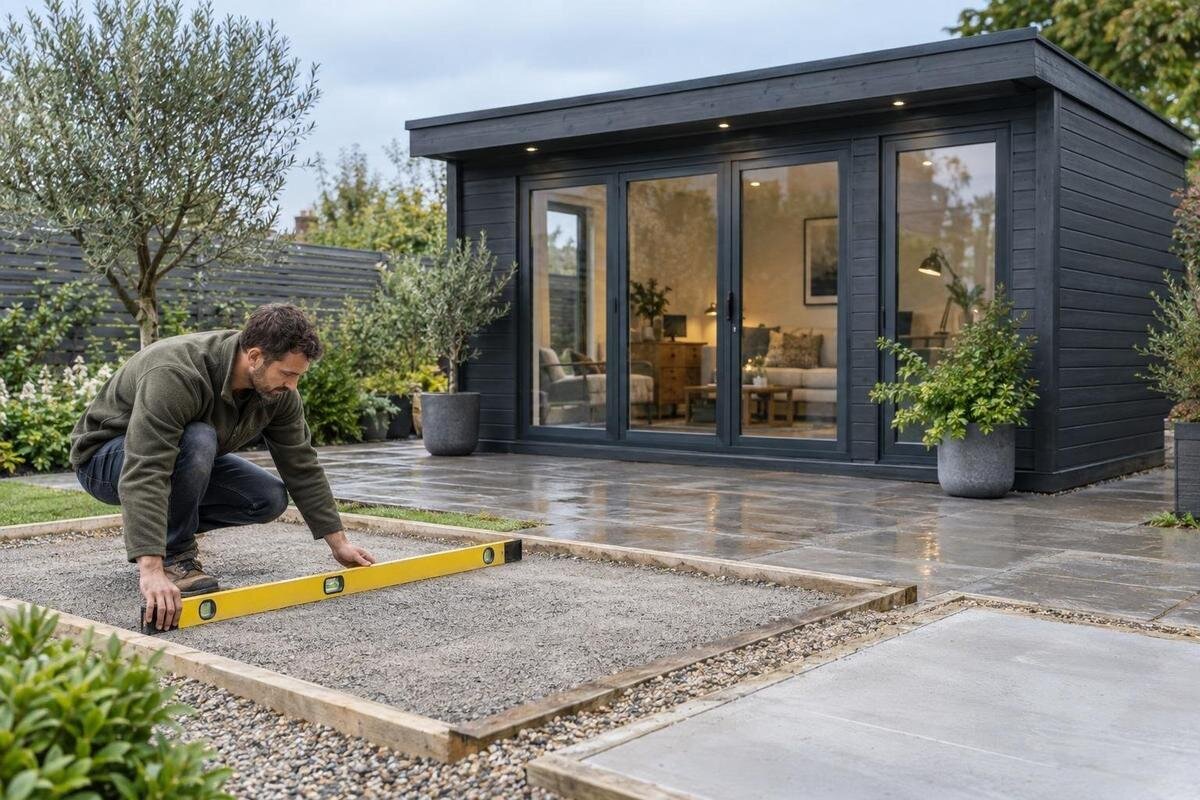
Mark the base outline using dimensions from the selected model’s current drawing, then take readings along each side, across the width and on diagonals where access allows. A long spirit level helps show whether a line is horizontal; a straight edge can reveal hollows or raised spots that a level alone may miss. Check the middle as well as the perimeter, including the support lines or points shown in the instructions. Keep the measuring tools on a clean contact surface: a loose stone or clump underneath can distort a reading. Repeat the check on several sections so no large area is skipped. Where a long straight edge spans the surface, look for daylight beneath it as well as checking whether its ends are level.
Write down where you took the readings and mark any variation on a simple sketch. That is more useful if the base needs attention than a note saying only ‘level’, which does not show what was tested. If you are considering the Durano garden shed, take the outline from its model information rather than estimating from a photograph or a similar shed. An image can help identify a model, but it cannot establish its ground footprint or an acceptable tolerance. Repeat any doubtful reading after removing debris and repositioning the level or straight edge.

Set out the base from the chosen shed’s dimensions
Before setting out or ordering the base, check what the shed’s listed dimensions actually measure. A drawing may give an outside wall size, a floor size or a separate base layout; these are not automatically interchangeable. Use the installation plan to locate the required support area and confirm which edges or positions must be level. If you set out the base from a guessed footprint, the shed may not sit over its intended bearing surface even if the pad itself reads level. Keep the drawing and measurement notes together so the groundwork and assembly are planned from the same reference. Check that the drawing is for the exact version you intend to order, since model names alone are not a substitute for a layout.
With the Veltor 1 garden shed on your shortlist, verify its dimensions and base arrangement before fixing the size of the prepared area. Keep the shed’s prescribed footprint separate from access space needed to bring components into position and assemble them; access is important, but it does not change the model’s base requirements. If you have not chosen a model yet, avoid ordering a finished base based only on a rough estimate. Choose the shed first, or obtain a layout explicitly intended to guide provisional planning.
Check which parts of the shed need support
Levelness does not tell you whether the base supports the right parts. The assembly drawing may identify a perimeter, bearers or particular support points; follow that layout rather than assuming the whole underside needs identical contact or that support at four corners is enough. A level surface can still leave a designed bearing line unsupported, while a local lump can lift one section and make the frame rock. Check the arrangement specified for the chosen model and compare it with the prepared base before placing the shed. Do not invent a support pattern because it was used for a different product. This comparison should be made before assembly starts, while the base remains accessible for inspection or correction.
Before choosing a base design or asking a contractor to prepare it, obtain the model’s support diagram and agree how it will be checked. If Orello 1 is one option you are comparing, confirm its current assembly requirements instead of inferring them from the model name or a picture. If the planned support does not match the available base, ask the supplier or a qualified installer how to resolve the discrepancy. Avoid filling gaps or altering bearing points by guesswork; any correction should preserve the arrangement the instructions call for.
Levelness does not confirm that the site is suitable
A level reading describes orientation; it does not establish that the ground beneath the base is stable or that water will drain appropriately. A surface can be horizontal today and move later, while a firm surface can still be out of level. Check separately for visible movement, soft spots, a base that rocks or water collecting where it should not. These observations do not diagnose the soil or tell you what foundation to build, but they flag questions a level alone cannot answer. Keep this assessment distinct from the horizontal and flatness checks. Note whether concerns occur at a particular edge or across the area, as this helps explain the issue clearly to the relevant professional.
If ground conditions are uncertain, the base needs substantial alteration or the prepared area has moved, ask a qualified groundworker or shed installer to assess it before arranging assembly. The instructions for the Modano garden shed can help define its required base interface, but a model document cannot establish that a particular patch of ground is ready. Clarify who is responsible for assessing the site and who will check the finished base. This is especially useful when groundwork and shed assembly are handled by different people, so an unresolved issue is not passed from one job to the next.
Recheck the base before assembly
Check the base again after the groundwork is complete, not only when its outline is first marked. Work around the area may have disturbed the surface, and loose grit or debris can create a false high spot beneath the measuring tool. Recheck along both axes, across the diagonals and at the support locations. Compare the result with the model’s stated tolerance, if one is provided, and confirm the dimensions have not changed. If work continues on or near the base before assembly, repeat the check afterwards rather than relying on an older measurement. Take final readings close enough to assembly that they describe the surface on which the shed will actually be placed.
Have the assembly guide for wooden garden shed M available before accepting the base, so the final check uses the right footprint and support positions. If a contractor prepared the area, ask what reference they used and whether they found any variation that needs attention; do not rely on an undocumented verbal assurance. Clear loose items before the kit is positioned, and avoid treating the shed floor or wall panels as a straight edge. They are components to assemble, not tools for correcting groundwork.
What to do when your measurements differ
If readings differ from the model’s requirement, pause before assembling the shed. Note where the difference occurs and whether it appears to be a slope, a local high spot, a hollow or movement, then compare that description with the installation guidance. Do not tighten fixings to pull misaligned parts together, force a door into place or add improvised packing unless the instructions or a qualified professional specify an appropriate correction. The right remedy depends on how the base was prepared and where the shed is meant to bear. Resolve the cause first, then test the surface again. Recording the location and direction of the variation makes it easier for another person to assess the same issue without relying on memory.
For wooden garden storage shed S or any other selected model, seek a correction plan that refers to its own support layout rather than a general claim that a small discrepancy never matters. If a contractor prepared the base, share the readings and ask them to review the work. If you are unsure how a change could affect support, consult the supplier or a qualified installer. After any correction, repeat the full level and flatness checks, including the centre and bearing points; a satisfactory reading at the altered patch does not confirm the complete footprint.
Questions to settle before ordering
Before placing the order or confirming groundwork, have these points clear: the exact shed model and its drawing; the base footprint and support arrangement; any stated levelness tolerance and how it is measured; and who is preparing and checking the finished surface. Ask for clarification where the instructions are silent, especially if a contractor needs measurements to plan the work. This is not about demanding a particular construction method; it is about ensuring the proposed base suits the model and that the person doing the work has the same information as you. Keep written answers with the order details so the agreed requirements can be referred to if questions arise later.
Also confirm what the purchase covers and what must be arranged separately. Do not assume that an order includes a prepared base, installation or a tolerance check. Agree when the base should be ready in relation to delivery and assembly, and who will flag a problem if the final measurements fall outside the stated requirement. These are practical ordering questions, not details to leave until assembly day. A clear model reference, current instructions and a recorded final check make it easier to coordinate the shed and its groundwork without relying on guesswork.
Frequently asked questions
How level should a garden shed base be?
There is no single millimetre figure that applies to every shed. Follow the tolerance for the exact model, measured over the span specified in its instructions. The support area should be level in both directions and even enough for the shed to sit as designed. If the instructions do not state an acceptable variation, ask the supplier or manufacturer before approving the base.
Is a level base the same as a flat base?
No. Level means horizontal; flat means the surface has no unwanted high spots, hollows or twists. A base can be flat but sloping, or appear level along one edge while dipping elsewhere. Check both qualities across the shed’s full support area.
Can I check the base with a spirit level?
Yes, but do not rely on one reading. Check along the length, across the width and, where practical, on the diagonals. A long spirit level helps assess horizontal alignment, while a straight edge can reveal local dips or raised spots. Include the centre and the support positions shown in the model’s instructions.
What should I do if the base is slightly out of level?
Compare the readings with the selected model’s stated tolerance rather than deciding that a small difference is acceptable. If the result falls outside the requirement, pause and ask the groundwork installer, supplier or a qualified shed installer about an appropriate correction. Recheck the whole support area afterwards; do not force shed parts into alignment.
Should I order the shed before preparing its base?
Choosing the model first usually makes it possible to check its exact footprint and support arrangement before setting out the base. If you need to plan groundwork earlier, obtain a model-specific layout rather than relying on an estimate. Also confirm what the order covers and who is responsible for preparing and checking the base.
Treat levelness as a check across the whole footprint, not as one bubble reading at a corner. Match the measurement to the chosen shed’s instructions, confirm that its intended support points are covered and recheck the base before assembly. If a reading falls outside the stated tolerance or the ground itself is uncertain, pause and clarify the issue before using shed components to force a fit. This keeps the model choice and groundwork aligned from the outset.
