
Spider mites in the greenhouse.
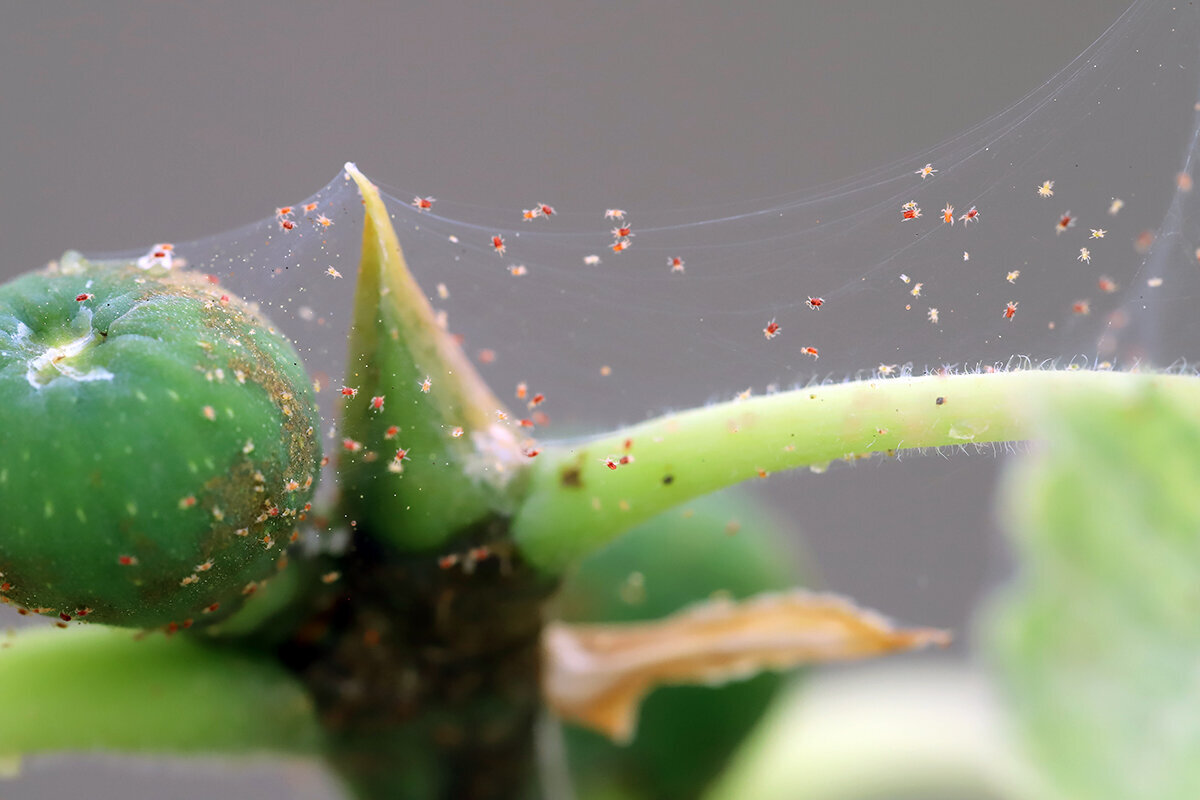
Greenhouse Note 41 · Diagnosis & crop care
Spider mites in the greenhouse.
Identification, prevention and control start with a close look at a leaf. The first sign is rarely obvious webbing. More often it is pale feeding marks, a stressed plant and a small population gaining ground in a sheltered, dry microclimate.
First inspection
Diagnose more than damage.
Spider mites do not chew holes or leave one clearly defined wound. They pierce leaf cells and draw out their contents. Early damage therefore appears as tiny pale or yellow dots: typical stippling. In a greenhouse, this can resemble dust, nutrient issues, leaf ageing, sun stress or thrips damage. Instead of treating everything in haste, assess the whole plant, the leaf surface and signs of live activity.
Start with the whole plant. Spider mites often begin as a local focus: at the warm end of a cucumber row, on a thirsty container plant, beside sun-warmed glazing or in older, difficult-to-reach foliage. Note whether stippling follows veins, affects lower leaves, occurs on one side, or has spread to nearby pots. Then turn over several leaves. The two-spotted spider mite commonly favours undersides, where animals, eggs, cast skins and fine silk are easiest to find.
Use a hand lens where possible. Alternatively, hold white paper beneath a suspect leaf and tap it gently. Tiny moving specks are not a certain species identification, but they justify closer inspection. Check leaves at different heights and in different climate zones. A sound early diagnosis prevents the entire greenhouse being treated because of one old damaged leaf when the active focus is still local.
Greenhouse design matters too. Paths, plant spacing and working height should let you lift leaves, clean beneath benches and reach dense growth without pushing plants together. A Classic aluminium greenhouse offers a considered basis for plant care, climate management and regular pest checks.
01 · Plant appearance
Read the distribution.
02 · Leaf surface
Read the pattern.
03 · Living clues
Read the colony.
Plant appearance. Watch for a tired grey-green look, stippled lower leaves and individual stressed plants as possible starting points. Mark the location rather than relying on memory.
Leaf surface. Pale punctures can merge into uneven mottling and later dull bronze areas. Compare upper and lower surfaces on several leaves, not just the most striking specimen.
Living clues. Look for moving dots, round eggs, pale cast skins and finest threads along veins or in leaf axils. Only these clues show whether visible damage is still actively progressing.
Damage atlas
From stippling to bronzing.
The severity of visible damage helps set priorities, but does not reliably show current population size. A heavily bronzed leaf may record an older infestation after mites have declined. Conversely, fresh eggs and active colonies may be present on a surprisingly green plant. Always assess both lasting damage and current activity on leaf undersides.
Spider mites are arachnids, not insects. Adults are very small and often look like moving dots without magnification. Depending on stage and colour, they may appear greenish, yellowish or reddish. The two-spotted spider mite, Tetranychus urticae, is especially relevant in small greenhouses; two dark back spots are typical. Decisions should still rely on the actual clues on the plant, not colour alone.
Fine stippling
Dense mottling
Bronzing
Silk appears
Leaf exhausted
Evidence, not worry
Spider mites and common lookalikes.
Stippling deserves attention, but it is not exclusive to spider mites. A reliable diagnosis answers two questions: does the damage fit sap-feeding mites, and can animals or direct signs of activity be found? Check leaf undersides, young and old growth, symptom distribution, dark droppings and surface texture. Also consider whether changes began after a hot spell, irregular watering or a spray application.
Thrips can cause pale to silvery, often streaked feeding scars that resemble mite stippling. Clues include tiny dark droppings and slender moving insects in flowers, tight leaf folds or on the surface. Lime and spray residues sit on the leaf and can usually be wiped away damp; spider-mite damage is within the tissue and remains visible. Oedema tends to appear as corky, blistered or raised patches linked to an uneven water balance. Normal ageing is usually more even: an old leaf loses vigour steadily instead of developing spreading fresh punctures in a warm zone.
Water stress and physiological leaf changes also call for restraint. Soft, curled or unevenly formed leaves alone do not prove spider mites. If moving animals, eggs, silk and fine undersurface stippling are absent, first check the root zone, watering and climate pattern. For unclear or advancing symptoms, specialist plant-protection advice is wiser than treatment on suspicion.
Why a small find becomes a greenhouse problem
Heat, drought stress and delay increase pressure.
Spider-mite development and reproduction are strongly shaped by conditions. Warmth can speed population growth, while drought-stressed plants are less resilient. Dusty leaves, crowded pots, inaccessible undersides and late detection compound the problem. There is no universal development time: temperature, host plant, mite species and microclimate act together. A consistent home-greenhouse inspection routine is therefore more reliable than a fixed number of days.
Zone oneWarm leaf surfaces
Zone twoDry root zone
Zone threeDense growth
Zone fourLate discovery
Warm leaf surfaces: Leaves beside glazing, pots on the sunny side and still air in upper foliage can be much warmer than a thermometer near the door suggests.
Dry root zone: Repeated lack of water increases loss of working leaf area and reduces a plant’s ability to tolerate a limited infestation.
Dense growth: Touching plants create protected routes between pots. Overcrowding also makes undersides harder to inspect and treatments harder to apply evenly.
Late discovery: Eggs, immature stages and adult mites may occur together. An action reaching only exposed animals can be followed by fresh activity without repeat checks.
Prevention does not mean forcing permanently high humidity. More important are less avoidable plant stress, timely ventilation and shading, clean accessible crops and an inspection rhythm that detects small colonies before dense foliage creates a sheltered, webbed microclimate.
Prevention through climate and access
A greenhouse you can inspect.
Inspect new plants thoroughly before they join established crops, and keep them apart for observation where possible. This is especially useful for herbs, young vegetables, annual flowering plants and overwintered containers, which can carry a light infestation without obvious damage. Keep a short note of plant name, location, date, symptoms, live findings and actions taken. Such records reveal recurring hot spots and vulnerable crops more reliably than memory.
Water for steady growth rather than crisis control. Spider mites do not disappear when a dry rootball is then kept waterlogged; wet foliage is no substitute for sound watering. Check pot weight or compost moisture and supply each crop according to its needs, as evenly as possible. A well-planned growing space such as the Classic aluminium greenhouse provides clear positions and dependable routes for regular care.
Ventilate and shade with actual leaf temperature in mind. Roof vents, open doors and suitable shading can soften extreme hot spots, but do not replace observation. In Malta, intense sunshine and dry, hot spells can place particular pressure on plants. A resilient growing space needs more than an attractive shell: it needs enough room to reach every plant. The Classic aluminium greenhouse supports practical planning; prioritise clear paths, suitable working heights and adequate space between plants.
Keep floor areas, bench undersides, pot rims and glazing clean. Dust can encourage mite problems, while discarded plant material obscures what is happening. Remove badly damaged leaves if this does not strip the plant unnecessarily. Bag infested material hygienically and take it out of the greenhouse. Do not place a heavily infested plant or cuttings beside the structure on an open compost heap where mites may reach the crop again.
- New plants: keep separate first, check undersides and inspect again before bringing them in.
- Plant spacing: Avoid continuously interlocking leaves that form bridges between neighbouring pots.
- Watering: Prevent repeated drought stress without compensating with permanently saturated compost.
- Heat: Assess stress at leaf level on bright afternoons, not only from the morning forecast.
- Inspection routine: Check at least weekly, and much more often in heat, after plant purchases or during an active infestation.
Treatment is about reach
Reach undersides, then inspect again.
A targeted rinse with water can mechanically reduce mites and webbing, especially in an early local infestation on manageable plants. Work gently and not in direct midday sun. For plant-protection products, use only products authorised in Malta for the crop, location and user category concerned. Many measures work only through direct contact. What does not reach the protected colony on the leaf underside cannot reduce it sufficiently. The aim is careful coverage, not a higher dose or hurried spray cloud.
Incomplete approach
Only from above
Methodical approach
Access before use
Excessive approach
More is not better
Only from above. Leaf tops are wetted while the colony below remains largely protected. The plant looks treated, but active mites remain in their preferred place.
Access before use. Move pots apart, support dense foliage carefully and work section by section according to product or beneficial-insect instructions. Inspect again rather than assuming one pass reached every life stage.
More is not better. Overdosing, applying on heat-stressed plants or using an unsuitable product can damage leaves and affect beneficial insects. Follow the label, protective measures, temperature guidance, waiting periods and all restrictions.
For a small isolated find, rinsing, removing severely damaged leaves and close follow-up may be enough. For a larger infestation, combine isolation, hygiene, stress reduction and an appropriate control strategy. Predatory mites such as Phytoseiulus persimilis are used deliberately against spider mites in greenhouses. Species, quantity and release method depend on infestation level, temperature, crop and products already used. Ask the supplier for advice and check compatibility with past or planned plant-protection measures. Broad-spectrum products can harm beneficials and disrupt biological control.
Plant-protection rules in Malta: Use only products authorised for the intended crop, use and user category in Malta, and follow the current label. Product status, restrictions and grace periods should be checked in the Maltese plant-protection register. A garden marketing claim does not itself prove authorisation. For an uncertain or current product status, seek specialist advice before use.
Recovery follows observation
The next leaf matters, not the old scar.
A stippled or bronzed leaf will not turn fully green again. Success is shown by less live activity, no new punctures, no increasing webbing and clean new growth that remains clear on repeated inspection. Leave a few cosmetically damaged but functioning leaves at first as comparisons. Removing every marked leaf immediately can make it harder to distinguish old damage from fresh feeding later.
Day 0Confirm and contain.Mark affected plants, isolate where possible, check neighbours and note live mites, eggs or webbing.
First follow-upLook beneath the visible action.Recheck undersides, leaf bases and dense plant centres. Confirm that rinsing or treatment reached the original colony zones.
Second follow-upSeparate old damage from fresh stippling.Compare marked leaves with new growth. New punctures, moving mites, fresh eggs or new silk mean activity continues.
AfterwardsReturn to the normal inspection routine.Keep records, correct recurring heat or water stress and preserve access around plants so a new focus is noticed early.
A well-planned structure supports this routine. The Classic aluminium greenhouse can be arranged as an orderly growing space rather than crowded storage. Keep a clear inspection path, place sensitive plants within reach and respond to your site conditions with ventilation and shading. The options of the Classic aluminium greenhouse suit a lasting, accessible and care-friendly layout.
Frequently asked questions
Clear answers for careful checks.
Can spider mites be present without webbing?
Yes. Fine silk often becomes clearly visible only with a larger population. Early colonies may show only pale stippling, round eggs, cast skins and tiny moving animals on leaf undersides. Webbing is a strong additional clue, but not a requirement for a reliable diagnosis.
Must an infested greenhouse plant be discarded?
Not automatically. A valuable plant with a light infestation can often be isolated, gently rinsed or treated appropriately and then checked closely. However, if a plant is badly damaged, very dense and no longer possible to inspect fully, it can become a continuing source for the whole crop. Hygienic removal may then be the sensible choice.
Does higher humidity eliminate spider mites completely?
No. A stable, crop-appropriate water balance reduces drought stress and is preferable to a hot, extremely dry microclimate. Humidity alone is not a control programme. Do not keep the greenhouse permanently damp or leaves constantly wet, as this may encourage other problems such as fungal diseases.
Can I release predatory mites after spraying?
Possibly, but compatibility depends on the product used and how long it remains active. Some products affect beneficial insects more strongly or for longer than expected. Check the label and authorisation, then ask the beneficial-insect supplier about waiting time, suitable predatory-mite species, release and required climate conditions.
How often should I inspect during an infestation?
Inspect more often than on the normal weekly schedule. The right interval depends on the crop, temperature, infestation level and chosen action. What matters is revisiting the same leaf undersides promptly, before missed eggs or sheltered colonies create surprising new activity.
Are spider mites actually spiders?
Like spiders and ticks, they belong to the arachnids, but they are tiny plant-feeding mites. Their silk forms fine threads and, in heavy infestations, dense webbing on plants; it is not a large radial spider web.
Sources and further reading
A short, dependable reading list.
These sources support this guide’s diagnostic and integrated approach. For specific crops and uses, the current Maltese authorisation, the relevant product label and professional advice always take priority.
More from Bloomcabin: Greenhouse curtains and shading · Setting up a greenhouse · Weather and pest protection in an aluminium greenhouse
- North Rhine-Westphalia Chamber of Agriculture: spider mites on greenhouse fruiting vegetables
- North Rhine-Westphalia Chamber of Agriculture: spider mites in biological crop protection
- North Rhine-Westphalia Chamber of Agriculture: predatory mites as natural enemies of spider mites
- EPPO: Malta plant-protection product register lookup
- Malta authorised plant-protection products database
- Julius Kühn Institute and German Environment Agency: beneficial organisms for purchase
- North Rhine-Westphalia Chamber of Agriculture: diagnosing and controlling spider mites on fruiting vegetables
- North Rhine-Westphalia Chamber of Agriculture: spider-mite biology and management
