
Can You Add a Second Module to a Pergola Later?
Pergola planning guide
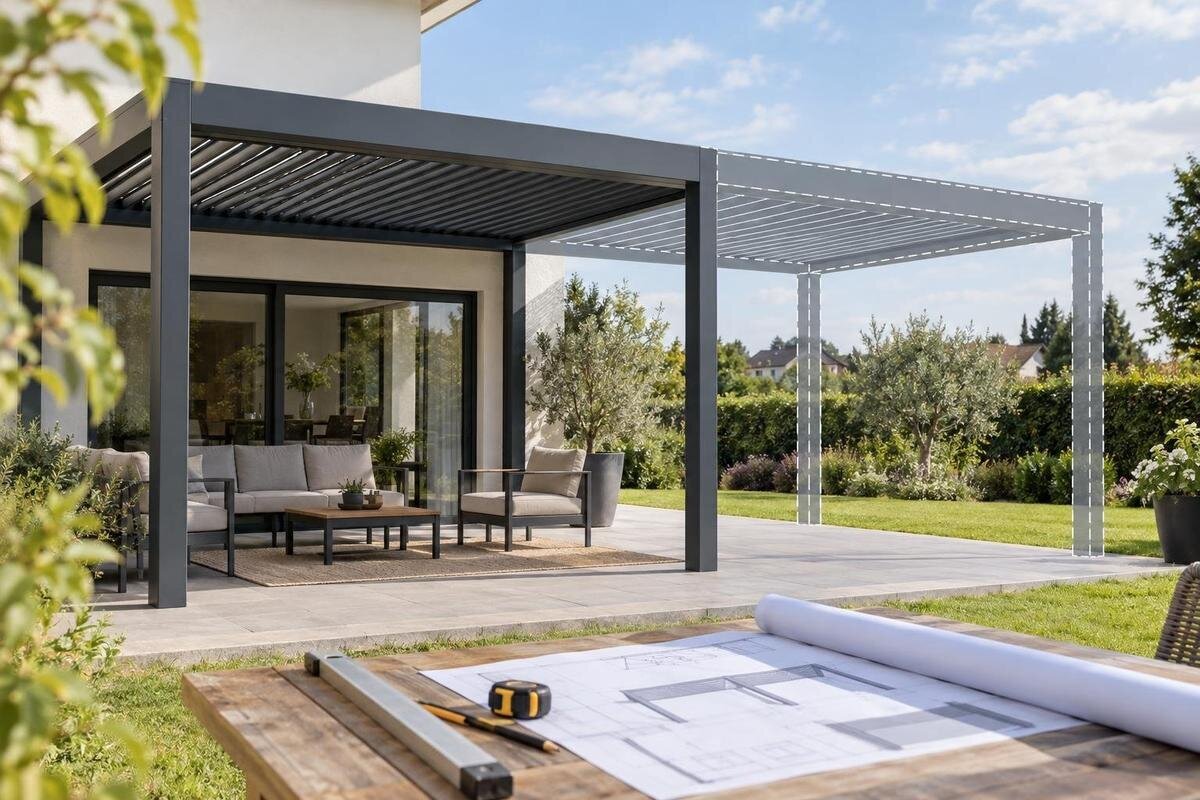
Adding a second pergola module later may be feasible, but modularity is not a standard promise attached to every pergola. The first frame has to be compatible with an approved connection, the supports and foundations must suit the completed layout, and roof water needs a clear route after both stages are in place. Future components also need to remain compatible and available. A separately controlled roof section is a different question: control zones describe how a roof is operated, not whether one structure can be joined to another. Treat the eventual layout as part of the first design, and get the connection, support positions and drainage shown in writing.

Connected modules or two separate pergolas?
First decide whether you mean one physically connected pergola or two freestanding structures arranged to look continuous. A true extension needs a joining method approved for the exact model and configuration; aligning two beams, matching colours or buying from one brand does not establish that the frames are designed to connect structurally or form a continuous roof edge. A catalogue entry such as the Bloomcabin Wall-Mounted Pergola identifies a starting model, but its name alone does not confirm that another module can attach. The supplier should state whether it approves that exact future addition and show where the structures meet.
If no approved join is available, two independent pergolas may still be an option, but treat them as separate structures with their own support needs, a deliberate gap, drainage routes and maintenance access. A close visual fit does not establish structural compatibility or a weatherproof join. Ask the supplier to describe the proposal as an approved multi-module structure, two independent frames, or a redesign that requires replacing part of the first. The distinction affects whether the roof line continues, where each footing goes and how water is managed. If the plan depends on removing or altering a post or beam, get that change documented before ordering the original; do not leave it to a later installer to improvise.
Decide what shape the completed pergola should take
Draw the eventual arrangement, not just the first purchase. Decide whether the new area would extend along the house, widen towards the garden, or sit nearby as a separate bay. Direction changes the design conversation: a side extension may meet a long edge, while an end extension may alter where supports sit; the approved options depend on the specific system. On the sketch, mark which roof edge should appear continuous, whether a gap is acceptable and which posts may remain visible. This gives the supplier a precise layout to assess rather than a vague request for a bigger pergola.
Also show how the full area will be used: door swings, dining or seating, the route to the garden, and room to clean or maintain the structure. Two modules that look alike are not necessarily compatible, so use exact model names and drawings rather than relying on the word 'module'. If you are considering the Bloomcabin Pergola, use that model name in your enquiry and show where you want the second unit to sit. Ask the supplier to mark the supported arrangement, any unavoidable post or gap, and the roof boundaries on the proposed plan. If you would accept separate frames, say so; that may change the design answer.
Request an approved connection drawing
Before ordering, request a supplier-approved drawing for both the first-stage and completed configurations. It should identify the exact models and modules meeting, their orientation, the relationship between frame and roof edges, any shared or separate posts, the supports that remain and any approved joining parts. Ask for a plan and a cross-section through the meeting point; a marketing image cannot establish the interface. If the later unit might be another model or a future revision, ask for written confirmation that the combination is accepted. Similar overall dimensions do not prove that profiles, fixings or roof sections are compatible. The Bloomcabin Bioclimatic Pergola page identifies a product, while only project-specific drawings can address your proposed join.
Find out whether the first-stage installation is complete in its own right and what the approved second-stage work would involve. Would it require removing an edge component, replacing a beam, adding supports, or changing existing fixings? Ask the supplier and qualified installer rather than assuming any of these can be done later. Record the model, configuration, approved join, prerequisites and exclusions in the quote or contract, and ask who will confirm compatibility when the second order is placed. Check that the drawing applies to the actual orientation and site attachment. If no approved detail is available, compare a separate second structure or a different initial design instead of treating an unconfirmed alteration as part of the original plan.
Map the full footprint and access routes
Ask for a site plan showing both stages at scale. Mark existing and proposed posts, the full roof outline, the house wall and eaves, doors and windows, boundary lines, paths, steps, drains and fixed services. Include the edges of paving or a deck and the exact space where a future post might stand. This is more than a measurement exercise: a post that fits the first module can block a doorway, a path or furniture after the second is added. A completed-layout drawing lets the supplier assess the join and helps the site professional identify whether the original frame would have to move. Add any outdoor tap, lighting or planting planned near the future supports.
Where the pergola meets the house, show the intended attachment and how the extension relates to it; do not assume a wall can take a particular connection or that a wall-mounted model can be extended in any direction. If you are considering the Wall-Mounted Pergola page, include the proposed attachment position in your site sketch so the supplier can assess that specific arrangement. Record finished surface levels and access for installation, cleaning and future repairs, including how equipment and components can reach the proposed area. Consider how later work could be carried out without damaging the first roof or finished surfaces. If the site changes before the second stage, have the drawing checked again rather than relying on measurements made before new paving, steps or services were installed.

Plan foundations for the completed structure
Foundations must suit the support arrangement required for the completed pergola. The first module may have a complete set of supports of its own; the later design may need additional posts or a specific approved connection that changes how the frame is supported. Do not assume a paved surface, existing deck or the first module’s footings will automatically support an expanded structure. Ask for the support-point layout for the final arrangement and have a suitably qualified local designer or installer confirm what the actual site requires. The plan should state which supports are installed in the first stage and which are deferred; generic footing dimensions are not a substitute for a site-specific design.
Clarify whether the first-stage foundations need to be positioned or built with the second stage in mind, and what must remain accessible. Confirm finished levels, the locations of future supports and the compatibility of specified anchors with the approved drawings. Raise unknown ground conditions, changes in level and the existing surface before choosing a staged approach. If unused foundation points are prepared early, ask how they should be protected and marked, and whether later paving or drainage work could cover them. Doing the work now may avoid disturbing a finished terrace, but only if the final arrangement and site design are settled first. Include the intended model, such as the one on the Bloomcabin Pergola model page, alongside the proposed support layout when discussing the foundations.
Show where roof water will drain
Roof drainage can change when two roof sections meet. Depending on the approved arrangement, water from the first stage could leave where the later frame is planned, or the connection may require a defined gutter or outlet. Do not infer that a seam is watertight or that one gutter can serve both sections because their edges line up. Request a drainage drawing for the first stage and a separate drawing for the finished layout, with gutters, outlets and downpipes identified. Ask where each outlet discharges and whether it remains accessible for cleaning; the answer must reflect the actual roof configuration and site. Ask what the supplier’s design provides for if an outlet is obstructed.
Trace the route all the way to ground level, not just to the nearest post. Confirm that water will not be directed onto an entrance, a path or an area where runoff could interfere with use, and coordinate outlet positions with the site’s drainage plan. If the roof has adjustable elements, ask which setting or position the drainage description applies to; do not assume every configuration behaves identically. When enquiring about the model on the Bioclimatic Pergola product page, ask for the drainage arrangement for your proposed layout and an explanation of what changes between stages.
Roof controls and physical expansion are separate questions
Separate roof controls and a physical extension are different decisions. Some systems may divide roof operation into more than one area while remaining a single structure; two complete frames could also have their own controls and still be unconnected. Neither setup proves that the frame, roof edge or drainage can be joined. Ask the supplier to mark the structural connection and the control boundaries separately on the drawings. That prevents a description such as 'two zones' from being mistaken for approval to add a second module later.
Describe the operation you want in practical terms: should each roof section move independently, or should both operate together? Ask what 'independent' means in the proposed system, which components are included in each stage, and whether later controls can work with the first-stage equipment. If power or controls are involved, have the supplier and a qualified electrical professional confirm any provisions that need to be planned; do not leave cabling or equipment decisions to guesswork. Put the chosen control boundary in the configuration notes, separate from the structural join approval. If a section will be added later, ask what operation remains available during the first stage and whether that temporary arrangement is supported.
Confirm future compatibility and product availability
Future compatibility is a supply question as well as a design one. Models, finishes, joining components or control equipment may change, and a product listed today is not a promise that the same configuration will be available later. Ask whether the supplier currently supports an extension for the exact starting model, which model or revision details identify compatible parts, and how a discontinued product or changed finish would be handled. Get the answer in writing; phrases such as 'you can add another bay later' do not specify a compatible system. If the Wall-Mounted Pergola listing is your starting point, ask which configuration reference should be used for a future order.
Ask whether a future order would require a new survey, an updated design or a matching component that is not guaranteed to remain in the range. If appearance matters, state whether a close finish is acceptable or whether you expect a consistent match, and have the supplier explain what can realistically be supplied. Distinguish a commitment to supply compatible components from an intention to try to source them later. Check how later work affects the applicable warranty terms instead of assuming the original cover automatically includes a second-stage addition. If the supplier offers to reserve compatible parts, get the exact terms in writing, including which parts are covered and what remains to be ordered.

Compare the costs and scope of both stages
Phasing can change the total project cost, not just the timing of payments. Compare a quote for the completed arrangement with a clearly scoped first stage. Ask each quote to state what is included or omitted: design and drawings, foundations, frame and roof components, delivery, installation, drainage work, electrical or control work where relevant, and reinstating paving or landscaping. A second visit or work around a finished terrace may affect labour and site preparation; ask the supplier or contractor to identify those items instead of leaving them implicit. If you are comparing options from the Bloomcabin Pergola listing, make sure each quote names the configuration and separates the product from the associated site work.
Get the division between present and later work in writing, along with assumptions that could change, who keeps the drawings and who confirms the later configuration. Ask whether the second stage must be carried out by the original installer or whether another qualified contractor can use the approved detail; confirm how any later alteration affects the supplier’s terms. Do not treat a future price, finish or supply date as fixed unless the agreement says so. For a project involving consent, insurance or shared property responsibilities, verify the position for the actual site with the relevant local council, insurer or qualified professional before committing. A changed design should not simply inherit a decision made for a different scope.
Keep records for the later installer
Keep a handover record that someone can use years later. Save the exact product and configuration name, final drawings, approved connection detail, site measurements, foundation and support locations, installation notes, drainage plan, and photographs taken before paving or cladding hides relevant areas. Include manuals for any roof controls and identify what belongs to the first stage and what was reserved for a later addition. Give the pack to the person managing the property as well as saving it digitally. A future installer should not have to infer the hidden layout from a brochure or from what remains visible above ground.
Before buying the second module, ask the supplier or an appropriately qualified professional to compare the original plan with the actual site and confirm that the proposed configuration remains supported. Changes to paving, services, house alterations, drainage or ground conditions can make an old drawing incomplete. If another contractor is engaged, send the record before they quote and ask them to identify anything they cannot verify. Keep any revised drawings with the originals, clearly identifying which version describes the work now proposed. This gives the later installer a record of both the initial installation and subsequent changes, rather than leaving them to work out which details still apply.
Frequently asked questions
Can I attach a second module from a different brand?
Do not assume that matching dimensions, colours or materials mean two brands can connect. You need an approved connection detail for the exact products and confirmation that it suits the site. If neither supplier approves a join, plan the units as separate structures or have a suitably qualified professional assess another design. Do not cut, drill or alter the original frame without approval.
Do separate roof-control zones prove that the pergola can be extended?
No. Control zones describe how roof sections operate; they do not confirm that frames or roof edges can be joined. Ask the supplier to show the approved structural connection, support positions and drainage separately from the control boundaries.
Should I install the second module’s foundations at the same time as the first?
There is no universal answer. Preparing them early may avoid disturbing finished paving, but only if the final layout and site-specific foundation design have been confirmed. Ask a suitably qualified local professional what should be built now, what can wait, and how any unused points should be protected.
Can two separate pergolas sit next to each other?
They may be an option if the site and each design allow it, but treat them as independent structures. Check post positions, access and drainage for both. Do not assume that adjacent roof edges form a weatherproof join or can share supports.
Can the supplier guarantee the second module will still be available?
Ask what the supplier can commit to in writing; a product being available now is not, by itself, a promise of future supply. Keep the exact model and configuration details, and ask how a discontinued model, changed finish or revised component would affect a later addition.
Planning for the eventual footprint before ordering the first pergola makes a staged project more realistic. What matters is not the word modular or a matching roof-control arrangement; it is an approved join for the exact products, a support and foundation plan for the completed layout, drainage that works in both stages, and recorded supply commitments and contract assumptions. If any of those points cannot be confirmed, compare the practicality of two independent structures with the cost and scope of building the intended layout at the outset.
