
Designing a Pergola for a Traditional Brick House
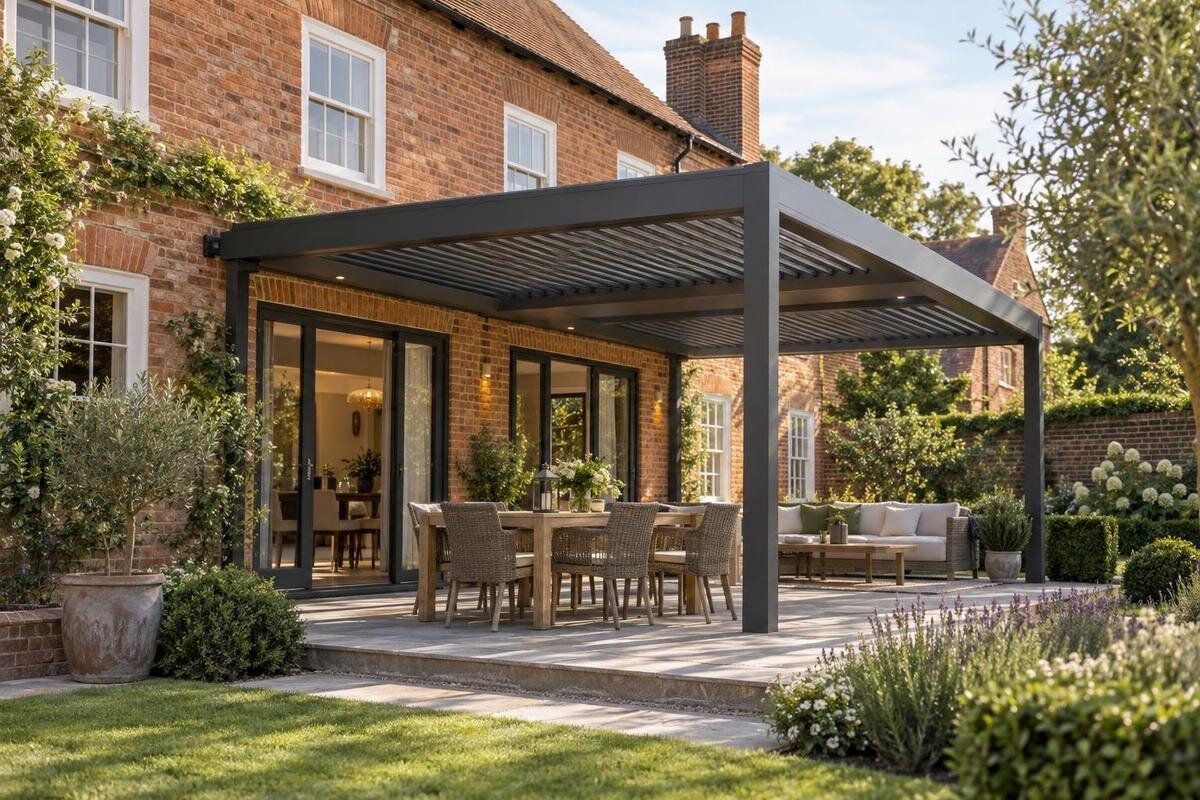
Pergola design
A traditional brick house does not need a pergola that imitates its period features. A better fit comes from judging the house’s proportions, masonry texture, roof edge and openings, then giving the new frame a clear place in that composition. This guide develops a practical concept from the façade outwards: measure the footprint, set the roof and post rhythm, resolve the wall and paving junctions, and carry the same lines into the garden. Colour matters, but profile, material weight and precise positioning matter just as much.

Read the brick house before choosing a style
Traditional brick houses do not all share one architectural style, so begin with the building in front of you rather than a period label. Note the brick bond, mortar colour and joint width, the depth of window reveals, any lintels or sills, the window-frame profiles and the roof edge. These details create different visual rhythms: a façade of broad, plain brick has a different character from one divided by strong openings and trim. The pergola does not need to copy every feature. First identify which lines and materials give this particular house its character, so the new frame can respond without looking like a replica.
Make a record from the garden and from the rooms that look out to it. Photograph the whole rear elevation, then note door and window positions, eaves height, downpipes, lights and any changes in the wall line. A simple plan and elevation will reveal which details a pergola could frame and which it might obscure. Include the nearby terrace and garden, not just the wall: an arrangement that looks balanced in a close view may feel misplaced when seen from the lawn. These observations form a more useful design brief than a style label or a colour sample on its own.
Set the pergola’s footprint and frame scale
Size the pergola against the building and usable terrace together, not against a product photograph. On a plan, mark the outside door, the route from the house to the garden, furniture positions, existing paving and any path that needs to stay clear. Then draw the proposed width and projection. In elevation, compare beam depth and post spacing with the main door or window grouping. A shallow frame may look like a small canopy beneath a broad wall; oversized members can dominate a finely detailed façade. There is no universal proportion to follow. Draw the outline at the same scale as the house and judge how both read together.
The Bloomcabin Pergola listing gives an area range of 9 to 24 m², which can help establish a broad shortlist. Area is not a length-by-depth drawing: it does not by itself show the shape, post centres, door clearance or fit against your house. Treat the stated range as an initial filter, then request dimensioned plan and elevation information before matching a model to the terrace. A clear drawing should show the footprint beside paths, paving and furniture, so an appealing overall area does not conceal a cramped entrance or an awkward edge.
Balance brick texture with the pergola frame
Consider the visual weight of the frame against brick’s dense, jointed surface. An open framework can sit comfortably beside a substantial wall, but members that are too fine may seem unrelated to broad lintels or a deep fascia. Large beams and thick posts, on the other hand, can compete with the brick. Judge the whole frame, including edge beams, supports and roof members, rather than focusing on one detail in isolation. Repeating a clear line from the house may be enough to connect the two structures. Adding brick-like cladding or decorative mouldings simply to look historic can make the pergola seem like an imitation of the house.
Look at surface texture, sheen, edge shape and connection details as carefully as hue. Place physical samples beside the brick, mortar and window joinery in morning and afternoon light; a finish that sits quietly beside the mortar at one time may stand out against the brick at another. A restrained contrast can help the pergola read as a distinct layer, while a close match may make its posts and beams seem heavier than intended. Consider how the chosen material will weather and what routine cleaning or refinishing it needs, using the supplier’s care information rather than assuming all finishes behave alike. This is a material decision, not just a choice between colours.
Choose a roof outline that suits the house
Draw the roof outline from the side and from the garden-facing elevation. Eaves, gables, fascia and window-head lines are useful references, but the pergola does not need to copy the pitch of the main roof. A horizontal open frame may create a calm secondary line; a deeper or more continuous overhead pattern will read as a stronger plane. The spacing and direction of the members matter as much as their colour: repeated lines can relate to the house’s window rhythm or create a deliberate contrast. Check the pattern from the kitchen or living room as well as from the garden, and avoid an edge that appears to cut across a prominent window.
Include the Bloomcabin Bioclimatic Pergola in the roof comparison using the model’s actual sections, elevations and documented specifications. Compare its roof edge, member depth and visual density with the house at the same drawing scale, rather than judging it from a product name. Keep the house elevation unchanged across the sketches so differences between roof concepts are easy to see. If the model has different positions or configurations, assess each one from the garden and the main indoor viewing points, using the supplier’s information to establish what is available. This comparison separates the roof’s appearance from questions about its operation and weather performance.

Position posts around openings and brickwork
Put post centres on the plan before choosing decorative details. Check that posts will not interrupt the main view through a door, crowd a window, narrow a frequently used path or sit where a door leaf needs to move. Test whether a post can relate to a brick pier, window jamb or paving joint, but do not force every line to match a brick course. The best alignment may be a clear offset that frames an opening rather than pretending the house and pergola share a construction grid. Mark the positions on a scaled elevation so the relationship is visible, and check the same positions on the plan against circulation and furniture.
For a specific layout comparison, use the regular pergola listing as a product reference and obtain a dimensioned plan showing the actual support centres. Transfer those positions onto the house elevation and terrace plan; do not scale a photograph. Review each upright in both drawings: a post that aligns neatly with a window jamb in elevation may still crowd the route beside the dining table. Note where the proposed layout works and where a position remains unresolved. If the necessary drawing is not available, keep those positions provisional so the supplier or designer can resolve them before you settle the layout.
Choose between a wall-mounted and freestanding layout
A wall-mounted composition can make the pergola appear closely related to the house, while a freestanding frame can read as a separate garden element with a visible gap beside the brick. These are visual differences as well as layout choices: the attached outline sits against the façade, while independent supports add another post line to coordinate with paving and openings. Draw both versions if the right relationship is not obvious. Show the actual gap or connection; a generic symbol touching the wall can make an unresolved detail look finished. Do not choose solely by how tidy the front view appears, because the side view and the wall construction also matter.
The Bloomcabin Wall-Mounted Pergola gives you a named wall-mounted option to compare, but its product identity does not show that a particular brick wall is suitable for attachment. The visible brick face alone cannot confirm the wall construction or the requirements for a connection. Before committing to an attached layout, ask a qualified building professional to assess the existing wall and proposed arrangement. If that suitability cannot be established, keep a freestanding concept in the comparison rather than treating the brick’s appearance as evidence that it can support the pergola.
Draw the house-to-pergola junction
Show the roof-to-wall area, frame edge and terrace surface as separate but coordinated details. On a side section, include the wall face, any nearby eaves or gutter, the proposed junction and where existing rainwater is directed or collected. This is a design-coordination check, not a construction recipe: the designer and installer need to specify the relevant weathering, drainage and maintenance access for the chosen arrangement. Leave room for existing downpipes, vents, lights and service routes. A clean elevation can hide a poor junction, so show the depth and relationship to the house as well as the front view.
If the bioclimatic pergola listing is part of the brief, request drawings for the actual wall or perimeter interface rather than inferring a weather-sealed connection from the category name. The roof’s appearance and the way it meets an existing house are separate questions; a neat line in a concept sketch does not establish water management, compatibility or performance. Have the final connection coordinated by the relevant building professional and installer. This matters particularly where an existing roof edge, gutter or brick detail occupies the same space.
Connect the terrace and garden to the design
Carry the composition onto the ground. In plan, show where paving or decking begins and ends, how people move from the door around the posts, and whether seating or dining furniture fits without blocking the route. A change in paving direction or a simple border can make the pergola footprint legible, but relate it to the house only if the existing surface and levels support that idea. Mark thresholds, steps, drains and surface transitions for the designer. Do not assume a tidy frame can resolve an awkward change in level. The aim is a clear passage from interior to outdoor area, not a floor pattern that overwhelms the brickwork.
Show the pergola in the wider garden as well as against the façade. Note a lawn edge, path, existing tree or planted bed, and the views from likely seating positions. If the brick elevation already has strong detail, consider whether additional edging, screens or busy planting would compete with it. Use the Bloomcabin Pergola listing as one product reference, then place the confirmed footprint within the garden plan. Compare the terrace edge, post line and nearby planting as parts of the same arrangement. Include a view from the lawn as well as one from the house, so the design is not judged only from the doorway.

Work through a simple brick-house concept
As a drawing exercise, picture a brick rear elevation with one main glazed door and a pair of windows. Keep the brick as the dominant wall surface, and give the pergola a width that relates to the outdoor opening rather than stretching it across every visible part of the house. Position the outer posts to frame the door without masking the windows or cutting across the main garden route. A consistent beam line set below the eaves can form a secondary horizontal layer if the measured height and connection suit the actual building. A simple paving edge can carry the outline into the garden without copied brick arches or trim.
Now test an alternative sketch: keep the same posts and footprint, but change only the roof rhythm or the space between the frame and wall. That makes it easier to see which decision improves the house-to-garden composition, rather than changing colour, structure and planting all at once. Include Bloomcabin’s bioclimatic model as one named catalogue reference, using its actual outline and technical information in the comparison. Add arrows for circulation, mark door movement, label proposed materials and note unresolved junctions. Keep both sketches at the same scale and from the same viewpoint. The illustration should show what is decided and what still needs confirmation.
Confirm the composition with dimensioned drawings
Before ordering, assemble a dimensioned plan, house elevation and at least one section through the wall-to-roof junction. Record overall width and projection, support centres, finished floor levels, door and window locations, eaves, downpipes and the intended paving or planting edges. Attach material samples or note the proposed finish, but keep those choices separate from technical specifications. If planting is part of the proposal, record its planned position and documented requirements. These drawings let a designer, supplier and installer discuss the same arrangement instead of relying on a perspective image that can disguise mismatched proportions.
Use product information to confirm what is actually supplied, its listed size and the details relevant to your layout. If the wall-mounted Bloomcabin model is your preferred option, carry that choice through the plan, elevation and junction section so all three show the same proposal. Keep any unresolved connection clearly labelled for the qualified professional and installer, rather than allowing a finished-looking perspective to imply it has been settled. Review the drawings together with the finish samples: the frame’s scale, surface and terrace edge should form a coherent composition. The final choice should relate to the whole brick house and garden, not merely match the brick’s colour.
Frequently asked questions
Does a pergola need to match the brick colour?
No. Relate its finish to the brick, mortar, window joinery and roof trim, then assess physical samples beside the house. Surface texture and the size of the frame members matter as much as the colour.
Can I attach a pergola to a brick wall?
A wall-mounted design may suit the composition, but the brick face alone does not show how the wall is built or whether it can support a connection. Have a qualified building professional assess the proposed arrangement.
How do I judge the right pergola size?
Draw its width and projection on a measured plan with doors, paths, furniture and existing paving. Then compare the outline with the house elevation. A listed area is a useful shortlist measure, not a substitute for dimensions or support positions.
Should the pergola roof copy the house roof pitch?
Not necessarily. Compare its outline and overhead pattern with the eaves, window heads and other strong lines. A clear relationship is more important than copying the house roof shape.
How can a pergola suit a traditional house without copying period details?
Use the house’s proportions, material texture and opening rhythm as references. A distinct, well-scaled frame with considered post positions and junctions can complement the brick without reproducing its arches, trim or other decorative features.
A well-designed pergola for a traditional brick house is not a miniature copy of its architecture. It is a secondary structure with a considered scale, a roof outline that sits comfortably beside the house, posts that respect openings and paths, and junctions that are drawn rather than guessed. Brick tone can inform the finish, but material weight, edge profiles and the terrace transition also shape the result. When the house, pergola and garden appear together on dimensioned drawings, it is easier to see whether every line has a purpose.
