
Pergola lighting design for dining, reading and ambience
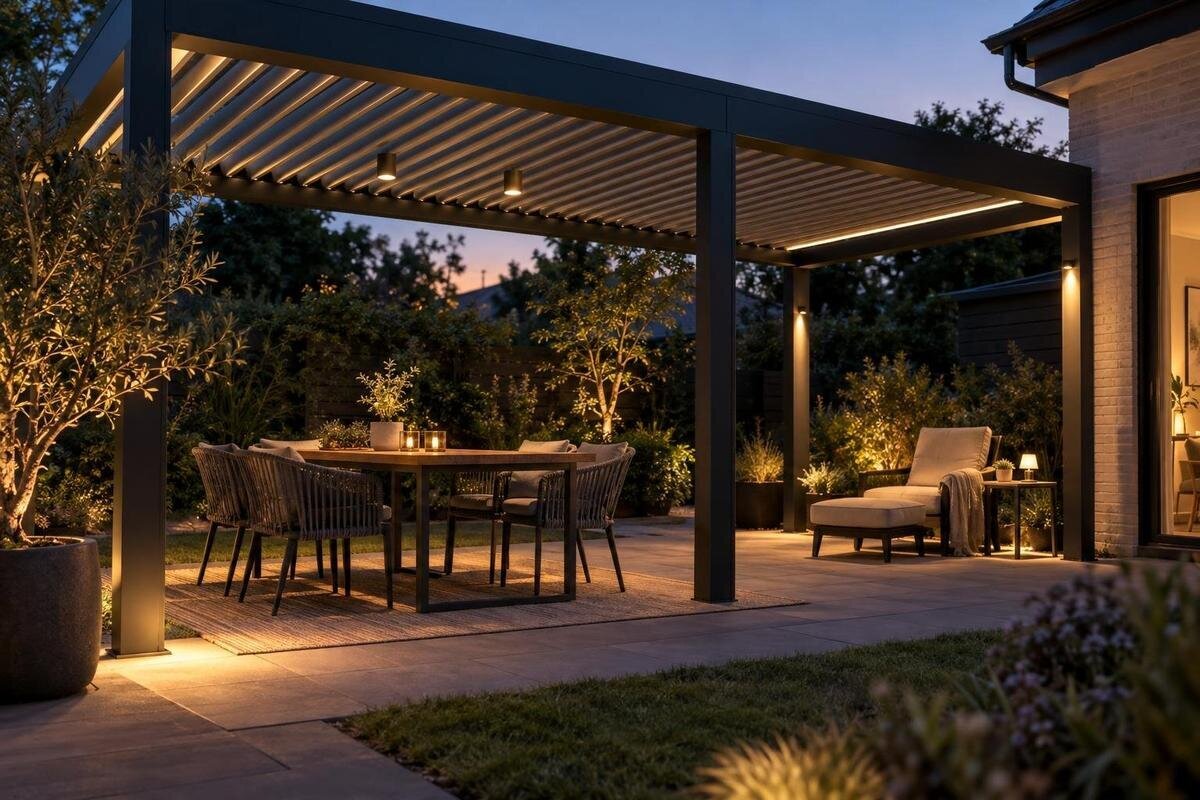
Pergola lighting guide
Pergola lighting is easier to live with when every light has a job. The table needs clear light for food and conversation, a reading seat needs focused light on the page, and the rest of the space benefits from a softer background. One bright source rarely does all three well: it can leave corners dim while shining into someone’s eyes. Plan around furniture, sightlines and controls first, then confirm that the exact fittings and mounting positions are approved for the chosen pergola and outdoor exposure.

Map the uses before placing any lights
Begin with a scaled sketch of the pergola footprint, furniture, doors and the routes people use. Mark where diners sit, where food is served, where someone will read and how people move between the house and garden. Lighting planned from the roof outline alone can miss the table once chairs, a sideboard or a pot plant are included. Draw chairs in their usual positions and show any likely change in table size; note doors that open into the area as well. Record which activities happen at the same time: a meal may need clear task light while someone nearby wants a quieter reading corner. This map gives every proposed light a real job.
If you are comparing structures, place each candidate’s confirmed footprint on the same plan as the furniture. The listing for Bloomcabin Bioclimatic Pergola gives a range from 9 to 24 m²; use that as a broad area reference only, then check the dimensions for the exact configuration under consideration. Mark possible light positions provisionally, keeping the dining table and reading chair visible on the drawing so their relationship to the frame is clear. Add the house wall, boundaries and windows too, because they affect sightlines and where background light needs to stop. A clear layout drawing gives the pergola supplier and electrician a shared reference for discussing mounting positions, cable routes and which areas need separate control.
Give the dining table clear, comfortable light
At the dining table, the practical target is an even view of the food and table surface without a harsh bright point dominating the scene. Consider the table’s shape and the places used for serving: a small pool of light at the centre can leave dishes at the ends or a serving area in shadow. Also account for faces; people should be able to look across the table without repeatedly looking towards a bright source. Light arriving from one side can be blocked by hands, glasses or dishes, so consider where shadows will fall during an ordinary meal. Make the table the reference point, not the centre of the whole pergola.
On the drawing, mark each seat, the table ends and the usual serving position. Check whether someone standing to pass food would block the main light, and whether the table can move or extend without leaving part of it noticeably dimmer. If it can be rearranged, decide whether the lighting should cover a flexible area or suit one preferred position; do not compensate for poor alignment by making the whole setting brighter. Use the confirmed footprint of the intended structure, not the whole patio, as the boundary for this exercise. If Bloomcabin Pergola is on your shortlist, put its proposed layout on the same drawing as the table so the task-light area follows the way you will actually dine.
Design a separate reading light
Reading is a more concentrated task than general dining light: the page needs to be clear, while the fitting should not become the brightest thing in the reader’s view. Set the chair and side table where they will actually be used, then consider how light reaches a book, magazine or screen without the reader’s head or hands casting a strong shadow across it. A position that works while standing can feel very different when seated, especially when the reader looks up from the page. Test the planned direction from the chair, and include its usual angle, any footstool and the side table in the sketch.
Give the reading area a control separate from the main dining task light if people will use the two spaces at different times. A softer background can remain on while the page gets focused illumination, rather than switching on every light at full output. Keep the control within easy reach if the selected system allows it, and confirm compatibility before specifying dimming or adjustable output. If Bloomcabin Wall-Mounted Pergola is under consideration, show the reading chair in relation to the adjoining wall and nearby doors. Include the reader’s view towards the dining area, so the proposed light can be assessed both by the person using it and by anyone sitting nearby.
Ambient light and routes to the house and garden
Ambient light fills the space between task areas, making the pergola feel like a connected setting rather than a bright table surrounded by darkness. It should support the dining and reading layers, not overpower them. Decide how much of the area should be gently lit when no one is eating or reading, and how the transition to the garden or house should look. A bright table beside an unlit route can feel abrupt; lighting every edge equally may remove the calm contrast you want. Use the background layer to make furniture and boundaries easy to see, then leave task lighting responsible for detailed work. Check the balance from inside and outside.
Include the entrance, route back to the house and any change in ground level in the plan, not just the seats. A restrained light near an approach can help show where the usable area ends, while a bright beam aimed beyond it may distract from the pergola or spill towards neighbours. Look at the scene from outside too: what feels subtle from a chair can appear much brighter from a bedroom window or garden boundary. If the Bloomcabin Pergola product page is one option you are comparing, draw its confirmed intended footprint separately from the route beyond it, then decide deliberately where the background layer stops.

Separate lighting layers with useful controls
Think in three jobs rather than a catalogue of fittings. Task light helps with food, reading or serving; ambient light softens the wider setting; orientation light makes entrances and changes along a route easier to recognise. One selected fitting may contribute to more than one job, but test the jobs separately: light strong enough for a page can overpower a quiet meal, while a soft glow alone may not make a menu easy to read. Sketch settings for dinner, reading and simply sitting, and list which layers each one uses. This makes it less likely that an attractive background effect will be mistaken for useful task light.
Group controls according to how the space is used, not just where the cables happen to run. It can be useful to control the table and reading tasks separately from the background layer, so one can be reduced or switched off while another remains. Dimming adds flexibility only if the selected lamp, driver and control are explicitly compatible; do not assume every LED fitting can dim or that different products work together. Record which lights each control operates and the combinations you want to use. When comparing the bioclimatic pergola configuration, ask which lighting and control options are available for that exact model, then match those options to the settings on your plan.
Check glare from every seat
Check potential glare with a top-down plan and from normal seated eye positions. Mark where each person sits and the directions they look—to a companion, towards the garden, across the table or back towards the house—and note whether a proposed bright source lies in those views. A fitting can feel unobtrusive when you stand beneath it yet fall directly within your line of sight when you sit down. Include standing positions where people serve or move through the space, and consider the view from nearby rooms if the pergola is close to windows. The aim is not to eliminate every visible lamp at any cost, but to avoid a source that repeatedly catches the eye.
Review each layer on its own and together: a reading light may be comfortable for the reader but distracting to someone at the dining table. Assess the combinations you expect to use, rather than assuming that every light will always be on. A bright spot on glass, a glossy table or a pale surface can be as noticeable as the fitting itself, so inspect likely reflections at the same eye height. For a wall-mounted pergola option, include planned seat positions and views towards adjoining surfaces on the same drawing. Compare the view across the space with the view towards the house; looking up at the frame alone will not reveal what diners and readers will see.
Account for reflected light and colour
Light does not land on a blank backdrop. The surface above or behind it, the table finish and nearby glazing can change what feels bright: a glossy tabletop or glass panel may show a reflection, while darker surroundings can make a modest fitting stand out more strongly. Include fixed surfaces on the sketch, then check likely reflected points while seated. Outdoor paving can look different when it is dry and damp, so consider whether reflections change in ordinary conditions. A picture or finish label cannot predict the view at night in your own space; judge the combination of selected light and actual surfaces.
Colour also shapes mood and legibility. A warmer tone may feel relaxed, while a cooler white may look more task-focused, but the result depends on the fitting and the surrounding light. Compare how food, faces, timber, plants and paving appear in context instead of choosing by a colour label alone. Where zones will often be lit together, check that their colour and brightness feel coherent; separate scenes can differ if that is intentional. Ask about a sample or consult the chosen fitting’s product data where possible, and keep the final choice tied to the dining and reading experience you want.
Coordinate electrical supply and approved mounting
Electrical planning belongs alongside the pergola plan, not after a light has been chosen. Ask a qualified electrician to assess the supply, control arrangement and route for each proposed fitting, and to check its stated outdoor rating against the actual location’s exposure. A sheltered position and an exposed edge may have different demands; the roof’s design and the way the area is used also matter. Use the fixture manual and the pergola manufacturer’s documents for the exact configuration. This is a specification check, not an invitation to improvise wiring, connectors or mounting methods.
Get mounting approval for the exact proposed position before finalising the layout. Frames, roof members, wall connections and moving components are not interchangeable attachment points, and a catalogue image does not document the support or clearance available at a particular spot. Ask the manufacturer or supplier to confirm whether the proposed fitting and fixing are approved for that configuration, then have the electrician specify suitable cable routing and service access. If you are considering the Bloomcabin Wall-Mounted Pergola listing, identify the chosen configuration and mark each proposed fitting on the drawing. This keeps the discussion specific to the positions you intend to use, rather than treating a general answer about the model as approval for the whole plan.

Allow for movement, access and maintenance
If the chosen design has parts that move, such as an opening roof or retractable screen, check the full operating position rather than relying on a closed or photographed arrangement. A fitting or cable must not occupy a place where it could be hidden, obstructed or exposed to movement beyond its approved clearance. Ask for the relevant manual and written mounting guidance for the exact model. Do not infer moving clearances from a product name, a generic sketch or an image; the configuration and any permitted accessories need explicit confirmation.
Include how each fitting will be reached for cleaning, adjustment or replacement, and whether a driver or control device needs to remain accessible. A light that works on the first evening but cannot be maintained without disturbing the structure is a poor long-term choice. Ask who will maintain it, what access is needed and how replacement equipment can be identified; keep product and fixture instructions with the final layout. For Bloomcabin’s bioclimatic pergola option, record the exact configuration alongside the selected lighting equipment. That record should distinguish the pergola components from the fittings and controls, so future maintenance enquiries can identify the relevant item without relying on a photograph or a broad model name.
Turn the plan into a fitting schedule
Turn the sketch into a short lighting schedule with one line for each proposed source. Record its purpose—dining, reading, background or route—its target surface, the seats from which it will be viewed and the control or scene it belongs to. Add the exact fitting model, documented outdoor suitability, approved mounting position and any dimming requirement once these have been confirmed. This makes gaps visible: a reading seat without task light, a table end with weaker coverage, or an entrance that has been overlooked. It also gives the electrician and pergola supplier a specific plan to review instead of a vague request for attractive lights.
Review the plan in the order the space will be used. With the dining arrangement in place, check the table and faces; sit in the reading chair and check the page; then assess the quieter ambient setting and the routes in and out. Look at the proposed combinations from every usual seat, including views back towards the house and garden. Keep changes to brightness, position or controls within the fitting instructions and documented approvals. If a setting leaves a task unclear or puts a source in a regular sightline, revise the plan before sign-off. This is more reliable than judging an individual light in isolation.
Frequently asked questions
How many lights should a pergola have?
There is no useful fixed number. It depends on the pergola footprint, furniture layout, reading and dining needs, the spread of the chosen fittings and how you want to control each area. Plan the light coverage by activity rather than adding fittings to reach a target count; too many bright points can create glare and uneven light. Have the final selection checked against the exact pergola and the fitting instructions.
Can one light serve both the dining table and a reading seat?
Sometimes, if it provides useful light for both tasks without putting a bright source in either person’s line of sight. Check how it lights the table and the page from the actual seating positions. Dimming or adjustment may help when the activities happen at different times, but only if the selected fitting supports them. If the two areas need different light levels at the same time, separately controlled lights offer more flexibility.
Should pergola lights be dimmable?
Dimming can help move from a practical dining setting to a quieter one, but only if the lamp, driver and control are designed to work together. Do not assume every LED fitting can be dimmed. Confirm compatibility for the exact products, and decide whether separate controls for the table, reading seat and background layer would be more useful.
Are all outdoor lights suitable for a pergola?
No. The fitting’s stated outdoor rating needs to suit its exact position and exposure. A covered location and an exposed edge may have different conditions, so do not rely on a general product description alone. Ask a qualified electrician to check the fitting instructions, the site and any mounting requirements for the chosen pergola.
Can I add lights to a pergola I already own?
Possibly, but first check the exact model’s documentation, approved mounting positions, electrical requirements and access for maintenance. A fitting that looks light or easy to attach is not automatically approved for the frame. Ask the pergola supplier about mounting compatibility and have a qualified electrician assess the proposed equipment and supply.
A useful pergola lighting plan is not about fitting the most lights; it is about giving the table, reading seat, route and background distinct roles that work together. Sketch the furniture as it will be used, choose which layers should operate at the same time, and review the result from the seats where people will spend their evenings. Once the layout feels right, confirm the exact fittings, controls and mounting approval for the chosen structure.
