
Pergola Louvres Parallel or Perpendicular to the House?
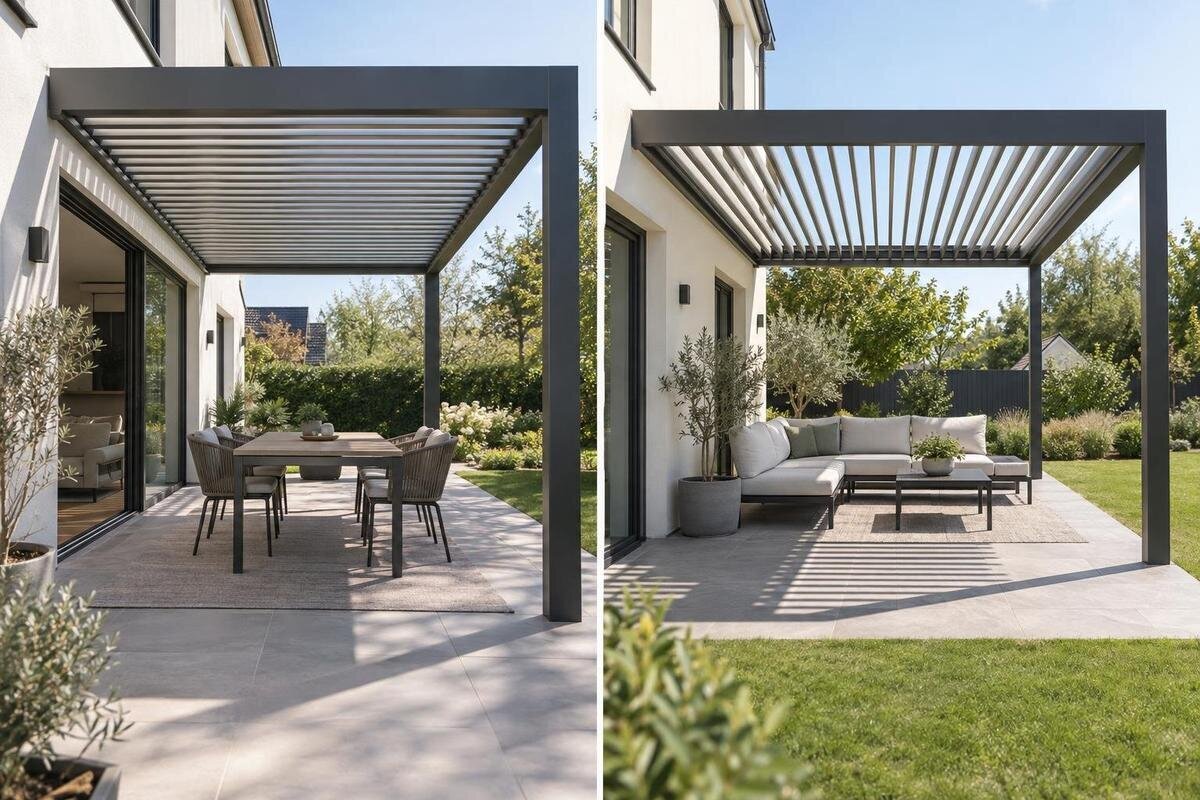
Pergola roof planning
Deciding whether pergola louvres run parallel or perpendicular to the house is about more than a neat roof pattern. The orientation changes how the blades relate to the facade, the view from adjoining rooms and the way light gaps read across the deck. It does not, by itself, guarantee shade at a particular hour or tell you where rainwater will go. Those outcomes also depend on the sun, blade position, roof geometry, surroundings and the model’s drainage design. Compare both directions on the same site plan, then confirm the selected model’s actual dimensions and diagrams. That gives you a decision based on your home and routine rather than a one-size-fits-all rule.

Before you choose 1
What parallel and perpendicular louvres mean
Parallel means that each louvre’s long axis runs in the same direction as the nearby house wall when viewed from above. Perpendicular means that the long axis runs at a right angle to the wall, extending from the house towards the outer edge of the roof. This describes the blades, not the pergola frame, the direction the whole roof projects or the way the louvres tilt. A roof can sit alongside a wall while its blades run out from it. If the pergola sits at an angle, identify the facade you are using as the reference; for a freestanding structure, use the wall the roof is meant to relate to. A simple arrow on the plan makes this relationship clear.
Use a top view or labelled assembly drawing rather than relying on a perspective photo. A line showing the blade axis, a symbol showing its open position and a rotation arrow communicate different things; a roof pictured partly open may make the blade direction harder to read. The wall-mounted model page identifies a product category, but that alone does not tell you whether louvres are included or which way they run. Keep the product name separate from the geometry you need to decide. When reading a drawing, identify the house side first, then follow the length of an individual blade. This gives you a clear reference for describing the layout to an installer.
How parallel louvres change the roof’s appearance
Parallel louvres form long repeated lines in the same direction as the wall. That can make the roof read as a continuation of the facade’s horizontal lines, or as a calm lengthwise pattern above the outdoor area. From a room looking through glazing, the slats may form bands across the view; from the garden, the same roof can appear as a broad plane. A long, narrow roof can make its direction more prominent than a near-square one. The effect also changes with the facade length and viewing angle, so consider the main view from inside as well as the one from beneath the pergola. It is a visual preference, not a measure of shade or weather protection.
When there are gaps between the louvres, the blades and openings form alternating bands. With parallel louvres, these bands run along the wall, although the light falling on the deck will not necessarily follow the same pattern. Blade position, sun angle and nearby shade all affect where a bright strip lands. Keep the roof type separate from that geometry: the Bloomcabin Pergola listing identifies a regular pergola, but that label by itself does not confirm an adjustable-louvre roof. When comparing images, check that they show the roof system you are considering. Look separately at the blade pattern overhead and the light beneath it; a photograph can illustrate their appearance at one moment, but it does not establish how the roof operates.
Before you choose 2
How perpendicular louvres change the roof’s appearance
Perpendicular louvres run across the house wall’s direction and point from the facade towards the outer edge of the roof. Their lines can make the depth of a shallow terrace more noticeable, or give a long, narrow area a different rhythm from one aligned with the wall. Looking out from a doorway, the pattern may lead the eye towards the garden; a side window may show more of the roof’s cross-lines. These are visual tendencies rather than fixed results: a deep roof, an angled wall or an oblique viewpoint can change what stands out. Draw the axis on a plan before judging it from a photograph.
This is an appearance and layout choice, not an instruction about how the roof operates. A blade’s long axis does not tell you which way it pivots or whether a particular roof can be configured either way. For example, the Bloomcabin Bioclimatic Pergola listing gives an area range of 9–24 m²; that name and range do not specify the blade axis or the drainage arrangement for a chosen version. If you are considering it, compare the exact model’s overhead drawing with the line of your house wall. Use a labelled plan: perspective images can make straight rows appear diagonal or converging.
Compare the roof plan with your outdoor layout
Before choosing an axis, sketch the roof footprint on a plan of the outdoor area. Mark the house wall, proposed outer edge, doors and their opening arcs, windows, steps, downpipes and the usual paths between the house and garden. Add the table, lounge seats or barbecue where they are likely to stay, leaving clear routes around them. Then draw the same roof twice, changing only the louvre direction. This separates the effect of the blade pattern from changes in coverage or furniture; otherwise the more attractive sketch may simply have more usable space. Include existing eaves or overhangs that affect where the roof could sit.
With a wall-mounted option, compare the actual roof dimensions rather than relying on an area figure. The Bloomcabin Wall-Mounted Pergola is listed with an area range of 9–24 m², but that range does not give the width, projection or support locations of the configuration you would use. Two footprints with a similar area can leave very different space for a doorway, table or walkway. Distinguish the outer roof dimensions from the clear area beneath it, and mark any supports shown on the model plan. Check whether your furniture fits within that clear area without obstructing the routes you have marked. This establishes whether the proposed footprint works before you compare the appearance of the two blade directions.

Before you choose 3
Assess shade at the times you use the space
Keep blade direction and compass direction separate. Parallel to a house wall might be close to north–south on one property and east–west on another. Across New Zealand, the sun generally reaches its highest point in the northern part of the sky, but its path and height change with season and location; morning light generally comes from the easterly side and afternoon light from the westerly side. Trees, fences, neighbouring buildings and eaves can interrupt those broad patterns. Low-angle light can also reach beneath a roof edge, so an overhead blade layout cannot solve every side-on exposure. The way rays meet roof openings depends on both blade axis and sun angle.
List the hours when you use the area and assess both layouts for those periods, rather than aiming for an abstract promise of all-day shade. A breakfast table may be affected by morning light in a different way from seating used after work. If practical, note where sun and existing shadows fall from the same viewpoints at more than one time of day; repeat in the season that matters most to you. A sun-path sketch can help you consider a future pergola, but it remains an estimate because buildings, trees and roof settings also matter. Neither blade direction guarantees shade at a chosen seat.
Check the view from inside and outside
Check the roof from rooms that open on to the outdoor area, not only from directly underneath. Stand at the kitchen or living-room doorway, and consider seated and standing views if a window looks across the terrace. Parallel blades may echo the long lines of the facade; perpendicular blades may make the roof’s depth more noticeable. Decide which view you want to preserve and whether the outer roof edge sits across it. A layout can look balanced from the garden but feel visually busy through wide glazing, especially when the roof is close to the house. Check more than one sightline if different rooms face the terrace.
For each important viewpoint, compare both blade directions with the roof edge and supports in the same positions. Include arrows on your plan to show where you would be looking from indoors and across the deck. Avoid judging one option from beneath the roof and the other from the garden: the change in viewpoint can obscure the difference you are trying to assess. If the bioclimatic model page is on your shortlist, use the overhead drawing of the version you are considering to place its blades relative to your wall. Then compare that layout with the views through your windows. Keep blade position consistent in any visual comparison, so you are assessing direction rather than how far the roof is open.
Before you choose 4
Confirm how the roof handles rain
Do not choose a louvre direction on the assumption that it determines the rainwater route. Water handling is a feature of the complete roof design: where the louvres shed or collect water, whether channels or gutters are provided, and where outlets discharge are model-specific details. Blade direction alone cannot show which edge carries water, whether the route changes with the blade position, or how runoff is kept away from a doorway. Look for a flow path in the relevant manual or technical drawing, and confirm which roof positions it covers. If that information is missing, ask before treating a particular direction as a solution to rain.
Use the drainage detail to trace the route all the way to the outlets, rather than stopping at the roof edge. If you are considering the Bloomcabin Pergola product page, establish the roof type and water-handling arrangement for the selected configuration before adding a drainage route to your plan. Mark where each outlet would sit beside the house, path and seating, and compare those positions with the places you want to keep clear of runoff. If the proposed arrangement connects with building or site drainage, have it assessed by a suitably qualified professional. Do not redirect an existing downpipe or assume water can discharge wherever is convenient from a blade-orientation sketch.
Check model dimensions and installation constraints
Blade orientation also has to fit the model’s frame and assembly. Overall width, projection, beam positions, louvre-module direction and support locations may constrain how a roof can be set out; a rectangular footprint does not guarantee that every part can simply be turned through 90 degrees. Compare the model’s plan, assembly sequence and permitted configurations, including the difference between overall dimensions and clear space beneath the roof. Do not infer support arrangements or allowable spans from a photograph. These are model-specific constraints, not details to resolve by adjusting a generic sketch.
For an attached layout, separate the roof’s permitted configuration from the suitability of the attachment to your house. The wall-mounted pergola listing is a starting point for identifying the model; use its documentation to establish the connection details and allowed layout. A qualified installer or building professional should assess the proposed attachment, supporting surface and clearances where relevant. Ask whether changing the louvre axis would also change the frame arrangement or water route. Keep any resulting changes visible on the drawing rather than rotating the blade lines alone. This is especially important on an awkward terrace, where a layout that looks convenient on paper may not match the model’s assembly.

Before you choose 5
Mock up both directions before ordering
A simple mock-up makes the visual choice less abstract. Use two copies of your scaled layout, one for each blade direction, keeping the roof outline, furniture and door openings identical. If you can mark the outline on the terrace, use removable markers only where the surface allows and keep entrances and paths clear; otherwise, paper plans or a digital sketch are enough. Compare both versions from the same viewpoints. Note what you prefer in each: the lines seen through the main window, the pattern above the table or the relationship to the garden. Recording those specific differences helps you avoid choosing a blade direction simply because one sketch is more attractive or easier to understand.
For an area reference, the regular model listing shows the Bloomcabin Pergola in a range from 9 to 24 m². Use the exact dimensions of the selected configuration for your mock-up, rather than drawing an approximate rectangle from that range. Mark the roof edge and supports separately, and label the dimensions so both versions can be checked against the same footprint. If a shortlisted product is not louvred, compare it as a different roof option rather than adding imaginary blade lines to it. Keep your notes beside the two drawings, including any questions about a configuration that remains unclear. The mock-up should help you compare real options, not suggest that every layout you can draw is available.
Choose the layout that suits your main priority
If both drawings fit, let the relationship to the house settle the aesthetic choice. Choose parallel when you prefer the blade lines to run along the facade and link visually with its length; choose perpendicular when you want those lines to cross the facade direction and emphasise the terrace’s depth. These are visual preferences, not guaranteed performance advantages. If shade is your main concern, compare the layouts at the hours you use the area. If rain handling matters more, use the model’s illustrated drainage route. Do not give the louvre axis credit for features that depend on the complete roof system.
Before deciding, write down your leading priorities: the view from indoors, usable shaded area, table placement, the way the roof reads from the garden, or the path of rainwater. Rank them, then compare the same two layouts against that list. If the preferred direction conflicts with a model’s permitted configuration or site constraints, do not force a quarter-turn based on appearance alone; revisit the model or footprint with a qualified professional. A clear drawing that labels the house wall, blade axis, doors, seating and drainage points makes the choice easier to review and keeps appearance separate from technical suitability.
Frequently asked questions
Does perpendicular louvre direction mean the pergola sits perpendicular to the house?
No. It describes the direction of the louvres’ long axes when viewed from above. The pergola frame can run alongside the house while the blades extend out from it. Check an overhead drawing rather than relying on a product label or perspective image.
Which direction gives more shade?
Neither direction guarantees more shade. The result depends on the sun’s angle, the blade position, the openings between blades and shade from nearby buildings or trees. Compare both layouts at the times you use the outdoor area, rather than choosing by direction alone.
Should the louvres run north–south or east–west in New Zealand?
Compass direction and direction relative to the house are separate things. The sun’s path changes with season and location, and nearby obstructions matter too. Mark the house wall and compare the blade axes with the sun and seating at the times that matter to you.
Does louvre direction decide where rain drains?
No. Drainage depends on the design of the complete roof, including any channels, gutters and outlets. Ask for the model-specific water-flow diagram and check which louvre positions it covers; do not infer the discharge point from the blade direction.
Can any louvred pergola be turned to use either direction?
Do not assume so. The frame, supports, assembly and drainage design may limit the permitted layout. Check the exact model’s documentation and have site-specific attachment or support questions assessed by a suitably qualified professional.
Treat louvre direction as one part of the roof layout, not a shortcut to controlling every condition. Once both drawings show the same roof size, the real differences are the line pattern, the views and the way sunlight meets the openings. Choose the arrangement that suits how you want the terrace to look and function, then verify it against the exact model drawing. A plan showing the house wall, blades, furniture, openings and water route is more useful than a product photograph or an isolated compass rule.
