
Planning a Pergola as the Focus of a Long Garden
Garden design guide
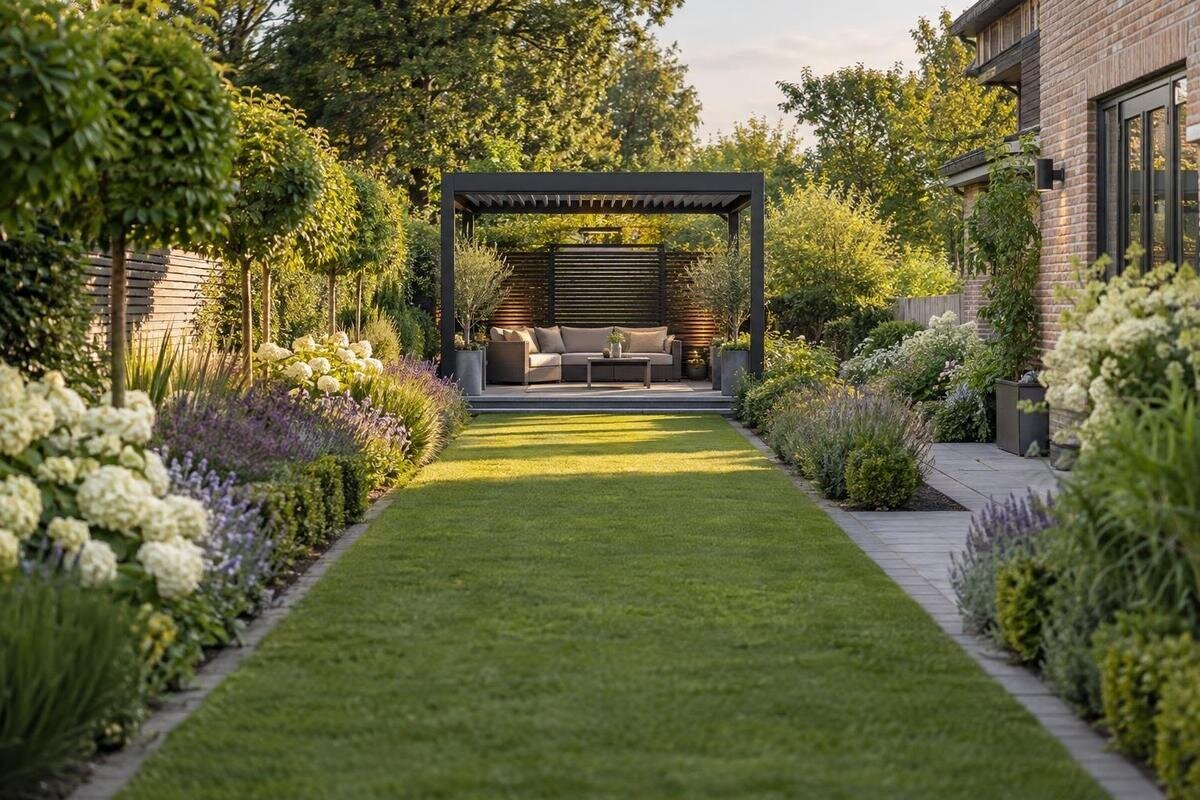
A pergola can give a long garden a clear destination, but placing one at the back does not automatically make the layout feel complete. The view from the house, the line of the approach and the planting between them all shape how the structure reads. Treat those parts as one plan: the garden should lead towards the pergola without becoming a corridor or losing its depth.

Planning checklist 1
Define the pergola’s role in the garden
A pergola in a long garden can do more than occupy the far end: it can give the view a point to settle on and give the journey a reason. Decide what the space is meant to offer—perhaps somewhere to sit, dine or pause beside a particular view. Those uses affect the open sides, the route and the planting around it. If the aim is simply “something at the back”, the structure can feel disconnected from the rest of the garden. Also decide whether it should be visible from the house throughout the journey or partly revealed as people walk towards it.
Treat the pergola as one point in a sequence rather than an isolated object. A long plot may offer a view from the house, a closer view partway down and an arrival at the destination; the structure should make sense in all three, even if one is the main focus. Note what occupies the foreground, middle distance and background, and which existing views you want to keep. The far boundary is only one possible backdrop. A position slightly before it may leave a view beyond, while a position further back may suit the activity better. Give each part of the garden a role: the space near the house might remain open, the middle might contain planting and the pergola might mark the main sitting area. There is no need to fill every gap with another feature. Open space can keep the destination legible and allow the different parts of the layout to remain distinct. Let use and sightline guide the choice.
Map the views before fixing the position
Read the garden from the places it is normally seen: the kitchen or living-room window, the back door, the deck and the garden entrance. Walk its length as well, because a position that works indoors may feel awkward on the approach. Note trees, fences, sheds and other structures that already draw the eye. A pergola directly behind another strong feature can disappear from view; one that repeats every boundary line may reinforce a tunnel effect. A rough plan and photographs taken from eye level help reveal these overlaps before you commit to a location. Include the view back towards the house as well as the view towards the destination.
Mark two or three candidate positions on a plan, then check them from the main viewing points with a temporary marker or another visible reference. A position may look balanced on paper but vanish behind a trunk or overlap the roofline of a shed. Where a house-side pergola is part of the brief too, place the Bloomcabin Wall-Mounted Pergola in the comparison as a foreground element: decide whether it frames the view down the garden or competes with the destination. Treat that as a composition question, not a reason to put the far-end structure automatically on the same axis.
Planning checklist 2
Choose an axis without forcing symmetry
Running the pergola along the garden’s centreline can make a long space feel formal and direct, especially if a path and boundary planting repeat that line. An offset position gives the eye a view across the plot and may leave room for planting or a secondary route on the opposite side. Placing the structure across the line of travel can make it read as a threshold rather than a distant object. None of these arrangements is automatically right. Sketch each option, including its open sides, and compare how it relates to the house view and the way people will reach it.
Long, parallel edges can draw attention towards the far end, but repeating every line can make the garden feel like a corridor. A change in the path or planting can add another layer without hiding the destination. For an independent position, a product reference such as the Bloomcabin Pergola can be drawn against the chosen axis. Compare the alignment of the frame with the direction of the path: they need not share a centreline, particularly if the entrance is approached from one side. Also look at the spaces left on either side of the structure. An offset arrangement should create a useful planting area or passage rather than an awkward strip. Judge the product within that layout; a catalogue image cannot show its relationship to your boundaries and approach.
The approach path and views along it
A direct path makes the destination easy to understand, but it also shows the whole length of the garden at once. A gentle change in direction or a planted pause can reveal the pergola gradually and make the journey feel less like walking down a corridor. Keep any change clear enough that people can still see where the route goes. Consider what the path passes beside and whether planting, gates or existing features create a natural turn. Its line should connect the garden’s entrances to the pergola rather than simply point towards its centre. On a sketch, mark the views at the start, at any turn and just before arrival. Decide what each view should reveal: perhaps the roof outline first, then an open side and finally the seating area. This gives a bend a purpose within the layout rather than adding a detour solely to make the path look less straight.
Draw the route from the most-used door to the pergola’s entry, then check where people will turn, pause or carry things. Mark the structure’s proposed footprint and the space needed to approach it, rather than drawing the path as a line that ends at a post. If the regular Bloomcabin pergola is under consideration, use the dimensions of the selected configuration to show the entrance and sides accurately. Consider whether the path continues beyond the pergola or ends there. A continuing route needs a clear passage, while a destination at the end of the path needs space to arrive without stepping straight into the furniture.

Planning checklist 3
Set the pergola’s scale against the whole plot
A structure that looks substantial close up may seem slight when viewed from the house at the other end of a long garden. The opposite can happen too: a large outline can take over the destination and leave little visual breathing space around it. Compare the proposed width and depth with the garden’s proportions, the distance from the main viewing point and the planting that will sit nearby. The listed area range for the Bloomcabin Bioclimatic Pergola is 9–24 m²; area is a useful first filter, not a complete measure of visual weight.
Area alone does not show whether a chosen layout is long and shallow or compact, or how its outline will sit against the full length of the garden. Use a dimensioned plan for the exact configuration to compare width, depth and position with the path and surrounding space. Look at the gaps around the structure as carefully as the footprint itself: they determine how much of the backdrop and adjoining planting remains visible. A scaled outline on paper, or simple markers at the proposed corners, can help you judge the view from several points. Markers show position and footprint, but do not represent the full height or appearance of the frame. Use them alongside the product drawing rather than as a complete visual mock-up. Make comparisons at the same scale; photographs taken from different distances and angles are poor guides to relative size.
Layer planting to show depth
Planting can frame a pergola while making the space between the house and destination feel considered. Think in layers: a lower foreground beside the path, groups in the middle distance and taller forms towards the sides or background. The arrangement need not be symmetrical. Varying height and spacing can give the eye several places to pause, while a deliberate opening keeps the structure visible. A continuous, uniform row along both edges may strengthen a tunnel effect, so look for opportunities to vary the planting and reveal more of the garden as people move through it.
Plan for plants at their expected mature size rather than the size they are when first planted. Record the intended height and spread, any root-space needs and the maintenance each plant is likely to require, and confirm those requirements with an appropriate nursery or landscape professional. Keep the path and access around the pergola usable as the planting grows. A scheme that frames the structure on paper can lose the view if its mature foliage closes the opening, so include plant size and position in the same drawing as the sightlines.
Planning checklist 4
Keep the destination visible from key views
A focal point does not need to be exposed from every angle, but its outline should make sense from the view that matters most. If there is a view beyond the pergola, decide whether to frame it through the structure or to make the pergola itself the endpoint. If there is no view beyond, consider what will form its backdrop. Planting or other garden features placed close behind it can either give a clear setting or visually merge with the frame. Check which background lines appear through the open sides and which fall behind the posts. A fence top, shed roof or tree trunk may create a distracting overlap from one viewpoint even when the elements are well separated on the plan. Adjusting the proposed position slightly may improve that relationship without changing the overall route. Compare the result from the house and from the approach before choosing the final alignment.
Include the house and its windows in the view study if a pergola is proposed near that edge of the garden. The wall-mounted pergola option may form part of the foreground, so distinguish its role from that of a separate destination further down the plot. Check whether the near structure frames the distant one, obscures it or creates two competing focal points. View the arrangement from the seats and windows you actually use, as well as from the doorway. From the far pergola, consider whether the return view leads towards the house or towards another garden feature. This reverse view helps connect the destination to the rest of the layout.
Plan the arrival around the intended use
The route should lead to a place people can actually use, not stop at the edge of the structure. For dining, consider the path from the house and the room needed to enter, pull out chairs and move around the table. For a quieter sitting area, decide whether the main route should pass through the seating space or reach it from the side. Keeping through-traffic separate from the place to pause can make the destination feel purposeful, while a clear entry prevents the approach from ending awkwardly against a post or planting bed.
Include furniture and access in the plan rather than judging the space from the frame alone. Mark where people will stand, sit and turn, and retain practical access to the surrounding planting for care. Use the Bloomcabin pergola model as one product reference when comparing layouts for the garden destination. Draw the intended furniture within the selected configuration, including chairs in use rather than tucked under the table. Then trace the route through the space. If access depends on moving a chair every time someone arrives, reconsider the furniture arrangement or entry position before increasing the structure’s footprint.

Planning checklist 5
Put paths, planting and site constraints on one plan
A dimensioned landscape plan brings the main decisions together. Show the garden’s length and width, existing paving, steps, doors, windows, trees, the proposed path and the pergola’s position. Note changes in level and the direction of surface water where known, because those details may affect the route and planting layout. Record known service locations rather than guessing where they run, and have relevant site constraints checked by a qualified professional before fixing the design. A drawing that shows only the new structure will miss the relationships that make the whole garden work.
Add the intended planting positions and expected mature sizes, along with the areas that need to remain accessible for maintenance. If a wall-mounted layout remains under consideration, include the house as well as the garden destination when comparing it with the wall-mounted Bloomcabin model. Keep existing features and proposed additions clearly distinguishable on the drawing so that a reviewer can see what will change. Record unresolved choices, such as an alternative path alignment or planting group, rather than presenting them as settled decisions. A design consultation is more useful when the route, sightlines, structure and documented planting requirements can be considered together on one dimensioned landscape drawing.
Compare pergola types against the finished layout
Once the position, route and scale are clear, compare a freestanding option with a wall-mounted one against the same plan. Consider what each would change in the composition: whether the main outdoor space remains connected to the house, whether there is still a separate destination and how the approach reaches it. Avoid changing the furniture, path and planting in every comparison, as that makes it harder to identify the effect of the pergola itself. First assess alternatives within the agreed layout, then note any adjustments each would require. This separates a genuine fit with the garden from the appeal of a product photograph.
If you are considering a bioclimatic pergola option, treat the model name as a product category, not evidence of how a particular configuration will perform at your site. Separate the visual comparison from questions about product features and site requirements, confirming relevant details with the supplier and a qualified professional where needed. Record the design trade-offs beside each option: the view retained, the space available at the entrance and the relationship to nearby planting. The strongest choice is the one that supports the intended destination and approach, rather than requiring the rest of the long garden to be rearranged around its appearance.
Frequently asked questions
Does a pergola always belong at the very end of a long garden?
No. The far end can be a satisfying destination, but a position slightly before it may leave a view beyond or make better use of the space. Choose the location by testing the main sightline, the approach and the activity planned for the pergola.
Should the pergola line up with the centre of the garden?
Not necessarily. A central position can create a formal, direct view; an offset position may show more of the garden across its width. Compare both on a plan and check that the chosen alignment works from the house as well as along the path.
How can a pergola stand out without dominating the garden?
Check its outline against the full length and width of the site, rather than judging it from a product photo. Planting can frame the structure and give it a clear backdrop, while open space around it helps preserve the sense of depth.
What should planting around the pergola achieve?
It can add foreground, middle distance and a backdrop, while keeping the approach and the pergola visible. Plan for plants at their expected mature size, and check their growing and maintenance requirements before deciding where they sit.
What should a landscape plan show before you choose a pergola?
Include the garden’s dimensions, key views, path, proposed pergola position, existing features and planting at expected mature sizes. Note site constraints that need checking, such as levels, drainage routes and services, and ask a qualified professional to review relevant requirements.
A pergola becomes a convincing focal point when it is visible from a meaningful viewpoint, reached by a route that makes sense and framed by planting that adds depth without closing the view. In a long garden, those relationships matter more than placing a structure at the furthest possible point. Test the position and scale on a dimensioned plan, check how the journey feels from the house and through the garden, then compare pergola options against the layout you intend to create.
