





T orangery on a masonry plinth
T-shaped orangery on a masonry plinth – greenhouse and garden room in one
Our T-shaped orangery on a masonry plinth is a fully freestanding aluminium-and-glass structure, with its frame installed on a purpose-built masonry plinth. The model combines protected plant growing with a versatile garden room. Its distinctive form can be oriented to connect the long section and cross wing neatly with existing paths, a patio and garden views.
When selecting the right configuration, consider not only the available area but also the intended division between plants, work surfaces, furniture and clear walkways. Draw these zones to scale before ordering.
The key benefit of the T-shaped plan is its natural division of space: the long section and cross wing can serve different purposes without additional internal walls. Find out more about the Bloomcabin T orangery.
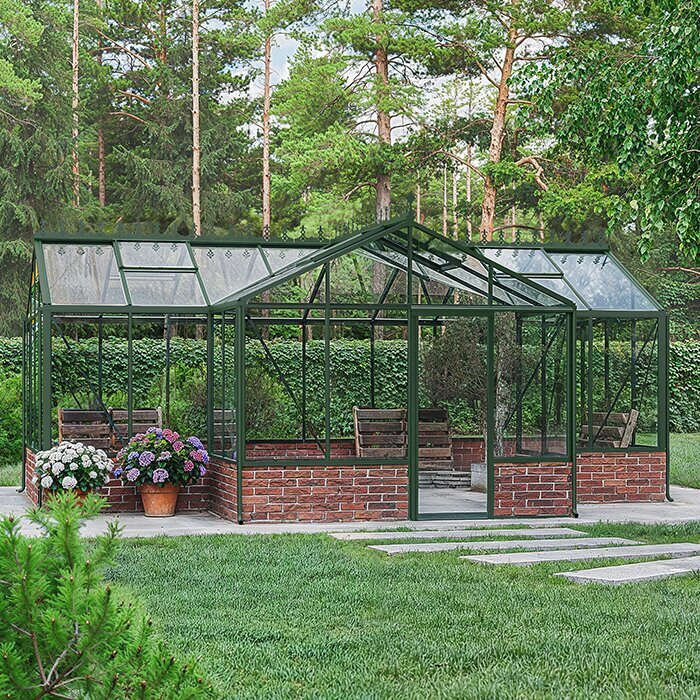
Space division with the T shape
The cross wing creates a distinct second-use area
The long section can be used for tomatoes, citrus plants, propagation or worktables, while the cross wing can become a dining area, seating nook or display space.
Plants, furniture and work surfaces therefore do not have to compete for the same rectangular central aisle. The shape supports a clear layout from the outset.
Choose the role of each section around door positions, sunlight and desired garden views.
Features at a glance
What distinguishes the T model
The divided floor plan, site-built masonry plinth, glass surfaces and independent siting are especially important for planning and use.
T-shaped plan
Separate zones for plants and relaxation
Masonry plinth
Site-built plinth in brick, natural stone or concrete
4 mm glass
Clear glazing in toughened safety glass
Freestanding
Positioned independently of a house wall
Masonry plinth & architecture
Coordinate plinth, frame colour and flooring
The plinth is built on site to the confirmed greenhouse dimensions. Its dimensions, levels and bearing surfaces must be fully correct before the aluminium structure is installed.
Brick can echo the material of a house façade, while natural stone can link to existing garden walls. Smooth rendered or concrete plinths create a more restrained, contemporary appearance.
The top edge, door openings and finished floor level must align precisely in both the long section and cross wing.
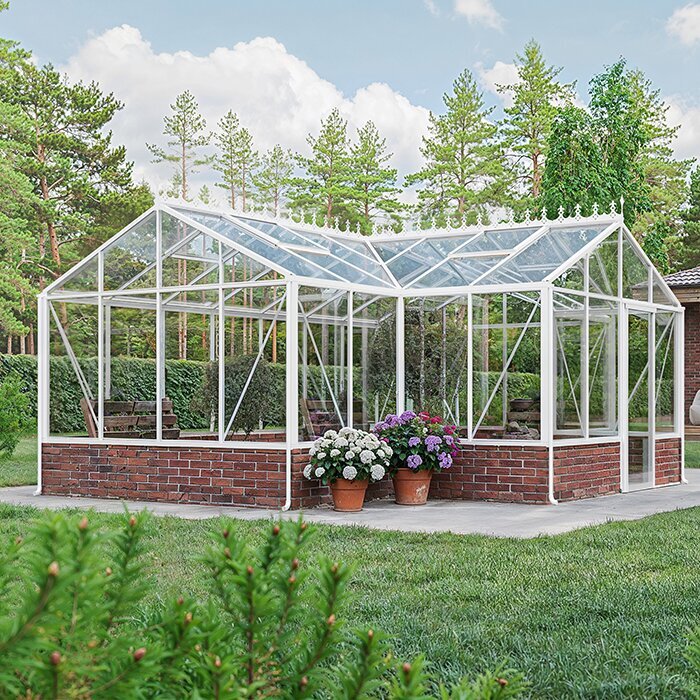
Technical data
Dimensions and features of the T orangery
Area: approximately 16.5–30.0 m².
Main width: approximately 3.10 m.
Ridge height: approximately 2.67 m.
Door height: approximately 1.85 m.
Frame: powder-coated aluminium frame.
Glazing: 4 mm toughened safety glass.
Doors: single or double sliding doors, depending on configuration.
Ventilation & drainage: Roof vents and integrated rainwater drainage. The structure is designed for a wind speed of 30 m/s and a snow load of 210 kg/m².
Warranty: 12 years, subject to the applicable terms.
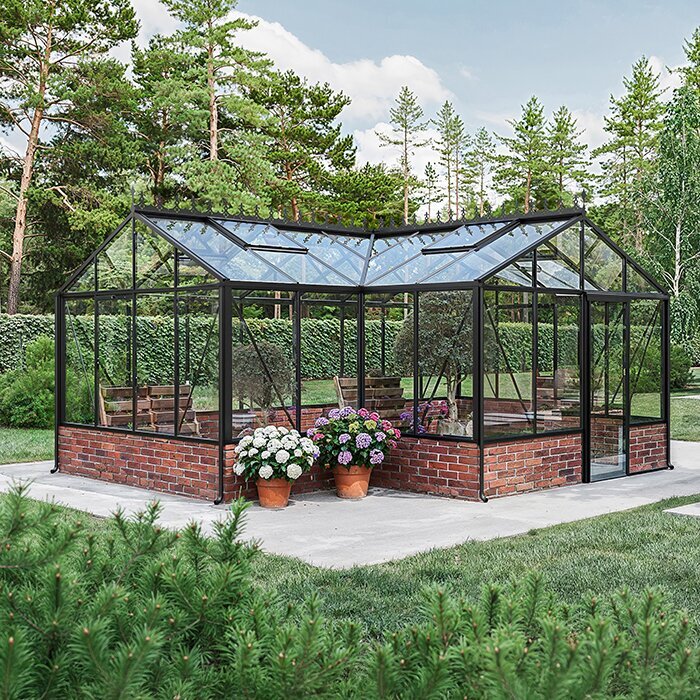
Foundation planning in New Zealand
Consider frost conditions, load-bearing capacity and drainage from the start
The foundation below the masonry plinth must suit the ground conditions, local frost conditions and the project’s actual loads. The aluminium structure does not replace a properly designed and constructed foundation.
A T-shaped plan has more outer and inner corners than a rectangle. Water must not collect in these areas or run continually against the plinth.
Plan drainage together with the foundation, masonry plinth and external paving, rather than after the orangery has been installed.
Setting out before building
Check the complete T outline from one common reference line
Before laying the first course, mark the complete T outline on the site. Check lengths, angles and door positions several times against the confirmed drawing.
Even a small deviation in the cross wing can affect the long section. One shared reference line is therefore more reliable than measuring individual wall sections separately.
Build the masonry plinth only once the plan, door openings and finished floor level are clearly established.
Ventilation and shading in summer
Large glass surfaces need effective summer ventilation
On sunny days, the interior can become much warmer than outside. Roof vents and sliding doors must therefore remain freely accessible and easy to operate.
A seating area has different comfort needs from tomatoes or heat-loving citrus plants. Seasonal shading in the cross wing can therefore be useful, even if the growing area remains unshaded.
Position furniture, tall pots and climbing plants so air can circulate between the long section and cross wing.
Flooring by use area
Plant and relaxation areas can have different finishes
Stone, tile or another easy-care floor finish suits the cross wing as a garden room. The plant area can instead be designed around everyday gardening work.
Both areas need a common level reference at the sliding doors. Thresholds, joints and drainage must therefore be considered when planning the masonry plinth.
Arrange material changes, joints and thresholds so they do not obstruct walking routes and both areas remain easy to clean.
Use rainwater
Route rainwater from all roof surfaces to suitable outlets
The integrated drainage brings together water from several roof surfaces. Decide where each outlet will lead before landscaping the surrounding area.
Rainwater tanks or larger storage tanks can meet part of the watering requirement, particularly where the orangery contains many container plants or vegetable beds.
Overflow must not end directly beside the masonry plinth. This helps prevent repeated washout or saturation of the base.
Plan furniture with sufficient circulation space
A dining table needs more room than its tabletop alone
If the cross wing will be used for dining, draw in pulled-back chairs and the walkways genuinely required. Only then will the plan show whether the layout works day to day.
Keep a clear route between the entrance, seating area and plant zone, even when several people are sitting at the table.
Also check that the sliding doors can be operated freely when the seating area is fully in use.
Plan plant height
Tall plants shape the room but must not obstruct ventilation
Large citrus plants, figs or climbing crops can deliberately frame views. They should not stand directly in front of roof vents or sliding doors.
Lower plant groups suit the transition between the long section and cross wing better, as they restrict sightlines and movement less.
When positioning plants, consider not only their height but also eventual canopy width and the growth direction of climbers.
Year-round use
Each season brings different requirements
In spring, the T orangery provides room for propagation, tender containers and early vegetable crops. In summer, ventilation and shading take priority.
In autumn, the orangery can still serve as a sheltered garden room and protect plants from direct rain. In winter, use depends on plant choice and the heating concept.
An unheated orangery is not automatically frost-free and is not a substitute for living accommodation. Match use and expectations to the season.
Plan heating early
A planned heating or fireplace solution affects floor construction and layout
If a heating or fireplace solution is intended, decide its position before planning flooring, furniture and plant areas.
Clearances, flue routing and technical connections must suit the chosen solution and be professionally planned. These points should not be improvised after completion.
Early planning allows the heat source to be positioned so doors, walkways, furniture and plant areas remain practical.
Access for cleaning and maintenance
Every side of the T orangery must remain accessible
Glass, gutters, vents and frame connections are easier to clean and inspect when beds and shrubs do not extend right to the outside edge.
A dense hedge can later make cleaning and repair work difficult. Leave adequate access space around the orangery.
This is particularly important at the internal corners of the T-shaped plan, where several glass and frame surfaces meet in a tight space.
Compare the T model
When is a T shape better than a rectangular orangery?
Where plant growing and a relaxation area should be clearly separated, the T shape offers a practical advantage over one rectangular room.
If you only intend long vegetable beds without seating, a rectangular form can often be simpler and more area-efficient.
On the T model, the masonry plinth also emphasises the shape of the structure. This makes the design especially suited to a prominent garden location.
Coordinate the build sequence
Coordinate trades and responsibilities early
Several tasks connect directly in this Bloomcabin model: the foundation and masonry support the aluminium structure, floor construction determines door transitions, and external works must drain rainwater reliably. Before work begins, establish who transfers dimensions, checks levels and releases the completed plinth for installation.
The confirmed model drawing is the shared basis for everyone involved. Changes to door openings, plinth height or floor construction must be traceable in the relevant construction documents. First set the model, orientation and level reference. Then build the foundation and plinth; install the frame only on the checked base.
Coordinate handovers between the masonry contractor, landscaper, electrical professional where needed, and installation team in good time. By installation day, bearing surfaces must be level, masonry complete, and access and work areas clear. Dusty or dirty work should no longer take place directly beside the glass structure.
Site and construction access
Plan delivery, installation space and future garden paths together
Sunlight is not the only consideration when choosing a location. Check how components and glass panes can be carried to the intended position. Narrow garden gates, tight turns, steps, major changes in level or densely planted trees can make access difficult. Keep the route clear during installation and establish delicate planting near the orangery afterwards.
Installation needs more space than the finished footprint. Temporary working room is required around every outside face for erecting, aligning and glazing. Stored components must not block access routes, doors or the internal corners of the T-shaped plan. Define storage and installation areas before creating new paths, borders or beds.
After installation, paths should serve both use areas effectively. A direct route to the plant area makes moving soil, pots and garden tools easier. A clean path to the seating area can avoid visitors always walking through the work zone. The exact arrangement depends on the chosen door positions.
Brick, frame and details
Coordinate materials and plinth connections carefully
The masonry plinth has a stronger visual effect than on a greenhouse with full-height glazing. It can repeat materials from the home or create deliberate contrast. In addition to the masonry, bond pattern, joint finish, cappings and the transition to external paving shape the result. Uneven joints and inaccurate cuts show quickly at the T shape’s many corners.
View samples of masonry, joints, flooring and powder-coated aluminium together in natural light. Samples that work individually can reveal different colours or gloss levels beside one another. The visible inside of the plinth should also suit the furnishing. Brightness, colour and surface texture further influence the interior light.
Do not alter technical connections for appearance. The top edge must be suitable for frame installation; cappings and joints must not channel water onto fixing surfaces. Coordinate special design details with the confirmed product dimensions before construction. This avoids later grinding, building up or levelling.
Workflows in the plant area
Arrange planting tables, water and tools around daily routines
The plant area works efficiently when regular routes are short. Arrange propagation, potting, watering and temporary set-down areas in the order of typical tasks. Frequently used tools should be reachable without blocking the main aisle. Narrow consoles or worktables can stand by the masonry plinth, but must not load frame connections or hinder glass cleaning.
Draw in more than the depth of work surfaces. Space in front is needed for bags, pots or watering vessels, and to move while carrying plants. Doors must remain fully usable during work. Temporary set-down areas should therefore belong directly to their respective workstations.
Give soil, tools and watering accessories a fixed place in the plant area. This keeps moisture and dirt away from seating or textile furnishings in the cross wing. Suitable storage helps keep the connection between both room sections permanently clear.
Ventilation in a T-shaped plan
Balance air exchange in the divided interior
As planting increases, the long section and cross wing may warm differently and feel differently humid. Dense foliage, tall containers and furniture affect air movement. Observe both areas separately rather than assuming identical conditions throughout.
Compare how quickly moist air leaves each area after watering or cool nights. Dense foliage may stay damp longer locally, while draughts can disturb the seating area sooner. Adjust the opening of doors and roof vents to these differences.
As planting changes through the seasons, a ventilation routine set once will not remain suitable indefinitely. Reassess conditions when canopies become denser, climbers cover larger areas or use of the cross wing changes.
Cleaning glass and frames
Clean glass and powder-coated aluminium frames gently
Dust, pollen, algae growth and splash residue can reduce glazing transparency over time. Use suitable gentle cleaners and soft tools. Abrasive aids or harsh cleaners can damage surfaces. Work section by section and rinse away loosened dirt so it does not remain in joints, door tracks or corners.
Powder-coated aluminium needs only regular gentle cleaning. At the same time, inspect visible connections, frame junctions and areas directly above the masonry plinth. For work at height, use only suitable stable equipment and do not lean ladders unprotected against glass or frames.
Secure or remove movable plants and furniture before cleaning inside. Clean upper glass surfaces first, then the plinth and floor. This prevents loosened dirt being spread back over already cleaned areas. A tidy interior also makes frame and connection checks easier.
Light, electricity and watering
Plan technical services before building plinth and floor
Lighting makes evening workstations usable and illuminates the cross wing. Power points may be needed for tools or other equipment. Set their location around actual use zones. Connections behind large pots or deep furniture are difficult to reach, while cables across walkways create unnecessary trip hazards.
Conduits and cable routes can be integrated more discreetly before the floor and masonry plinth are finished. Ask a licensed electrical worker to plan, select and install the electrical system, taking account of the metal-and-glass structure, watering and changing temperatures. Temporary extension leads are not a substitute for a properly planned installation.
Plan the internal water route at the same time. The route from the water connection or storage to the plants should be short and should not cross the seating area or main walkway. Excess irrigation water must not remain around plinth connections. Clear separation of electrical work, watering and drainage makes use and maintenance easier.
Winter use and roof checks
Adapt use, ventilation and care to the cooler season
Before winter, clear gutters, outlets, door tracks and vents of leaves and plant debris. Position movable containers so doors and inspection routes remain accessible. Arrange overwintering plants according to their temperature and light needs, and keep sensitive plants away from frequently opened doors.
Moist air should not remain trapped all winter. Brief ventilation adapted to the weather can reduce condensation, while sensitive plants need protection from cold draughts. In the T-shaped plan, cold-sensitive plants can stand farther from door areas provided air still circulates between room sections.
Inspect roof surfaces from ground level after unusual weather events and keep drainage routes clear. Do not walk on the glass roof. Where overhead work is needed, use suitable professional methods that do not place point loads on the glass or aluminium frame.
Regular inspection
Keep connections and moving parts under observation
Regular visual checks help identify minor changes early. Pay particular attention to transitions between the aluminium frame and masonry plinth, visible fixings, door travel and vent operation. After strong wind, an additional walk-around inspection of the whole orangery is advisable.
Check masonry for damaged joints, persistent moisture marks or spalling. Do not simply conceal such areas with unsuitable sealants. Instead, investigate the likely cause, because water ingress is not always visible where it begins. Check outlets, falls and connections together.
Record maintenance work and unusual changes with dates and photos. Keep the model drawing, installation documents and details of the masonry, flooring and frame materials used. This assists later repairs or adjustments. Replacement parts and work on the structure must suit the existing system; avoid additional drilling or loads on the frame.
Frequently asked questions
FAQ: T orangery on a masonry plinth
Is the T orangery intended to attach to a house wall?
No. The T orangery is freestanding and installed on the site-built masonry plinth; connection to a house wall is not intended.
What documents does the contractor need for the masonry plinth?
Before construction begins, the contractor needs the confirmed model drawing for the selected configuration. It is the binding basis for the T outline, dimensions, door openings, plinth height and top edge. Record changes in the documents before work starts.
How are sliding-door tracks kept clean?
Remove dirt and deposits with soft, suitable tools before they impair door movement. Avoid aggressive or abrasive cleaners on adjacent frame surfaces as well.
Can the connection between the long section and cross wing be used for storage?
No. It should remain clear as a passage. Position large pots, climbing supports and furniture so neither circulation space nor air exchange between the areas is restricted.
What must be checked on the masonry plinth?
Before installation, check the T-shaped plan, angles, levels, door openings, flatness and continuous top edge against the confirmed documents. This is the only way to establish whether the aluminium frame can be installed correctly.
Where should tall plants and climbing supports stand?
Plan for the height and spread plants will reach during the season. Roof vents, sliding doors and the transition between room sections must remain accessible; climbing supports must not obstruct their operation.
When should a heating or fireplace solution be planned?
A heating or fireplace solution can be considered for selected configurations. Decide on it before floor construction, technical connections and furnishing. Clearances, flue routing and connections must be planned by qualified professionals for the specific solution.
Who builds the masonry plinth?
A suitable contractor builds the masonry plinth on site to the confirmed dimensions of the selected configuration. Before frame installation, the geometry, door openings, levels and bearing surfaces must be fully completed and checked.
Bloomcabin T model
Integrate the T orangery carefully into the garden
Before ordering, decide the intended use, the division between plant and relaxation areas, and the required routes and standing space.
This provides the basis for preparing the masonry plinth, door positions, flooring, drainage and furnishing for the selected configuration.
Checklist before masonry work
✓ Compare the T-shaped plan with the model drawing
✓ Set door openings and access routes
✓ Plan the foundation and frost protection
✓ Confirm rainwater drainage
✓ Choose the frame RAL colour
✓ Select flooring and furnishing
Bloomcabin