
Garden Shed Floor Insulation: What to Plan Before Assembly
Garden shed planning guide
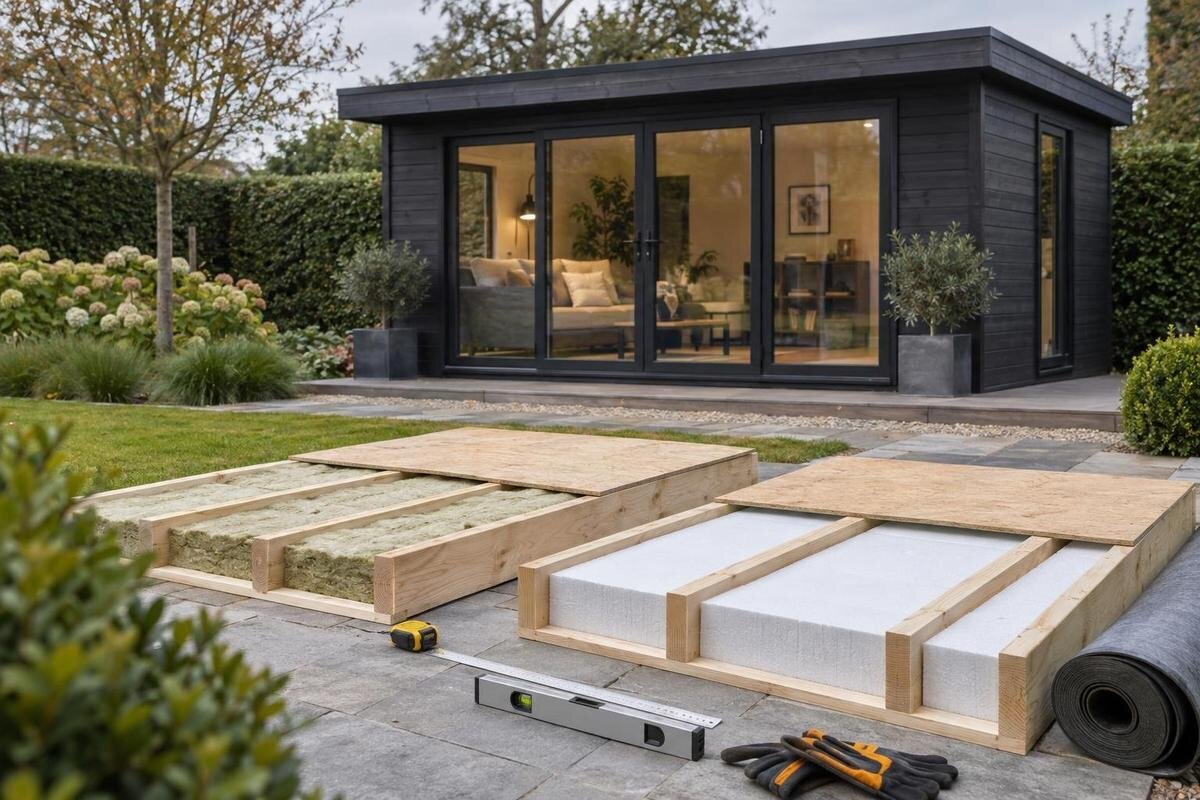
Garden shed floor insulation is easiest to plan while the floor structure is still accessible. Before ordering a garden shed, find out how its base, frame and finished floor are meant to fit together; then decide where insulation can sit, how moisture will be managed and at what stage it must go in. Those choices affect floor height, material quantity and assembly sequence. This guide focuses on planning a new shed before assembly, not retrofitting an existing building or insulating its roof. The current instructions and details for the exact model should resolve anything the general guidance here cannot.

Before you order 1
Decide what the floor needs to do
Before choosing an insulation product, decide what the shed will actually be used for and how often anyone will stand or work inside it. A space used mainly to store garden tools has different priorities from one used regularly for sorting pots, repairing equipment or keeping items that should not sit directly on a cold surface. Insulation can slow heat transfer through the floor, but it does not by itself make a shed comfortable in every season or protect stored goods from damp. Note the intended use, the time spent inside and any contents that need a stable, dry place. That gives you a sensible basis for deciding whether floor insulation is worth including.
Sketch the floor area and mark fixed shelving, workbenches, stored equipment, the doorway and the route used to bring items in. Insulation hidden between floor members may not reduce the usable surface, but a layer above the deck can raise it; either arrangement may affect the threshold or a ramp. Mark the points where the floor meets the walls and any narrow areas that could be awkward to reach. Think about how large items will pass through the doorway once the floor is finished, too. If you cannot show where the insulation sits in relation to the walking surface, the layout needs more work before you order materials.
Confirm the shed’s floor and base arrangement
First establish exactly what the shed package includes: a floor deck, a separate floor frame, only a perimeter base, or no floor components. These arrangements are not interchangeable, and the available cavity depends on the design. Check the itemised listing and assembly documents for the exact model; photos, a product name and a general category description are not proof of a floor kit or an insulation space. If the Verdana 1 garden shed is on your shortlist, use its exact model name when checking the included parts and asking for current floor instructions. Record the answer before ordering extra flooring or insulation, and list base pieces separately from deck pieces so you do not duplicate or omit a layer.
Treat base preparation as a separate decision from insulation. Follow the exact shed instructions for the supporting surface and make sure the planned floor assembly can be built on it as specified. Record where the frame is supported and whether the underside will remain reachable; those details affect whether and when insulation can be held in place. Do not assume insulation can compensate for an uneven, unsuitable or damp base, or that changing member positions is harmless. If a detail appears to require altering the structure, changing supports or inventing an opening, ask the shed supplier or a qualified installer before assembly rather than improvising on site. Also settle who will prepare or check the base, so insulation is not used to cover an unresolved support question.
Before you order 2
Measure the cavity and finished floor height
Measure the clear space that will actually accept insulation, not just the shed’s external footprint. Use the model’s floor drawing to identify the depth between the deck and underside, the width and length of each bay, and any cross-members or edge details that interrupt it. Nominal member sizes do not necessarily equal usable cavity dimensions, and a wall measurement tells you nothing about the space beneath the floor. If the Verdana 2 garden shed is on your shortlist, ask for its current floor information rather than estimating from an image. Record the smallest usable space as well as any irregular bays; insulation needs to fit the real structure.
Check what the completed build-up does to the finished floor level. Insulation within a designed cavity may leave the walking surface at its planned height; material added above an existing deck can raise it and affect the door threshold, clear opening, ramp, shelving or stored equipment. Note how the floor meets the walls and where any edge trim belongs. Do not cut down a member, lift the deck or alter a threshold to make room unless the instructions or a qualified professional confirm that change. Show the insulation position and final surface as separate layers on your plan, so nobody mistakes insulation thickness for available structural depth.
Choose insulation that fits the floor design
Choose insulation by its documented application and the way it will be supported, not by a familiar label alone. Rigid boards, flexible batts and other forms can need different cutting, retention and edge treatment; a product described for a wall is not automatically suitable for an enclosed floor. Ask the insulation supplier for written information on its intended use, thickness, moisture exposure and installation method. Establish whether it needs a supporting layer or protection underneath, too. Avoid a material that must be forced into a space or left unsupported contrary to its instructions. If the answer depends on a floor component that has not yet been selected, settle that component first.
Compare published thermal-resistance information only on a like-for-like basis and at a thickness that will genuinely fit. A rating for insulation by itself does not describe the complete floor or promise a particular indoor temperature. Gaps, compression, dampness and unplanned layers can all affect the result, while a thicker product may raise the finished floor or block a designed void. When considering the Durano garden shed, or any other model, verify its own floor arrangement before matching it to an insulation specification. Keep the chosen product sheet and shed instructions together; if their requirements conflict, ask the relevant supplier to clarify compatibility before purchase.

Before you order 3
Plan for moisture at ground level
Think about where water or damp could reach the floor from below and around its edges. Rain run-off, watering, wet footwear, cleaning spills and persistently damp ground are different sources, and insulation is not a fix for any of them. Check the site and the shed’s base guidance for how surface water should be kept away from the structure. Address any known water-entry issue before closing in the floor. A floor that looks dry from above may have a different condition underneath, so include the underside in the plan if it will be accessible. This is about the floor–ground interface, not a substitute for planning roof or wall moisture control.
Do not add a generic plastic sheet or membrane simply because insulation is being installed. The right layer, if one is specified, depends on the complete floor and base design, where moisture is expected to move and whether the assembly can dry as intended. Confirm the required material, location and orientation from the shed and insulation instructions; do not guess which side should face up. Before ordering the Veltor 1 garden shed, or another shortlisted model, use the exact model documents to ask what ground-side layers and floor details are expected. If the guidance is missing or contradictory, pause and get advice instead of sealing the cavity.
Keep edges, supports and any vents clear
Check whether the floor design relies on a clear void, ventilation openings or a particular gap below or around the floor. If it does, insulation, a retainer or an added closure must not block that route. Identify intended openings from the drawings and mark them on your plan before fitting anything; do not treat every gap as a defect to fill, and do not create new openings because they seem helpful. Floor ventilation is a design detail, not a reason to leave insulation loose or incomplete. If the manual does not make clear which spaces must remain open, ask before assembly, when the underside and frame can still be inspected.
Plan how the insulation will stay in its intended position and how its edges will be finished without taking support away from the floor. Material that shifts, hangs below a frame or is left exposed may be vulnerable to damage or make inspection difficult; an edge cover must also suit any required airflow. Do not assume a facing, adhesive or improvised board can serve as a retainer unless the relevant instructions allow it. For the Orello garden shed listing, as with any model under consideration, confirm the exact floor details instead of inferring them from the model name. If the supplied design leaves the retaining detail open, ask a qualified installer how to resolve it.
Before you order 4
Set the installation order before assembly
Agree the installation order before assembly begins, because access changes as the floor and walls are closed in. Obtain the current assembly sequence, decide who will fit the insulation and identify the stage when the floor members are accessible. A planning outline might be to prepare the specified base, assemble the floor support, fit and retain insulation at the stage allowed by the instructions, then close the floor with its planned deck. That is not a universal method: some designs use a different floor arrangement or sequence. Treat the instructions for the exact shed as controlling; do not assume a familiar kit builds in the same way.
Put each layer on a simple sketch in build order, with a note beside it for who supplies and installs it. Include a membrane, support or edge component only when the documents call for it, and decide who will inspect the fit before the deck hides it. The Modano 1 garden shed can be considered through the same process: obtain the correct instructions and confirm when the floor cavity is accessible, rather than relying on a catalogue picture. If work pauses, protect materials and any partly completed floor as the manufacturers specify. A written sequence helps prevent insulation arriving after the only planned access point has been closed.
Work out quantities and prepare materials
Work out the quantity from the actual floor bays and the insulation product’s stated coverage, not from the shed’s outside dimensions alone. Take each bay’s width and length from the approved plan or measure the assembled frame where practical; note cross-members, narrow perimeter spaces and inaccessible areas. Compare those figures with the product’s individual piece size and pack coverage, and allow for cut-offs based on the layout rather than a universal percentage. Different bays may need separate pieces, so one total-area figure can conceal shortages or awkward offcuts. Keep a simple cutting record for unusual shapes, and do not compress leftovers into a gap just to use the material; the specified fit matters more.
Before placing the materials order, confirm the exact product name, dimensions, pack coverage and handling instructions, then plan a dry, protected place to keep it until the floor stage. Check that packs can be moved to the work area without damage or obstructing assembly. Review the shed model and documents together: the garden tool shed M listing should be matched to its own floor information, not to measurements from another shed. Keep labels and product sheets available for whoever is fitting the insulation. A substitution made on site can change thickness, coverage or layer requirements, so recheck the layout rather than assuming the original plan still applies.

Before you order 5
Check the listing and order details
Before ordering, ask the seller or manufacturer questions that the product page does not answer: which floor and support parts are included; whether the base is separate; what cavity dimensions and underside access the design provides; and which assembly document applies to the exact model. For a garden tool shed S shortlist, the same questions apply; the product name or a photograph should not be treated as a technical drawing. Request or locate the current parts list and floor section, and compare them with your insulation sheet. If a floor accessory is a separate item, confirm its identity and its relationship to the main shed kit before finalising the order.
Also check whether the insulation is being ordered separately, whether its stated use matches the proposed floor and who is responsible for confirming the interface between both systems. Keep the product details and any written answers for the selected model and material, and note exclusions or work that must be arranged separately. Read the order summary against that list, especially if you are comparing similar model names or variants. Do not assume that a bundled description includes every layer, fastener or floor component shown on your sketch; only an explicit itemised inclusion settles that. If suppliers give conflicting details, resolve the point before committing rather than relying on a guess at assembly.
Use a pre-assembly decision check
Put the final decision on one page before assembly: exact shed model; base and floor components; clear cavity depth; insulation type and thickness; required support or retention; any moisture layer and its position; openings or clearances to preserve; finished floor level; and the order in which each part will be installed. Add the source for every dimension, such as a current drawing or product sheet, and mark unanswered items clearly. This is a planning record, not an engineering drawing. It helps the installer, supplier and anyone ordering materials work from the same version instead of making separate assumptions about the floor.
Use a hold point before the deck closes: compare the frame and supplied parts with the instructions, check that the chosen insulation fits the documented space and confirm that no intended opening or access point has been covered. If the actual build differs from the plan, stop and recheck the fit and layer order; do not force material in or alter structural parts to rescue an incorrect purchase. Where support, moisture control or compatibility remains unclear, get the supplier or a qualified installer to resolve it. It is often better to defer the insulation choice than to bury a mismatch beneath the finished floor.
Frequently asked questions
Do all garden sheds have space for floor insulation?
No. Floor designs vary: some may have a suitable cavity, while others may use a different arrangement or have no documented space for insulation. Check the instructions and floor drawing for the exact model. If there is no specified place and support for insulation, do not assume you can create one by altering the frame.
Can I put insulation on top of the shed floor?
Only if the floor design and insulation instructions allow that arrangement. A layer above the deck can change the finished floor height and affect the doorway, threshold or ramp. Do not rely on a loose layer or add one without checking how it will be supported and finished.
What thickness of insulation should I buy?
There is no single thickness that suits every shed floor. Measure the usable cavity and compare it with the insulation product’s stated dimensions and installation guidance. The material must fit the documented space without being forced into place or blocking a designed opening.
Should I add a moisture barrier beneath the floor?
That depends on the complete floor and base design. A generic sheet is not automatically suitable, and the correct layer and position should come from the shed and insulation instructions. Ask the supplier or a qualified installer if the documents do not explain the detail.
Can I assemble the shed first and insulate it later?
It depends on whether the floor remains accessible and how the specific shed is designed. Planning the work before assembly makes it easier to account for the cavity and sequence, but it does not guarantee that later access will be possible. Check the instructions before deciding when to fit the insulation.
A sound floor-insulation plan starts with the actual shed floor, not a guessed thickness or a product chosen in isolation. Confirm the base, available cavity, moisture details and assembly order while everything is still accessible, then match the insulation and quantity to that documented design. If a detail remains uncertain, resolve it before the floor is closed. That preparation makes the order clearer and helps avoid material that does not fit the structure.
