
A Timber Base for a Garden Shed: Design and Moisture Considerations
Garden shed planning
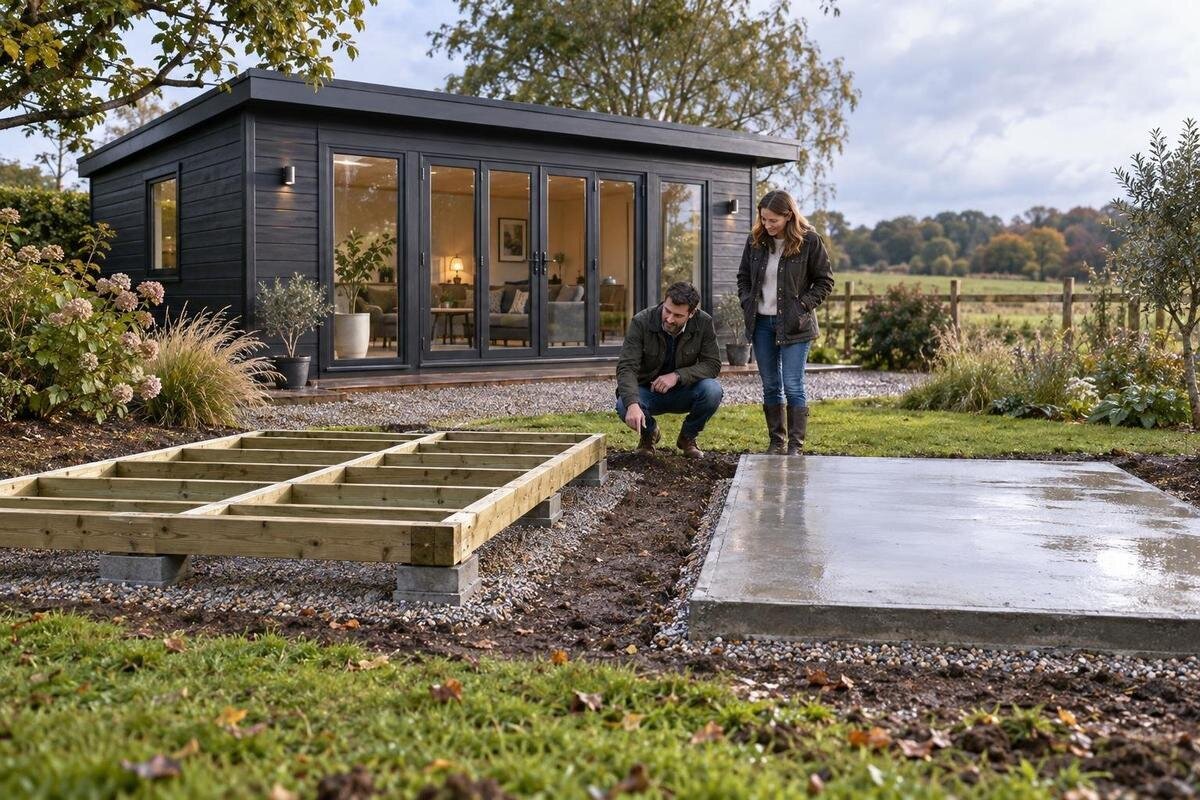
Planning a timber base for a garden shed means balancing structural support, water management and access for maintenance. The layout has to match the particular shed’s foundation requirements, but it also has to suit the ground, slope and rainwater flow at your site. Timber can form a practical base, yet prolonged damp can shorten its service life when it sits against soil, is enclosed without airflow or is exposed to runoff. The decision is therefore not simply between a low frame and a raised platform. Check the footprint, support points, clearance, drainage route, materials and installation scope before you order or build. The sections below show what to confirm and when site-specific advice is worthwhile.
Before you order 1
What a timber base must support
A timber base for a garden shed has to provide the support the structure is designed to sit on and avoid remaining wet for long periods. It is not simply a rectangular deck or a substitute for checking the ground. The frame, bearing points and top surface need to follow the shed maker’s foundation instructions, while the ground underneath must suit that arrangement. A tidy frame cannot compensate for loose fill, a soft patch or water collecting beneath it; good drainage alone cannot make an under-supported frame adequate. Consider the shed, base and soil as one system before settling on a layout. That keeps design decisions tied to the conditions the finished structure will actually face.
Timber bases may be designed as framed platforms or as bearers over specified supports; the labels do not tell you whether either arrangement suits your site. Ask for the current foundation drawing and identify whether the shed floor, joists or other components are included, rather than assuming they form part of the base. The dimensions must relate to the manufacturer’s support plan, not just the outer wall line. For a named model such as Verdana 1 garden shed, the product identity is not a base specification. Confirm the footprint and required support locations in writing before setting out timber. Ask whether the dimensions refer to the outside of the base or its bearing lines, and keep the drawing for the installer.
Assess the site before choosing a layout
Walk the proposed position after rain as well as on a dry day. Look for puddles, soil that stays soft, runoff from higher ground, water discharged by nearby roofs and irrigation that reaches the base area. Note where water can leave without running under the shed or collecting at another low point. A level-looking patch may still hold water, and drainage patterns can change when paving, garden beds or downpipes are added. Observe existing flows before deciding whether to move the shed, adjust the surrounding surface or arrange a drainage solution. Make a note of what you see while wet areas and water paths are visible; do not make the timber layout the only response to a wet site.
Ground firmness and level matter alongside moisture. Look for recently disturbed or filled areas, roots or other obstructions where supports are planned, and slopes that would require a substantial change in height. Avoid treating a timber frame as a way to bridge uncertain ground or retain soil; loose blocks or improvised packing can also shift. Identify buried services before digging, and pause for a site assessment if support locations vary or the slope and runoff are unclear. When asking about Verdana 2 garden shed, use the exact model identity and request its foundation requirements; the name alone cannot tell you what this ground needs.
Before you order 2
Match the frame to the shed footprint
Use the maker’s base drawing, not just the outside dimensions in a product image, to set out the timber. The shed’s footprint, wall line and specified bearing points all affect where bearers and cross-members can go. Confirm what each dimension measures, since a nominal outside size does not necessarily describe the base perimeter or support layout. A frame ending short of a required bearing point, or leaving an intended edge unsupported, may transfer weight differently from the approved arrangement. Do not choose member sizes or spans by eye. If the supplied instructions do not cover a timber base, ask the supplier or a qualified professional to confirm the design before ordering material. If two documents differ, get clarification before cutting timber or booking installation.
Plan the surrounding space as well as the measured footprint. Check that the entrance can be reached, that the door can open as intended, and that the base will not create an awkward step or block a regular path. Do not add a wider ledge just to provide more standing room unless the instructions allow it: an exposed edge can collect leaves and may direct water back towards the structure. For Durano spacious garden shed, request the actual base footprint and threshold details rather than inferring them from the name or a photograph. Include room to inspect and maintain the base when comparing possible positions, then keep the drawing with your order records.
Set ground clearance and limit soil contact
Timber in contact with damp soil is exposed to a different moisture load from timber kept clear of the ground. Soil can hold water against the underside, and moisture can move into timber at its contact points. Plan the clearance required by the shed and base specifications; no single figure suits every frame, site and shed. A very low base may leave little room to inspect or dry, while raising it without a design check can alter access, entrance height and anchoring needs. Avoid placing structural timber directly on earth unless the specified detail and material are expressly intended for that use. Keep soil, mulch and garden debris from building up against it, and leave the underside accessible for checks.
Ask what timber is suitable for each exposure and whether the specified treatment covers the actual use, including cut ends or notches. Check the treatment documentation for its intended use; a surface stain or coating should not be assumed to provide the protection of timber intended for ground contact. Follow the treatment maker’s instructions and avoid applying an unverified chemical to a finished component. If termites or other wood-boring pests are a known concern at your site, seek locally appropriate advice and leave vulnerable areas inspectable. Before buying Veltor 1 garden shed, request the base-clearance guidance for that exact model rather than copying a measurement from a different shed.
Before you order 3
Plan drainage around the timber base
Drainage is about giving water a route past the base, not just making the timber water-resistant. The surrounding surface should not funnel rain towards the footprint, and the completed layout should not create a shallow basin or a closed edge that holds water. Consider runoff from the shed roof if it is collected or redirected, along with nearby paving and garden irrigation. Keep discharge away from supports and from places where water will remain beneath the floor. If water repeatedly pools or the site has no clear outlet, resolve that condition before setting timber in place rather than expecting a raised frame to solve it. A simple sketch of water paths can expose conflicts between the base and the garden.
Permeable ground beneath a frame is not a guarantee of good drainage: compacted soil, slopes and neighbouring surfaces affect where water travels. Conversely, covering the underside without a drainage plan can trap moisture and make inspection harder. If you are considering an apron, membrane or other ground covering, check how its edges will carry water and whether it blocks access or airflow. For Orello 1 garden shed, confirm the exact base footprint first, then plan the water route around it; the model name does not specify a drainage detail. Do not let the base perimeter form a barrier that traps runoff. Seek site advice if drainage depends on altering a slope or receiving water from elsewhere.
Allow airflow and inspection access
Airflow under a raised timber base can help damp areas dry, but a visible gap is useful only if air can move through it and the space remains clear. Leaves, stored items, soil build-up and dense planting can gradually close the gap. Avoid boxing the sides in without considering how moisture will escape; an enclosure can conceal wet timber and restrict inspection. Keep the underside accessible enough for a visual check, and put any required clearance in the base drawing rather than treating it as an afterthought. Follow ventilation instructions supplied for the shed itself, but do not assume that ventilation in the walls will dry a sealed base.
More height is not automatically better. A higher platform may make inspection easier, but it can add a step at the entrance and change how the structure is exposed to wind or secured. The right clearance depends on the maker’s details and site conditions, not a rule copied from a general guide. Ask how the shed is meant to be supported and anchored if your proposed base differs from the supplied plan. When discussing Modano 1 garden shed, use the exact model identity and request that information directly; styling or product images cannot establish clearance, fixing or airflow requirements. Keep specified openings unobstructed.
Before you order 4
Choose suitable timber and compatible fixings
Specify structural timber suitable for the intended outdoor exposure, and obtain enough information to distinguish it from material chosen only for appearance. Ask the timber supplier or designer what grade and treatment are appropriate for the supports and parts likely to become damp. Do not assume every treated length is suitable for direct soil contact. If assembly involves cuts, ask how exposed ends are to be protected and maintained. Keep product information for the timber used, particularly if the frame combines more than one type or treatment. Those records can help you follow the correct maintenance guidance and identify suitable material if a repair is needed later.
Connections are another moisture detail. Water can linger where horizontal pieces meet, and corrosion can occur if fixings are unsuitable for the timber treatment or the exposure. Use the connectors and fasteners specified for the structural design, and confirm compatibility rather than substituting general-purpose screws. Avoid improvised joints or changes to support spacing during assembly. A product name such as wooden garden tool shed M identifies which shed you mean; it does not establish which base components or fixings are included. Ask for the material and connection details for the base itself, especially if it is being supplied separately.
Confirm the base details before ordering
Before ordering, separate the shed package from the base work in your comparison. Confirm whether a floor or base components are included, whether a timber frame is supplied separately, and who is responsible for ground preparation, base assembly and placing the shed. Request the model’s dimensions and foundation drawing, then compare them with the proposed layout and measured site. Check the full kit list and fitting instructions rather than assuming a product photograph shows every component needed. This makes different quotations easier to compare and helps avoid a gap between what the shed requires and what the base installer has allowed for. Record who is responsible for preparing the ground and what that work includes.
Keep answers tied to the exact model and configuration you intend to order. Ask which base arrangement the manufacturer specifies or accepts, whether the instructions set clearance or support conditions, what is excluded and what access is needed to bring materials to the selected position. If a contractor designs or installs the base, share the shed documents before work starts and agree who checks the finished footprint against them. Use a precise name such as wooden garden tool shed S in correspondence so the response is not confused with another listing. Read applicable order, installation and warranty terms directly; do not rely on assumptions about the scope.
Before you order 5
Inspect the base after installation
Plan inspection access from the outset. After rain, look beneath and around the base for standing water, persistently wet soil, blocked flow paths and splashback on the timber. Check that leaves, soil and mulch have not built up against the frame, and that stored items or planting have not closed the airflow gap. A quick look at the perimeter will not show central supports if they are hidden, so leave a safe way to inspect those too. If water remains after rainfall or the ground conditions change, investigate the cause before enclosing or covering the area again. Regular access matters as much as an initial drainage plan.
During routine checks, look for recurring dark or damp patches, softening, separation at joints, loose connectors and changes in level; these are reasons to investigate, not proof of one specific fault. Maintain protective finishes according to their maker’s instructions, and address drainage or soil build-up before repainting over a symptom. Clear nearby runoff channels only when they are safely accessible, and arrange competent help for work beyond routine maintenance. A simple record of inspection dates, rain-related pooling and repairs can reveal whether the same area keeps getting wet. If a defect seems to affect support or stability, seek a professional assessment before attempting a structural repair.
Weigh low and raised layouts against the site
A low base can reduce the step into a shed, but if it sits close to damp ground it may be harder to inspect and dry. A raised arrangement can create room for airflow and access, but may make entry less convenient and increase exposure beneath the structure. Neither option is a universal answer: the maker’s support instructions, water route and maintenance needs determine what is appropriate. Compare the trade-offs for the actual position, including the door approach, room to inspect, and whether vegetation or stored goods could block a gap. Do not select a base height on appearance alone; include the surrounding ground in the decision.
Get professional input before construction if the ground is soft or variable, a significant slope needs levelling or retaining, water cannot be directed away, or the proposed layout requires spans or support choices not covered by the shed instructions. A qualified local designer or installer can assess the site and specify the arrangement; do not try to resolve uncertain conditions by guessing timber sizes. Even on a straightforward site, keep the written shed requirements, base drawing and material details together. That allows the design, purchase and installation to be compared against the same information if questions arise later.
Frequently asked questions
Should a timber base touch the ground?
Not by default. Timber sitting directly in soil can remain damp, so use the contact detail and materials specified for the base design. Direct ground contact is appropriate only when the detail is intended for that exposure and the timber is suitable for it. If the instructions are silent, ask the supplier or a qualified professional rather than assuming ordinary outdoor timber will be suitable.
How much ground clearance does a timber garden shed need?
There is no universal clearance that suits every timber base and site. Follow the particular shed’s installation guidance and consider drainage, airflow and whether the underside will remain accessible for inspection. If the instructions do not cover your proposed arrangement, ask for model-specific advice instead of borrowing a measurement from another shed.
Can a timber base work on sloping or damp ground?
It may be possible, but a timber frame should not be used to mask soft ground, uneven support or persistent runoff. The base needs to suit the actual ground and level change. If the site is sloping, recently filled or stays wet, ask a qualified local professional to assess it before choosing support positions or timber sizes.
Should the timber base be larger than the shed footprint?
Not automatically. The base should follow the shed’s specified footprint and support points. An overhang may collect leaves or water, while a frame that is too small may leave a required bearing point unsupported. Compare the manufacturer’s drawing with the proposed layout, and use a larger footprint only if the instructions or designer allow it.
How can I reduce moisture under a timber base?
Keep surface runoff from flowing into the footprint, avoid standing water and leave the underside open enough to dry and inspect where the design calls for airflow. Clear leaves and soil build-up, then check the area after rain. If water repeatedly pools, investigate its route rather than covering the wet area or relying on a coating alone.
A sound timber base begins with the shed’s actual support requirements and the behaviour of the site, not a standard sketch. Confirm where the structure bears, how the ground suits the arrangement and where rainwater will go; then provide appropriate timber, airflow and access for inspection. If any of those depend on uncertain ground, drainage or structural spans, have the site assessed before work starts. Careful ordering and periodic checks help keep moisture risks visible rather than hidden beneath the floor.
