
Spider mites in the greenhouse.
Greenhouse field note 41 · Diagnosis and crop management
Managing spider mites under glass.
Effective identification, prevention and control begin by examining individual leaves. Obvious silk is seldom the earliest warning. More often, pale pinpricks and plant stress appear while a small mite population expands within a protected, dry pocket of the greenhouse.
Your opening survey
Look beyond the visible injury.
Instead of chewing holes or producing a single neat wound, spider mites pierce cells and remove their contents. The first injury is usually a scatter of tiny cream or yellow marks known as stippling. Under glass, it may be mistaken for dust, nutrient stress, ageing leaves, sun scorch or thrips. Avoid an immediate greenhouse-wide treatment. First assess the plant as a whole, examine its leaf surfaces and establish whether living mites remain active.
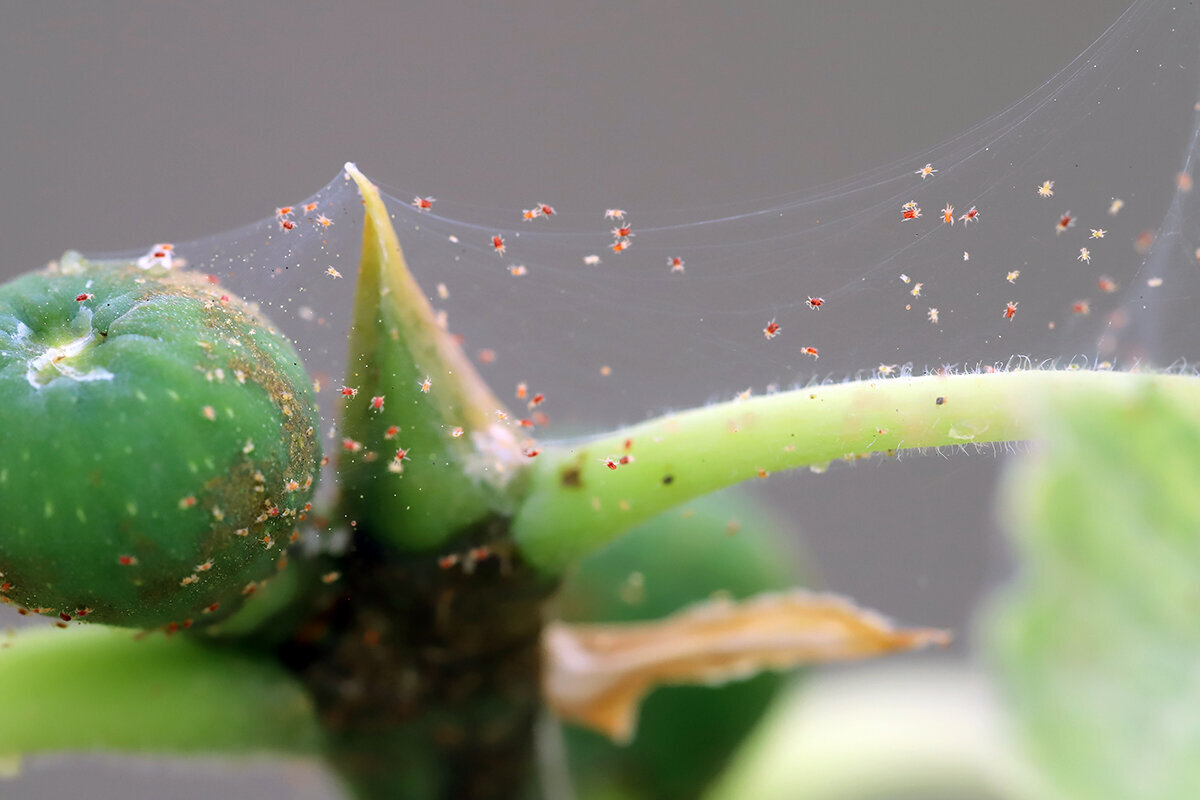
Start with the plant’s overall pattern. A colony often begins in one favourable pocket: the hotter end of a cucumber row, a pot allowed to dry, glazing warmed by direct sun or mature leaves that are difficult to reach. Note whether marks follow veins, occur mainly on lower leaves, affect one side or have spread into neighbouring pots. Then turn over several leaves. Two-spotted spider mites commonly shelter underneath, making that surface the best place to find mites, eggs, shed skins and fine strands.
Magnification makes the inspection easier. If no hand lens is available, place a sheet of white paper below a suspect leaf and tap the leaf lightly. Moving flecks justify further investigation, although they do not identify a species by themselves. Sample leaves from several heights and temperature zones. Reliable early evidence prevents one old, damaged leaf from prompting treatment of the whole greenhouse when the active pocket remains confined.
The layout of the greenhouse affects surveillance as well. Paths, plant spacing and bench heights should allow leaves to be turned, areas below benches to be cleaned and thick growth to be reached without pressing neighbouring plants together. A classic-style aluminium greenhouse can form an accessible setting for crop care, responsive climate control and routine pest surveillance.
01 · Whole-plant pattern
Map where symptoms occur.
02 · Leaf condition
Interpret the markings.
03 · Active signs
Verify the infestation.
Whole-plant pattern. A dull grey-green cast, stippled lower foliage or one struggling plant may identify the starting point. Record its position instead of trusting recollection.
Leaf condition. Isolated pale marks may join into irregular mottling before broad areas turn dull bronze. Examine both faces of several leaves rather than concentrating on the worst example.
Active signs. Check veins and leaf junctions for crawling flecks, rounded eggs, whitish shed skins and almost invisible strands. Such findings establish whether damage is continuing rather than merely historical.
A guide to damage
How stippling develops into bronzing.
The amount of visible injury helps set priorities but does not reveal the current population reliably. Deeply bronzed foliage may record an older outbreak that has already declined. Conversely, fresh eggs and feeding colonies may occupy a plant that remains unexpectedly green. Always assess two separate things: lasting leaf injury and present activity beneath the foliage.
Spider mites belong to the arachnids rather than the insects. Adults are minute and, without magnification, can resemble nothing more than mobile dots. Their apparent colour varies with life stage and may be green, yellow or red. The two-spotted spider mite, Tetranychus urticae, is particularly important in protected crops and usually bears two darker dorsal patches. Even so, management decisions should rely on evidence from the affected plant, not presumed colour.
Scattered stipples
Extensive mottling
Bronze tissue
Visible silk
Declining leaf
Confirm, rather than assume
Separating spider mites from similar symptoms.
Stippling deserves attention, but spider mites are not its only cause. A dependable diagnosis answers two questions: does the damage suit sap-feeding mites, and can the mites or direct traces of their activity be found? Inspect leaf undersides, young and old growth, symptom distribution, dark droppings and surface texture. Also consider whether the change followed a hot spell, irregular watering or a spray application.
Thrips may produce pale or silver scraping damage, often in streaks, that can be confused with mite stippling. Look for narrow moving insects and tiny dark faecal spots in flowers, tight folds or on leaf surfaces. Mineral deposits and dried spray remain on top of the leaf and can generally be removed with a damp wipe; mite damage lies within the tissue. Oedema instead produces raised, blister-like or corky areas associated with disrupted water balance. Ordinary senescence is usually more uniform: an old leaf fades progressively rather than acquiring an expanding patch of new pinpricks within a warm pocket.
Water stress and other physiological changes are further reasons to avoid hasty treatment. Soft, rolled or misshapen leaves do not establish a mite diagnosis on their own. When mites, eggs, silk and characteristic underside stippling cannot be found, examine the roots, irrigation pattern and recent greenhouse conditions first. Seek qualified plant-health advice if damage remains uncertain or continues to spread.
How a local colony spreads through a greenhouse
Heat, moisture stress and slow detection raise the risk.
Environmental conditions strongly influence mite development and reproduction. Warmth can speed population growth, while drought-stressed plants have less capacity to withstand feeding. Dusty foliage, crowded pots, inaccessible undersides and late discovery add to the pressure. There is no universal number of days for development: temperature, host plant, species and local microclimate all contribute. For a home greenhouse, disciplined surveillance is more dependable than any generic timetable.
Area oneSun-warmed foliage
Area twoMoisture-stressed roots
Area threeOvercrowded plants
Area fourDelayed detection
Sun-warmed foliage: Foliage against the glazing, pots exposed to afternoon sun and stagnant air above the canopy may be far hotter than a reading taken beside the entrance.
Moisture-stressed roots: Recurring shortages of water accelerate the loss of useful foliage and leave the plant less able to withstand a colony that began in one small area.
Overcrowded plants: Leaves that touch give mites protected routes between plants. Crowding also obstructs underside inspection and prevents even coverage by mechanical measures or registered treatments.
Delayed detection: Adults, immature mites and eggs may all be present at once. If a measure reaches exposed stages only, renewed activity may emerge unless the plants are checked repeatedly.
Prevention is not a matter of maintaining maximum humidity indefinitely. Give priority to reducing avoidable stress, ventilating and shading at the right time, keeping plants clean and reachable, and inspecting often enough to intercept colonies before crowded growth provides a protected, silk-bound refuge.
Prevent problems through access and climate care
Design the space so every crop can be examined.
Inspect new plants carefully before placing them among established crops, and keep them apart for an initial observation period where feasible. Herbs, vegetable seedlings, annual flowers and overwintered pots deserve particular attention because they may carry small populations without obvious injury. Record the plant, position, date, symptoms, live findings and response. Brief notes expose recurring heat pockets and vulnerable crops sooner and more accurately than memory alone.
Water to sustain steady growth rather than to rescue plants after severe drying. Saturating a previously dry root ball will not make mites disappear, and routinely wet foliage is not a substitute for sound irrigation. Judge need from pot weight or growing-medium moisture, then water each crop evenly according to its needs. A workspace organised for this purpose, such as the aluminium greenhouse in the classic style can provide orderly growing positions and practical routes for ongoing care.
Base ventilation and shading on conditions around the leaves. Roof vents, open doors and suitable shade can reduce severe heat pockets but cannot replace direct observation. Australian summers differ markedly between regions, and intense sun may be followed by abrupt weather changes. A resilient growing area therefore needs both a sound enclosure and enough room to approach every plant. The classic-style aluminium greenhouse allows several layout choices; make unobstructed paths, workable bench heights and generous spacing the priorities.
Keep floors, the spaces below benches, pot rims and glazing free of debris. Dust may favour mite problems, while discarded foliage makes inspection harder. Remove badly ruined leaves only when doing so will not strip the plant unnecessarily. Bag affected material cleanly and take it out of the greenhouse. Do not leave heavily colonised plants or prunings on an uncovered compost pile beside the structure, where mites could regain access to the crop.
- Incoming plants: hold them separately, inspect below the leaves and examine them once more before introduction.
- Spacing: prevent foliage from forming continuous bridges between adjacent containers.
- Irrigation: avoid repeated drying without compensating through permanently waterlogged growing media.
- Heat exposure: assess afternoon conditions where the leaves sit, rather than relying solely on the morning forecast.
- Inspection frequency: survey plants no less than weekly, increasing the frequency during hot conditions, after introducing plants and while an infestation remains active.
Control succeeds only where it reaches
Cover the undersides and return to inspect them.
A directed rinse can dislodge mites and silk mechanically, particularly when an early, confined outbreak occurs on plants that are easy to handle. Protect tender foliage and avoid working in direct midday heat. If using agricultural chemical products, select only a product currently registered or covered by a valid permit for the relevant crop, use and location, and comply with the label and regional requirements. Many measures depend on contact. A colony sheltered below a leaf cannot be reduced adequately when the treatment misses it. Thorough reach matters more than extra concentration or an indiscriminate spray cloud.
Poor coverage
Treating the top alone
Planned coverage
Create access first
Unsafe excess
Extra product adds risk
Treating the top alone. Spray may coat the upper surface while mites beneath it remain sheltered. Although the plant appears treated, the active colony continues in its favoured position.
Create access first. Separate the pots, lift dense foliage carefully and progress in sections, following the directions for the product or beneficial organism. Reinspect afterwards; never presume that one application contacted every stage.
Extra product adds risk. Excess dose, treatment during heat stress or a product not suited to the crop may injure leaves and harm beneficial organisms. Observe every label direction, safety measure, temperature limit, withholding period and restriction.
For a minor, isolated colony, gentle rinsing, selective removal of ruined foliage and close monitoring may be enough. A broader outbreak needs a combined response: separation, hygiene, less plant stress and an appropriate control method. Predatory mites such as Phytoseiulus persimilis are released against spider mites in protected crops. Selection, release rate and placement vary with crop, temperature, infestation level and products used earlier. Consult the biocontrol supplier and verify compatibility with both previous and proposed chemical applications. Broad-spectrum treatments can harm beneficial organisms and disrupt biological regulation.
Chemical-use rules in Australia: Check APVMA PubCRIS and the permits search for a product authorised for the crop and proposed use. Read the current label and any permit in full, including application, safety, withholding and restriction requirements. Garden marketing is not evidence of registration. National registration and permits must also be considered alongside the chemical-use rules applying in the destination state or territory.
Measure recovery through repeated evidence
Judge the fresh growth rather than old scars.
Existing stippling or bronzing will not turn completely green again. Progress instead means fewer live mites, no fresh feeding marks, no expansion of silk and clean new growth at successive inspections. Retain a few cosmetically marked but functioning leaves initially as reference points. Removing every damaged leaf at once makes it harder to distinguish historical injury from renewed feeding.
Day 0Verify and contain.Label affected plants, separate them where practical, survey their neighbours and document live mites, eggs, shed skins or silk.
First reinspectionExamine the sheltered areas again.Return to leaf undersides, stem junctions and crowded centres. Determine whether the rinse or other measure reached the places where colonies were first recorded.
Second reinspectionDistinguish historic injury from new feeding.Use marked foliage as a reference against new growth. Recent stipples, mobile mites, newly laid eggs or fresh strands show that the population remains active.
Longer termResume routine surveillance.Retain your notes, address recurring heat or moisture stress, and preserve working room around each plant so the next developing pocket is noticed promptly.
A thoughtfully arranged structure makes this process easier. The classic-style aluminium greenhouse can function as a managed growing area instead of an overfilled storage space. Preserve a dedicated survey route, keep vulnerable plants within easy reach, and adjust ventilation and shade to the conditions on your site. For a layout that remains accessible during routine care, review the available configurations of the aluminium greenhouse in the classic style.
Questions growers often ask
Practical guidance for accurate monitoring.
Can an infestation begin before any silk is visible?
Yes. Delicate strands generally become conspicuous only after numbers increase. At an early stage, the only clues may be pale pinpricks, rounded eggs, whitish shed skins and minute crawling organisms beneath the foliage. Silk adds useful confirmation, but its absence cannot exclude an active colony.
Do I need to remove every affected greenhouse plant?
Not automatically. A valuable plant with a light infestation can often be isolated, gently rinsed or suitably treated, then monitored closely. But a plant that is badly damaged, very dense and no longer practical to inspect fully can become a lasting source for the whole crop. Hygienic removal may then be the sensible choice.
Will added humidity eradicate the mites?
No. Maintaining suitable moisture for the crop limits drought stress and is preferable to an extremely hot, arid pocket. It is not, by itself, a mite-management plan. Avoid holding the greenhouse in persistently damp conditions or leaving foliage wet, because this may favour other disorders, including fungal disease.
May predatory mites be introduced following a spray?
Sometimes, but the answer depends on the product and the length of its residual activity. Certain treatments remain harmful to beneficial organisms longer than a grower might expect. Consult the label, registration or permit information, then ask the biocontrol supplier about a safe interval, the suitable predator, release method and necessary environmental conditions.
What inspection schedule is appropriate during an outbreak?
Return to affected plants more frequently than the standard weekly survey. Crop, temperature, population size and the chosen response all influence timing. The essential step is to revisit the same sheltered surfaces before missed eggs hatch or surviving colonies generate another noticeable wave.
Are these mites a type of spider?
They are arachnids, as spiders and ticks are, but they are tiny plant-feeding mites rather than spiders. Their silk forms delicate strands and, in severe outbreaks, dense sheets over foliage; it does not resemble the large radial structure of a spider’s web.
References and additional guidance
Selected sources for further investigation.
The references below inform the diagnostic and integrated approach used here. For any particular crop or treatment, current Australian registration or permit details, the product label and qualified advice take precedence.
Continue with Bloomcabin: Curtains and shade for greenhouses · Planning the greenhouse interior · Protecting an aluminium greenhouse from weather and pests
- North Rhine-Westphalia Chamber of Agriculture: Spider mites affecting greenhouse fruiting vegetables
- North Rhine-Westphalia Chamber of Agriculture: Spider mites in biological crop protection
- North Rhine-Westphalia Chamber of Agriculture: Predatory mites as spider-mite enemies
- APVMA: Registered agricultural chemical products and permits search
- Australian Department of Agriculture: How agricultural and veterinary chemicals are regulated
- Julius Kühn Institute and German Environment Agency: Commercially available beneficial organisms
- North Rhine-Westphalia Chamber of Agriculture: Identifying and managing spider mites on fruiting vegetables
- North Rhine-Westphalia Chamber of Agriculture: Spider-mite development and biological management
