
To improve the quality of the content of this website and to adapt it to the needs of users, cookies are used - including third-party cookies. By continuing to use this website, you agree to the use of cookies and to possible communication when you enter your contact information in one of the forms on the site.

Elegant Pyramid Greenhouse for Custom Bases

Pyramid Greenhouse for a Masonry Base

  • Custom base options
  • Long-lasting premium construction
  • Favourable climate for plants
  • Stylish architectural design
The greater the purchase, the bigger discounts you get.
Estimated delivery:
We offer the opportunity to CHOOSE A SUITABLE DELIVERY WEEK, which you will find in the last step of the shopping cart.
The greater the purchase, the bigger discounts you get.
Personal Bloomcabin consultation
Personal consultation?
We are happy to help with questions about models, prices and delivery.
+49 152 28196712

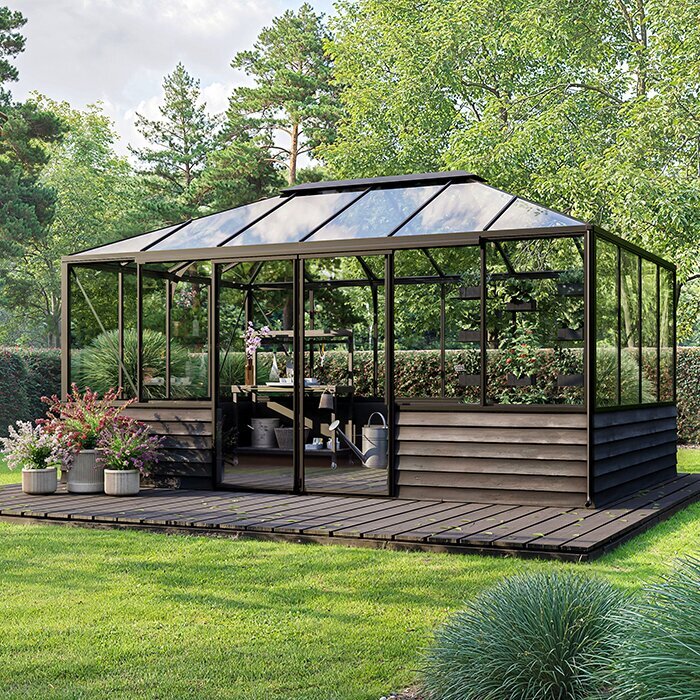
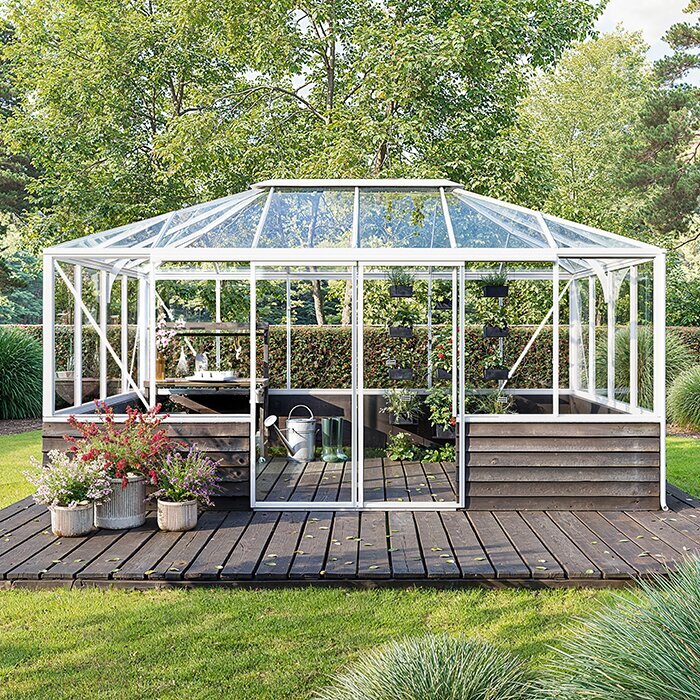
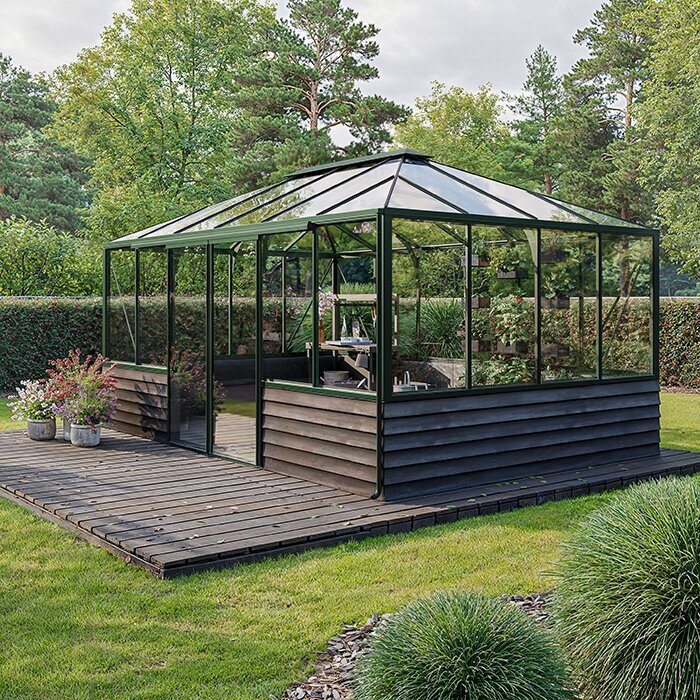
Elegant Wall-Base Pyramid Greenhouse

Create a naturally balanced garden setting

Meet a distinctive expression of modern greenhouse architecture: Bloomcabin Pyramid Greenhouse. Purpose-built for a masonry plinth or another firm foundation, it pairs enduring style with practical thinking. The result is a warm, organic setting that enriches an outdoor space—ideal for gardeners drawn to quality, individuality and considered design.

What makes the Bloomcabin Pyramid Greenhouse different?

Designed for masonry bases:
This greenhouse is intended for a masonry plinth or another solid foundation you select. Natural stone, concrete or custom brickwork can define the base, giving the finished greenhouse a personal character that reflects your garden.

Strong, lasting construction:
Quality aluminium profiles can be paired with glass or polycarbonate glazing. Together they give the Pyramid Greenhouse impressive stability and resistance to the weather, supporting years of gardening enjoyment.

Harmonious architectural design:
The crisp pyramidal silhouette settles gracefully into varied surroundings. Raised above masonry, it becomes a distinctive architectural feature that pairs well with patios, garden walls and timber elements.

A favourable climate for healthy plants:
Its geometry encourages air to move naturally and temperatures to remain even, helping vigorous, healthy plants thrive in every season.

Quick, uncomplicated assembly:
Precision-made parts and clear instructions keep installation manageable, helping you get your garden under way without delay.

Buying direct, fair value:
With Bloomcabin, you buy direct from the manufacturer, benefiting from quality materials, lasting construction and a fair price without intermediaries.

What our customers say 

“Our greenhouse stands on a masonry base and looks fantastic – stable, elegant and perfectly integrated!” – Emily Clark
“A real garden feature. The pyramid form feels modern yet natural.” – Ethan Davies
“Very good quality and easy to assemble. Highly recommended!” – Chloe Brown

Secure and convenient payment options

Select an available secure method and move smoothly through checkout.

Order now

Bring enduring elegance into the garden with the Bloomcabin Pyramid Greenhouse for a Masonry Base.
Order now for quality workmanship, reliable delivery throughout Australia, including territories and islands, and a distinctive architectural feature for your garden.
More information
SPECIFICATION

Dimensions:

For 235x235 greenhouse:

Highest roof point: 270 cm

Wall height: 194 cm

Door height: 185 cm

For 310x310 greenhouse:

Highest roof point: 265 cm

Wall height: 194 cm

Door height: 185 cm

For 310x385 greenhouse:

Highest roof point: 269 cm

Wall height: 194 cm

Door height: 185 cm

For 310x460 greenhouse:

Highest roof point: 270 cm

Wall height: 194 cm

Door height: 185 cm

Material:

Premium aluminium profiles

Polycarbonate or 4 mm toughened safety glass

Door options:

Single sliding door or double sliding doors (for walls at least 310 cm wide)

Key features:

Robust, strong profiles for maximum stability

Integrated roof guttering for efficient water drainage

Integrated aluminium base for easy assembly

Warranty:

12-year extended warranty

Key benefits:

Durability: Made from premium aluminium and toughened glass for a long service life.

Safety: Toughened safety glass helps create a safer environment.

Adaptability: Available in 6 sizes and a choice of RAL catalogue colours.

Functionality: Integrated roof guttering and durable profiles for changing weather conditions.

Reliability: A 12-year warranty provides confidence and reassurance.

Bloomcabin pyramid greenhouse with a masonry base

Freestanding pyramid greenhouse above a base of brick, natural stone or concrete

This Bloomcabin pyramid greenhouse on a masonry base sets a glazed aluminium structure above a low, site-built base made from brick, natural stone, concrete or another suitable material. Its pyramid roof creates a distinctive silhouette, while the substantial lower section can repeat finishes used on the home, terrace or garden walls. Select the model and confirm every dimension and the door location before masonry begins, as both structures must meet accurately.

The current configuration offers 6 sizes with an area of about 5.6–14.2 m². Square plans measure roughly 2.35 × 2.35 m or 3.10 × 3.10 m, while longer versions are about 3.10 × 3.85 m or 4.60 m. The powder-coated aluminium profiles may be combined with polycarbonate or 4 mm toughened safety glass. Compare sizes by considering circulation, planting benches, clearance around the door and open airflow as well as floor area.

No building wall supports or closes this freestanding design. Instead, the low masonry base carries an independent assembly of frames, sides and roof. Choose a position that leaves every face accessible for daylight, construction and ongoing maintenance. Discover more about Bloomcabin in Australia.

Freestanding Bloomcabin pyramid greenhouse above a masonry base
Freestanding architecture with a custom-designed base

Masonry defines the proportions without changing the freestanding design

Because the pyramid roof is symmetrical, it presents a strong profile from every direction. Review the proposed location from the house, terrace, paths and favourite outdoor sitting areas. These perspectives reveal how the entrance, frame colour and base finish will sit within the garden.

As the permanent lower tier, the base has a major visual role. Brick may reference the home, natural stone may extend a garden wall, and render or concrete may provide a quieter contemporary finish. Colour is only one consideration: brick or stone format, bond, joint treatment, coping and adjoining paths also shape the result.

The solid base gives this version more of an orangery character than a greenhouse glazed down to ground level. Its enclosed lower zone also looks calmer, hiding pots, work materials and watering equipment from view while the upper section remains bright and open.

Custom masonry base

Select brick, stone, concrete or render that complements the setting

Striking pyramid roof

Roof apex approximately 2.64–2.69 m, depending on footprint

Flexible glazing

Polycarbonate or 4 mm toughened safety glass

RAL colour choice

Match the frame colour to masonry and façade

Coordinate materials and colour

Set the masonry base first, then choose the frame colour and interior fit-out

Construct the base only from the approved dimensions for the chosen greenhouse. Finalise the exact model, doorway and completed floor level before site work. Catalogue figures used during early planning are insufficient: a minor discrepancy could shift the opening, perimeter or fixing locations away from the delivered frame.

Assess brick format, bond, mortar colour and frame finish together with physical samples. Natural stone can connect the greenhouse to existing garden walls, although its irregular face makes a flat, carefully formed top especially important. Render and concrete work well with contemporary buildings. Inspect all samples outdoors at the proposed position because daylight can alter their appearance.

Regardless of its finish, the completed wall must provide a straight, continuous, structurally sound and dimensionally correct bearing surface. This prevents the aluminium frame from twisting. Settle the top width, cap and junction details before bricks are cut or concrete formwork is made; assembly is too late to improvise corrections for an uneven base.

Pyramid greenhouse supported by a masonry base
Four points before masonry work begins

Confirm footprint, door, bearing surface and drainage beforehand

Once built, the base fixes the greenhouse location as well as its doorway and internal circulation. Peg out the full plan before digging or laying masonry. Use the marked area to test access for a wheelbarrow, pots and supplies and to confirm that the outer faces can still be maintained.

01

Accurate footprint

Transfer the approved outside measurements to the site, then verify the diagonals and right angles. Mark the entrance face together with nearby paths, beds and drainage zones. This practical layout check identifies space or connection problems before excavation.

02

Door opening

Keep a straight, open approach outside the entrance. There should be comfortable clearance for moving a wheelbarrow, containers and supplies through it. Shelving and side beds must stay outside both the passage and the travel area of the sliding door.

03

Corners and connections

Resolve wall caps, corners and entrance reveals as connected details, avoiding projections that could hinder installation or cleaning.

04

Drainage

Observe the direction in which rain moves over the site while setting out. Position the doorway, surrounding paving and any future storage tank so water cannot pool around the base and maintenance routes remain usable.

Key technical data

Technical data for the structure above the masonry base

Model overview

Square and extended footprints

Compact square models

Roof apex approx. 2.69 m; wall height approx. 1.93 m; door height approx. 1.85 m

Large square model

Roof apex approx. 2.64 m; wall height approx. 1.93 m; door height approx. 1.85 m

Extended models

Roof apex approx. 2.69 m; wall height approx. 1.93 m; door height approx. 1.85 m

Glazing

Polycarbonate or 4 mm toughened safety glass

Structure

The powder-coated aluminium structure incorporates sliding doors and gutters and needs an accurately detailed junction with the separately built base. Its design ratings are 30 m/s wind speed and 210 kg/m² snow load. Those ratings depend on correct assembly over a suitable load-bearing support; foundations and masonry still require planning for the individual site.

Bloomcabin pyramid greenhouse above a low masonry wall
Light and plant climate

Solid below, light-transmitting above

Replacing the lowest transparent section with masonry changes the distribution of light near floor level. Daylight still enters through the glazed sides and angled roof from several directions, but short crops placed immediately inside the wall may experience different conditions from taller specimens nearer the middle.

Use raised platforms or low benches to lift smaller plants beside the base. Keep dense foliage and taller containers closer to the brighter central space so they do not deepen shade along the wall. Avoid leaving leaves in continual contact with either glass or polycarbonate.

Conditions vary with aspect, time of year, plant height and the base finish. After adding a crop, monitor each zone for shade and drying rate. Move plants or alter watering when observations show that one part of the greenhouse behaves differently.

Four typical uses

Four ways to use this masonry-base pyramid greenhouse

01

Kitchen-garden greenhouse

Link the base finish visually with productive beds and paths.

02

Flower house

Display seasonal flowers and selected ornamental plants to advantage.

03

Space for tall plants

Use the taller central roof volume for climbing or larger plants.

04

Green retreat

Depending on the selected size, place a bench or small table among the plants.

Masonry and architecture

Combine the base, doorway and interior arrangement on a single drawing. Record the outside outline, wall thickness, circulation, growing zones, drainage, services and entrance detail. Conflicts can then be resolved before the floor and masonry become permanent.

Brick, natural stone, render or exposed concrete

Include cleanability and future repairs when selecting an exposed finish. The craft approach used for corners, copings and entrance reveals should suit the material, because these prominent details need to retain a neat appearance over time.

Door reveals and external corners bring several visible edges together. Give particular attention to regular joints, clean coping ends and well-aligned paving junctions; treat them as deliberate architectural features rather than incidental construction details.

Levels established by adjoining paths and beds determine how visually heavy the base appears. Consistent paving lines and clearly arranged planting can frame it, while purposeful gaps allow the wall and aluminium frame to read as one composition.

Door opening and floor connection

Build the opening to the approved sliding-door details, setting its height, width, frame position and side junctions before masonry starts. For double sliders, verify that the selected greenhouse and available wall width work together. Enlarging the opening later risks damaging the bond, finish and floor edge.

Coordinate the outside path, threshold and internal floor from their final finished levels, including every supporting layer and surface. Incorporate any structurally necessary sill at the design stage rather than discovering it later. A direct approach with generous width makes moving a wheelbarrow or heavy container much easier.

Finish joints, paving edges and other doorway details outside the sliding-door travel zone. Permanent fittings also need enough separation from its guide track.

Internal floor and usable area

Choose an internal floor that tolerates frequent moisture and is straightforward to sweep and wash. Its substrate, joints and finish should control rather than trap water. A continuous surface releases loose potting mix more readily than inaccessible cavities, but even a smooth finish needs reliable grip under wet footwear.

Paving, stone or another suitable surface can repeat the character of the base. Retain an open central area instead of filling the floor with permanent fittings; it provides turning room for pots and access for cleaning glazing and working beneath the roof. Where plants grow directly in soil, separate beds clearly from firm paths at the planning stage.

Locate routine work close to the entrance, water point and supply storage where practical. Shorter watering and potting routes preserve the open central area.

Foundation, drainage and site

Treat soil, foundations and water management as one site-planning task. Before excavation, work out delivery access, component storage and movement to the build area. Finished paths that are narrow may not accommodate construction supplies or long aluminium sections. Sequencing the work carefully helps prevent damage to paving and garden beds.

Frost and foundation

Provide the low wall with support designed for the site's soils and any local frost depth. Filled ground, slopes, clay and earlier construction can each change foundation requirements. The design must respond to the property rather than relying on a generic detail.

Uneven settlement or frost-related movement may disturb the flat support required by the aluminium frame. Design the wall and foundation as a single system. Seek a competent ground assessment before permanent work where the soil history or condition is uncertain.

When planning the foundation, also allow for the final levels of surrounding ground, paths and beds so connections around the base can be completed as intended.

Rainwater

Rain collected by the integral gutters is directed away from the wall. Keep every outlet visible and reachable rather than concealing it behind plants or fixed furniture. The site plan should show whether water goes to storage, another controlled destination or suitable drainage; short, accessible runs are easier to clear.

Collected rain can supply plant watering when directed to a suitable tank or vessel. Give the container a stable position that does not obstruct maintenance. Fit a lid to limit debris and provide an overflow route so a full vessel cannot discharge beside the entrance or wall. Observe the container manufacturer's guidance where frost occurs.

Provide a controlled route for excess water so it cannot pond beside masonry or in low sections of paving.

Tall plants beneath the roof

Climbers and large specimens can occupy the generous height below the roof centre. Decide on trellising early, but never use glazing, vents or frame members as improvised supports. Independent or purpose-made structures guide shoots and can be removed when the planting changes.

Draw the interior to scale using the mature size of each plant. Add pots, saucers, benches and climbing supports to see whether circulation remains comfortable. Shorter crops usually suit the perimeter, leaving the greater central height to upright growth.

Keep each tall plant's container accessible for watering, turning and removal. Headroom alone does not make a position workable.

Interior and plants

Plan separate summer and winter arrangements. Broad summer growth demands additional room, whereas cooler-season planning must identify protected positions for containers and storage for furniture that is temporarily removed. Prepared layouts make seasonal changes easier.

Summer ventilation

Extra air volume beneath the pyramid does not stop heat building up in sunny weather. Vent openings need a clear path for rising warm air, with cooler replacement air entering through the door and other inlets. Let current conditions and the crop determine when ventilation begins and how long it continues.

Maintain open airflow between the roof vents and sliding entrance. Keep climbing growth, tall specimens and furniture away from this route. Gaps beside shelves and glazing improve circulation and also leave condensation and fallen plant matter easy to see and remove.

Temporary shade may help sensitive plants and improve comfort during intense sunshine. Position it without restricting the frame, door or vents. Because planting and seasonal light levels change, a system that can be adjusted or removed is preferable to permanent cover.

Who suits the masonry-base version?

Choose this version for a settled, long-term site where masonry is intended to contribute to the garden design. A permanently constructed foundation and base are important drawbacks to consider if relocation is likely.

Mock up the proposed top edge of the wall before construction. Viewed from normal sitting height, the marker shows what it will screen, how its proportions relate to the garden and whether the enclosed lower zone suits the planned activities.

The project extends beyond the greenhouse itself to the design and construction of foundations, masonry and floor junctions. It is best suited to work where the relevant trades and schedules can be coordinated properly.

Electricity and water

Set out intended water, irrigation and lighting points before completing the wall and floor. Decide what is genuinely required and place each connection where it remains convenient: neither a tap behind a raised bed nor a socket beside a tight doorway is practical. Services must also leave the frame's bearing surface uninterrupted.

Conduits can conceal services and permit future additions without reopening completed masonry. Label their endpoints, keep them accessible and exclude soil and water. A drawing of each concealed route and its purpose reduces the risk of damage during later drilling or fixing.

Have water and electrical systems designed and completed by appropriately qualified trades for their location and intended use. Protect electrical components from watering and cleaning damage. Do not treat extension leads across circulation areas as permanent wiring, and keep water lines accessible for isolation and seasonal operation.

Fit-out, maintenance and seasonal use

Allocate separate areas for movement, plant care and growing. Limit permanent fittings to positions where they will not impede cleaning or seasonal changes, and use movable furniture elsewhere to retain flexibility.

Shelves, worktables and raised beds

Benches, shelves and raised growing zones can follow the inside of the base. Size them around the entrance, circulation and comfortable watering reach. Excessive depth makes rear pots and cleaning difficult; select the height according to whether the surface is for sowing, potting or plant display.

Leave an inspectable, ventilated gap between furniture and masonry rather than forming a hidden damp strip. Open-framed units improve access for cleaning. Put heavy supplies on secure lower tiers and reserve convenient positions for tools used often.

Heavy or tall units require stable support from the finished floor and must remain independent of the frame and glazing. Preserve enough access behind them for inspection and cleaning.

Care of frame, glazing and masonry

Work downwards so loosened dirt does not resettle on cleaned areas. Keep gutter outlets open throughout, then clear residues from the wall cap and floor junctions. Use care methods appropriate to each finish.

Regularly clear soil, foliage and other debris from the sliding-door guide to preserve smooth operation.

Inspect finishes, mortar joints and junctions for cracks, looseness or persistent moisture. Clean gently to avoid harming coatings, glazing or masonry joints, and clear the gutters before accumulated material restricts drainage.

Seasonal use

Spring provides space for sowing and young plants, with timing adjusted for Australia's varied regional climates. Clean benches and shelving before bringing plants inside so old material does not remain in awkward corners. Clear days can heat the greenhouse rapidly even in cool weather, so water and ventilation need to be ready.

Summer growth often occupies more space than spring planting. Reserve room to harvest, tie and prune without repeatedly shifting containers into the doorway. A small permanent work zone supports these tasks, and prompt removal of trimmings keeps it usable.

In autumn, tender container plants may need more indoor room. Assess each plant for pests, condition and light requirements before it enters. Mobile pots and shelves make the revised layout easier, while an early check of glazing, gutters and the door guide avoids leaving maintenance until wetter conditions arrive.

Preparing for greenhouse assembly

Complete and inspect the masonry base before greenhouse assembly

Finish the wall only after the model, base dimensions and entrance position have been approved. Clear scaffolding, unused tools and loose construction material from the work zone ahead of delivery. Protect finished paving and wall surfaces while ensuring that components can be unloaded and carried safely to the site.

For final acceptance, record the base height, length, width and both diagonal measurements. The roof converges above the centre, so an error below can misalign the entire assembly. Never conceal an inaccurate base by pulling frame parts into place with fixings; resolve deviations before erection.

Ground conditions and location determine the foundation, drainage and any frost measures. Also confirm relevant state or territory and council requirements, boundary conditions, buried services, changes in level and construction access before ordering material or excavating. Use appropriately qualified specialists wherever the work requires particular expertise.

Comparing the three greenhouse forms

Masonry-base pyramid, standard pyramid and lean-to designs

Masonry-base pyramid greenhouse

This independent greenhouse stands on a low wall constructed for the project. It is suited to designs that intentionally connect masonry, paving and frame colour, provided the programme and budget allow for foundations and accurately built walls.

Standard pyramid design

Here, glazing and aluminium framing continue into the lower part of the structure, producing a lighter and more transparent appearance without a custom wall. Select the masonry-base design when a screened lower zone or continuity with existing brick or stone is preferred.

Lean-to design

A lean-to is connected to an existing wall and its roof falls in one direction. That wall affects the available daylight, siting and construction junctions. This is a separate greenhouse form, not another term for the independent pyramid erected over masonry.

Recommended sequence from selection to assembly
1

Document the configuration

Place the approved size, glass or polycarbonate choice, frame colour and entrance position on one controlled drawing. Issue it to every participant and withdraw obsolete versions so foundations, masonry and greenhouse assembly all follow identical information.

2

Assign responsibilities

Name the parties responsible for designing, constructing and accepting foundations, walls, flooring, drainage and any services. Define how each task meets greenhouse assembly, especially at the wall top, doorway and gutter discharges.

3

Approve interfaces

Before site work, jointly compare levels, access, junctions and service routes against the current drawing. Include known underground utilities. Close every unresolved interface before excavation or masonry establishes dimensions that are difficult to reverse.

4

Prepare assembly

After the completed base is inspected and accepted, organise component delivery, protected storage and the erection sequence. Assemble the frame to its instructions, handling glazing and roof pieces carefully and keeping them protected until required.

Frequently asked questions

Questions about masonry-base pyramid greenhouses

How much clear space should remain around the greenhouse?

There is no single minimum clearance. Provide access to each face for erection, inspection and cleaning, with additional working room at the entrance, gutter discharges and roof perimeter.

Who plans and builds the wall and foundation?

The project team must design and construct both elements from the approved measurements for the selected greenhouse. Their assessment should cover the site's soil, structural support, dimensional tolerances and any frost conditions. Because properties vary, the greenhouse package does not include one foundation or wall detail suitable for every location.

Can the base material be matched to the house and garden?

Yes. Whichever construction you choose must carry the load and finish with a level wall top of the correct dimensions to support the greenhouse. Irregular facing materials require especially careful preparation of that bearing surface.

How do I find the right size?

Set out each candidate model at full size in its intended position. Test the area needed by plants together with circulation, benches, the doorway and cleaning access to the glazing. This practical comparison gives a clearer picture of usable space than outside measurements by themselves.

When must the glazing be decided?

Confirm polycarbonate or 4 mm toughened safety glass at the same stage as the size, frame colour and entrance position, before detailed construction planning is approved. Build the wall only from the final documents for that exact configuration.

Do the stated heights include the masonry base?

No. Technical wall and ridge measurements cover only the greenhouse frame above the separately built base. The final on-site height also includes the completed masonry and its relationship to finished ground level.

Are double sliding doors possible?

Yes, where a compatible wall is approximately 3.10 m wide or more. Verify the door arrangement against the selected model before its opening is built. Afterwards, treat the opening width, side sections, threshold and floor junction as one resolved construction detail.

How long is the warranty for the greenhouse structure?

A 12-year commercial warranty applies to the greenhouse structure under its relevant terms. Foundations, walls, flooring and external services constructed for the site are separate elements and require appropriate design, workmanship, care and maintenance for their intended functions.

Bloomcabin pyramid greenhouse

Next step: coordinate configuration and base planning

Review the chosen configuration with the contractor and issue one approved drawing set to every trade. Use this checklist to expose unresolved junctions before contracts are placed or construction starts.

Bloomcabin Australia

Documents to bring to coordination meetings

✓ approved model drawing showing dimensions, glazing and entrance location

✓ foundation and wall drawing identifying construction, finish and bearing surface

✓ level drawing covering the doorway, threshold, outside path and completed internal floor

✓ survey of the completed base with length, width, height and diagonals

✓ drainage plan with gutter outlets, pipe route and overflow

✓ interior plan with paths, planting areas, shelves and connections

Close x
10 year warranty
Bloomcabin takes pride in its high-quality products and maintains these standards every day through a range of manufacturing and quality-control processes. This is backed by a 20-year warranty covering wood rot in timber structures and a 10-year warranty covering functional defects.
GET A 45% BETTER PRICE WHEN YOU BUY ONLINE
Shopping online is convenient and cost-effective
Ask us!
Get in touch
Email:
This email address is being protected from spambots. You need JavaScript enabled to view it.
Reg. No.:
38944924
Address:
Thriges Plads 6, 5000 Odense C, Denmark
Social media
Follow us on Instagram, Facebook and Twitter to find out about news and offers from Bloomcabin:
X
Have questions and want us to call you back?
+61
−
✖