
Greenhouse Garlic: A Canadian Growing Guide
A Canadian Greenhouse Garlic Fieldbook
Greenhouse Garlic: From Clove to Cure
A clove arrives with its own seasonal timetable. A good greenhouse crop moves through chilling, root establishment, leafy growth, longer days, gradual ripening and careful curing; warmth alone cannot hurry that sequence.
Think of the greenhouse as a shelter you can adjust. Its roof keeps downpours away, while the vents and controlled watering make the root zone easier to manage. Keep enough natural cold in the plan, however, because many cultivars need it before their bulbs divide properly.
01 · Work with the season
Success begins by preserving garlic’s seasonal cues. The structure should moderate difficult weather without screening out the cool period that supports divided-bulb development.
The journey from clove to bulb has several distinct stages. Roots establish first, followed by enough foliage to power the crop. For many varieties, sustained cool conditions provide an important developmental cue. Bulb division follows later as the plant responds to its temperature history, warmer conditions and increasing daylight.
Heating the space from the outset can therefore work against the crop. Garlic may produce lush tops yet finish with undersized bulbs or single rounds if it misses the required chill. An unheated greenhouse, or one protected only from severe frost, usually offers a better balance: easier access, deliberate irrigation and ventilation, and shelter from wind without erasing the season.
Match the named variety to your conditions before arranging the bed. Hardneck types often perform well in cooler areas and normally produce an edible scape with fewer, larger cloves. Softnecks commonly carry more, smaller cloves, braid readily and keep longer. Treat those tendencies as a starting point, then follow advice for the specific stock from a reliable supplier serving your region.
If garlic will share the structure with other autumn and spring crops, plan the bed and greenhouse together. Compare your needs with the Classic Aluminium Greenhouse while deciding where paths, vents and deep beds will go. Keep the garlic where later tomatoes or cucumbers will not cast early shade across its spring foliage.
Getting readySelect sound cloves
During the cold periodEstablish roots and receive chill
As spring brightensDevelop healthy foliage
With increasing daylightDivide and fill the bulbs
At early-summer maturityHarvest, dry and cure
Use these stages as checkpoints rather than attaching them rigidly to calendar months. Start with large, healthy cloves. Moderately moist, cool soil supports root establishment, and suitable winter chill prepares the crop for later bulbing. Strong spring foliage then captures the energy needed for clove division. Near maturity, ease off irrigation so the bulbs finish in drier soil and come out cleanly.
Cold exposure, temperature changes, daylight and genetics all influence garlic development. The Royal Horticultural Society gives about 1 to 2 months at 0 to 10 °C as a useful reference for most varieties. It is not a universal instruction to refrigerate every clove. Requirements vary with the cultivar, its origin and earlier storage, so directions supplied with the planting stock should lead your decision.
Colder growing locations
Where regional advice supports autumn planting, October or November may suit a deep greenhouse bed with reliable drainage. Leave the structure ventilated through winter so the crop still experiences natural cold. Glazing limits persistent rain and abrupt exposure, but a covered bed can become unexpectedly dry; inspect it after prolonged freezes rather than judging moisture from the air temperature.
Milder protected sites
Reserve the coolest suitable part of the greenhouse instead of placing garlic against a wall warmed by the sun. Ask for varieties proven in comparable local conditions. Pre-chill only when the stock supplier recommends a method for that cultivar, since excessive or badly timed chilling may trigger bulbing before the plant has enough foliage.
Greenhouses with strong winter sun
Begin venting before heat accumulates. Bright winter and spring sun can warm glazing rapidly while outdoor air remains cold. Give humid air somewhere to escape through reachable openings, adequate plant spacing and an unobstructed central path.
Know the planting clove
Tunic
Tip facing up
Basal end facing down
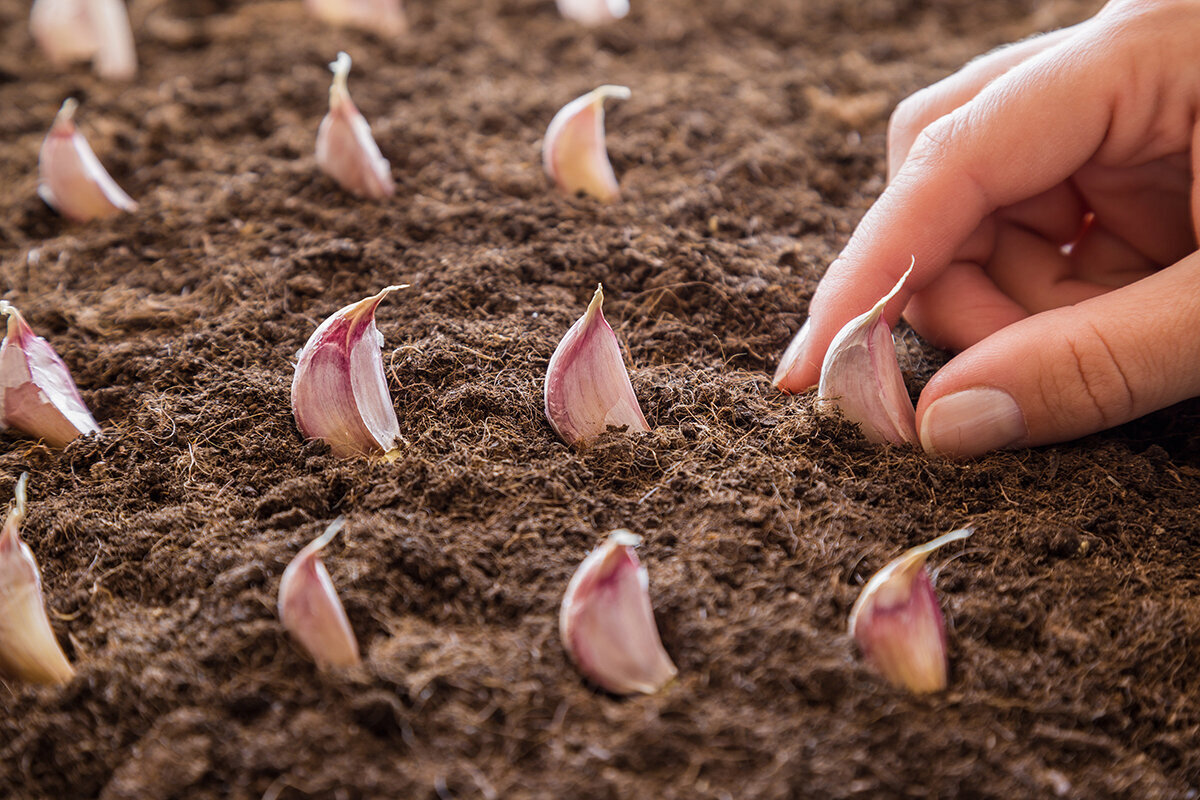
Papery tunic. Preserve this dry skin wherever possible. It reduces moisture loss and shields the clove from bruises and small wounds.
Shoot tip. Aim the tapered end upward to give the emerging shoot a short, direct path to the surface.
Basal plate. Place the flat end against loose soil that is evenly moist, with the root-producing surface facing down.
03 · Start with sound stock
Decide what to plant before deciding where it will grow.
Healthy stock is the first line of defence for the crop. Choose certified garlic, or stock clearly sold for planting, from a reputable specialist rather than relying on an anonymous grocery bulb. Culinary garlic may be adapted to another climate, treated to delay sprouting or carrying a problem that is not yet visible. Select plump, firm bulbs enclosed by dry skins, and reject anything soft, mouldy, injured, unusually light or shrivelled at the base.
Hardneck
For many colder Canadian locations, hardneck garlic is a practical option. It normally forms a rigid central scape and a ring of comparatively large cloves. Where bulb size matters most, remove tender scapes after they make a pronounced curl. They are edible, so additional plants can supply both scapes and mature bulbs.
Softneck
Some softneck varieties are well suited to milder conditions. They generally lack a stiff central scape, carry a greater number of smaller cloves and can be braided once cured. They also tend to keep longer. Reserve robust, unblemished outer cloves when choosing stock for another season.
Elephant garlic is a different crop
Despite its name, elephant garlic is more closely related to leeks than to true garlic. Enjoy it as a food crop, but do not use its size or growth pattern to design a bed for ordinary garlic.
Break bulbs apart only 1 to 2 days before they go into the soil. Separate the cloves gently, leaving each dry skin and flat basal plate intact. This reduces moisture loss and avoids creating wounds. Send a badly torn or crushed clove to the kitchen rather than into a damp winter bed.
04 · Build the bed and set the rows
Allow enough soil for roots to establish and bulbs to expand.
A skim of rich compost over compacted ground is not an adequate root zone. Garlic performs best in a deep, friable greenhouse bed. If containers are unavoidable, choose broad, frost-resistant pots with unobstructed drainage and at least 25 to 30 cm of growing medium. Pots respond more quickly than in-ground beds to both drying and temperature changes.
Too shallow
Correct
Too deep
If set too shallow: A visible tip is prone to drying, movement during temperature swings and poor anchorage.
A suitable depth: Place the tapered end upward, then add about 5 cm of loose soil above the clove in an ordinary greenhouse bed.
If set too deeply: Excess soil above the clove slows emergence, particularly where the bed remains cold, dense or wet.
Spacing that keeps the bed workable
For mature bulbs, leave roughly 12 to 15 cm from clove to clove and 20 to 25 cm from row to row. Double rows can make efficient use of a bed if there is still a generous path for maintenance. Keep feet away from the rooting area. Raised beds may improve a slow-draining site, but avoid unstable, overly fluffy fill that will sink substantially by spring.
Blend mature compost into the bed before planting. In heavy soil, improve drainage with an appropriate mineral amendment, coarse sand or greater bed height. The finished mix should retain useful moisture without holding standing water. Fresh manure or a heavy dose of nitrogen encourages soft top growth and may impair ripening and keeping quality.
Before covering the row
- Plant the largest sound outer cloves and use the small inner ones for cooking.
- Keep the pointed end above the flat root-producing base.
- Give the row one thorough initial watering to bring soil against the cloves, then avoid prolonged saturation.
- If mulch is needed, choose clean, loose material and keep it away from emerging shoots.
- Mark each variety and record both its planting date and its position in the greenhouse.
05 · Manage moisture through the season
Put water into the soil profile rather than adding humidity around the foliage.
The goal is neither a dry bed nor a permanently wet one. Maintain a well-aerated root zone with enough moisture to support the crop from autumn establishment until the bulbs finish filling.
After planting
Apply enough water to settle the prepared soil around each clove. For subsequent checks, look a few centimetres beneath the top layer. Cool soil beneath a greenhouse roof may remain moist through winter even after its surface appears dry.
While leaves and bulbs develop
Demand rises as the crop makes more leaves and receives stronger light and warmer temperatures. Irrigate thoroughly and consistently, but let conditions in the bed determine timing. Rain cannot reach the crop, while ventilation, sunlight, bed volume and soil texture all affect water loss. Inspect the soil where roots are active. A drip line or slow morning application at soil level is preferable to spraying foliage. Slight surface drying is acceptable, but repeated complete drying during active growth is not.
As harvest approaches
Taper irrigation as maturity nears and, if conditions allow, stop during the final stage. Moderately dry soil simplifies harvest and shortens the initial drying period. Do not create water stress while the bulbs are still actively enlarging.
Water management and air exchange belong in the same plan. Vent from the roof and sides early on bright days so warmth and condensation do not collect around the foliage. The Classic Aluminium Greenhouse can be especially useful as spring light intensifies and temperatures beneath glazing rise quickly. Arrange paths, vents and irrigation as a connected system. Additional model details are available for the Classic Aluminium Greenhouse.
06 · Diagnose from the foliage
What appears at harvest often began much earlier.
Before adding fertilizer or applying a treatment, interpret the symptom in relation to the crop’s current stage. Because garlic remains in place for a long season, the finished bulb can reveal stresses or decisions from many months earlier.
Strong tops, disappointing bulbs
A missed chill period or poorly matched growing schedule may be responsible. Late planting, unsuitable stock, excessive greenhouse heat and too much nitrogen can also contribute. Review the cultivar and recorded temperatures before making another intervention; extra warmth cannot recreate winter exposure.
Yellowing ahead of schedule
Begin by examining the soil around the roots. Excess water, inadequate nutrition, pests, disease and ordinary maturation can produce similar foliage. Lift a representative plant before diagnosing a deficiency. Remove clearly diseased plants with the bulb attached, and keep suspect material out of the compost.
Undersized bulbs
Potential causes include small starting cloves, crowding, weeds, irregular irrigation, weak foliage and bulb initiation before sufficient leaf growth. A managed structure helps by reducing several stresses together, including downpours, dry intervals and abrupt heat.
Wrappers splitting
Outer skins that have opened often signal that harvest came too late. Once cloves break through their protective covering, the bulb will not keep as well. Use those bulbs promptly and reserve only intact, firm specimens for replanting.
07 · Choose the lifting window
A short set of visible cues marks the best time to harvest.
Do not harvest while the entire plant is richly green, but do not wait for total collapse either. Variety, site and seasonal development all affect timing. Lower leaves that are yellowing or drying while upper foliage retains some green provide a practical signal. Once about 1/3 to 1/2 of the leaves have aged, uncover a trial bulb. Distinct cloves should show beneath firm, closed skins before any splitting begins.
Autumn-planted garlic is generally harvested in summer. Greenhouse conditions, local weather and varietal differences can move that point earlier or later. Use the neck, leaves, skins and a sample bulb to make the final call instead of relying on a printed month, and choose a dry spell if possible.
1
Taper irrigation
As maturity approaches, reduce water in stages and let the soil become moderately dry. This is a finishing step only; withholding water while bulbs are still filling can reduce the crop.
2
Loosen first; do not tug
Work a garden fork or slim hand trowel beneath the bulb, loosen the surrounding soil and raise the intact plant. Tugging the stem can crush the bulb or split its neck, shortening the period it will store successfully.
3
Protect the wrappers
Shake away only soil that falls off easily and let stubborn material dry with the plant. Garlic destined for keeping should not be washed or stripped of its outer skins immediately. Those dry layers shield the cloves during curing and storage.
4
Sort eating bulbs from next year’s stock
After curing, reserve the healthiest, largest and most uniform bulbs for another season. Careful selection can improve the following crop more reliably than additional equipment or heavier feeding.
An airy place to cure
Out of the sun
Keep direct sunlight off the bulbs.
Keep direct sunlight off the bulbs.
Moving air
Space the plants apart.
Space the plants apart.
Duration
Usually 2 to 4 weeks.
Usually 2 to 4 weeks.
08 · Cure before storing
Dry the crop for keeping quality, not appearance.
Garlic can be eaten immediately after harvest, but curing prepares it for storage. Suspend complete plants in small, open bunches or arrange them one layer deep on a ventilated screen or slatted shelf. Select a dry, shaded location protected from rain and supplied with steady air movement. A greenhouse is suitable only when dependable ventilation and shade prevent direct sun, condensation and trapped heat from damaging the wrappers.
Allow about 2 to 4 weeks under ordinary conditions. Curing is complete when the roots are dry, the neck feels crisp and the outer skins have become papery. Brush off loose soil at that point, then trim the roots and stems. Softneck stems may be braided while they remain flexible. Check every bulb again and use any soft, injured or conspicuously marked specimens before sound storage stock.
Keep fully cured bulbs somewhere dark, dry and ventilated, using mesh, open crates or loose hanging arrangements. Sealed plastic traps unsuitable moisture. A refrigerator is generally a poor long-term location for whole bulbs because humidity and temperature shifts may encourage sprouting. Actual keeping time varies with the variety, curing and room conditions; softnecks commonly outlast hardnecks. Inspect the supply periodically and take out bulbs that begin to soften.
For an orderly growing space that remains useful across the gardening year, consider the Classic Aluminium Greenhouse as a bright setting for a cool-season garlic bed. Once the summer crop is harvested and the soil is cleaned up, the space can be prepared for a suitable warm-season successor or the next stage of the rotation.
09 · Answers for the home grower
Common questions about greenhouse garlic
Use these answers to guide the choices that most affect bulb development, harvest timing and keeping quality.
Is a heated greenhouse suitable for garlic?
Garlic will make foliage in a heated structure, but steady warmth cannot supply the chilling many varieties require before the bulb divides. Reserve warm-house methods for specialized production where the chosen cultivar’s needs are known. For a household storage crop, an unheated greenhouse, minimal frost protection or a deliberately cool compartment is usually more dependable.
Should planting cloves be refrigerated first?
There is no automatic need to do so. Many Canadian gardens can supply suitable natural cold to autumn-planted garlic in an unheated structure, although conditions vary widely by location. A supplier may recommend controlled chilling for a particular variety in a mild site. Follow those specific directions: excessive or mistimed chilling can begin bulb formation before adequate foliage develops.
Will garlic grow in greenhouse pots?
Yes. Choose a broad, frost-resistant pot at least 25 to 30 cm deep and make sure every drainage opening remains clear. The plant must still receive the winter chill required by its variety. An in-ground bed buffers heat and moisture more effectively, so pots need closer attention. Prevent saturation and allow about 12 to 15 cm between cloves intended to make full bulbs.
When should hardneck scapes be cut?
For the best chance of larger bulbs, remove young scapes after they form a clear curl while they are still tender. The plant can then direct more resources below ground. Use the edible scapes in pesto or cooked dishes. A few may remain for observation, although those plants may finish with smaller bulbs.
What causes a bulb to remain as a single round?
Common reasons include inadequate winter cold, a variety poorly matched to the site, late planting or too little time for foliage to develop before bulbing. Excess greenhouse heat may contribute as well. The round is still edible. Record the variety, planting date and temperature pattern, then change only 1 variable during the following season.
How should the bed be used after harvest?
Depending on the timing, the cleared bed can support a warm-season crop, leafy vegetables or a period of soil rebuilding. Avoid immediately following garlic with another allium such as onion, leek, chives or more garlic. Removing debris and rotating plant families over several years helps limit recurring problems. For ideas on arranging the space, use the Classic Aluminium Greenhouse.
References and next steps
Sources used for crop guidance.
More from Bloomcabin: Setting up a greenhouse: layout, plants and care · Water-saving greenhouse gardening · Greenhouse curtains and shading
- LWG Bavaria — Garlic: the remarkable clove An introduction to garlic planting, crop care, harvesting, culinary use and notable growing characteristics.
- LWG Bavaria — Vegetables in a changing climate: garlic German field experience concerning climate, crop management and garlic development.
- Royal Horticultural Society — How to grow garlic Information about chilling, planting schedules, site choice, maintenance, harvesting and storage.
- University of Minnesota Extension — Growing garlic in home gardens Research-based advice on selecting varieties, autumn planting, spacing, irrigation and healthy stock.
- Oregon State University Extension — Garlic (Fall) Seasonal advice covering autumn planting, crop management, maturity indicators and harvesting.
- Oregon State University Extension — Preserving garlic Food-preservation guidance for handling, curing and keeping harvested garlic safely.
- LWG Bavaria — Garlic: the remarkable clove Additional German information on site preparation, planting, maintenance, harvest and kitchen use.
