To improve the quality of the content of this website and to adapt it to the needs of users, cookies are used - including third-party cookies. By continuing to use this website, you agree to the use of cookies and to possible communication when you enter your contact information in one of the forms on the site.

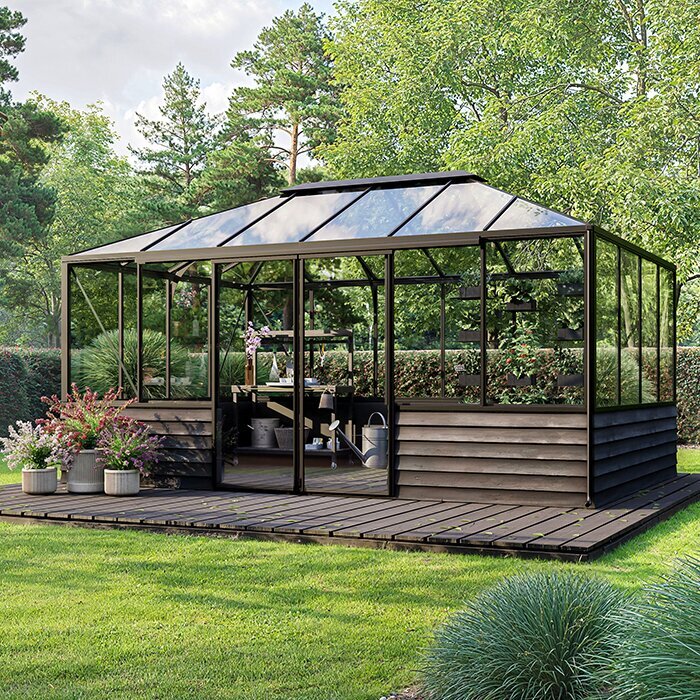
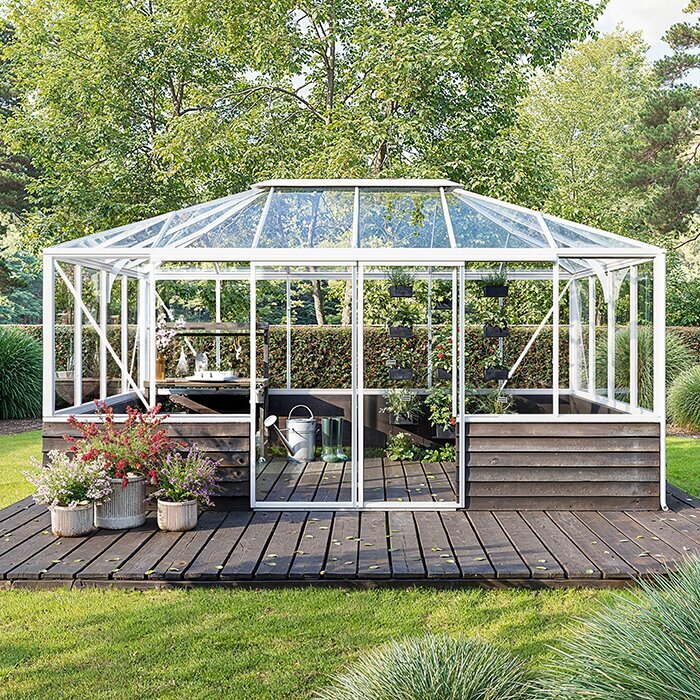
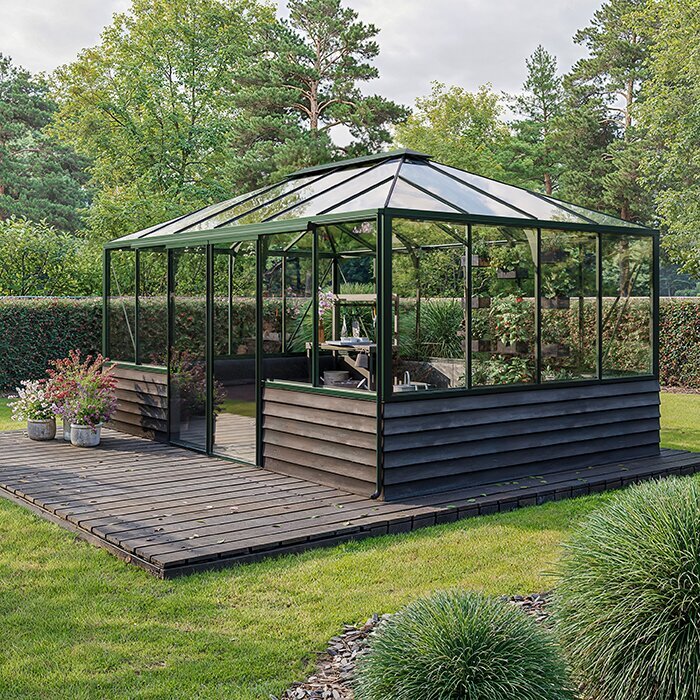
Elegant Wall-Base Pyramid Greenhouse

Pyramid Greenhouse for Masonry Bases

  • Foundation of your choice
  • Long-lasting premium construction
  • Healthy climate for your plants
  • Stylish architectural design
The greater the purchase, the bigger discounts you get.
Estimated delivery:
We offer the opportunity to CHOOSE A SUITABLE DELIVERY WEEK, which you will find in the last step of the shopping cart.
The greater the purchase, the bigger discounts you get.
Personal Bloomcabin consultation
Personal consultation?
We are happy to help with questions about models, prices and delivery.
+49 152 28196712

Refined pyramid greenhouse on a masonry plinth

Create a calm, natural setting outdoors

Explore a fresh interpretation of greenhouse architecture: the Bloomcabin Pyramid Greenhouse. Created to rest on a masonry plinth or other firm support, it joins timeless visual appeal with practical thought. A warm, organic mood enriches the surrounding outdoor area, making this a fitting option for gardeners drawn to quality, personality and considered detail.

Why consider this Bloomcabin pyramid greenhouse?

Purpose-designed for a masonry base:
The supporting plinth can be tailored to your setting. Form it from stone, concrete or individually laid masonry, then use that foundation to give the completed greenhouse a character that belongs naturally in your own garden.

Strength for seasons ahead:
Premium aluminium framing, combined with a choice of glass or polycarbonate panels, gives the structure excellent stability and lasting protection against changing weather.

Harmonious architectural presence:
The precise pyramid outline adds elegance while settling naturally into its surroundings. Above a built base, it becomes an architectural feature beside terraces, boundary walls or wooden garden elements.

Better conditions for plant growth:
Its unusual geometry promotes natural airflow and spreads temperature more evenly, helping vigorous, healthy plants thrive in every season.

Assembly without needless complication:
Accurately prefabricated parts and an accessible guide simplify construction, so your first planting session can follow without a lengthy wait.

From the manufacturer at fair value:
Buying straight from Bloomcabin means manufacturer quality, durable materials and a fair price, with no intermediary added to the process.

Comments from greenhouse owners 

“The greenhouse stands on a masonry base and looks fantastic – sturdy, elegant and perfectly integrated!” – Emma Ryan
“A real garden centrepiece. The pyramid shape feels modern yet natural.” – Fionn Byrne
“Very good quality and easy to assemble. Highly recommended!” – Ciara Kelly

Secure, convenient ways to pay

Use the available secure payment methods for an easy journey through checkout.

Choose your greenhouse

For an outdoor setting with lasting architectural grace, choose the Bloomcabin Pyramid Greenhouse for Masonry Bases.
Order today for fine workmanship, reliable delivery and a distinctive garden feature with genuine architectural presence.
More information
SPECIFICATION

Dimensions:

For greenhouse 235x235:

Highest roof point: 270 cm

Wall height: 194 cm

Door height: 185 cm

For greenhouse 310x310:

Highest roof point: 265 cm

Wall height: 194 cm

Door height: 185 cm

For greenhouse 310x385:

Highest roof point: 269 cm

Wall height: 194 cm

Door height: 185 cm

For greenhouse 310x460:

Highest roof point: 270 cm

Wall height: 194 cm

Door height: 185 cm

Material:

High-quality aluminium profiles

Polycarbonate or 4 mm toughened safety glass

Door options:

Single sliding door or double sliding doors (for walls at least 310 cm wide)

Key features:

Robust, strong profiles for maximum stability

Integrated gutter system for efficient water drainage

Integrated aluminium base for easy assembly

Warranty:

12-year extended warranty

Key benefits:

Durability: Made from high-quality aluminium and toughened glass for a long service life.

Safety: Toughened safety glass helps create a safer environment.

Adaptability: Available in 6 sizes and a range of RAL catalogue colours.

Functionality: Integrated guttering and durable profiles for year-round weather exposure.

Reliability: A 12-year warranty provides confidence and reassurance.

Bloomcabin Pyramid Greenhouse on Wall Base

Freestanding pyramid greenhouse for a brick, stone or concrete wall base

The Bloomcabin Pyramid Greenhouse on Wall Base pairs the unmistakable geometry of a pyramid roof with a low plinth constructed locally in brick, natural stone, concrete or another appropriate masonry finish. This substantial lower band visually anchors the aluminium-and-glass upper structure and may repeat finishes seen around the dwelling, patio or garden boundaries. Settle the exact greenhouse version, measurements and entrance location first, as the two built elements have to fit accurately.

The current range comprises 6 sizes covering approximately 5.6–14.2 m². Choose a square plan of about 2.35 × 2.35 m or 3.10 × 3.10 m, or an elongated plan around 3.10 × 3.85 m or 4.60 m. The powder-coated aluminium frame can take polycarbonate or 4 mm toughened safety glass. Compare usable growing room with circulation, benches, door operation and ventilation clearance.

The greenhouse stands entirely on its own. Its masonry plinth carries a self-contained arrangement of roof, sides and framing, without relying on a house wall for support or closure. Choose a position where light can reach the structure and where every elevation remains practical to assemble, inspect and maintain. Find out more about Bloomcabin Ireland.

Freestanding Bloomcabin pyramid greenhouse above a masonry plinth
Freestanding architecture with a tailored base

The wall base shapes the proportions – the greenhouse stays freestanding

Because the pyramidal roof is symmetrical, the building presents a strong elevation from every direction. Review the proposed siting from the home, terrace, paths and the places where people usually sit. These viewpoints show whether the entrance elevation, aluminium finish and masonry choice belong comfortably in the garden.

The plinth remains permanently visible as the building’s lower layer. Brick may relate to the dwelling; stone can pick up garden boundary work; rendered masonry or concrete gives a quieter contemporary result. Colour matters, but so do module dimensions, laying pattern, joints, coping and the way nearby paths meet the base.

With masonry beneath the glazing, the result recalls a compact orangery more than a greenhouse glazed to ground level. The opaque band also hides containers, tools and watering equipment from many outside views, helping the base appear calmer while the transparent upper portion retains its light, open quality.

Made-to-measure wall base

Choose brick, stone, concrete or render to suit house and garden

Pyramidal roof profile

Apex height about 2.64–2.69 m, according to plan size

Choice of glazing system

Polycarbonate or 4 mm toughened safety glass

RAL frame colours

Relate the aluminium finish to façade and masonry

Co-ordinate material and colour

Set the wall base first, then choose frame colour and interior layout

Construct the plinth from the approved measurements for the selected greenhouse. Fix the exact version, doorway location and final floor level before site work. Catalogue dimensions are only preliminary: minor errors may leave the doorway, perimeter or anchor locations out of line with the supplied frame.

Review brick dimensions, bond, mortar tone and aluminium finish side by side with physical samples. Stone may relate well to existing boundary work, although a variable face demands particular accuracy when forming the flat bearing course. Render and concrete complement contemporary settings. Since daylight alters colour and texture, inspect the sample materials outdoors where the greenhouse is proposed.

Regardless of finish, form a continuous, true and structurally sound bearing course; otherwise the aluminium could distort when seated. Finalise the course width, cap and all junctions before masonry is cut or shuttering prepared. Correct discrepancies during the masonry stage, not by makeshift adjustment when assembling the greenhouse.

Pyramid greenhouse with masonry base
Four checks before the wall is built

Confirm layout, entrance support and drainage first

Once built, the plinth fixes the greenhouse footprint, doorway and internal routes. Peg out its whole plan before excavation or masonry starts. Test the approach with a wheelbarrow, pots and typical supplies, then make sure there is practical room beside every elevation for cleaning and maintenance.

01

Accurate footprint

Transfer the approved outside dimensions to the ground, checking corners for square and comparing both diagonals. Indicate the door side, paths, beds and drainage areas as well. This reveals space and connection problems before excavation commits the layout.

02

Door opening

Keep a straight, unobstructed area in front of the entrance. A wheelbarrow, pots and supplies should pass comfortably both ways. Side beds or shelving must not narrow the walking route or encroach on the sliding door’s movement.

03

Corners and connections

Design the corner work, entrance reveals and coping as one detail, avoiding ledges that would hamper installation or cleaning.

04

Drainage

At the setting-out stage, observe where rain travels over the site. Position the doorway, adjoining surfaces and any rainwater vessel to avoid a low spot around the plinth, while preserving clear routes for maintenance.

Key technical details

Dimensions and ratings above the masonry plinth

Available model formats

Square plans and longer versions

Smaller square versions

Roof apex approx. 2.69 m; wall height approx. 1.93 m; door height approx. 1.85 m

Larger square version

Roof apex approx. 2.64 m; wall height approx. 1.93 m; door height approx. 1.85 m

Extended models

Roof apex approx. 2.69 m; wall height approx. 1.93 m; door height approx. 1.85 m

Glazing

Polycarbonate or 4 mm toughened safety glass

Frame and load performance

The powder-coated aluminium frame includes sliding doors and rainwater gutters and must meet a precisely prepared masonry support. It is designed for 30 m/s wind and 210 kg/m² snow loading. Achieving those figures depends on correct erection and an adequate load-bearing substructure; specify the foundations and plinth for the particular ground and exposure.

Bloomcabin pyramid greenhouse on a low wall
Light and plant climate

Opaque masonry beneath, daylight glazing overhead

Masonry removes some of the glazing that would otherwise occur close to ground level. Daylight still arrives through the glazed elevations and pitched roof from several angles. As a result, short crops placed immediately inside the plinth may receive less or differently directed light than plants rising into the central volume.

Raised platforms or low growing benches beside the plinth can improve the position of shorter plants. Keep large containers and heavy foliage nearer the more open central area so they do not deepen shade at the perimeter. Prevent leaves from staying in prolonged contact with either polycarbonate or glass.

Conditions vary with orientation, time of year, crop height and the surface chosen for the plinth. After bringing in a new group of plants, watch how quickly each zone loses moisture and where shadows persist. Move containers or alter irrigation in response to what you observe.

Four typical uses

Typical roles for this wall-base pyramid greenhouse

01

Kitchen-garden greenhouse

Tie the plinth finish into edible beds and pathways.

02

Floral display

Display seasonal flowers and selected ornamental plants attractively.

03

Central zone for taller crops

Arrange larger plants and climbing crops beneath the high roof.

04

Green retreat

If its dimensions allow, place a small table or seat among the planting.

Wall and architecture

Put the plinth, entrance junction and fit-out on the same drawing. Include the external outline, wall thickness, routes, beds, drainage and planned utilities. Reviewing all of these together exposes poor interfaces before either the masonry or finished floor is completed.

Brick, natural stone, render or exposed concrete

Consider how readily exposed surfaces can be cleaned and patched later. Workmanship is especially conspicuous around door reveals, corners and copings, so specify detailing that suits the selected finish. Careful execution in these prominent positions will help them remain neat over time.

Outer corners and entrance reveals bring several finished faces together. Careful mortar alignment, properly terminated coping pieces and well-resolved junctions with paving deserve close attention. Treat them as intentional focal details rather than incidental edges.

Path and bed levels affect how visually substantial the plinth feels. Continuous paving edges and clearly organised planting can frame the greenhouse, while deliberate breathing space helps the walling and aluminium read together as a single architectural composition.

Entrance opening and floor junction

Construct the masonry opening from the approved sliding-door information. Establish its width, height, side returns and exact relationship with the frame in advance. If double sliders are proposed, verify the chosen greenhouse and available wall width together. Altering the opening afterwards risks disrupting the bond, visible finish and adjoining floor detail.

Coordinate the completed indoor surface, any threshold and the outside route so their levels meet predictably. Work from the final height of every layer, including the supporting course and finish. Allow from the beginning for any threshold required by the construction. Wheelbarrows and heavy containers benefit from a direct entrance of comfortable width.

Keep mortar joints, finished edges and paving at the entrance outside the door's travel. Permanent furniture or fittings must also leave adequate clearance around its guide.

Internal floor and usable space

Choose a durable indoor surface that simplifies irrigation, repotting and housekeeping. Its foundation layers, finish and jointing should tolerate repeated dampness without creating pockets where water remains. A continuous floor releases spilled compost more readily than hidden voids do. If the surface is smooth, it must nevertheless provide secure footing when footwear is wet.

Stone, paving or an appropriate alternative can be chosen to complement the plinth. Avoid filling the interior with fixed fittings: clear space through the centre supports pot handling, cleaning the glazing from inside and access under the sloping roof. Where crops will grow in soil, define planted areas and hard-surfaced routes separately from the outset.

Put routine tasks within convenient reach of the entrance, water point and supply storage. Shorter journeys make watering and repotting easier while preserving an uncluttered central area.

Site, foundations and drainage

Treat the foundation design, runoff and soil characteristics as related decisions. Before digging, establish how deliveries, temporary storage and greenhouse parts will reach the work area. Completed narrow paths may be unsuitable for masonry supplies or lengthy aluminium sections. Sequencing the jobs carefully reduces damage to finished paving and planted beds.

Frost and foundation

Support the low wall on a foundation suited to local soil and frost conditions. Made ground, slopes, cohesive soils or earlier works may alter the required solution. Have the substructure specified for this particular property; a generic detail cannot reliably cover every site.

Frost movement or uneven settlement can disturb the true seating surface needed above. Treat the wall and foundation as one structural assembly. If ground conditions are uncertain, arrange competent advice before permanent masonry is installed.

Include the eventual levels of landscaping, paths and planted beds in the foundation drawings, ensuring that perimeter junctions finish at their intended heights.

Rainwater

Gutters collect roof runoff and carry it clear of the plinth. Leave every outlet visible and serviceable, not screened by permanent fittings or dense growth. The site drawing should show whether the flow goes to storage, a drain or another appropriate discharge point. Keeping pipework short and reachable simplifies maintenance.

A water butt or suitable tank can store collected rain for irrigation. Place it on a firm base without blocking maintenance access. Use a lid to exclude debris and provide an overflow that carries surplus water away from the plinth and entrance. Follow the container manufacturer’s instructions during freezing conditions.

Prevent surplus water from ponding beside the masonry or within lower sections of paving. A defined discharge route helps preserve nearby construction.

Using the central roof height

Climbers and substantial specimens can occupy the generous height below the roof's central point. Decide on training systems early, but never use glazing, vents or aluminium members as plant supports. Independent frames or purpose-made systems can direct growth and be taken away when the crop changes.

Draw the inside to scale and plot mature plant heights without compromising circulation. Include every pot, saucer, growing bench and support. Lower or compact crops will often work around the perimeter, leaving the greater headroom nearer the middle for plants with upright growth.

Keep every tall specimen accessible so its container can be watered, rotated or removed. Headroom is only one factor; practical reach and circulation also decide whether a position works.

Interior and plants

Make separate layout drawings for summer and winter occupation. Spreading crops demand more area in summer; for colder months, identify which containers need protection and where temporarily removed furniture will go. With these arrangements decided in advance, seasonal changes need not involve starting the whole interior plan again.

Summer ventilation

Although the pyramid roof encloses ample air, sunny weather can still cause excessive heat. Use the designed high-level openings to release heated air, with replacement airflow arriving at lower level through the entrance and vents. Adjust how often and how long you ventilate according to conditions and the crops being grown.

Keep both the roof openings and sliding entrance effective as ventilation points. Do not let vigorous climbers, tall crops or furniture obstruct the movement of air. A gap around shelves and glazing supports circulation while keeping moisture, fallen leaves and other residue easy to spot and remove.

In strong sun, temporary shade can protect sensitive crops and make the interior more comfortable. Keep it clear of vents, sliding doors and framing. Retractable or removable screening is more useful than permanent shade because both seasonal light levels and the needs of the planting change.

Who is the wall-base version for?

This version suits an established position where the masonry is intended to play a lasting part in the garden design. If moving the greenhouse later is a realistic prospect, consider that carefully before accepting the permanence and added work of its built plinth.

Use stakes, tape or another temporary marker to show the proposed top of the plinth at the site. View it from chairs and common routes before building. This reveals how much of the garden will be hidden, whether the proportions feel balanced and whether the opaque zone serves the intended activity.

The scope extends beyond supplying a greenhouse: the foundation, masonry and finished floor junctions also require design and construction. This option is best where the relevant contractors and stages of work can be coordinated both practically and technically.

Electricity and water

Plan lighting, irrigation and the water supply before finishing either wall or floor. Determine which connections are genuinely useful, then locate them for convenient operation; neither a tap obscured by planting nor a socket squeezed beside the entrance will work well. Keep every service route away from the greenhouse bearing course.

Conduits can conceal services and reserve capacity for later work without cutting into finished masonry. Label each termination, keep it reachable and seal it against incoming soil or moisture. Add every route and its purpose to the project drawing so future drilling, anchors or fixings do not strike buried services.

Arrange competent installation of water and electricity in accordance with applicable requirements. Select electrical equipment for the conditions and protect it from damage during watering and cleaning. In Ireland, a Registered Electrical Contractor alone may undertake and certify Restricted Electrical Works. Do not use extension leads across circulation routes as permanent wiring, and keep seasonal water shut-off points accessible.

Fitting out, upkeep and year-round growing

Allocate distinct space for circulation, cultivation and practical jobs. Limit permanent fixtures to positions that preserve access for housekeeping and seasonal changeovers, and use moveable furniture elsewhere to keep the layout flexible.

Benches, shelves and raised growing areas

Use the wall-side zone for an orderly arrangement of work surfaces, storage and elevated planting. Match their depth and height to the doorway, circulation and watering reach. Over-deep tops hinder access to rear pots and make cleaning harder; choose a working level suited to sowing, repotting or simply holding plants.

Leave a visible, serviceable gap rather than trapping moisture in an unreachable space behind furniture. Open-framed units help with checks and housekeeping. Put bulky supplies on secure low shelves, reserving the easiest-to-reach positions for tools used routinely.

Secure tall units and heavily laden furniture on the specified floor; glazing and aluminium framing must never carry them. Retain enough access to examine and wash the area beyond each installation.

Care of frame, glazing and masonry

Work downwards so dirt released from upper parts does not soil sections already washed. While cleaning, preserve flow through every gutter outlet, then clear residue from coping and floor junctions. Use the maintenance method specified for each surface or component.

Remove compost, fallen leaves and crop residue from the sliding-door guide regularly, maintaining smooth and unobstructed movement.

Inspect mortar joints, finishes and junctions for developing fractures, looseness or continuing dampness. Clean with non-aggressive methods that preserve the coating, panels and pointing. Clear gutter sediment while water can still pass through the outlets normally.

Use through the year

In spring, use the interior for sowing and young plants. Clean tables and shelving beforehand so old debris is not left in concealed corners. Even when outdoor temperatures are low, clear sunshine may warm the greenhouse quickly; have both ventilation and watering ready before crops are moved inside.

Summer growth often occupies considerably more room than spring planting. Leave sufficient access for harvesting, training and pruning without moving containers into the entrance each time. Retain a modest clear surface for routine jobs and clear away cuttings without delay.

Autumn may bring tender container plants indoors in greater numbers. Before transfer, consider their light needs and inspect health and pests. Moveable shelving and pots simplify the rearrangement. Use the same period to check glazing, gutters and the sliding guide before Ireland's wetter weather makes outside maintenance less convenient.

Preparing for greenhouse assembly

Complete and inspect all masonry before greenhouse installation starts

Finish construction of the plinth only after approval of the model, overall footprint and entrance location. Clear surplus materials, access towers and tools from the working zone ahead of delivery. Cover finished masonry and paths appropriately, providing a safe route for unloading every component and carrying it to the assembly position.

For final sign-off, record overall length, width and height, then measure both diagonals. Because all roof slopes converge over the middle, inaccuracies below can throw the entire aluminium assembly out of alignment. Never pull a faulty base into shape by overtightening or forcing fasteners. Keep the completed survey available before erection.

Foundation design, frost precautions, drainage and site constraints differ by property. Boundaries, existing utilities, level changes and routes for construction or upkeep can influence placement. Clarify these matters, consulting the planning authority where relevant, ahead of purchases and digging. Appoint appropriately qualified people wherever specialist judgement is needed.

Comparing the three greenhouse forms

Masonry-base pyramid, glazed-base pyramid or lean-to

Pyramid greenhouse on wall base

A self-supporting greenhouse sits over a purpose-built low plinth. Select this form when wall finish, garden paving and aluminium colour are to be composed together, with the programme allowing for extra foundation work and masonry executed to accurate dimensions.

Standard pyramid design

On this version, transparent panels and aluminium descend close to ground level, producing a lighter visual effect. It is not intended for a custom masonry plinth. Prefer the plinth model if screening at low level or continuity with existing brick or stone is desired.

Lean-to form

A lean-to is supported and enclosed along one side by an existing building, with its roof falling in one direction. That host wall affects siting, daylight and junction design. The term does not describe this self-supporting pyramidal greenhouse over masonry; it identifies a separate structural form.

A practical order for selection, preparation and assembly
1

Document the configuration

Create one controlled drawing showing the final dimensions, glazing choice, aluminium colour and entrance position. Issue that revision to every participant. Foundation builders, masons and installers should all work from it rather than relying on superseded sketches.

2

Assign responsibilities

Name who will design, build and approve each element: substructure, walling, floor, runoff measures and any services. Also record responsibility at the greenhouse interfaces, especially the bearing course, doorway and gutter discharge locations.

3

Approve interfaces

Hold a joint review before construction to compare levels, junctions, access and service alignments against the controlled drawing. Include all known pipes or cables below ground. Settle uncertainties while alterations remain possible, rather than after earthworks or masonry fixes the layout.

4

Prepare assembly

Once the completed plinth has passed inspection, agree the delivery route, storage positions and erection order. Assemble the aluminium using the supplied instructions, handling panels and roof parts carefully and keeping them covered until required.

Frequently asked questions

Questions about the wall-base pyramid greenhouse

How much access space should I allow around it?

No universal clearance applies. Provide access to each elevation for construction, washing and inspection, with extra working room wherever the entrance, rainwater discharges or roof edges need attention.

Who is responsible for the plinth and substructure?

The customer arranges design and construction of both elements from the approved model information. The appointed professionals need to evaluate soil, structural support, frost exposure and dimensional tolerances for that property. The greenhouse package does not include a single foundation or masonry specification suitable for every site.

Can masonry finishes reflect the home and its landscape?

Yes. Any selected construction must provide adequate support and finish with an accurately formed, flat bearing course beneath the aluminium. Where stone or another facing has an uneven character, particular care is needed to create that precise supporting surface.

Which size will work at my site?

Mark the outline of each candidate model at the proposed location. Within it, map the doorway, walking routes, benches and the reach needed for cleaning the panels, rather than allocating everything to plants. This trial provides a truer picture of functional indoor room than the overall outside measurements by themselves.

At what stage do I choose glazing?

Settle polycarbonate or 4 mm toughened safety glass at the same stage as the dimensions, aluminium colour and entrance arrangement, before detailed construction drawings are finalised. Thereafter, build the plinth solely from the approved information issued for that exact configuration.

Do the stated heights include the wall base?

No. Published wall and apex dimensions measure only the aluminium and glazed assembly sitting above the locally constructed masonry. Establishing the finished overall height also requires the plinth dimension and the final level of the surrounding ground.

Can I specify paired sliding doors?

Yes, where the relevant model has a compatible wall at least approximately 3.10 m wide. Verify the proposed pair of sliders before constructing their opening. Treat the clear width, masonry returns, threshold and finished floor junction as one coordinated entrance detail.

What warranty period covers the greenhouse frame?

The greenhouse structure carries a 12-year commercial warranty under the relevant warranty terms. Its site-built foundation, plinth, floor and external installations are separate from that cover; each must be properly designed, constructed and maintained for its own purpose.

Bloomcabin Pyramid Greenhouse

Next step: co-ordinate configuration and base planning

Discuss the selected configuration with the appointed builder and give every trade the same approved drawing revision. Use the checklist below to identify unresolved interfaces before placing contracts or starting work on site.

Bloomcabin Ireland

Documents to gather for project coordination

✓ approved model drawing showing dimensions, glazing and entrance location

✓ foundation and wall plan with build-up, facing material and wall top

✓ level plan for door opening, threshold, external path and finished internal floor

✓ measured record of finished base length, width, height and diagonals

✓ drainage plan with gutter outlets, pipe route and overflow

✓ internal layout showing circulation, cultivation, storage and service points

Close x
10 year warranty
Bloomcabin is proud of its high-quality products and maintains these standards every day through a range of manufacturing and quality control processes. This is backed by a 20-year warranty against wood rot in timber structures and a 10-year warranty against functional defects.
GET A 45% BETTER PRICE WHEN YOU BUY ONLINE
Shopping online is convenient and cost-effective
Ask us!
Get in touch
Email:
This email address is being protected from spambots. You need JavaScript enabled to view it.
Reg. No.:
38944924
Address:
Thriges Plads 6, 5000 Odense C, Denmark
Social media
Follow us on Instagram, Facebook and Twitter to find out about news and offers from Bloomcabin:
X
Have questions and want us to call you back?
+353
−
✖