
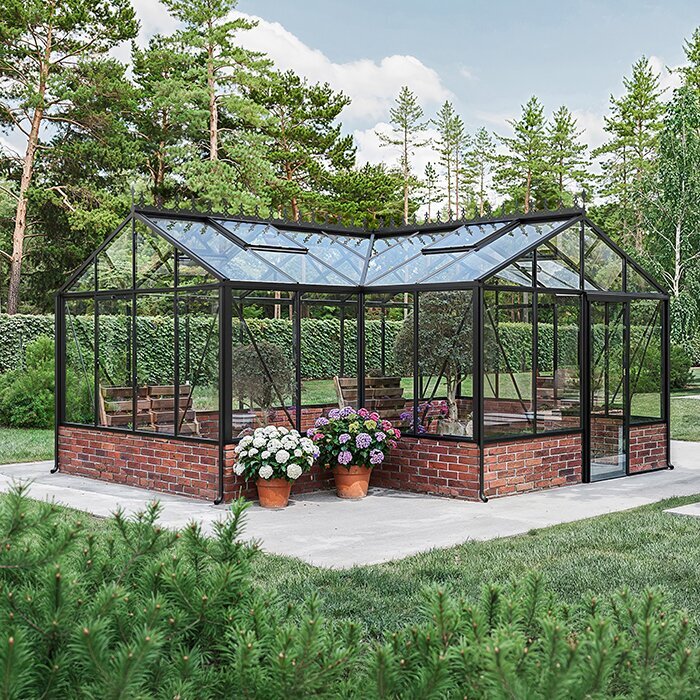
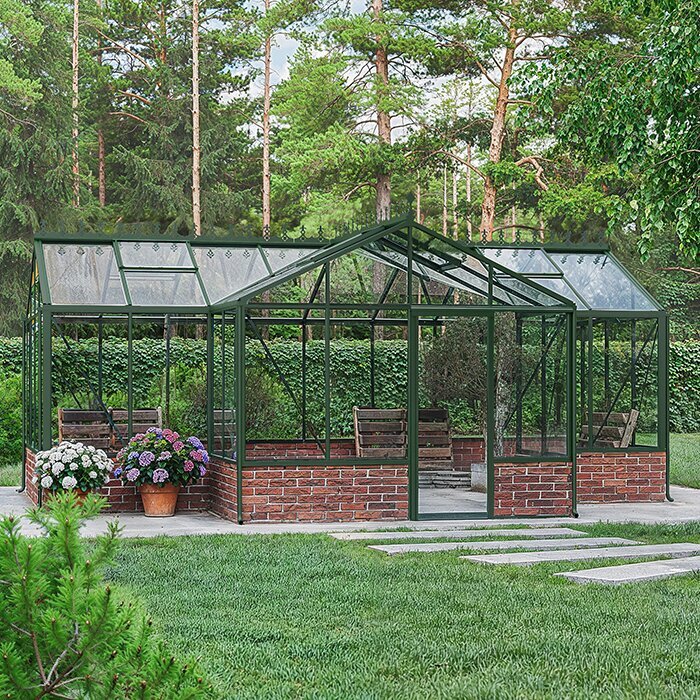
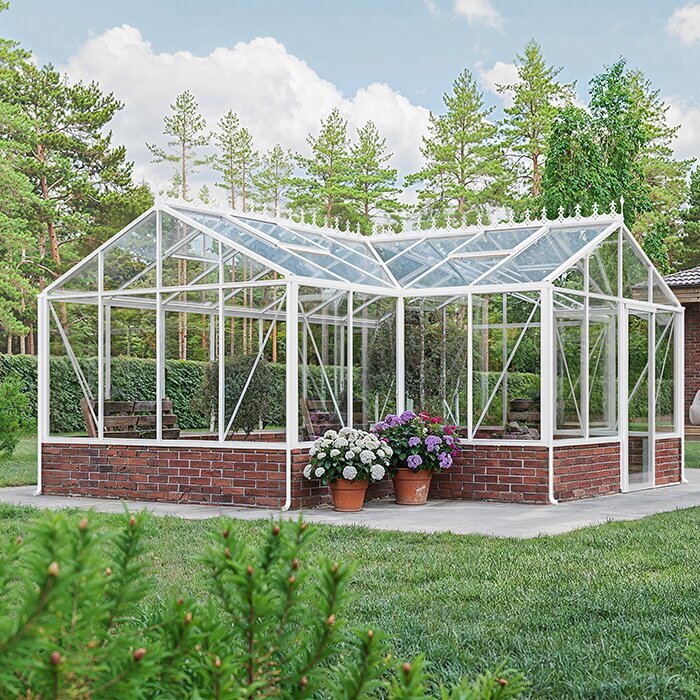







Plinth-mounted T orangery
T-plan orangery on masonry – glasshouse and garden room together
This T-plan orangery on a masonry base stands independently as a glazed aluminium build whose frame rests on made-to-measure masonry. It gives plants a sheltered growing environment while providing an adaptable garden room. The distinctive layout may be orientated so its main run and side wing relate well to paths, terrace and chosen views.
Available space is only one consideration when selecting a configuration. Decide how much room plants, benches, furniture and unobstructed circulation each require, then plot those zones to scale before ordering.
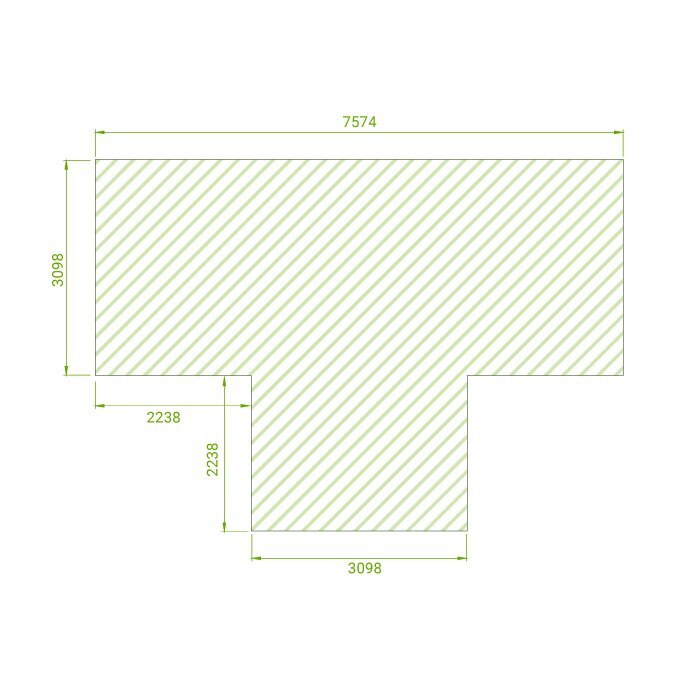
The T plan divides the interior naturally. Its main run and projecting wing may fulfil separate roles without the need to build partitions inside. Explore Bloomcabin’s T-plan orangery.
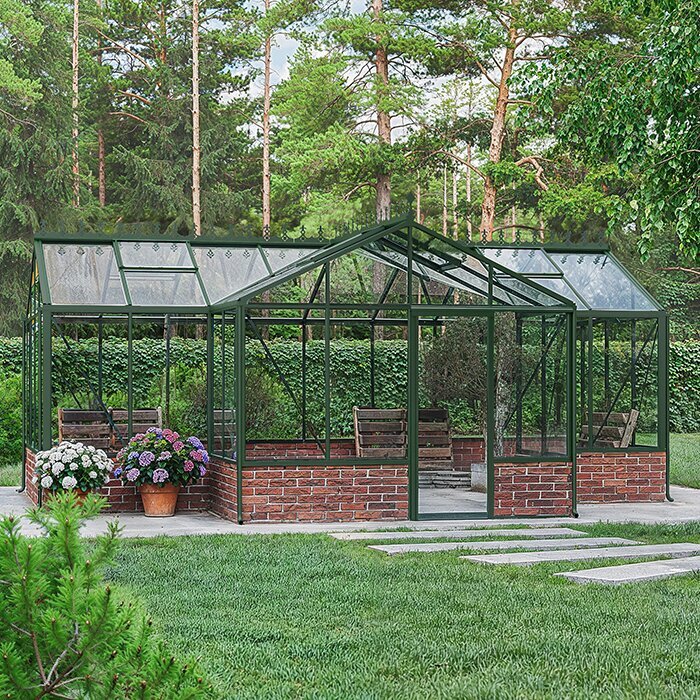
Natural zoning within the T plan
A projecting wing provides another clearly defined zone
Tomatoes, citrus, young plants or potting benches can occupy the main run; the projecting section lends itself to meals, informal seating or displays.
This arrangement prevents furniture, crops and work surfaces from crowding one straight central passage. Distinct zones can be established as soon as the interior is laid out.
Assign each zone by considering the doors, the path of the sun and the views through the garden.
Feature summary
Defining qualities of the T model
Its zoned footprint, site-built masonry, broad glazing and independence from an existing wall shape both planning and everyday use.
T-plan footprint
Distinct places for growing and spending time
Masonry base
Site-built base using brick, concrete or natural stone
Glazing, 4 mm
Transparent toughened safety glazing
Freestanding
Freedom to choose a site away from buildings
Architecture and masonry
Bring the base, frame finish and floor together
Construct the masonry to the approved dimensions for the selected glasshouse. Check every level, measurement and supporting face before fitting the aluminium frame.
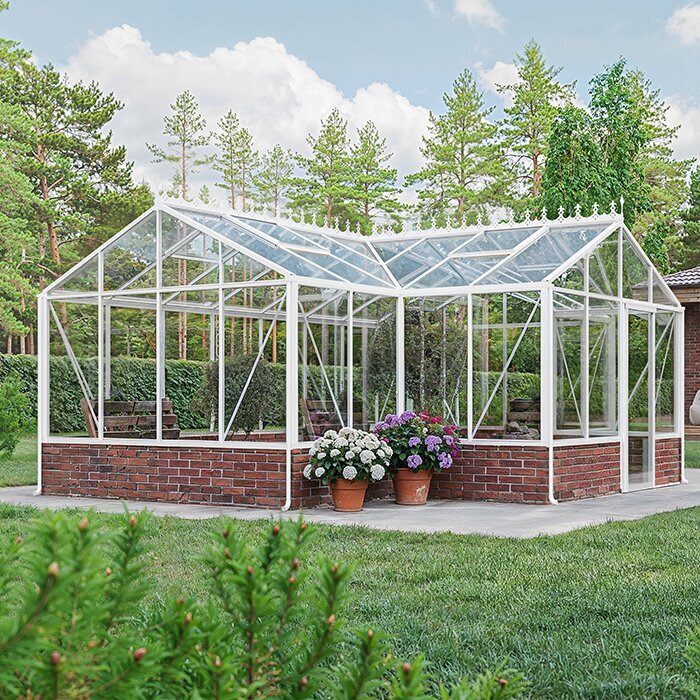
Brickwork may reference the dwelling’s façade, whereas natural stone can continue the character of a garden wall. Rendered or cast-concrete masonry gives a restrained, modern result.
Across both arms, the masonry cap, completed floor and openings for the doors must share the correct levels.
Technical details
T-orangery specifications and dimensions
Area: approximately 16.5–30.0 m².
Main width: approximately 3.10 m.
Ridge height: approximately 2.67 m.
Door height: approximately 1.85 m.
Frame: aluminium framing with a powder-coated finish.
Glazing: toughened safety glazing, 4 mm thick.
Doors: configuration-dependent sliding doors with one or two panels.
Airflow and water management: Opening roof vents plus built-in collection of rainwater. Rated performance is 30 m/s for wind speed and 210 kg/m² for snow loading.
Warranty: 12 years under the relevant warranty conditions.
Planning foundations for an Irish site
Address frost, drainage and bearing strength at the outset
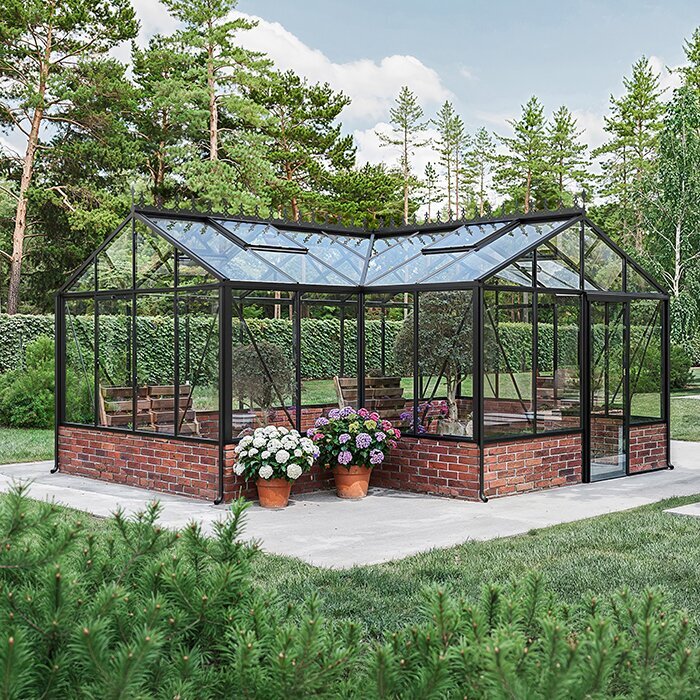
Design the foundation below the plinth around the site’s soil, local frost conditions and verified project loads. The aluminium superstructure does not replace competent foundation design and construction.
Compared with a rectangle, this footprint introduces additional inward and outward corners. Detail them so water neither pools there nor repeatedly flows against the masonry.
Resolve drainage as part of the foundation, base and surrounding paving design, well before assembly of the orangery.
Marking out the masonry
Use one datum to verify the entire outline
Mark the full T footprint on the site before the first bricks are laid. Recheck every length, angle and doorway against the approved model drawing.
An error at the projecting arm can throw out the main run. Working from one continuous datum is safer than setting out separate pieces of wall independently.
Begin masonry only after fixing the footprint, doorway positions and completed floor datum.
Shade and fresh air in summer
Extensive glazing calls for strong warm-weather airflow
Direct sunshine can raise the indoor temperature well above the open-air reading. Keep every sliding entrance and roof opening unobstructed and straightforward to use.
People seated inside will have different comfort requirements from tomatoes and warmth-loving citrus. The wing may benefit from temporary shade while the crop zone continues to receive full light.
Leave airflow paths through both arms when positioning furniture, climbing crops and tall containers.
Choose floors by function
Different zones may use different floor treatments
For a social wing, tiles, stone or another low-maintenance surface can work well. In the cultivation zone, select a finish suited to frequent gardening work.
The levels on both sides must relate correctly to the sliding entrances. Include drainage, thresholds and joints in the masonry-base design from the outset.
Place transitions and joints away from circulation lines, while ensuring that every floor zone can be cleaned without difficulty.
Collecting rainfall
Give runoff from every roof plane a planned route
Built-in channels combine rainfall arriving from several planes of glass. Determine the destination of every discharge point before paths and planting are formed outside.
Collected water in butts or larger tanks can meet some irrigation needs, particularly where vegetables and numerous potted plants are kept inside.
Route overflows away from the masonry so its foot is not repeatedly saturated or scoured.
Allow circulation around the furniture
Dining space extends beyond the table’s own dimensions
For dining in the wing, draw chairs in their pulled-back position as well as the routes people will use. This reveals whether the proposed arrangement remains workable day to day.
Preserve an unobstructed route linking the doorway, planting zone and seats, including while diners are using the table.
Test as well whether every sliding door remains usable with all dining seats occupied.
Allowing for plant growth
Tall specimens add structure without compromising fresh-air movement
Figs, mature citrus and trained climbers can frame selected sightlines. Keep them away from opening roof sections and doorways, where growth would interfere with operation.
Use shorter planting near the junction of the two arms so people can move through and see across the interior.
Account for mature canopy width and the direction of climbing growth, rather than considering present plant height alone.
Across the seasons
Requirements shift during the year
Spring offers space for raising seedlings, early vegetables and tender pots. In summer, greater attention turns to controlling heat with shade and airflow.
Autumn still allows the structure to function as a weather-sheltered garden room, keeping rainfall off plants. Winter arrangements depend upon the chosen crops and any heating proposal.
Without heating, frost protection cannot be assumed, and the orangery does not replace living accommodation. Adjust its role and your expectations as seasons change.
Consider heat provision early
Heating or a stove shapes the floor design and layout
If heat or a stove is proposed, settle its position before choosing floor construction, furniture locations and planting zones.
Have a competent professional design suitable clearances, connections and the route for combustion gases around the selected system. Avoid trying to resolve these matters once construction is complete.
An early decision lets the heat source sit clear of door operation, circulation, furnishings and cultivation space.
Maintenance and cleaning access
Retain a reachable route around the complete orangery
Inspection and washing are simpler when planting beds and woody shrubs stop short of the outside glazing, gutters, opening vents and framing joints.
Keep hedging far enough away that future repair and washing work can be completed comfortably around the structure.
Pay particular attention to the recessed corners, where multiple panes and framing members converge within limited working space.
Choosing between footprints
When does a T plan outperform a rectangular orangery?
A T footprint is useful where cultivation and social use need clearly recognisable zones rather than sharing one undivided rectangle.
For uninterrupted rows of vegetables with no furniture, a simple rectangle may use the available area more efficiently.
Masonry makes the T outline visually prominent, giving this version particular presence where the structure occupies a visible garden position.
Sequence the construction
Set responsibilities between trades in advance
The work packages on this Bloomcabin model depend on one another. Foundations and brickwork carry the frame; the floor build-up governs doorway junctions; and external works control runoff. Before starting, name who will transfer dimensions, verify heights and accept the completed masonry for assembly.
Give every participant the approved model drawing as the common reference. Record revisions to the floor, masonry height or doorway openings in each contractor’s working information. Select the configuration and orientation, establish a datum, and then construct the foundation and base. Mount the frame only after checking that support.
Schedule clear handovers among the bricklayer, landscape contractor, electrical contractor where needed, and erection crew. Before the frame arrives, complete the masonry, level its supporting faces and clear both the approach and work zones. Finish nearby operations that create heavy dust or debris before glazing begins.
Siting and construction access
Coordinate the delivery route, work zone and permanent paths
Solar exposure is only part of site selection. Trace how long components and panes will reach the build position. Gates of limited width, sharp turns, stairs, steep changes of level and established trees may all hinder movement. Reserve the access route for assembly and postpone delicate nearby planting until afterwards.
The erection crew requires working room beyond the finished footprint for lifting, alignment and glazing. Choose temporary storage and work zones before installing paths, beds or edging. Neither stored sections nor packaging should obstruct entrances, approach routes or the recessed corners within the T outline.
Once construction is finished, provide practical paths to each zone. A short route for compost, containers and equipment benefits the growing arm. A separate, easily kept path towards the social wing reduces traffic through the work area. Position both routes according to the selected door arrangement.
Brickwork, framing and finishes
Resolve the masonry materials and junction details together
Because the glass does not run to ground level, the base has a strong visual effect. It may continue materials from the dwelling or deliberately differ from them. Bond, pointing, copings and adjoining paving all contribute to the result. The numerous T-plan corners make poor cuts and inconsistent joints conspicuous.
Assess brick or stone, pointing, floor finishes and coated framing as one palette outdoors in daylight. Samples that appear compatible alone may differ in sheen or tone when combined. Consider the base’s visible inner face too, since its colour, reflectance and texture affect both furnishings and indoor light.
Appearance must not compromise a functional junction. Provide a masonry cap suitable for fixing the frame, and detail pointing and copings so runoff is directed away from that support. Confirm decorative proposals against approved product measurements before building to prevent later packing, grinding or additional masonry.
Efficient routines for plant care
Position water, tools and benches to suit recurring jobs
Efficient cultivation starts with a logical sequence for propagation, repotting, irrigation and temporary placement. Keep commonly used equipment close at hand without narrowing the principal passage. Slim benches or consoles may sit beside the masonry, provided they place no load on frame connections and leave room to wash the glass.
A plan must show more than bench depth. Allow standing room for bags, containers and watering equipment, as well as movement by someone holding a plant. Ensure doors can still open fully during work. Assign temporary set-down points beside the jobs they support.
Allocate dedicated storage for compost, irrigation items and implements within the cultivation arm. This limits damp and dirt near upholstery or seating in the other wing and prevents stored items narrowing the link between zones.
Air movement around the T
Manage ventilation separately in each interior zone
As foliage fills out, the two arms may develop different temperatures and humidity. Furniture, large containers and leaf density redirect moving air. Monitor conditions in each zone instead of treating the interior as uniform.
After irrigation or a cool night, note how long moisture lingers in each arm. Thick foliage can retain dampness in pockets, while moving air may discomfort seated users elsewhere. Vary door and roof-opening positions in response.
Plant density and room use alter during the growing season, so no single airflow routine suits every stage. Reassess it as canopies expand, climbers spread or the wing’s purpose changes.
Caring for frames and glazing
Use gentle methods on glazing and coated aluminium
Pollen, dust, algae and splashes can gradually cloud the glass. Choose non-abrasive equipment and compatible mild products, as harsh chemicals or scouring can harm finishes. Clean manageable sections and direct rinsed debris away from corners, joints and the sliding-door channels.
Routine mild washing is sufficient for the coated aluminium. During it, examine exposed fasteners, junctions and framing immediately over the base. Use stable equipment intended for elevated work, and protect all glass and metal surfaces from direct ladder contact.
Move or secure loose furnishings and plants before washing indoors. Work downwards from upper panes, finishing with the masonry and floor, so debris does not soil completed sections. Clearing the room also improves visibility when examining joints and framing.
Water, power and lighting
Design services before constructing the base and floor
Evening lighting supports workstations and the social wing, while sockets may serve tools or other equipment. Locate each outlet according to actual activities. A point hidden by deep furniture or a large pot is inconvenient; a trailing lead across a passage introduces a needless trip risk.
Incorporate conduits before completing the masonry and floor, when routes can remain discreet. Ask a Registered Electrical Contractor to assess the proposal, undertake any Restricted Electrical Works and advise on the applicable completion certificate. The design should account for irrigation, temperature changes and the metal-and-glass enclosure; extension leads are not a permanent installation.
Map the indoor water route concurrently. Keep the journey from a tap or storage tank to the crops direct and out of the social zone and main passage. Prevent irrigation runoff from lingering at masonry junctions. Distinct electrical, drainage and watering routes simplify operation and upkeep.
Cold-season operation and roof care
Adjust ventilation, use and upkeep during colder weather
Ahead of winter, remove plant matter and fallen leaves from channels, drains, sliding tracks and vents. Reposition portable pots to preserve access for doors and inspections. Group plants by their own heat and daylight requirements, placing vulnerable specimens away from entrances that are opened regularly.
Moisture still needs an escape route in cold weather. Short ventilation periods chosen for current conditions can limit condensation, provided tender plants are shielded from chilly airflow. They may be positioned deeper within the T layout as long as air continues moving between zones.
Following unusually severe weather, examine the roof from below and confirm that runoff routes are open. Never step onto the glazing. Any task at roof height requires an appropriate professional access method that avoids concentrated pressure on either the panes or aluminium.
Routine checks
Monitor operable components and structural junctions
A regular walk-around can reveal developing defects promptly. Examine the frame-to-masonry interface, exposed fixings, sliding action and roof-opening mechanisms. Carry out another inspection after high winds.
Inspect masonry for failed pointing, flaking surfaces and persistent damp marks. Rather than covering these signs with an unsuitable sealant, establish why they have appeared: the visible stain may be remote from the entry point. Review gradients, outlets and junctions as one drainage system.
Photograph noteworthy changes and maintenance, recording the date. Retain assembly information, the model drawing and records of all framing, floor and masonry products. They will assist future adjustment or repair. Use compatible parts and methods for structural work, and avoid unapproved holes or added loads in the frame.
Questions customers often ask
Questions about the masonry-base T orangery
Does the T orangery need to connect with a house?
No. It stands independently on masonry prepared by the customer’s contractor and has no designed attachment to a dwelling wall.
What information should the masonry contractor receive?
Supply the approved model drawing for the chosen configuration before construction. It governs the dimensions and outline of the T, masonry height, doorways and supporting cap. Enter any agreed revision in the project information before masonry begins.
What is the best way to clean sliding-door channels?
Clear deposits promptly with a suitable soft implement so the panels continue moving freely. Keep scouring materials and harsh products away from nearby framing.
May the link between the two arms be used for storage?
No. Preserve it as a passage, arranging furniture, large containers and plant supports so they restrict neither movement nor airflow.
What should be verified on the masonry base?
Against the approved information, verify the full T geometry, angles, doorway openings, levels, flatness and uninterrupted supporting cap before assembly. These checks establish whether the aluminium framing will fit as intended.
How should tall crops and supports be positioned?
Allow for the mature height and width reached later in the season. Keep doorways, roof openings and the route between zones reachable, and position supports where they cannot interfere with operation.
At what stage should heating or a stove be considered?
Selected configurations can accommodate a proposed stove or other heating arrangement. Define it before constructing the floor, installing services or placing furniture. Competent professionals must design the clearances, connections and flue route for the exact system.
Who is responsible for constructing the base?
A competent contractor builds it at the property from the approved dimensions for the chosen version. Finish and verify the geometry, levels, doorway gaps and supporting surfaces before frame assembly.
Bloomcabin’s T model
Set the T orangery comfortably within its garden setting
Before ordering, decide how the planting and social zones will be used and allow sufficient circulation and standing room.
Those decisions inform the base, doorway layout, drainage, floor finishes and furnishing for the selected configuration.
Checks before building the base
✓ Verify the T outline against the approved drawing
✓ Confirm doorway positions and approach routes
✓ Design the foundation for local frost conditions
✓ Resolve every rainwater outlet
✓ Select the frame’s RAL finish
✓ Choose furnishings and floor treatments
Bloomcabin Ireland