
Coordinating Pergola Footings with Porcelain Paving
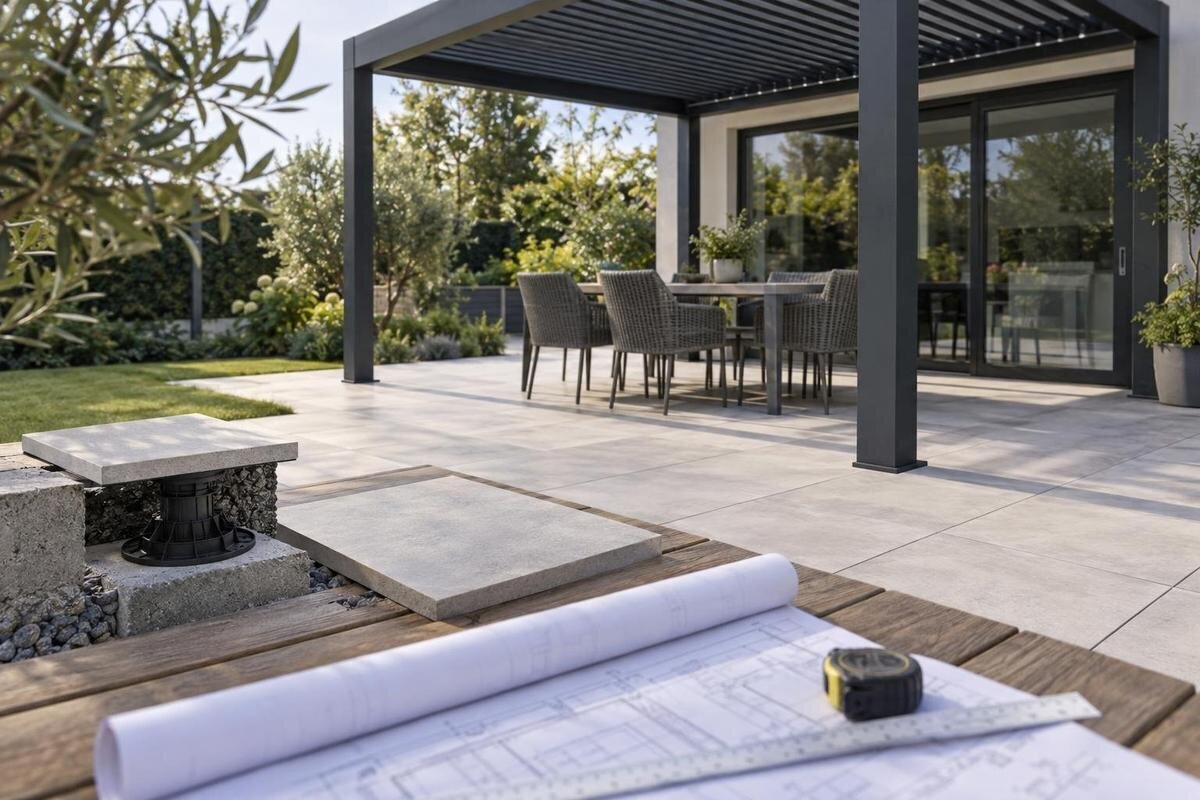
Pergola foundations
Porcelain paving and a pergola can be planned together, but they do different jobs. Tiles provide the finished walking surface; posts need an approved structural anchoring detail that transfers forces into a verified footing or supporting structure. When the two plans are drawn separately, a post may obstruct a drain, a tile opening may be poorly positioned, or the finished surface may sit at the wrong level. Coordinate the supports, tile grid, joints and drainage before either is installed.

Before paving begins 1
Porcelain paving is a finish, not an anchoring base
Porcelain paving is the visible finish of a terrace, not evidence of what can carry a pergola. A tile and its grout joint do not provide the structural connection for a post. Beneath them there may be a concrete slab, screed, bedding layer, pedestals or another build-up; the construction cannot be identified from the surface alone. A tile that feels firm underfoot is not thereby proven suitable for a concentrated post load or an anchor. If a post is fixed through porcelain without a designed detail, the tile may chip or crack, while movement can put pressure on its cut edge. Keep the finish and the supporting structure separate in the plan.
The structural design must show how forces from each post pass through an approved anchoring detail into a footing or other verified support. Depending on the chosen design and what lies below the paving, that support might be formed beneath the finish or connected to an existing structural base; neither arrangement should be presumed. The tile is cut and finished around the planned connection, rather than being counted as part of it. Ask for the model-specific anchoring drawing and give the structural professional evidence of the actual substrate. The appropriate footing and anchor arrangement depends on both the pergola and the site, not on the tile pattern.
Fix pergola post positions before setting out the tile grid
Begin with the exact post centres and anchoring arrangement for the pergola model. The roof outline shown in a product image is not a setting-out drawing: supports, base plates, wall connections and required clearances must come from the model-specific information. Mark proposed points from a fixed reference, such as the house wall or an agreed site datum, and note nearby thresholds, parapets, drains and access routes. Then check the whole footprint against the usable terrace. Doing this before the tiler sets out the porcelain grid helps avoid a post landing on a drain, joint or edge where the approved detail may not fit. A dimensioned plan lets the tile layout be tested against actual positions, rather than estimates.
Use the Bloomcabin Pergola product page to identify the model when requesting its approved anchoring drawings; the listing itself does not confirm post centres, base-plate dimensions or a footing design. Give the pergola installer and paving contractor the same dimensioned plan, with matching reference points and drawing revision. Confirm whether dimensions refer to a post centreline, an outside face or another point, and show how each relates to the finished tile. If a measurement changes on site, have the design checked before moving a support. Aligning a post with a grout joint is a finish preference, not a reason to change its structural position.
Before paving begins 2
Find out what lies beneath the porcelain
Before choosing an anchoring method, establish what lies beneath the tiles. Porcelain may be bonded over a bedding layer and screed, laid on a loose base, or supported on pedestals; other assemblies are possible. A level-looking surface does not reveal the thickness, continuity or condition of those layers, or whether there is a structural slab beneath them. Look for construction records and renovation drawings, and ask a qualified professional to investigate the proposed post areas if the records are incomplete. Where the terrace was built in stages, its construction may vary across the same surface. Avoid drilling, coring or excavating on guesswork: utilities, drains and waterproofing may be concealed in the build-up.
Record the material and condition at each planned support point, along with nearby cracks, changes in level, joints or previous repairs that the site assessor considers relevant. Note any available information about reinforcement where it matters to the assessment. A slab elsewhere on the terrace does not prove that the same construction extends under every post. If you are considering the Bloomcabin Bioclimatic Pergola, use that exact model name in the assessment request so the site information can be considered alongside the applicable anchoring drawing. Include known drainage or waterproofing layers. The evidence should relate to the actual proposed support points, not just one exposed area.
Design the footing for the actual pergola and site
Footing design belongs to the actual pergola, anchoring detail and site, not to the porcelain pattern. A structural professional needs the model’s approved support requirements and reliable information about the ground or existing structure. The assessment may need to account for the nature and condition of the supporting material, its distance from edges or existing foundations, and the actions transferred by the pergola. An existing slab may form part of a solution only if its construction and condition suit the specified anchorage. Conditions can also differ across one terrace, particularly where there have been extensions or repairs. No generic rule can set the correct footing depth, width, concrete volume or anchor type for an unknown site.
Ask for a coordinated detail showing the post centre, footing or structural substrate, anchor interface and finished surface. It should identify which part carries the structure and how the porcelain meets that part without acting as a load-bearing shim. The drawing should also make clear where the tile finish stops and how the surfaces meet. For the Bloomcabin Wall Pergola, include both the wall connection and the supports at terrace level in the request. The model name alone does not establish the support requirements. Review these connections together with the paving detail before work begins.

Before paving begins 3
Coordinate finished terrace levels with drainage
Agree a finished-floor datum before post heights or paving thicknesses are fixed. The finished surface includes more than the nominal porcelain tile: bedding or adhesive, any screed or support system, and installation tolerances all affect the final level. Give the pergola installer and paving contractor the same reference, and mark the intended paving height beside each post and structural support. This avoids one trade estimating from a tile sample while another sets the support from the existing slab. Check door thresholds, perimeter edges and level transitions in the same drawing, using the tile build-up specified for the job. A shared datum also reduces the risk of small level differences accumulating between separate measurements.
Plan drainage with those levels. Surface falls, channels, gullies and door thresholds must still work after footings and tile cuts are in place. A post or enlarged base should not block an outlet or form a pocket that holds water, and a local build-up around a support should not reverse the intended fall. Show the drainage route and finished levels on the coordination drawing, then check them against the paving and pergola details. Confirm that water can still reach the intended outlet once post positions and openings are accounted for. If the existing terrace has a fall or a change in level, do not set post heights by eye; have the installer and designer confirm how the approved geometry meets the measured finished surface.
Plan porcelain cuts around the posts
Once the support points and finished level are fixed, plan the porcelain grid around them. Tile sizes, grout-joint positions, border cuts and movement joints affect where each opening will fall. A small change in the tile layout may improve the pattern, but it does not authorise moving a structural post. Equally, the first layout should not force an awkward sliver or narrow corner cut beside a post if the grid can be adjusted without changing the support plan. The tiler should work from the agreed setting-out drawing, with post or base footprints and cut edges marked, and review the pattern from the main approach to the terrace. Check the cuts at every support, not only the first corner.
Confirm the cut-out and edge detail before porcelain is cut. If an approved base plate sits above the finished paving, the support beneath it—not the tile edge—must carry the designed load. The opening, clearance, edge finish and any cover trim should follow the approved detail and the tiler’s advice for the tile; no universal gap suits every arrangement. Consider how the cut edge will be protected during later access or maintenance. Do not pack a base plate with tile fragments, press a cut tile against a post to restrain it, or use a decorative cap to hide an uncertain fixing. For a regular Bloomcabin pergola, request the model-specific base detail so the tiler can plan the opening around the intended connection.
Before paving begins 4
Protect waterproofing, joints and drains
Check whether waterproofing, a drainage layer or a service layer sits beneath the porcelain, particularly on a terrace above an enclosed space. It may not be visible from the surface. A structural anchor that penetrates waterproofing needs a designed interface and an agreed way to maintain the layer’s continuity; filling a hole with sealant is not, by itself, proof of a suitable detail. The professional responsible for the building fabric should confirm where a penetration is acceptable and how water will be managed. If the construction cannot be verified, defer the fixing choice until the relevant layer has been investigated. Keep the water-management detail with the structural plan so it is not lost between trades.
Map movement joints, perimeter joints, drains and inspection points before locating footings or cutting tiles. A rigid support detail should not accidentally bridge a joint intended to let parts of the terrace move, and paving cuts should not hide access to a drain. Put those features on the same drawing as the post positions instead of leaving each trade to work from a separate plan. When planning for the bioclimatic pergola model, have its proposed anchoring interface reviewed against the actual waterproofing and paving assembly. Keep any removable drain cover or access panel reachable after the pergola and paving are in place. Show these access requirements on the plan as well as the permanent structural elements.
Give the pergola and paving teams one coordinated plan
Bring together the pergola supplier or installer, the person responsible for structural design, the paving contractor and, where needed, the contractor responsible for waterproofing or drainage. Agree one coordinated drawing showing post centres, supporting elements, finished levels, tile grid, joints, drains and protected services. Mark which dimensions control the work and who approves a change. This can reveal timing conflicts: a tile crew might otherwise close over an inspection point, while a pergola installer expects a clear opening that was never allocated. One shared drawing is more reliable than separate sketches or verbal instructions. Record the agreed responsibilities and keep the current version available to every trade.
Set the sequence only after the design is agreed. In a new terrace, settle support positions and levels before the porcelain grid is fixed; the exact order for forming supports, laying tiles and erecting the pergola depends on the approved detail and site method. For a retrofit, agree who will open and reinstate paving, protect the surrounding finish and address any waterproofing detail. Include a point at which work pauses for inspection before a support is concealed. For the wall-mounted Bloomcabin pergola, include the wall connection and paving edge in the same review; one trade’s plan may not cover both interfaces.

Before paving begins 5
Inspect support positions before they are covered
Before paving conceals any support, arrange a check against the approved drawing. Confirm the setting-out reference, post positions, levels and relationship to drains, joints and edges; the qualified person responsible for the structure should verify the work against the specified design and available substrate evidence. Keep the latest drawings and record the supporting layers at stages when they remain visible. Photographs labelled with location and date can help show what is beneath the finished terrace, but they do not replace inspection or structural confirmation required by the project. Record the final positions and any agreed changes while the details are still accessible.
After the paving is laid, compare the openings and finished levels with the coordinated detail. Tiles should not be wedged under a support or used to hide a shifted post. If the footing, anchor or opening differs from the drawing, pause before the mismatch is covered or the pergola is erected, and obtain an approved revision from the responsible designer or installer. Do not make a new hole through porcelain, enlarge an opening, move a post or add fixings as an on-the-spot correction. If the project uses the Bloomcabin Pergola model, identify it in the follow-up request and describe the discrepancy against the relevant drawing.
For an existing paved terrace, investigate before cutting
An existing porcelain terrace needs investigation before any tile is cut. Collect available plans and records for the paving build-up, locate drains, movement joints and services, then ask the site assessor to verify the proposed post locations and supporting construction. Surface appearance alone cannot distinguish a bonded installation from a loose-bed or pedestal-supported one, and a sound-looking tile does not prove that a slab beneath it is suitable for the specified anchors. Previous repairs may also conceal a different build-up in one area. Depending on the findings, the design may require local opening-up, another support arrangement or revised setting-out. Let the evidence—not the easiest tile to remove—guide that choice.
Keep options open until the verified support plan has been compared with the tile grid and drainage layout. If a proposed post conflicts with a drain, joint, doorway or unsupported edge, ask whether a model-approved arrangement can be revised; do not move it by a convenient amount. Even a small change can affect the frame, so an alternative needs review by the responsible designer and installer before cutting. If you are considering the Bloomcabin bioclimatic model, provide the terrace records alongside the exact product identity when discussing alternative positions. If no suitable position is confirmed, reconsider the overall layout rather than forcing a post into a problematic location.
Frequently asked questions
Can a pergola be anchored through porcelain paving?
Porcelain and grout are finish materials, not structural anchors. A fixing through a tile is suitable only if the approved detail transfers the load into a supporting structure that has been assessed for the purpose, with the tile and any underlying waterproofing properly coordinated.
Does every pergola post need an individual footing?
There is no layout that suits every pergola and site. The model’s approved anchoring drawing and a structural assessment of the actual ground or supporting structure determine the appropriate arrangement. Do not assume that each post needs the same footing, or that an existing slab can support any anchor.
Can I move a post so it lines up with a grout joint?
Only if a revised position is permitted by the model’s approved design and checked by the responsible professional. A neater tile pattern does not justify shifting a structural support. Set out the post positions first, then adjust the tile grid around them where the design allows.
Should the footing or the paving be installed first?
Agree the support positions, finished levels and tile layout before either stage is fixed. On a new terrace, those decisions need to be coordinated before the porcelain grid is set out. The actual construction order depends on the approved detail and site method, so include an inspection point before supports are concealed.
What if the terrace is already tiled?
Do not drill or cut on the assumption that a concrete slab lies beneath the tiles. Gather any construction records, locate drains and joints, and arrange an assessment of the proposed post areas. The findings will determine whether local investigation, a revised support arrangement or a different setting-out is appropriate.
Good coordination leaves the porcelain doing what it is meant to do: provide the finished terrace surface, while a separately verified support detail carries the pergola. The reliable plan brings together one set of post positions, substrate evidence, an approved anchoring drawing, the tile grid, finished levels and drainage. Resolve those relationships before paving or cutting begins. If the existing layers or a proposed support position remain uncertain, pause until the responsible professional confirms a solution for the chosen model and site.
