
Family Pergola Layouts for Play and Supervision
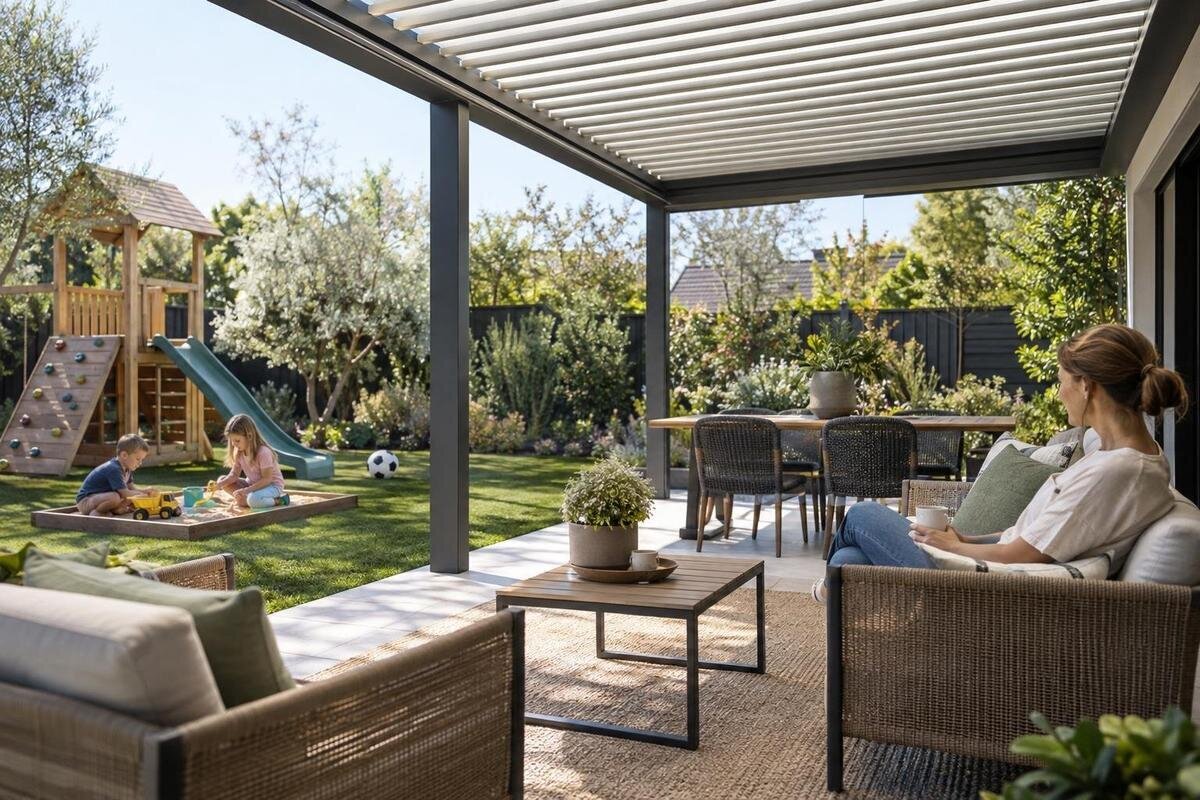
Family pergola layout
Arrange the family pergola around the view an adult has from a real seat, not around a neat rectangle on a plan. Separate the play zone from everyday walking routes, then allow for the space furniture and equipment occupy in use. A pergola does not make play equipment safe or replace active supervision.

Check the view from adult seating
Begin with the adult’s usual seat, not the pergola’s outline. Mark the chair or bench where someone is likely to sit while a child plays, then face towards the proposed play area. From that point, note anything that interrupts the view: a post, the back of a chair, a tall planter, a screen or an open door. Check what can be seen at seated height, including low activity close to the ground; a view from a standing adult may disappear behind a table. The useful test is whether the whole play zone remains visible without leaning around furniture or changing seats. A sightline supports supervision; it does not replace it or make an area safe by itself.
Repeat the test from every seat the family may actually use, including the place adults favour for meals or conversation. Put a chair temporarily where it would sit in the finished arrangement and look across from normal seated height. Then have another person stand and move around the play zone to reveal what disappears behind them. If adults take turns supervising, check each regular position rather than assuming one person will always occupy the best seat. Keep the arrangement realistic: a view that works only after moving the dining table is unlikely to work every day. When comparing the regular Bloomcabin Pergola, plot its proposed footprint only after the seating positions are clear.
Keep the play zone visible and distinct
Mark the area where play will usually happen before placing the dining set, lounge chairs or storage. A defined zone makes it easier to notice when toys have spread into a walking route and helps adults see what belongs to play. It need not be fenced or enclosed. Keep its open side facing the supervising seats and avoid placing tall cupboards, bulky cushions or large planters at the edge where they obscure a child’s movements. If several activities are planned, put quieter, smaller play nearer to the seats and reserve more open space for active movement only where it does not overlap with doors, table service or people crossing.
Describe the zone by the activity, not just with the label “children’s corner”. Drawing, building and quiet play need a different footprint from ball games or equipment with moving parts. Keep the boundary easy to understand without making it from loose cords, low objects or extra furniture that becomes an obstacle. The edge of a pergola does not contain play or separate it from a garden, driveway, pool or steps, so consider the view beyond the zone as well as the view inside it. When considering a wall-mounted pergola option, mark its position in relation to the house, the play zone and these surrounding features.
Measure equipment in use, not in storage
Measure each item of play equipment at the size it occupies when set up, not just its folded or stored dimensions. Add the space its maker requires around it where instructions specify a clearance, and mark the doors, posts, tables and chairs that share that area. Include the path a child takes to approach and leave the activity; equipment may fit in a gap on paper but still interrupt a route when used. If an item has more than one position, draw each arrangement, including where it will be stored when not in use. This is a layout check, not a reason to reduce the maker’s stated clearances to make a pergola fit.
An area total can hide awkward corners. Note the length and width of each zone, then sketch the proposed pergola outline and post positions using relevant product drawings if they are available. Leave room for chairs pulled out from the table and for people to pass without stepping through the play area. To compare the Bloomcabin Wall Pergola with those measured zones, use the exact dimensions of the configuration you are considering rather than an approximate outline. Do not assume a pergola is designed to carry a swing, climbing frame or other play item. Follow the equipment maker’s instructions and seek qualified confirmation before any proposed attachment.
Position seating for supervision and conversation
A seat offers a useful view only if its orientation and the furniture around it leave the activity visible. Angle a chair towards the play zone, and avoid placing a high-backed seat, shelf or display where it blocks the child’s main area of movement. A low coffee table may leave the sightline open but still occupy the route, so test both what adults see and where they put their feet. Keep everyday objects such as drinks, books or phones within easy reach without creating a tabletop between the supervising adult and the child. Aim for a usable seat that makes it easy to keep an eye on play, rather than a special chair nobody chooses.
Consider how the seating works when more than one adult is present. A pair of chairs facing each other may make conversation easy but leave both adults looking away from the play zone; a bench beside the open edge may suit the view better, depending on the garden. Test the arrangement with the expected number of people and with the dining chairs pulled out. If one adult is usually preparing food or going in and out of the house, do not make that busy route the only place from which play can be seen. Preserve a practical seated position with a direct view, and make any handover between adults clear.

Keep the main walking route outside the play zone
Draw the walking routes before adding decorative items. Trace the route from the house door to the garden, from the entrance to the adult seat and to any storage used during play. Where possible, keep the main route beside the play zone rather than through it. A person carrying food, a child retrieving a toy and an adult going indoors may all use the space at once; if each journey cuts through active play, the layout will constantly be interrupted. A line on a sketch makes this conflict visible early. It is more useful to protect a straightforward path than to fill every corner beneath the pergola with furniture.
Test the route with real furniture in place: pull chairs back as they would be when someone stands, open doors fully and walk from one end to the other with the usual items in hand. Check whether a child must pass behind a seated adult or between table legs to get to the play area. There is no single clearance that describes every site, so measure the pieces you own and check any product or equipment instructions that specify space. You can place Bloomcabin Pergola as one outline on that measured plan; its listing does not show whether your doorway, furniture and play route will align.
Play equipment placement and storage
Set larger equipment where its full footprint and the maker’s stated clearance are compatible with the open area, the routes and the supervising view. Follow the equipment instructions for its location, installation, anchoring and intended surface; the pergola’s presence does not answer those questions. Keep play items away from furniture adults need to move around, and leave any required access to the equipment unobstructed. If the instructions are unclear, get them clarified before settling the layout. Measure the setup as it will actually be used, rather than drawing only the most compact version and finding later that it blocks a seat or path.
Small items need a home too. Balls, chalk, building pieces and cushions left on a route can quickly make a tidy plan hard to use, so choose a storage place that does not block the adult’s view or take up the path. Keep the storage in the same position in your sketch as it will be in daily use. Include room to open a box or cupboard and take items out, rather than showing storage only as a closed rectangle. Account for this space when comparing configurations of Bloomcabin Bioclimatic Pergola, so that putting toys away is part of the layout rather than an afterthought.
Check sightlines as sunlight and surroundings change
Check the view and layout at the times the family expects to use the space. The direction and angle of sunlight change through the day, as do the shadows cast by nearby buildings, trees and furniture. A pergola name or image is not enough to establish where shade will fall or how much of the play area it will cover. Observe the actual spot at relevant times and note whether an adult can still see the activity from the preferred seat. If a particular roof or shade configuration is being considered, verify its stated function and limits for the exact model rather than assuming every pergola provides the same coverage.
Look beyond the space directly underneath the structure. A child may move towards a gate, steps, a pool or another part of the garden, so consider whether the adult can see that route and where play ends. If the garden has a boundary or a change of level, include it in the plan rather than focusing only on the pergola footprint. Keep fixed screens or tall planting out of the important sightline where practical. If a screen or planter blocks that view, consider repositioning it before fixing it in place.
Plan for play and adult activities to overlap
Family use seldom stays in one mode. Adults may be eating, talking, clearing the table or coming in from indoors while children continue playing. Sketch an everyday scene rather than an empty pergola: include occupied chairs, a table in use and a person standing to pass an item. Check that the active play zone remains visible in that arrangement as well. If conversation draws adults towards the far side, set chairs so at least one position still faces the activity rather than depending on everyone to remember to turn around. The layout should make a clear view convenient, not rely on an unusual routine.
If several adults share care, agree who is actively supervising when people change tasks or leave the seating area. A furniture plan cannot manage that handover, but it can avoid making the adult responsible for watching stand in the only route to the house. Draw a quieter meal-time arrangement and a play-time arrangement if chairs or toys will move between them. Place items that need to be carried aside, such as food or a toy tub, where they will not temporarily block the view of play. Use these everyday arrangements when comparing the regular pergola listing, so the choice reflects how the family will use the space.

Compare the measured layout with pergola dimensions
Once the zones, routes and furniture are drawn, compare their dimensions with the exact proposed pergola footprint. The product listings for Bloomcabin Wall Pergola, Bloomcabin Pergola and Bloomcabin Bioclimatic Pergola each state a range from 9 to 24 m². An area figure alone cannot show whether the posts, access points, chairs and play equipment fit your arrangement. For the listed wall-mounted model, check the product information and drawings for the exact configuration rather than using a lifestyle image as a scale reference. Keep the chosen configuration clearly identified on your plan so that dimensions from different options are not mixed.
Think about usable space on every side, not just whether the structure’s outline sits within the terrace or garden. Allow for the route to the house, the path around a table, the equipment’s stated clearance and any access needed to move or store items. If a post or edge falls where a child needs to pass, revise the layout rather than treating the pergola footprint as a flexible boundary. A smaller play zone may be more practical if it remains visible and uncluttered, but do not reduce it below the equipment maker’s requirements. Product dimensions and site conditions may need confirmation from the supplier or a qualified installer before final decisions.
Test the layout before deciding on a model
Before committing, test the concept at full scale. Mark the proposed seating, table, storage and equipment on the ground with removable markers, or make a measured paper plan if the surface cannot be marked. Sit in the intended adult seat, pull chairs out, walk the normal route and check the view while another person stands where the child would play. Include open doors and the equipment’s in-use footprint, not only an attractive arrangement with everything tucked away. A drawing of this kind is a concept, not an installation plan; it helps reveal conflicts before you choose a final configuration.
Repeat the test with the play equipment stored, with it set up and with the adult seat occupied. If the layout works only when one chair is moved or the play space is empty, adjust it now. When comparing the bioclimatic pergola model, use the exact dimensions for the proposed configuration to assess the sightline, route and equipment clearance on your site. Ask the supplier to clarify model dimensions and configuration, and use a qualified professional for site-specific structural or installation questions. Keep the finished arrangement simple enough that the clear route and adult view are not lost when daily items are put back.
Frequently asked questions
Which seat should I use to test a sightline?
Start with the seat an adult is most likely to use while a child plays, then check every other regular seat at seated height. Put furniture in its intended position and have someone stand and move around the play zone; this reveals blind spots an empty-room sketch can miss. A clear view supports supervision but does not replace it.
Can play equipment be attached to a pergola?
Do not assume that it can. Follow the equipment maker’s instructions and get explicit confirmation that the intended support is suitable from the relevant manufacturers and, where needed, a qualified professional. If that confirmation is unavailable, keep the equipment independent of the pergola and place it according to the maker’s instructions.
How much space should I leave for a walking route?
There is no single clearance that fits every terrace or garden. Measure the furniture, doors and items people carry, then test the route with the furniture in use. Keep the path out of the play zone where possible, and follow any space requirements specified for the equipment.
Will a pergola keep the play area shaded?
Not automatically. Shade depends on the location, time of day and the exact product configuration. Observe the spot when the family expects to use it, then check the relevant product details rather than relying on a model name or image to show where shade will fall.
What pergola size works for family play?
The listed Bloomcabin Wall Pergola, Bloomcabin Pergola and Bloomcabin Bioclimatic Pergola each have a stated range from 9 to 24 m². That range does not determine whether a particular layout fits. Compare exact model dimensions with the furniture, routes and equipment footprint you have measured.
A useful family pergola layout gives adults a clear view of play and leaves an unobstructed route between the house, seating and garden. Furniture, toy storage and equipment all need a defined place, both during play and when packed away. The best arrangement is one the family can use every day without shifting chairs to see a child or crossing active play to reach the house.
