
Space Planning for Raised Planters Beside a Pergola
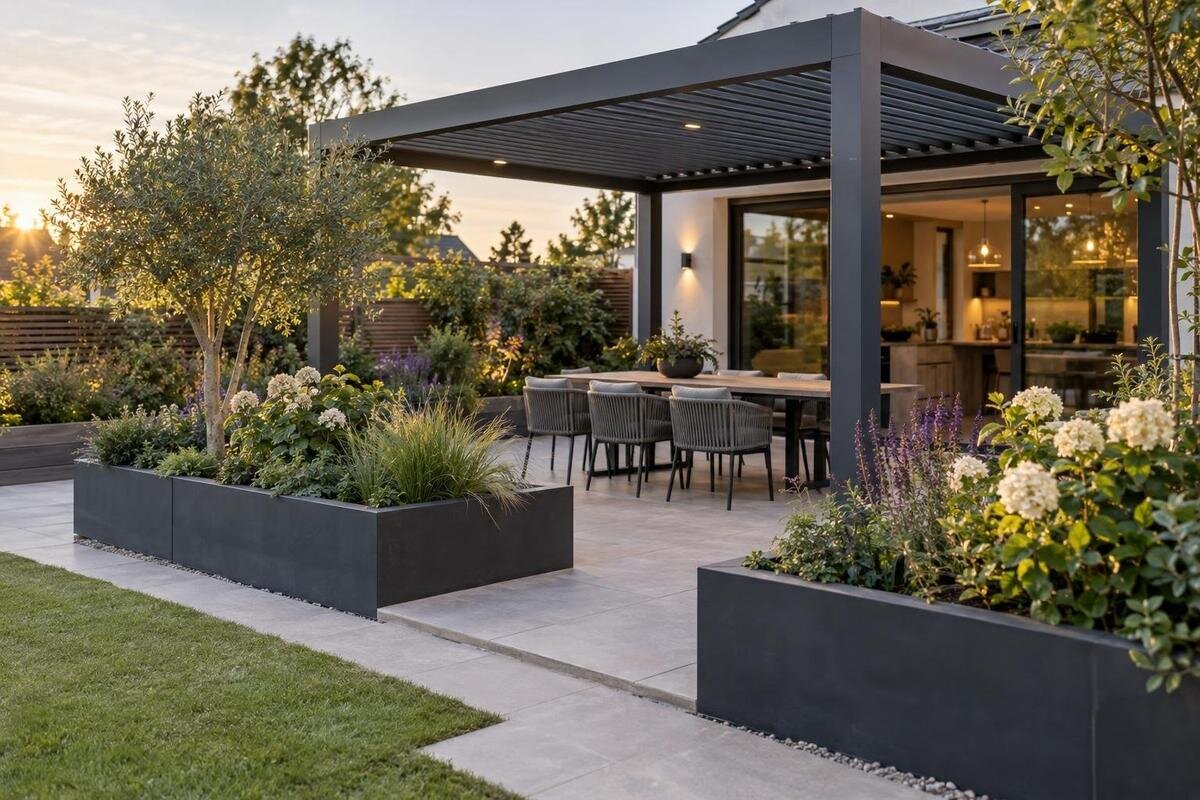
Pergola and raised-planter planning
Raised planters can make a pergola feel connected to the garden, but the layout works best when planting space and structure are planned separately. A bed needs enough usable soil for its plants, a route for excess water and room for tending; the pergola needs its own measured footprint, support positions and maintenance access. If both are drawn as one decorative outline, a planter can block a path, crowd a support or drain onto paving. Map each requirement first, then test how the footprints meet.

01
Measure the pergola and planters as separate footprints
Before choosing a planter shape, measure the site and draw its boundaries, walls, steps, doors, windows, existing paving and the routes people already use. Add the pergola’s full outline, then mark its support positions once these have been confirmed for the selected model; a roof outline alone is not enough. Draw each planter separately, using its external dimensions and allowing for any rim or projecting edge. The Bloomcabin Pergola listing gives an area range from 9 to 24 m², so Bloomcabin Pergola can be a reference when comparing overall scale. That area does not give the side lengths or support positions for a particular option.
Use one scale for the frame, planters, furniture and paths; a not-to-scale bed can make a cramped gap look generous, especially on a screen. Record level changes and fixed items such as a tap, drain, gate or service access, and show which way doors and gates open. Mark the route into the pergola rather than assuming people will walk around its edge. A temporary outline made with string or removable tape can test the drawing outdoors: walk the usual route, stand where chairs will go and look from the house. Adjusting a line on paper is easier than discovering that a decorative corner blocks everyday access.
Keep planter edges clear of the pergola supports
Treat the pergola’s supports as fixed points, not as gaps to fill later. Mark the support or base area using information confirmed for the selected model, and keep planter walls, edging and stored tools out of any zone needed for access. A bed should not brace, conceal or attach to a support unless the relevant design expressly allows it. Soil and retained water can be heavy, so plan the raised planter as a separate structure with a suitable base rather than relying on the pergola frame to support it. If planters will sit on an existing terrace, ask an appropriate professional to assess its surface and build-up instead of assuming it can take a filled container.
If Bloomcabin Bioclimatic Pergola is on your shortlist, use its confirmed support positions to compare where an adjacent bed could end. A planter that stops before a corner leaves a different approach from one that continues past it, even when both arrangements offer similar growing space. Draw the planter rim as well as its walls so that a projecting edge does not encroach on the access area. Check whether you can reach the support from the intended approach without leaning across soil or moving furniture. Where a bed would conceal a base, revise its length or position. Aligning the planter neatly with the frame should not make the support difficult to inspect.
02
Size the root zone for the plants you intend to grow
Choose the plants before fixing the planter’s internal length, width and soil depth. Root requirements vary: a compact leafy crop, a spreading perennial and a larger plant do not use the same volume of soil. Check the recommended rooting depth and spacing for the plants you want, using reliable growing guidance or supplier information. Then size the usable soil compartment rather than relying on the planter’s outside dimensions. Wall thickness, rims and any area that cannot hold growing medium reduce the available volume. A tall box is not automatically useful if its planting area is too narrow for the intended roots.
For a mixed bed, list the plants and group together those with similar space, watering and care needs. Very different plants sharing a long trough can compete for root space, while a spreading plant may encroach on access or shade its neighbour. Separate compartments or individual planters can give you more control, but they take extra floor space and may interrupt a continuous growing run. Show the soil depth and planting zones as well as the external box on the drawing, so the proposed root space is clear. Allow for each plant at mature size, not only the small specimen bought on planting day.
Give drainage and watering routes their own space
Plan where water leaves each planter, not just where it enters. Irrigation or hand watering can produce excess water, so drainage openings need a clear route and should not be blocked. On paving, water may travel across the finished surface rather than soak into a planted border; it can collect beside a wall or run across a path. Show the outlet and its destination, keeping flow away from pedestrian routes and pergola supports. Do not assume that paving joints, the edge of a bed or the ground below will take the water safely. The planter’s drainage arrangement should suit its position and follow its own product instructions.
Show taps, hose routes and any planned irrigation line on the same drawing. Keep them reachable without sending a hose across the main walkway or through the space needed to move a chair. Drainage points should remain accessible for inspection and clearing after the planter is filled; an outlet hidden behind a post, wall or piece of furniture is difficult to maintain. On a raised terrace or another built surface, confirm suitable drainage, waterproofing and support requirements with the relevant installer or qualified professional. A visual layout cannot establish how a surface has been built or where water should be discharged.

03
Keep everyday paths clear
Set out the route people will actually take: from a door or gate to seating, the garden, a tap or another regularly used area. Judge the clear space with supports, planter corners, pulled-out chairs and open doors in place, not by looking only at an empty floor. There is no single gap that suits every layout; users, furniture and tasks all affect what feels comfortable. Consider the room needed to carry a tray, water plants or use a mobility aid. A narrow pinch point beside a support can be more troublesome than a slightly longer route around a bed. If the pergola is used for dining, allow chairs to move without pushing people into the planter.
A wall-mounted arrangement may sit alongside an existing door or window, so mark those openings before choosing a planter run. Bloomcabin Wall Pergola is a wall-mounted option, but its product listing does not determine how far a particular selected size projects. Confirm the outline, then test the route between the wall, bed and furniture. Keep access to an entrance, garden gate or service point visibly continuous on the plan. Do not let a long planter turn a direct passage into a narrow slot simply to create a symmetrical border; adjust its length or position if the route becomes awkward.
Allow room for plant care and pergola cleaning
Growing space is only useful if you can reach it. Plan a working side for sowing, watering, pruning, harvesting and replacing soil or plants; a bed pushed tight against a wall or support may leave its back edge difficult to tend. Decide whether the main access is from one long side, both sides or an end, and make sure that position is not occupied by dining chairs or a narrow passage. If the planting plan includes frequent picking, place the bed near enough to the normal route to be convenient, but not where people brush against foliage every time they pass. Choose access according to the plants and how you use the space.
Plan cleaning access independently. The planter should not obstruct routine inspection or cleaning of the pergola supports, adjacent paving, wall or drainage points. When comparing Bloomcabin Pergola options, include any maintenance access specified for the configuration you choose. Then work through the cleaning tasks on your drawing: reaching each support, collecting loose leaves, clearing an outlet and bringing in a hose or tools. Note which tasks would require furniture to be shifted and where it could go without blocking the route. A separately positioned container may suit a tight area better than a fixed long bed, provided it still offers the intended root volume and a suitable base.
04
Plan for mature height and spread
Use mature height and spread when plotting the planting area. A small plant may later lean over a path, obscure a seat or take up the space needed to reach another planter. Distinguish the soil footprint from the above-ground space each plant is expected to use, including room for pruning and harvesting. Check spacing and mature dimensions for the plants you choose rather than relying on nursery-pot size. If the planting is seasonal, consider both a full-growth period and a cleared or dormant period. Even an empty bed needs to remain accessible, and its edges should not obstruct cleaning or become an unexpected obstacle on a route.
The same check applies above the planter rim. Decide whether a taller plant is meant to create a screen, add shade or simply grow beside the seating area. Show its expected height from the soil level, taking the height of the planter into account, rather than treating the plant as if it were growing at paving level. When considering Bloomcabin’s bioclimatic pergola, compare that outline with the documented clearances for the specific option. Keep foliage clear of routes and any parts that need access or movement. Consider the view from a seated position as well as a standing one, so the proposed planting matches the level of screening you want.
Compare planter layouts with the same root volume
Compare a single long planter, two separate beds and an L-shaped arrangement using the same intended root volume. Record each option’s internal length, width and usable soil depth as well as its external footprint. A continuous run can use an edge efficiently and simplify grouping, but it may close off a route or make the far end harder to reach. Separate containers can preserve an opening and allow different planting mixes, although their gaps need to stay clear and their combined outside dimensions may use more floor space. An L-shape can suit a corner but create a cramped inside angle. Draw each option on the pergola plan to compare its effect on paths, supports and seating.
For a candidate such as Bloomcabin’s regular pergola, overlay each planter version against the confirmed frame and support positions. Keep the root volume constant when comparing alternatives; otherwise a layout that looks more spacious may simply provide less growing room. Add the maintenance approach, irrigation point and preferred walking line to every version. This makes compromises visible: perhaps a bed can be shorter but deeper, one section can be a separate container, or an opening can stay clear for access. Choose the arrangement that can be planted, watered and cleaned in ordinary use, rather than the one that looks most complete in a plan view.

05
Freestanding and wall-mounted pergolas affect planter placement
Decide whether the site calls for a freestanding or wall-mounted pergola after mapping planting space and routes. A freestanding frame can be positioned within the garden, but its support locations and access around the structure still need to be accounted for. A wall-mounted arrangement must be considered alongside the building face, openings and access to the wall; it does not remove the need to plan planter edges or walking clearance. Neither format automatically leaves more growing room. Compare the actual footprint, support positions, installation conditions and maintenance access for the specific option against the site drawing. If the wall or surface conditions are uncertain, ask a qualified installer to assess them.
Use the wall-mounted pergola listing when comparing a wall-side arrangement with a freestanding one. Keep the proposed plants and furniture the same in both drawings so that the comparison shows how the frame’s position affects the available space. Beside the building, consider the planter boundary together with door openings and the route needed to reach the wall. For the freestanding arrangement, show how people would approach the beds from the garden and move between them and the seating area. Identify which side of each planter remains available for tending. This makes the choice more useful than a comparison of canopy areas alone: it shows how each arrangement would work with the planting you intend to keep.
What the final landscape drawing should show
Before committing, prepare a dimensioned drawing that shows the pergola’s outer dimensions and support positions, the planter’s outside size and internal growing dimensions, furniture, routes, drainage destination and access for care. Add the chosen plants with their root-depth and mature-spread requirements, plus any tap, drain or service point that must remain reachable. Separate what is confirmed from what still needs checking, such as the pergola’s precise footprint, the condition of the surface or how run-off will be handled. This gives a landscape designer or installer a concrete basis for review and makes proposed changes easier to compare. It is also useful for a design consultation.
Check the final candidate against its product information before fixing the planter in place. The Bloomcabin Bioclimatic Pergola product page lists an area range from 9 to 24 m²; that figure is not a substitute for the exact dimensions and support layout of the selected option. Verify those details, along with any required access, using the relevant documentation or design consultation. Check that the planter’s usable volume suits the documented planting requirements and that drainage has a suitable destination. If terrace support, waterproofing or installation conditions are unclear, pause for qualified input. A clear plan lets the pergola and raised planters share space without compromising their practical requirements.
Frequently asked questions
How much space should I leave between a raised planter and a pergola?
There is no single gap that suits every layout. Allow for access to the supports, plant care, cleaning, circulation and any requirements for the selected model. Mark those needs separately, then confirm the relevant clearances from the product information or a qualified installer.
How do I work out the root volume for a raised planter?
Start with the planter’s internal length, width and usable soil depth, then compare that space with the rooting depth and spacing of the plants you intend to grow. Do not size the growing area from the outside dimensions alone or assume every plant has the same needs.
Can a raised planter sit against a pergola support?
Do not assume it can. Keep support and inspection areas accessible, and do not attach a planter to the frame unless the selected design allows it. Check the required clearances and base arrangements against the product information and seek professional advice if the surface is uncertain.
Where should planter drainage go?
Show the outlet and where the water will go next. Avoid sending run-off across a main path or towards a wall or support. For a paved terrace or other built surface, confirm drainage and surface requirements with the relevant installer.
Does a pergola’s listed area show whether planters will fit?
No. An area figure does not show the selected option’s exact side lengths, support positions, access clearances or walking routes. Use confirmed dimensions for the pergola and planter on the same measured drawing.
The best layout is not necessarily the one with planters tight around the supports or arranged as a continuous border. It is the one that gives the intended plants usable root space, provides a planned route for excess water and leaves room to move, tend and clean. Treat the planter, pergola and circulation space as separate measured layers, then check where they meet against the selected model’s actual dimensions. When those layers still work together with mature plants and everyday furniture in place, the arrangement is ready for detailed review.
