
Designing a Comfortable Route Between Your House and Sauna in Winter
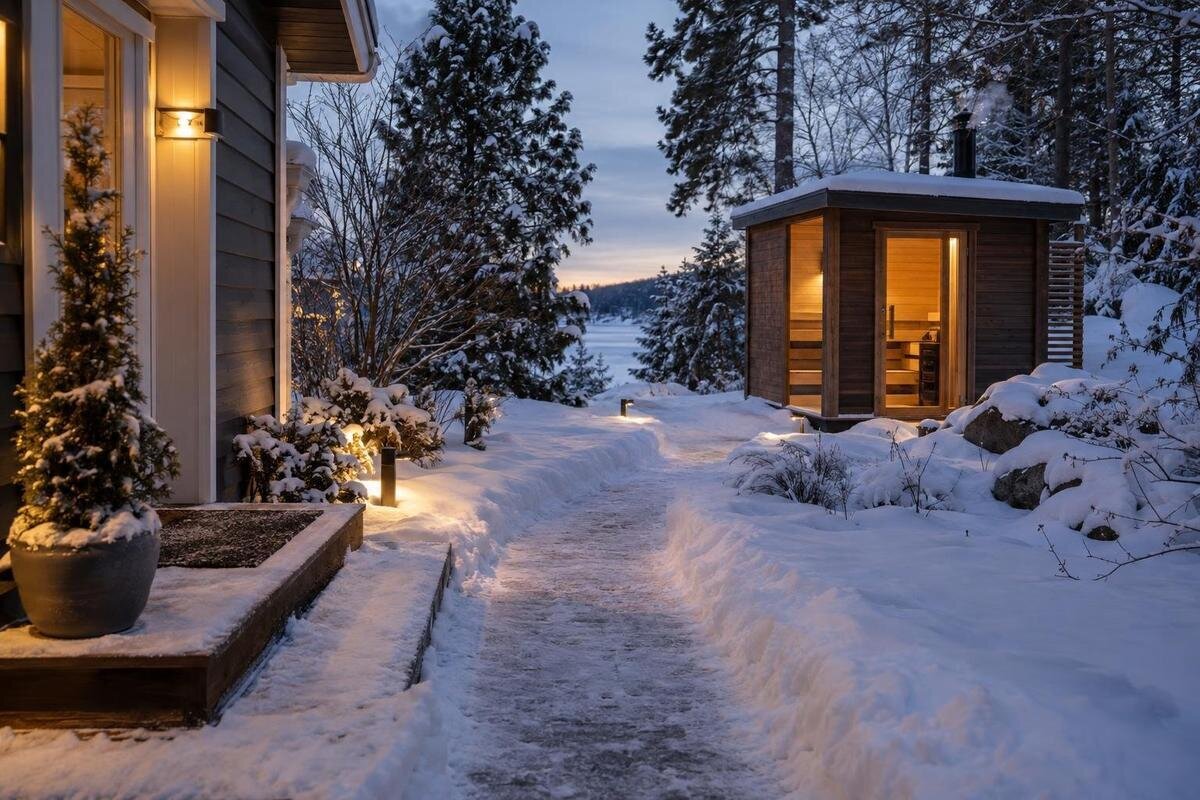
Winter sauna access
A short walk from the house to a garden sauna can feel quite different in winter, when rain, early darkness, leaf fall or frost change the garden underfoot. The shortest line is not always the easiest to use, and adding a roof does not solve poor drainage or a slippery surface. Plan the connection as an everyday route: from a practical house door to a clear sauna entrance, over ground that remains manageable in local conditions and can be maintained without special effort each time.
01
Choose a route people will use
Begin with the house door people are likely to use, rather than automatically choosing the nearest corner of the house. A route from a practical outdoor entrance may work better than a shorter line that crosses a busy entry, clips a garden bed or cuts through storage space. Think about the return trip as well as the walk out: people may be carrying towels, changing footwear or bringing items back indoors, and the route should make sense in both directions. If several people use the sauna, consider whether they can pass one another at narrow points and whether the path remains obvious when the garden is wet or dim. Notice whether one person can use a gate while another is approaching.
A direct line is valuable when it is also clear, stable and easy to maintain. It may be less useful if it crosses a frequently used driveway, steps, a drainage run or a spot where bins and garden tools collect. Look for a route that follows the way people already move around the property, while leaving room to open gates and maintain planting. Avoid a line that depends on moving outdoor furniture before every visit. If you are considering Thermowood Barrel Sauna LCF 300, compare possible approaches to its intended position rather than choosing the path in isolation. The route needs to connect a practical house exit with the sauna entrance, not simply reach the nearest point of the structure.
Mark the line and check both entrances
Once you have a likely route, mark it with cones, a garden hose or another temporary marker before committing to excavation or permanent paving. Walk the marked line from both directions, checking each turn and noting where a gate, planter, downpipe, outdoor tap, shed or frequently used door could interrupt it. Measure the route as people will use it, including the space to approach the sauna and turn back towards the house. There is no useful one-size-fits-all path width: household size, movement, objects carried and available land all affect what feels workable. If the garden allows it, mark two possible lines and compare them before settling on one.
Show the proposed path, sauna footprint and entrance together on a simple site sketch instead of judging distances from a product photo. For Thermowood Barrel Sauna S-140, use the current manufacturer drawing and the details of the configuration you intend to buy. Mark the door-opening area, the path edge and any clear space needed to keep the entrance unobstructed. Include the approach to the house door too, especially if it opens outwards. If the footprint or entrance position is not confirmed, hold off on setting levels or laying a permanent surface until it is.
02
Observe the garden in winter conditions
Visit the proposed route in more than one type of weather. After rain, look for puddles, damp patches, water running off the house or adjacent garden, and places where soil washes onto the path. In colder conditions, note which stretches stay shaded and where frost lingers; after wind, check for fallen leaves, branches or other debris. An exposed gap may feel different from a sheltered corner even when the two are only a short distance apart. The aim is to map conditions on your property, not to assume every part of the garden receives the same weather. If possible, inspect around the time you expect to use the sauna.
Take photographs or brief notes at consistent points after rain, on a dry day and at the likely time of use. This can help distinguish a one-off puddle from a recurring wet patch, and show whether seasonal leaf fall or shade affects particular bends. Note where water seems to come from, such as roof edges, downpipes or garden beds, rather than recording only where it collects. If you are comparing possible positions for Sauna HC-150, record the conditions along each approach as well as at the proposed sauna site. This gives you a clearer basis for comparing the routes than looking at either location on a single fine day.
Manage rainwater before it reaches the path
Work out where water goes before choosing a final path surface. If rainwater runs across the proposed line, even a suitable material can leave a regular wet spot or collect grit and leaves. Look for water coming from roofs, downpipes, raised beds and higher ground, then note where it gathers or drains away. The route should not become a low channel between the house and sauna, and a path that sheds water should not direct it towards either doorway or another area where it will create a problem. Check during rain and shortly afterwards; a dry afternoon gives little evidence of how water moves across the site.
Do not try to correct a persistent puddle by adding a thin layer of loose material or guessing at a gradient. Existing drains, soil conditions, level changes and nearby buildings can affect the right response. If water repeatedly crosses the route, pools beside a door or washes material away, ask a qualified landscaping or drainage professional to assess the cause and proposed work. The confirmed position of a model such as Thermowood Barrel Sauna HC-225 can be part of that discussion, but drainage needs to respond to the site's actual contours and run-off. Keep the water plan and path plan together, and avoid blocking access to existing drains.
03
Choose a surface for wet-weather footing
Choose a path surface for how it behaves when damp, not just how it looks when dry. Check the exact exterior product's information for wet-use performance, texture, drainage and cleaning needs; ask the supplier if that information is not clear. Different finishes of the same material can behave differently, and a rough appearance alone does not prove that a surface will provide dependable footing. Loose material may move out of the walking line, while joints or gaps can collect leaves and make clearing harder. Think about how the surface meets soil, lawn or garden edging as well as the main route, since a sudden soft or uneven edge can be awkward in poor light.
Consider the footwear people will normally wear, how water may reach the surface and whether you can keep it clear of leaves and growth. Ask the supplier or installer what outdoor-use conditions and maintenance apply, rather than assuming a familiar cleaner or treatment suits every finish. At the sauna end, a firm transition matters more than matching materials perfectly. If Thermowood Barrel Sauna N-210 is the model you are considering, confirm the entry position in its current documentation before deciding where the finished approach should stop. A sample can help you assess colour and texture, but it cannot reproduce site drainage or ongoing maintenance.
Use shelter where it makes a difference
Covering every metre is not always necessary. Shelter may be more useful at the house exit, at the sauna approach or along a short exposed stretch where rain commonly reaches the route. A partial cover can reduce direct rainfall at that point, but it cannot be relied on to keep the rest of the path dry in wind-driven rain or to prevent frost. Mark the places where cover would change the day-to-day experience, then weigh them against the maintenance and visual impact of extending a structure across the whole route. Keep uncovered sections in the plan too; their surface and drainage still need to work.
Plan where a canopy sheds water as carefully as where it provides cover: its drip line or downpipe should not send run-off across the path or into a doorway. Consider whether the shelter would shade an area that already dries slowly, or obstruct access to windows, doors or garden maintenance. Have its suitability for local wind, rain and the site assessed by an appropriate professional. Treat a canopy as separate from the sauna; do not assume the sauna or a general garden structure is designed to support an added roof. When coordinating separate shelter with Thermowood Barrel Sauna N-250, confirm the chosen sauna position from current documents before the shelter is designed.
04
Make the arrival areas easy to use
At each end, consider the arrival area as well as the line between the doors. The route should lead to a place where people can pause and operate the relevant door without stepping backwards into a puddle, planting bed or moving traffic. Check that a door or gate can open without blocking the walking line, and that a wall, railing, planter or stored item does not crowd the approach. If the ground changes level at a threshold, treat the transition as part of the route design rather than trying to disguise it later with a loose board or mat. A clear space at each end also makes it easier to turn around without stepping into the garden.
Think about the items that gather around sauna use: footwear, towels and a broom or other cleaning tool. Give them a stable place out of the path so they do not narrow the approach or become a trip hazard in poor light. If you use a mat, choose one intended for its location and keep it from sliding or holding standing water. When planning the approach to Sauna LC-260, include these storage spots on the site sketch rather than fitting them into whatever space remains beside the door. Check that reaching for footwear or a towel will not block someone entering or leaving. Keeping storage separate from the walkway also makes seasonal clearing easier.
Check slopes, steps and visibility
A sloping garden or several steps can make the route harder to use and maintain, particularly when leaves, water or frost alter the surface. If another line is practical, weigh its extra distance against the effort of a steep or stepped route. Where a level change is unavoidable, plan how the edge, landing and change of direction will be clear to household members and visitors. Avoid relying on a loose mat or narrow strip of different paving to make an awkward transition seem finished. For a substantial slope, steps or an edge beside a drop, ask a qualified landscape or building professional to assess the design; a generic surface choice cannot settle site-specific details.
Check whether the route is easy to follow at the time it will be used. A line that stands out in daylight may blend into the garden after dusk, especially where planting, steps or borders interrupt its edges. Keep branches, garden furniture and stored items away from the walking line, and consider whether existing outside lighting reaches the bends and thresholds. If extra lighting is needed, treat that as a separate, professionally specified outdoor-lighting decision. Do not assume a light by the house or sauna will make the whole route visible, particularly if a turn or planting blocks the view.
05
Plan for leaves, frost and seasonal clearing
Maintenance is part of route selection, not a problem to solve after the surface is laid. Leaves and fine debris can hide changes in level or gather where water drains; clear them before they become a regular obstacle. In areas that get frost or occasional snow, decide who will keep the path clear and where suitable tools can be stored without blocking a doorway. A covered stretch may still need attention around its edges and where run-off lands, so do not remove it from the winter check simply because it sits under a roof. Choose a route whose everyday upkeep fits the time you are willing to spend.
Inspect the surface after heavy rain and after clearing or garden work. Look for new puddles, washed material, loose or uneven areas and growth that makes the path harder to clean. Follow the surface maker's care instructions, especially before using a cleaning or ice-treatment product; compatibility varies, so do not assume a familiar treatment is suitable for every finish. If the same patch repeatedly becomes wet or slippery, address the underlying drainage, shade, debris or material issue rather than relying on a last-minute fix. Keep clearing equipment nearby but out of the walking line.
Coordinate the route with the sauna installation
Before permanent work begins, bring the path sketch together with the sauna's confirmed position, door approach, site drainage, existing services and access needed for future upkeep. If digging, grading or adding a cover is involved, ask the relevant trades or a qualified designer to check site constraints and any approvals that may apply. Do not estimate these details from a product photograph: installation documents, actual inclusions and the configuration you intend to buy are the useful references. Keep route, shelter and landscaping decisions on the same plan so one part of the work does not undermine another.
Allow details to change if a manufacturer drawing, site inspection or professional advice alters the proposed position. If Sauna HCF-300 is the model you are considering, verify its current local availability and chosen configuration before coordinating permanent landscaping work around it. Make sure everyone involved is working from the same revised sketch if the entrance position, path or shelter layout changes. A flexible sketch is easier to revise than permanent paving laid before access and drainage questions are settled, particularly when a change at one end affects the route between both doors.
Frequently asked questions
Should the path be as short as possible?
Not necessarily. A direct route can be convenient, but it may cross steps, a driveway, a drainage run or a busy garden area. Compare the distance with how clear, firm and easy to maintain each option will be in winter.
Does the route need to be covered?
No. Shelter can help at an exposed section or near a doorway, but wind-driven rain and frost can still affect uncovered parts. A roof or canopy also needs its own site-appropriate design and water run-off plan.
Which surface is best for a winter sauna path?
There is no single best choice for every site. Check the exact outdoor surface and finish for wet-use information, drainage and care requirements. Consider how leaves will be cleared and how the surface meets the ground at each end.
How can I deal with leaves or frost on the path?
Clear leaves and debris before they build up, and check for water that repeatedly pools or freezes. Follow the surface maker's care guidance before using cleaning or ice-treatment products, as a treatment suitable for one finish may not suit another.
Can I attach a canopy to the sauna?
Do not assume the sauna is designed to support an added roof, or that a general garden shelter is suitable for your site. Check the current manufacturer documents and have the proposed shelter assessed by an appropriate professional.
A comfortable winter route is not necessarily the shortest or the most extensively covered. It is the one that meets both entrances clearly, manages water on your site, provides footing suited to local conditions and remains straightforward to clear. Mark the proposed line and walk it in real weather before permanent work begins. When the path, shelter and seasonal upkeep are considered together, the journey between house and sauna can be a practical part of using the garden throughout winter.
