
Wall-Mounted or Floor-Standing Sauna Heaters: Planning the Layout
Sauna layout
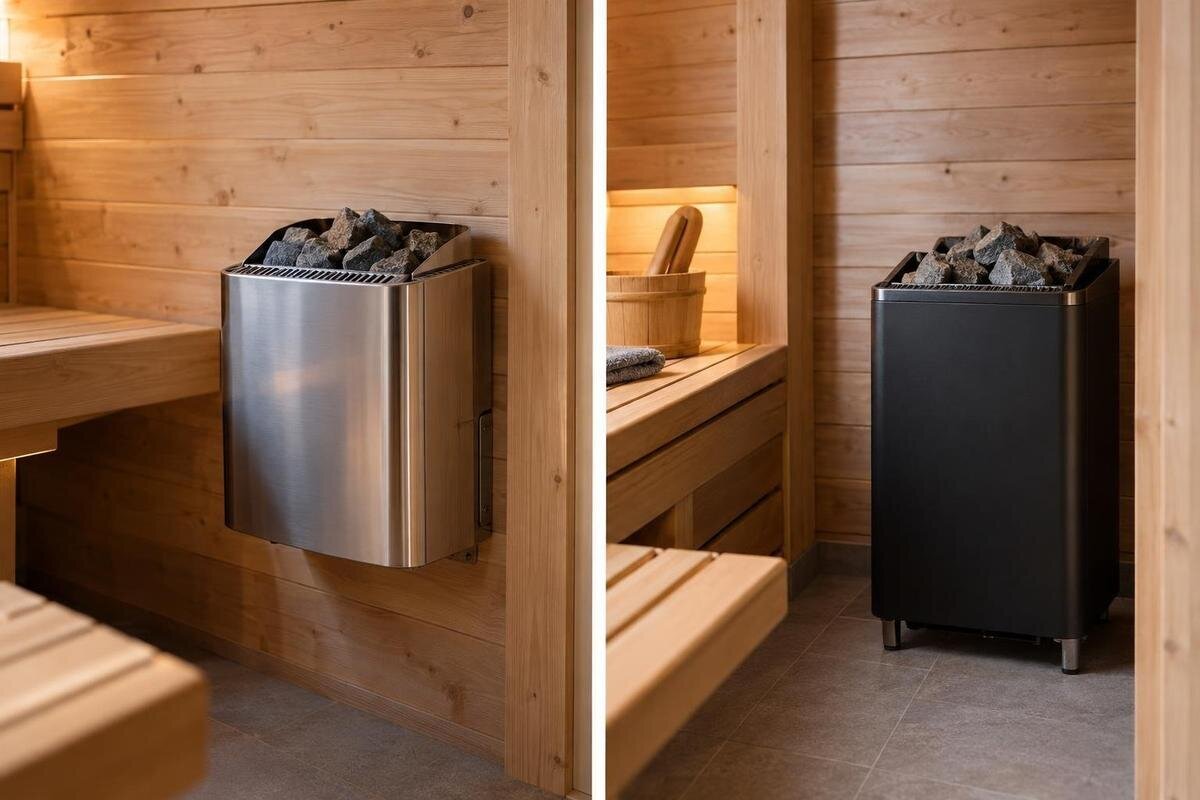
Choosing between a wall-mounted and floor-standing sauna heater is a layout decision as much as a question of where the unit rests. A wall-mounted design can leave more floor unobstructed; a floor-standing one occupies an area at floor level. Neither removes the space needed around the heater. Compare the complete installed zone: the unit, its approved support or base, manufacturer-specified clearances, any required guard, benches, the doorway and the route between them. A plan based on the exact heater drawing shows whether either format fits while preserving support and usable circulation.
What the two mounting formats mean
Wall-mounted describes a heater designed for a specified wall fixing; floor-standing describes a unit intended to rest on a floor-supported base. The label does not establish whether a particular model can be installed either way: some heaters allow only the arrangement stated in their documentation. A bracket or separate stand is not a general conversion option. Nor does mounting style tell you which room a heater suits, its output or its clearance requirements. A wall-mounted unit still projects into the sauna, while a floor-standing heater can affect movement around its base even if the casing looks compact. Compare the exact model and version.
Distinguish the physical installation from the distances required around it. The heater, bracket or base and any specified guard occupy space; manufacturer clearances describe the required separation from particular surfaces or objects. These are related measurements, but they are not interchangeable. A clearance diagram alone does not show whether someone can comfortably reach a seat or pass an open door. The Sauna LC-260, listed at 5.12 m² provides a useful starting point for a cabin enquiry, but its stated area does not establish the internal layout or an approved heater position. Ask for the cabin plan and the documentation for the proposed heater as separate items. Compare them together, showing both the equipment outline and the relevant clearances, rather than treating the catalogue area as the space available for seating and movement.
Put the full heater zone on the room plan
Use finished internal measurements rather than relying on the sauna’s external size or a single area figure. Draw the actual room shape and mark the doorway and its swing, windows, benches, steps, obstructions and ceiling height. Recesses or changes in wall shape matter because a heater that fits within the stated area may still conflict with a bench or opening. For a new room, base the plan on its intended finished dimensions so that linings and fitted benches are not overlooked. A plan and a side elevation make it easier to compare both the floor-level and vertical space available.
Plot each proposed heater position separately. Add the exact model’s body dimensions, approved bracket or base, clearances and any guard shown in its instructions, then draw the bench edges and route to the entrance. Use the drawing’s own measurement points; do not scale dimensions by eye to make a layout appear to fit. When considering the Sauna HCF-300, request a dimensioned internal plan rather than trying to reconstruct the room from photographs. Record whether each measurement refers to the finished interior, the external cabin or another part of the building. If a dimension is missing, mark it as unconfirmed instead of estimating it. This makes the comparison more useful to the supplier or installer: they can identify the specific information needed before either mounting format becomes a firm choice.
Wall-mounted heaters need suitable structural support
Wall mounting may preserve some floor space beneath a heater, which can help when a clear route or bench access is difficult to arrange. That space is not automatically free to use: the heater still projects into the room, and a guard or required clearance may occupy part of the area below or beside it. Check that the manufacturer’s permitted wall position works with the benches, doorway and other room features. In a narrow layout, the clearance zone can use the very floor area you hoped to gain, so compare the complete installation rather than the mounting label.
The support behind the finished wall must meet the heater manufacturer’s requirements for the specified fixing arrangement. A decorative lining or an apparently solid surface is not, by itself, confirmation that the wall is suitable. Have a qualified installer assess the structure and proposed configuration, including the load information stated for the complete heater installation. Do not improvise fixings or calculate support requirements from a product photograph. For a cabin such as the Sauna HCF-225, ask what construction information is available for the wall at the proposed heater position. Keep that information distinct from the heater’s mounting instructions: one describes the cabin, while the other defines what the equipment requires. Establishing whether they are compatible before the wall is finished can prevent a preferred heater position becoming impractical later.
Floor space needed for a floor-standing heater
A floor-standing heater occupies a defined patch at floor level, but its base is only part of the space to plan. Allow for its specified clearances, any approved guard and the vertical space above it. Check the manufacturer’s requirements for the floor and its finish rather than assuming that a unit resting on the floor needs no support assessment. Its position may also be constrained by the nearby benches or room openings. A floor-standing format can suit a plan where its approved position works with the room, but it is not automatically easier to place or move.
Mark the heater’s physical outline and guard against the entrance route, bench steps and any area intended for standing. Show the specified clearances separately, using the surfaces and measurement points identified by the manufacturer. Do not assume that every clearance is a walking-space requirement, or that a gap satisfying a clearance necessarily provides comfortable access. For the Sauna S-140, a dimensioned interior drawing would help you assess these relationships without inferring them from the listed area. Check the narrowest part of the intended route, not just the open space in the centre of the room. Also consider how a person reaches the lower bench or step: a base that leaves the doorway unobstructed can still be inconvenient beside the point where someone turns to sit down.
Use clearances from the exact manufacturer drawing
Heater clearances are specific to the model and its approved installation, not a standard gap that can be applied to every sauna heater. The manufacturer’s instructions identify the relevant distances and where to measure them from. Depending on the drawing, these may relate to nearby walls, the floor, the ceiling, benches or other surfaces. Read the diagram alongside its notes, particularly where it distinguishes between mounting arrangements or identifies materials that need a particular separation. Do not substitute a distance remembered from another model or estimate one from a product image.
Transfer the documented clearances onto the room plan and side elevation before settling bench positions. If the instructions distinguish between configurations, use the drawing for the exact one being considered, including any specified guard or mounting parts. Do not assume that adding a guard lets you reduce a clearance unless the manufacturer says so. When enquiring about the Sauna HC-150, identify the proposed heater by its full model designation and request the applicable installation document. A general brochure illustration is not a substitute for a dimensioned drawing. Keep any notes that accompany the diagram, since an isolated image can omit conditions governing its use. If two documents appear to disagree, ask the supplier or manufacturer to clarify which applies rather than selecting whichever distance makes the room layout easier.
Plan benches and circulation around the heater
Benches and heater clearances have to work together. Mark the ends and depth of each bench, steps used to reach it and the space needed to sit down or move between levels. A heater position that satisfies its wall clearances may still leave awkward access if it is beside a bench end or in the route to a seat. Where a guard is specified or selected, include its actual position in the drawing; it is another physical part of the layout. Do not shift a bench into a reserved zone to make the heater appear to fit.
Draw the entrance and the usual route from the door to the seating as well as the fixed furniture. Consider the door’s swing and whether entering or leaving involves passing close to the heater, turning around a guard or squeezing beside a bench. Clearances to surrounding surfaces and convenient circulation are separate checks; satisfying one does not establish the other. If the Sauna HC-225 is on your shortlist, request its bench and doorway arrangement before comparing heater positions. Trace the route to each seat, including the space used when stepping up or sitting down, rather than marking a single line through the room. Note any pinch points for discussion with the installer. This helps distinguish a layout that merely accommodates the equipment from one that also provides practical access to the seating.
Vertical clearances and access for servicing
A floor plan cannot show every constraint. Use a side elevation to compare the heater’s height and the manufacturer’s clearances above it with the ceiling and bench levels. A wall-mounted model may have a specified mounting position; a floor-standing model begins at floor level, but still needs the vertical space required by its instructions. If the ceiling height varies, show the low and high points in relation to the proposed heater position. Do not choose a location solely because it fits on the wall or floor if the required overhead space is not available.
Check the heater system’s documentation for any stated control, sensor or connection positions, and allow for the access needed to install or service the equipment. Coordinate these with benches and other fitted items before fixing their positions. Installation and connection work should be assessed by a suitably qualified professional; this guide is not a wiring plan. For the Sauna N-210, request internal height information and an elevation showing the proposed heater location. A floor-area figure cannot establish the space above a heater or access to its service points. Ask which parts need to remain accessible and whether a bench or guard would obstruct them. Distinguish routine user access to controls from maintenance access: a conveniently placed control does not prove that the rest of the equipment can be serviced without disturbing fitted furniture.
Match the heater configuration to the sauna
Mounting style is one part of heater selection, not proof that a particular model is right for a particular cabin. Check the manufacturer’s guidance for room suitability using the cabin’s actual dimensions and any room characteristics it asks you to consider. Confirm that the exact heater version is approved for the intended wall-mounted or floor-standing arrangement, and that the specified support, controls and other configuration details match the plan. Do not choose a heater from a broad area figure or assume that a compact body will suit a compact room.
Product listings and installation documents answer different questions. When considering the Sauna N-250, establish the dimensions and characteristics of the heated room rather than relying on the headline area alone. Check what that area includes: without further information, it should not be treated as the room’s internal floor area or converted into a room volume using an assumed height. Follow the heater manufacturer’s selection method and ask the supplier to confirm the proposed combination where necessary. Keep suitability and layout as two separate decisions. A heater may meet the manufacturer’s room-selection guidance yet be awkward to position; another may fit neatly on the drawing without being suitable for the room. The final choice needs to satisfy both checks, using the exact cabin and heater configuration rather than their catalogue names.
Coordinate the layout with the installer
Before wall finishes, benches or other fixed parts make changes difficult, share the room plan and the exact heater documentation with the installer. Ask them to assess the proposed wall support or floor requirements, the manufacturer’s clearance zones, and the position of the benches and access route. This is a check of the actual construction and configuration, not a general judgement based on whether a wall looks sturdy or a floor appears solid. If the chosen heater’s instructions do not match the proposed room arrangement, pause and resolve the conflict rather than adapting the installation by guesswork.
Keep the heater model and version, the applicable drawing and the agreed layout together in the project information. If a bench, guard or heater position changes later, review the affected clearances and access again; a small change on a plan can alter the space around the unit. Confirm who will assess any change to the support or configuration. This coordination is especially useful when the heater position is being decided alongside the cabin build, because the final installation needs to match both the manufacturer’s instructions and the finished room.
Compare both formats on the same drawing
Make two versions of the same room plan: one for the approved wall-mounted arrangement and one for the floor-standing arrangement. In each, draw the heater, its support or base, specified clearances, any guard, benches, door swing and route to the seats. Show the space available for circulation separately from the required distances between the heater and surrounding surfaces. This avoids overstating the space saved by a wall-mounted unit: an unobstructed floor beneath it does not necessarily provide a useful route or standing area. It also shows why the floor-standing heater’s base alone is not a complete measure of the space it needs. Compare both drawings at the same scale so that differences in presentation do not make one arrangement appear more spacious.
Compare the options against four practical questions: does the model permit that mounting format, can the structure support it as specified, do all clearances fit, and is there a usable route around the benches and entrance? A wall-mounted heater is not the better choice if its support or clearance requirements do not work; a floor-standing heater is not a better choice if its zone blocks access. If neither fits, revise the layout within the manufacturer’s requirements or consider another approved model. Do not make either option fit by reducing specified clearances.
Frequently asked questions
Does a wall-mounted sauna heater always create more usable floor space?
It may leave the floor beneath the heater unobstructed, but the heater body, any specified guard and required clearances still affect the layout. That space is not automatically suitable for walking, standing or storage. Check the manufacturer’s requirements and assess the route past the heater alongside the benches and entrance.
Can a floor-standing heater be mounted on the wall instead?
Only if the manufacturer specifically approves that mounting arrangement for the exact heater and configuration. A separate bracket does not make a floor-standing model suitable for wall mounting. Check the model’s instructions and have the proposed support assessed by a qualified professional.
Can I mount a heater on any sauna wall?
No. The wall structure and specified fixing arrangement must suit the complete installation; the visible lining alone does not prove that it can provide suitable support. Check the manufacturer’s requirements with a qualified installer before fixing the layout or finishing the wall.
Are heater clearances the same for every model?
No. Use the clearances and measurement points in the documentation for the exact model and approved configuration. Do not transfer a distance from another heater or assume that a guard or different mounting position changes the required space.
Which format works better in a small sauna?
Neither format is automatically better. Wall mounting may preserve some floor area, while a floor-standing model needs a defined base area. Compare each heater’s complete clearance zone with the cabin’s measured dimensions, support and bench layout; choose only a configuration that fits as specified.
The right format is the one that fits the complete room plan and the heater’s documented installation requirements. Wall mounting may preserve some floor area, while a floor-standing heater occupies a defined base area; both depend on suitable support, clearances and access. Once the exact model, room dimensions and bench positions have been checked together, the layout—not a general preference for one style—can guide the choice.
