
Designing a Coherent Minimalist Garden Around a Pergola
Garden design
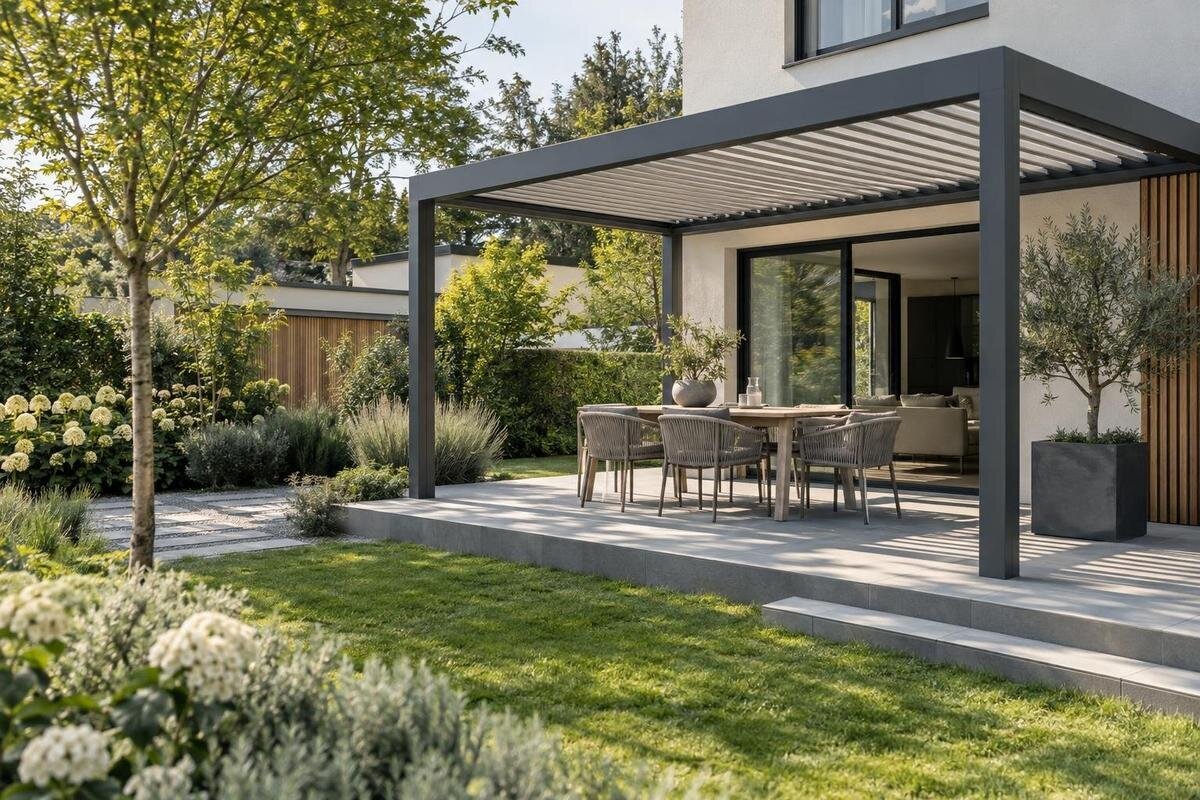
A minimalist garden is not defined by how much paving or planting it leaves out. It feels coherent when the pergola, outdoor room, planting edge and route through the garden belong to one plan. Picture a rectangular terrace beside a house: a pergola marks a dining area, a direct path stays open between the door and lawn, and one planted border frames the outside edge. The sections below follow that arrangement, showing how lines, materials and junctions can support it without adding competing features.

Before choosing a pergola 1
Choose one organising line
Choose one line that already makes sense on the site: the long edge of the house, the direction of the terrace, or the route from a door towards the lawn. In the example, the façade and terrace edge position the dining pergola, while the walking route passes beside the table rather than through it. A planted strip along the far edge frames the space. This hierarchy gives each feature a job without making the garden feel busy. It avoids adding another focal point, a second paving pattern or a row of unrelated pots simply to make the layout feel finished.
Put existing features on the first sketch: doors, windows, steps, established trees, boundaries and the route to the lawn. Once a candidate such as Bloomcabin Pergola is under consideration, mark its confirmed footprint on that plan rather than drawing a generic rectangle. Check how its orientation relates to the terrace and whether the passage remains straightforward. A coherent composition can be asymmetrical; the important point is that each offset has a reason. If two strong lines compete, choose which one should lead and let the other sit quietly in the background.
Size the pergola around the dining area
Measure the terrace and proposed pergola position rather than estimating from a seating plan. Mark the structure’s outside dimensions, support positions and the space intended for use separately, then draw the table, chairs and any door swing. The listing for Bloomcabin Bioclimatic Pergola states a range from 9 to 24 m²; that figure does not show the proportions or support positions of the particular option you select. A dimensioned drawing of that configuration is needed to test the layout. Allow enough room for chairs to move so the dining area does not feel squeezed against the frame.
Think of the pergola as a defined outdoor room, not simply a rectangle on a plan. In this layout, the dining table sits within the frame, but the main route stays outside the chairs; a post or planter should not interrupt the natural line between the house and lawn. Trace ordinary movements on the drawing: approaching the table, pulling out a chair and carrying a tray. Measure the furniture you intend to use, since allowances depend on its actual size and arrangement. If the space only works when everything is pushed to the edges, reconsider the footprint or furniture layout instead of relying on a smaller drawing symbol.
Before choosing a pergola 2
Set the pergola’s relationship to the house
Decide whether the structure should read as attached to the house or as a separate element before setting the paving lines. A wall-mounted arrangement may make the terrace feel like a continuation of the house, while a freestanding arrangement has its own perimeter and a visible separation. Neither option automatically makes the garden more coherent. Consider the Bloomcabin Wall-Mounted Pergola in relation to the building’s openings and proportions; its suitability for the particular wall still needs assessment. For the dining area beside the house, align a clear pergola edge with an opening, wall line or terrace edge, then check the relationship from indoors and across the garden.
Map doors, windows, exterior lights, downpipes and regular routes before deciding how the structure meets the building. An edge that aligns with a doorway or wall, or maintains a consistent gap from it, is usually easier to read than one that nearly aligns but misses. If a wall-mounted arrangement is being considered, have the wall and proposed connection assessed for the specific site by a suitably qualified professional. For a freestanding layout, show the separation on the plan and decide whether the paving continues through it. Do not leave a thin, accidental strip to be resolved only once work starts.
Align paving with the structure
Use the house threshold or long terrace edge as a reference for the main paving lines. When planning around the Bloomcabin pergola model, place the paving pattern beneath its selected footprint on the drawing so you can compare the two geometries. Decide which paving line should align with the structure and where a consistent offset would be clearer. Not every joint needs to meet a support: forcing that relationship throughout can distract from the larger arrangement. The aim is a calm, continuous surface, with deliberate cuts at its boundaries rather than a grid that competes with the outdoor room.
Mark paving joints in relation to supports, steps and the edge of the dining area. A joint that finishes cleanly at a support, or continues in a clear rhythm, looks more considered than a very narrow leftover piece. Do not shift the whole pergola to rescue one paving line if that disrupts the route or its relationship to the house. Review the pattern at the entrance and at the garden edge as well. If the paving has a direction or repeating module, carry it far enough to support the main composition, then stop it at a clear boundary rather than introducing a second pattern without a purpose.

Before choosing a pergola 3
Repeat a small planting palette
A limited planting palette helps the border read as one part of the design. In the example, repeated groups along the outer edge give the dining area a clear frame, while open space beside the route keeps the planting from crowding the passage. Use a small number of forms and repeat them rather than filling every gap with a different plant. A taller group at one end can help define the area, provided it does not obstruct a route or compete with the pergola. The effect comes from repetition and placement, not from making every bed identical.
Choose plants using documented requirements for the actual site, including their needs for light, water and soil, as well as their mature height and spread. Draw them at a size that reflects their expected growth, not just the small size of a newly planted specimen. Keep access for routine care in mind and leave space between planting and paving where it is needed for maintenance. A restrained plan can still include variation in leaf shape or height, but those differences should support the same border rather than create a sequence of unrelated displays.
Draw the paving-to-planting edge
Show the boundary between paving and planting precisely, and place it on the same drawing as the pergola supports. If you are considering the bioclimatic pergola option, look closely at where the bed edge passes each support: does it continue in a straight line, turn a corner or stop before the structure? Choose a relationship that remains clear along the border rather than changing the edge around every element. Decide whether the finish will be a clean paving line, a separate edging strip or another defined treatment that suits the design. Keep that treatment consistent wherever the same surfaces meet.
Show changes in level and the finished edge on a drawing rather than leaving them to be interpreted on site. Consider how soil or mulch will be kept within the bed, how the edge can be maintained and whether the boundary needs to allow for access. Avoid placing plants where their mature spread will regularly spill across the walking surface. Where levels or water movement are difficult to resolve, have the site-specific detail reviewed by an appropriate professional. The aim is a neat transition that works with the rest of the composition, not a decorative strip added to hide an unclear junction.
Before choosing a pergola 4
Keep the route to the garden clear
Draw a direct route from the house to the lawn before arranging chairs, pots or planting. When considering the wall-mounted pergola option, distinguish the route through the terrace from the space used for dining; being close to the house does not by itself determine where people will walk. In the example, the path follows the open side of the table and remains distinct from the planted border. This arrangement lets someone pass without relying on diners to tuck in their chairs or move aside. Keep the route continuous at both ends, rather than providing a generous passage beside the table that narrows abruptly near the door or lawn.
Test the route with the furniture in its normal positions, including chairs pulled out and doors open. Include other regular destinations, such as a gate or storage area, if they are part of the garden. A path can be marked by a change in paving, a clear band through the same surface, or another feature already in the plan; it does not need an extra material merely to announce itself. Check that it remains legible from the house and does not end at a planter or an awkward corner. Keeping movement clear is part of the composition, not spare space left over after the objects are placed.
Limit changes in material and colour
Choose a small number of materials and give each one a clear role. In this layout, paving defines the main terrace, the pergola is the central structure, and the planted border marks the garden edge. The house remains part of the palette, so a finish that relates to its existing surfaces may be more coherent than introducing several new colours. Matching everything exactly is not necessary; the materials need to sit comfortably together and make the transitions easy to understand. Repeating one secondary finish at a boundary can link the areas without turning every detail into another feature.
Check material and colour samples beside the house and paving, rather than judging them separately or relying only on a catalogue image. Compare them where the structure is planned, since the surrounding surfaces affect how a finish reads. Keep the strongest contrast for a useful distinction, such as the boundary between the terrace and planting, rather than repeating it at every edge. If a chosen finish cannot be confirmed from the supplied product information, ask for its documented specification before making it part of the palette. Restraint comes from limiting changes and using them consistently, not from assuming all materials must be the same.

Before choosing a pergola 5
Resolve the structure’s visible junctions
The small meeting points often determine whether a restrained design looks complete. Mark where the supports meet the paved area, how the pergola edge relates to the planted border and where the paving finishes beside the house. When comparing a model such as Bloomcabin’s Bioclimatic Pergola, review these junctions as part of the overall layout rather than treating them as separate finishing decisions. Enlarge the relevant parts of the drawing and label the intended boundaries and finishes. This makes it easier to see whether a paving joint, bed edge and support form one clear meeting point or leave an awkward sliver between them.
Include existing services and any proposed fittings in the plan where they affect the composition. If the design includes a drainage route, light fitting or irrigation line, decide where it belongs and make sure the relevant access is not hidden beneath permanent furniture or dense planting. This is a coordination point, not a reason to add visible equipment everywhere. Keep the number of trim materials and small features low, and make any necessary change of finish happen at a clear boundary. A clean junction is usually the result of deciding how elements meet in advance, not of adding a cover strip after the main layout is complete.
Test the complete layout on a drawing
Bring the house, pergola, furniture, route, paving pattern and planted bed together on one dimensioned plan. For a proposal using the Bloomcabin Wall-Mounted Pergola listing, identify the selected configuration clearly so that everyone reviewing the layout is considering the same option. Keep a record of the decisions already made: the main alignment, the dining position, the paving direction and the extent of the border. Then check whether they still work together. A change to one element should be assessed against the whole plan, rather than accepted because it improves an isolated detail while weakening the overall arrangement.
Use the drawing to review both the whole composition and its junctions: the route from door to lawn, the space around the table, the edge of the planted bed and the line where structure meets paving or house. Documented planting requirements help keep the planting plan grounded in the site, while measured furniture and structure dimensions make the layout easier to assess. Where a connection or level change needs technical review, involve a suitably qualified professional. If an element does not fit, adjust the plan and review it again; adding another feature rarely resolves a basic conflict between lines, movement and space.
Frequently asked questions
How can a minimalist garden feel welcoming rather than bare?
Use a few repeated plants and materials with different textures, rather than filling every gap with another feature. In the example layout, the dining area, clear route and planted edge give the garden purpose while leaving open space between them.
Should the paving continue beyond the pergola?
It can, particularly where a continuous surface makes the route from the house to the lawn clear. If the paving stops, give its edge a deliberate finish and show where the next surface begins. The site and layout determine which arrangement reads best.
How many plant varieties should I use?
There is no fixed number. A limited group repeated along the bed usually gives a more unified effect than a different plant in every gap. Choose varieties using their documented requirements and mature size, then leave room for access and maintenance.
Can a pergola support line up with a paving joint?
It may be possible, but do not assume the support positions can be changed to suit the paving pattern. Put the selected structure’s dimensions and support positions on the same drawing as the paving, and have the detail reviewed by the relevant professional.
Is a wall-mounted pergola always the best choice beside a house?
No. The relationship depends on the building, openings, intended route and overall layout. A product’s wall-mounted name identifies its type; it does not establish that it suits a particular wall. Confirm how the pergola would meet the wall at your site before settling the plan.
In the worked layout, the pergola defines the dining area, the path remains clear, planting frames one edge and paving meets each boundary deliberately. Those relationships do more for a minimalist garden than a collection of isolated design features. When the structure, surface, planting and route are drawn together, the finished space can feel simple because its practical details have already been considered.
