
How to Design a Pergola for a Traditional Brick Home
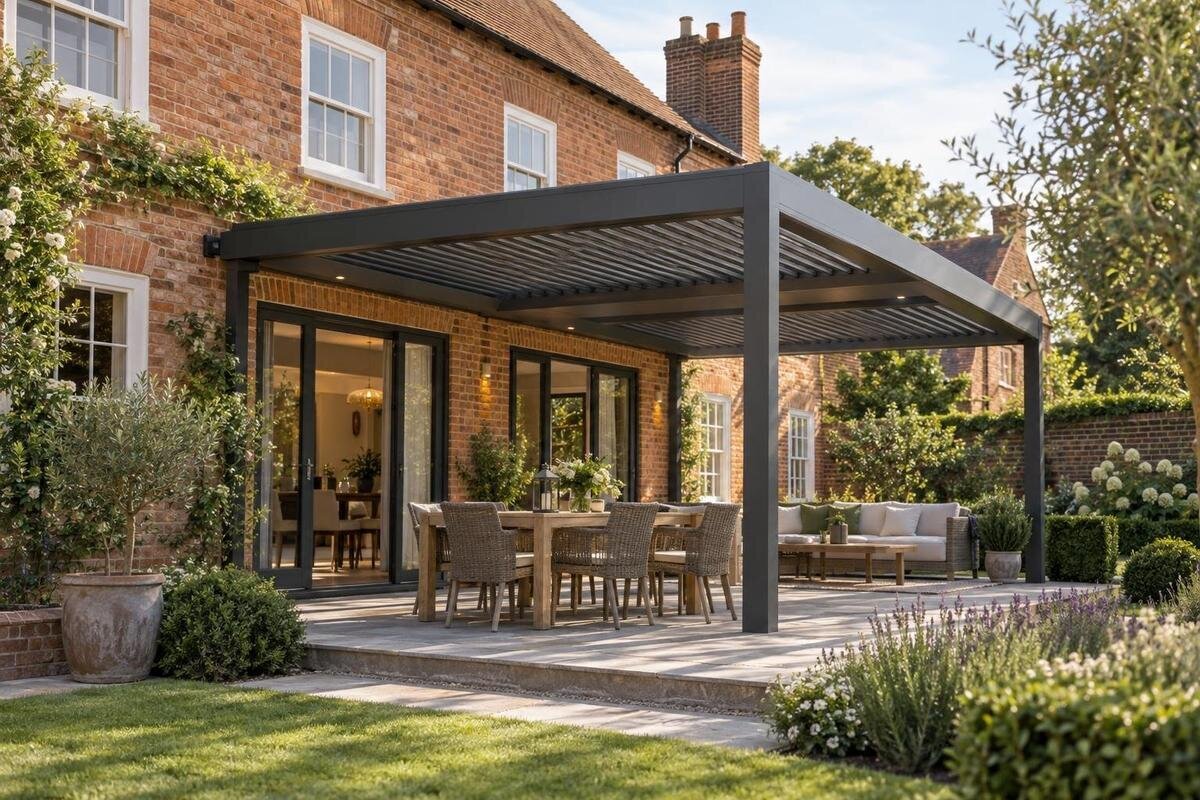
Pergola design
A pergola beside a traditional brick home should look planned with the house, not simply chosen to match its colour. Brick brings a textured surface, strong joints and a clear pattern of openings; a pergola adds a lighter frame and another line against that pattern. A convincing design relates the two through scale, post positions, roof outline, frame finish and the transition from doorway to patio and garden. Start with the house elevation and the space people actually use, then test the idea in a measured drawing. This keeps the pergola visually connected to the home without imitating its masonry.

Identify the house’s main architectural lines
Traditional brick houses do not all share one architectural language. Some have a simple rectangular façade and modest eaves; others include projecting gables, deep reveals, prominent lintels or strong window divisions. Read the actual house rather than applying a period label. Note the eaves, the head and sill lines of nearby windows, the doorway, any columns, and the proportion of solid brick to glass. Look at whether the masonry reads as a broad plane or is broken up by projecting details, and whether window frames or rainwater goods already introduce another material. These elements show where the pergola can sit comfortably and which existing lines it might acknowledge. The aim is not to copy every detail, but to make the new frame feel intentional beside the brickwork.
View the proposed area from the patio, garden and rooms that face it. A roof edge that seems balanced from the lawn may cut across a window when seen indoors, while a post can interrupt a familiar route. Photograph the wall straight on and from the angles people actually use, then note the main sight lines and the parts of the façade worth keeping visible. One clear relationship, perhaps a beam aligned with the eaves or the top of a broad opening, usually reads more quietly than a frame trying to follow every brick course. If the home already has a porch, veranda or projecting bay, decide whether the pergola should relate to it or remain visually separate. A second roof line should look deliberate, not accidental.
Plan the transition from doorway to patio
The connection between house and pergola begins at the door, not at the structure’s outer edge. Mark the path between the doorway, dining area, garden gate and any route used to carry food or move furniture. Note how each door opens, where a screen or shutter operates, and whether people routinely pass close to the wall. A post or furniture zone that makes a familiar route awkward can undermine an otherwise well-proportioned design. Draw the usable circulation before setting the frame outline; this also clarifies whether the covered area should sit directly outside the main opening or leave part of the patio open.
Record the existing paving pattern, joints, edges, changes in level and drainage points before fixing the pergola’s position on the plan. Where an outer beam or post line can follow a main paving joint, the meeting may look intentional; do not force that alignment if it narrows a route or clashes with the patio layout. Decide whether the change from indoor floor to patio should be emphasised with a border or kept visually simple, using the home’s existing materials as a reference. Any changes affecting levels or water flow should be resolved with the appropriate designer or installer. The concept can show these relationships without prescribing construction details.
Relate the pergola’s proportions to the brick elevation
Scale is a relationship, not a universal height or footprint. A narrow frame can appear insubstantial against a wide brick elevation, while heavy-looking uprights may compete with closely spaced windows. Compare the overall height, clear span and depth with the façade’s main bays, the door group and the area you want to use. Check the roof line from the garden as well as from the doorway: a broad projection changes the balance of a low wall differently from a compact frame. The furniture arrangement helps define a useful footprint, but should not dictate the outside proportions on its own. Review the near edge and outer corners from several viewpoints. The pergola should leave the house visually legible while giving the patio a clear form.
Use a measured plan rather than estimating from a photograph. Mark the wall, openings, patio edges, intended furniture and likely post positions, then compare the drawn outline with the elevation. The Bloomcabin Pergola listing gives an area range from 9 to 24 m². Treat that as a broad product reference, not a complete dimensional answer: area does not show the exact width, projection or post layout of a selected configuration. Confirm the dimensions for the model under consideration and place them on your site plan before judging fit. Check how the chosen outline relates to the windows, eaves and available circulation, not just whether its stated area sounds suitable.
Place posts around openings and routes
Position supports in response to both the elevation and the way people move. Mark doors, windows, garden gates, steps and the furniture route before fixing a post line on the drawing. A post near the edge of a window bay can look purposeful; one sitting in front of glass or narrowing a path can feel accidental. Repeating the rhythm of the wall is an option, not a rule: forcing uprights to line up with every brick pier or window division may create a cluttered pattern. Check views from the dining table and the principal room, and make sure the support layout does not obscure a feature the household values. These checks can lead to a small change in the outline before other details are settled.
Freestanding and wall-mounted arrangements create different visual relationships. A freestanding frame has its own perimeter and can sit apart from the wall; a wall-mounted form visually continues from the house and makes the meeting with the brick more prominent. This is a design distinction, not a guarantee that either layout suits a particular building. The Bloomcabin Wall-Mounted Pergola listing identifies a product type to review, but its suitability depends on the actual wall, opening layout and site. Have a suitably qualified designer or installer assess the proposed connection and any relevant constraints before selecting it. Compare both layouts on the same elevation so their visual weight is easy to judge.

Choose a roof outline that sits comfortably beside the house
The roof outline often has more visual influence than the frame colour because it crosses the house elevation and forms the ceiling of the outdoor space. Compare its front edge with the eaves, lintels and the main door or window heads. A pergola does not need to copy the house roof pitch to belong beside it; a simpler, lower outline may provide a deliberate contrast. Consider how the roof pattern appears from below and from upstairs windows, if visible. Repeated rafters, slats or a solid-looking edge produce different levels of visual detail, so choose a pattern that sits comfortably with the brickwork rather than adding another competing grid. The outline should also make sense from the garden, where the pergola may be seen against the full elevation.
If you are comparing open rafters, fixed slats or an adjustable-louvre format, use the roof drawing and product information for the chosen model rather than inferring its arrangement from a name or lifestyle image. For the Bloomcabin Bioclimatic Pergola roof configuration, consult the product page and confirm the details of the option under consideration. Compare the roof pattern and edge with your elevation drawing, including the view from inside the house. The aim is not to choose the most elaborate roof, but to find an outline that relates to the brickwork and defines the patio clearly. Note any details that remain uncertain so they can be resolved before the concept is finalised.
Coordinate frame finishes with brick, mortar and joinery
Treat finishes as a relationship among several surfaces, rather than a search for a frame colour that imitates one brick. Brick faces vary in tone and texture, and mortar can be lighter, darker or more prominent than the units; nearby window frames, gutters, downpipes and patio paving add further references. A darker frame can define a clear outline, while a quieter finish may recede, but the result depends on the real materials and light at the site. These are visual effects to test, not rules. Decide whether the frame should echo an existing metal detail, contrast with the brick or act as a restrained link between wall and paving. The material’s apparent visual weight matters too: a fine, plain edge and a broad, strongly detailed edge will make different impressions beside the same masonry.
Compare a physical finish sample against the actual brickwork and mortar at more than one time of day, and look at it beside the paving and joinery as well. A small digital swatch cannot show texture, sheen or how a large frame will read at a distance. The Bloomcabin Pergola product page identifies the regular pergola model; confirm the precise finish information for the option you are considering, then judge that specification against on-site samples. Keep the visible elements coherent where the chosen product allows, and avoid introducing an unrelated accent solely to make the pergola stand out. A restrained contrast can give the brick house more definition without competing with its detail.
Resolve the junctions with brick and paving
Plan the meeting between frame, brick and paving as a visible junction, not as a gap to be improvised after the main design is chosen. On the concept, show where the structure approaches the wall, where its edge stops, and how the post line relates to paving edges and existing drains. Think about whether the junction can be kept visually tidy and accessible for routine cleaning. Also note where rainwater currently runs and where a new edge could affect the patio; the drawing should flag the question, not prescribe a drainage solution. This detail matters because a clean, simple outline can look unresolved if the wall-side edge, paving cut or post position appears arbitrary.
If the design proposes a connection to the house, the wall-mounted pergola product page helps identify the product category, but it cannot determine the correct detail for a particular brick wall. Existing masonry condition, concealed services, surface finish and water management all need site-specific review. Ask an appropriately qualified professional to assess the wall and proposed junction; do not select a fixing method from a photograph or assume that brickwork is uniform. For a freestanding layout, show the same care at the paving: post positions should be coordinated with joints, circulation and drainage features, while the supporting installation remains for the responsible professional to specify.
Include planting in the pergola layout
Carry the composition into planting and garden circulation. Draw the route from the patio to the lawn or gate, then show beds, existing trees and the space needed to use outdoor furniture. Planting can soften the transition between a rectilinear brick wall and an open frame, but it should not be used to conceal posts in poor positions or a badly resolved wall junction. Allow for plants at their expected mature size, not only the size of a young specimen at purchase. A narrow bed beside the pergola may need a different selection and maintenance plan from a broad border beyond the patio; use reliable nursery or landscape information rather than estimating growth from a photograph.
Put planting locations and mature dimensions on the landscape drawing, and record the requirements for the chosen plants, including access for maintenance. Show which plants are new, which are retained and how their mature spread relates to posts, walking routes and the house. When reviewing the Bioclimatic Pergola listing, check the information on clearances and nearby planting for the exact configuration. Where a plant’s expected spread overlaps the frame or an access route, identify that overlap on the drawing for discussion with the designer or installer. This makes the planting plan useful for assessing the layout, rather than simply adding greenery to an illustration.

Test the design in an illustrated concept
An illustrated concept helps test whether the pergola and traditional brick home look like parts of one plan. Ask for a dimensioned site plan that shows the house wall, door swings, patio limits, existing paving joints, intended posts, furniture and routes. Add an elevation or straight-on photograph marked with the frame height, roof outline and the brick openings it relates to; a perspective view can then show how the composition reads from the garden. These views answer different questions: the plan tests practical use, the elevation tests proportion and the perspective tests character. A single attractive rendering rarely makes all three clear, so consider showing two layout alternatives at the same scale.
Include proposed finish references for the frame, brick and paving, along with a landscape plan that records planting positions and documented planting requirements. Mark what is measured, what is provisional and which dimensions still need confirmation; this prevents an illustrative line from being mistaken for a product specification. If the Bloomcabin Pergola range is on your shortlist, identify the exact option being discussed and compare its confirmed particulars with the drawing, rather than relying on an image for scale. A design consultation is more useful when the brief names your priorities, such as clear views, a defined dining area or a quiet wall connection, so the drawings can resolve trade-offs instead of presenting colour variations only.
Compare the final design and product options
Compare the final alternatives using the same plan scale, elevation and garden viewpoint. This makes differences in projection, support positions and roof outline easier to judge without being distracted by a more attractive rendering. Assess each option against the priorities in your brief: a clear view from the main room, space around the dining table, an unobstructed route to the garden or a restrained outline beside the brickwork. Where an option improves one priority but compromises another, record that trade-off. This gives you a practical basis for choosing between designs that may both look appealing, rather than allowing colour or presentation alone to decide.
Compare the shortlisted products against the chosen concept, focusing on dimensions, configuration, finish, installation requirements and any stated roof or maintenance details. If the Bloomcabin Bioclimatic Pergola is among your options, make sure the comparison drawing represents the exact configuration being considered. Separate differences that would alter the composition, such as the frame outline or post layout, from finish choices that can be assessed with samples. Keep unresolved product details clearly marked rather than treating them as settled features of the design. The final selection should preserve the relationships established in the concept: the pergola’s scale against the brick elevation, its position around openings and the connection between patio and garden.
Frequently asked questions
Should the pergola frame match the colour of the brick?
Not necessarily. Brick and mortar have their own variations, so an exact match can be difficult and may not create a convincing connection. Compare the frame finish with the actual brickwork, mortar, window frames and paving. A considered contrast or a link to another existing detail can work better than copying one brick tone.
How do I choose the right pergola size?
Measure the patio and mark doors, routes, furniture and intended post positions on a plan. Then compare the proposed width, projection and height with the house elevation. The aim is to fit the way the space will be used while keeping the brickwork and openings visually clear; an area figure by itself cannot settle the proportions.
Can a wall-mounted pergola be attached to any brick house?
No. A wall-mounted layout needs a site-specific review of the wall, its condition, the proposed connection and nearby openings or services. Ask a suitably qualified designer or installer to assess the particular house before choosing this arrangement. The visual fit of a product does not establish whether a connection is appropriate.
Does the pergola roof need to match the house roof pitch?
No. A pergola can relate to the house through its height, front edge and position without copying the roof pitch. Compare the roof outline with the eaves and window heads, and look at it from the patio and inside the house. The aim is a deliberate relationship, not an imitation.
What should an illustrated pergola concept include?
Use a dimensioned plan to show the wall, patio, openings, routes, furniture and post positions. Add an elevation or marked photograph to test the frame’s height and roof outline, plus a perspective view for the garden setting. Include finish references and a planting plan with documented requirements, and identify any dimensions that still need confirmation.
A traditional brick home does not call for a pergola that imitates its masonry. A stronger design respects the house’s proportions, keeps openings and routes clear, and carries a considered relationship from the wall to the patio and garden. When a measured concept explains the frame, roof outline, finishes, junctions and planting, choices become easier to compare on their merits. The house remains the anchor; the pergola should read as an intentional outdoor space while leaving the character of the brickwork visible.
