
Planning a Pergola Extension with a Second Module
Pergola planning guide
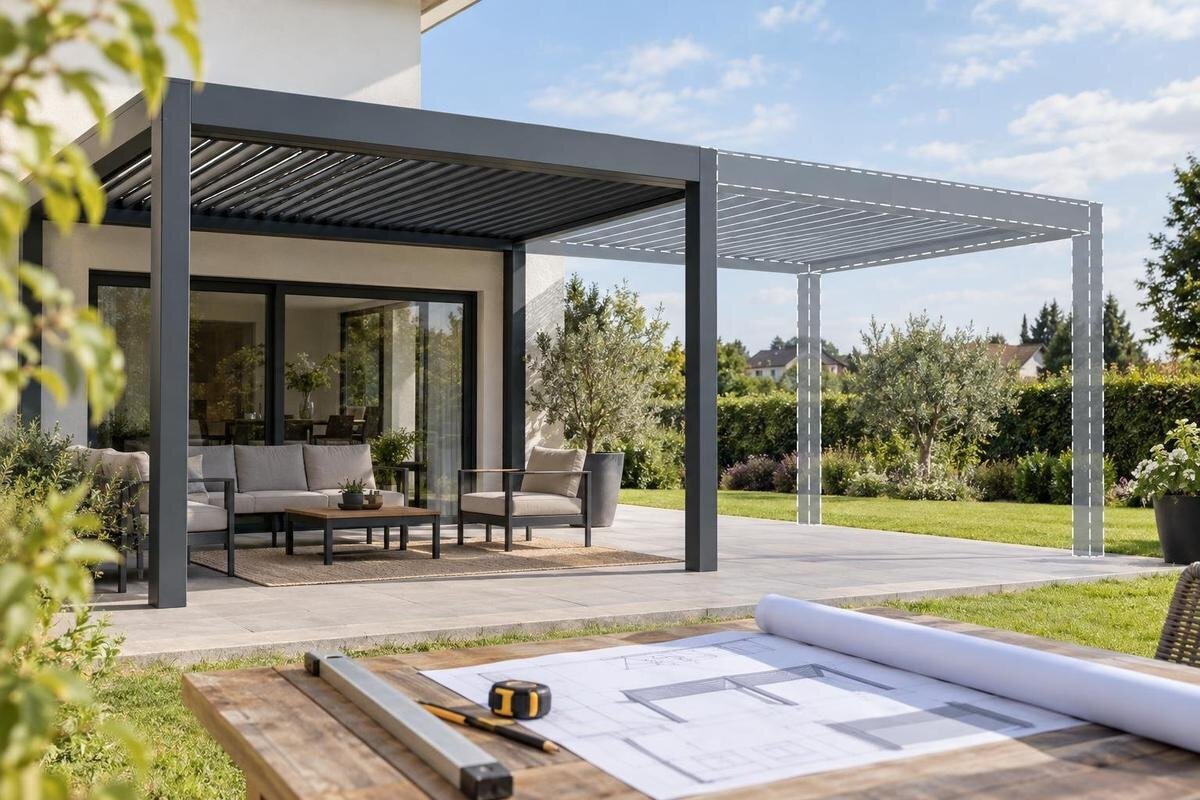
A second pergola module can be a practical way to plan a larger outdoor area in stages, but the word “modular” does not establish that a particular frame can be extended later. Compatibility depends on the approved connection, support positions, roof drainage, controls and what remains available when you are ready. This guide explains which drawings and written confirmations to secure before choosing the first unit.

What a future extension could mean
“Extend it later” can describe several different layouts. One may be a system designed from the outset as adjoining bays; another may be a second, complete pergola standing beside the first; a third may be a new bay physically connected to the original frame. These arrangements are not interchangeable. Two roofs can look continuous from below while having a gap, separate support lines or no approved structural connection. Ask for a drawing of the proposed arrangement and confirmation of whether it is one structure or two independent units. The word “modular” is too broad on its own: the drawing should show the exact model, orientation and shared edge you have in mind, rather than an illustrative arrangement from a brochure.
Physical connection, roof layout and controls are separate questions. A joined frame might be designed as one roof area, while a system could be divided into separately operated areas; a pair of stand-alone pergolas could also have separate controls without becoming one structure. None of those arrangements follows automatically from calling a product modular. In your brief, say which side the second module would meet, whether a visible gap is acceptable, whether supports may be shared or should remain separate, and whether each roof zone must operate independently. If you only need more covered area, a neighbouring unit might be acceptable. If you expect a continuous roofline or coordinated operation, make that clear before the configuration is quoted.
What an approved connection drawing should show
An approved connection is more than two products that happen to sit next to one another. It needs written confirmation for the exact model, size, roof orientation and proposed join, including any shared beams, posts or connection parts. Dimensions or an attractive brochure image do not establish that a configuration is approved. The Bloomcabin Pergola product page lists an area range from 9 to 24 m²; that information describes the listed range, not whether two units can be joined or whether the largest footprint can be formed by adding a module. Ask for confirmation tied to the model and options on your quote. If revisions exist, have the supplier name the relevant version rather than writing “same system”.
Request a combined plan and at least one section through the joining line, not just separate single-unit drawings. The plan should locate every post, the existing and proposed roof edges, the connection, overall finished dimensions and any new end or middle supports. The section should show how the roof edges meet and what the design assumes at that interface; notes should identify any approved connection components, if relevant. Have the supplier confirm that the drawing covers the exact orientation and options in the quote. A rendering can help with appearance, but it cannot show what is inside a joint or what the installer will supply. If the answer is verbal, request a revised drawing or written clarification attached to the project documents.
Plan roof drainage across the join
At the joining edge, confirm where water from each roof area is collected and discharged. A second module can alter the drainage route, outlet positions or access to a gutter, depending on the design; the first unit’s drainage plan does not necessarily cover the combined roof. If you are considering the Bloomcabin Bioclimatic Pergola, request a product-specific drainage plan for the proposed combination rather than relying on the model listing. It should show the roof edges, collection points and discharge direction, and make clear whether the modules have separate or shared drainage arrangements.
Have the designer or installer confirm where runoff will go and whether the site’s drainage arrangement can receive it. Pay attention to door thresholds, pedestrian routes, walls, lower paving and nearby boundaries; an outlet that works for the first roof could create a problem after an adjacent roof is added. Ask whether the route remains inspectable and whether the proposed join or a support post obstructs access. The aim is not to calculate flow yourself, but to have the combined layout and discharge point resolved before foundations and finishes are fixed. If more than one trade is involved, clarify who coordinates the drainage details.
Check foundations and support positions
The support pattern can change when another bay is added. Depending on the approved design, the new module might have its own post line, use a designed shared support or require a different arrangement; do not assume existing posts, a wall or the paved surface can support the additional structure. Paving, a deck or a slab can conceal what lies below, so appearance alone cannot establish what foundations are present. Have the combined design identify every support location, and ask an appropriately qualified professional to assess the existing base and ground against that specific proposal. A generic foundation rule cannot replace a site-specific review.
If the first phase will be built before the second, record the actual support and foundation positions, finished levels and any relevant buried services. The Wall-Mounted Pergola model page can identify the product under discussion, but it cannot establish whether your wall, paving or existing foundations suit a later connection. Ask for the original support plan and proposed final support plan to be reviewed together by an appropriately qualified professional. Keep the as-built record, not just the sales layout, and include photographs before paving hides the work. Do not pour extra bases from an indicative sketch alone; have the final configuration and site conditions assessed before committing to them.

Separate roof controls from structural connections
In this guide, a separate control zone means one roof area can be operated without necessarily operating another. That is different from structural modularity. A single engineered frame could be divided into separate operating areas, while two stand-alone pergolas might each have their own controls without sharing a structure. Conversely, a physical connection does not guarantee independent movement or any particular control arrangement. Ask for the proposed zones to be marked on a plan, with confirmation of whether the areas will operate together, separately or in a specified combination. If one area must remain unchanged while the other is operated, state that requirement before settling the configuration.
Product identity and control layout are different pieces of information. The bioclimatic pergola model listing does not by itself confirm how many control zones a proposed installation can have. Request a control plan for the combined arrangement: which module responds to each control, whether one command affects both, and what instructions will be supplied at handover. If independent operation matters because different parts of the patio are used at different times, make that a written requirement rather than assuming it can be added later. Also clarify who is responsible for any control connections and commissioning, and have that scope recorded in the quote.
Measure the combined footprint and clearances
Draw the enlarged roof outline and columns on a measured site plan, rather than simply placing two rectangles side by side. Include the existing wall, doors, windows, eaves, steps, paths, outdoor lights and access to the garden. Check the usable area at ground level: a new line of posts could end up in the middle of a route or where a table needs to stand. Note the finished surface levels too, since work completed in two phases can leave changes in level that affect movement and drainage. A plan of the combined footprint makes these conflicts easier to spot before the layout is fixed.
When comparing options on the Bloomcabin Pergola model page, use the listed area as a starting point, not a substitute for a plan showing the combined post and roof-edge positions. Mark likely furniture and circulation areas, then check whether a joining beam, outlet or additional post would occupy them. Compare the proposed roof edge with windows and doors: an extension may change daylight, views or shade in ways that are not obvious from the total area. Ask for the original and additional module to be shown on one site plan using the same reference points, with the finished dimensions and clearances made clear.
Confirm future supply and model compatibility
Compatibility is time-sensitive. Product names, options and available components can change, so being able to order a model today does not guarantee that the same configuration or connection parts will be available when you are ready to extend. Ask whether the supplier can quote or reserve the second module now, which parts are needed for the join, how long any written confirmation remains valid, and what happens if the exact model is discontinued. A catalogue listing is not a promise of future supply. Have the supplier state any availability period or conditions it is prepared to support, rather than relying on a verbal estimate.
Save the exact model and option details, quote date, drawings, connection information and correspondence. Record finishes and roof or control choices too, since a later alternative may not match the first installation. The Bloomcabin Wall-Mounted Pergola listing identifies a model, but it cannot promise future availability or compatibility. Before buying a later module, send the supplier the original records and current site information, then ask for a fresh confirmation that the proposed connection still applies. If a substitute is suggested, do not treat a similar appearance as proof that it fits; request a written comparison and an approved revised drawing.
Separate the first-phase quote from future work
Ask for the first phase and potential second phase to be set out separately. For the first quote, clarify whether it includes the module, any connection parts, foundations, drainage work, controls, drawings, installation and site preparation. These are questions to confirm, not standard inclusions to assume. For the later phase, ask whether additional site work, access, removal or reinstatement of paving, and a separate installation visit might be needed. A comparison of the two phases can show which items are included now, which are provisional and which would need a new quote. Keep any future estimate distinct from a guaranteed price or confirmed supply.
Put responsibility in writing: who confirms the connection details, whether the original supplier or installer needs to review later work, and how alterations would affect the terms for the original installation. Do not assume a future change is either covered or excluded; the answer depends on the project documents. If you are requesting a quote for the Bloomcabin Pergola, make sure it identifies the exact model, actual inclusions and installation scope. It should also state whether the second phase assumes an independent unit or an approved connection, so the basis of the quote is clear.

Keep installation records for the later module
If you install the first pergola now, include the future layout in the handover file. Keep the approved combined drawing, the as-built positions of posts and foundations, product and option details, drainage and control information, manuals and a record of any agreed changes. For a project involving the wall-mounted pergola model, save the listing alongside the exact configuration recorded in your quote. Photograph work before foundations or services are covered and before paving or finishes obscure support details. Check that measurements in the file reflect what was actually installed, rather than an earlier drawing that may have changed on site.
Do not cut, drill, remove or reposition structural parts to create a join unless the supplier and relevant design professional have confirmed that change in writing. If a later installer proposes an alteration, pause until the revised design and responsibilities are clear. Ask how any area intended to connect should be maintained in the meantime, and whether a future join needs particular access or parts kept available. Before the second phase begins, arrange a current site review: paving, services, walls or other changes since the first installation may affect the original layout. The handover record is useful evidence, but it does not replace a check of present conditions.
Check local approvals before treating expansion as certain
A second module changes the footprint and may affect how the project needs to be assessed. Before either phase, check what approvals, property permissions or insurance updates may apply with the relevant municipality, property owner, body corporate or estate manager, and insurer where applicable. The answer depends on the property and the proposed work, so verify it locally rather than assuming that approval for the first installation also covers a later layout. If a qualified professional needs to review the project, provide the combined drawing together with the support and drainage plans, not just a product image.
Treat the project as expansion-ready only when the written documents match: the exact model and connection, the combined support plan, the drainage route, the required control arrangement and the proposed installation scope. Future supply should also be addressed rather than left as a general expectation. If one of those points cannot be confirmed, design the first pergola to work as a complete stand-alone structure and treat any later addition as a separate project requiring its own review. That approach avoids relying on an unverified join when the site or product options may have changed.
Frequently asked questions
Can I attach a second pergola module to the first one later?
Sometimes, but it depends on whether the exact models and layout have an approved connection. Get written confirmation and a drawing of the combined structure, including its supports and drainage. Two pergolas that fit beside each other are not automatically designed to join.
Can two modules have separate roof controls?
Possibly, but control zones and structural connections are separate design questions. Ask for a plan showing which roof area each control operates and whether the areas can work independently. A physical connection alone does not confirm how the roof will be controlled.
Can the first pergola’s foundations support a later addition?
Do not assume they can. The existing foundation locations, construction and ground conditions need to be assessed against the proposed combined design by an appropriately qualified professional. Paving or a visible slab does not show what is beneath it.
Does a pergola’s listed area range prove it can be extended?
No. A product area range describes the listed model options; it does not confirm that two units can be joined or that a particular combined layout is approved. Ask for model-specific connection and support drawings.
What records should I keep after installing the first module?
Keep the approved layout, as-built support and foundation positions, product and option details, drainage and control information, manuals, and photographs taken before foundations or services are covered. These records give a later review more useful information than a brochure image alone.
Plan the possible addition while the full arrangement is still being designed: confirm the join, supports, drainage and controls before the first installation is fixed. If the supplier cannot document the exact connection and future supply, treat the first pergola as complete on its own. A later module can then be considered through a fresh design review rather than relying on a connection that was never confirmed.
