
Can a Pergola Feed Rainwater into a Garden Tank?
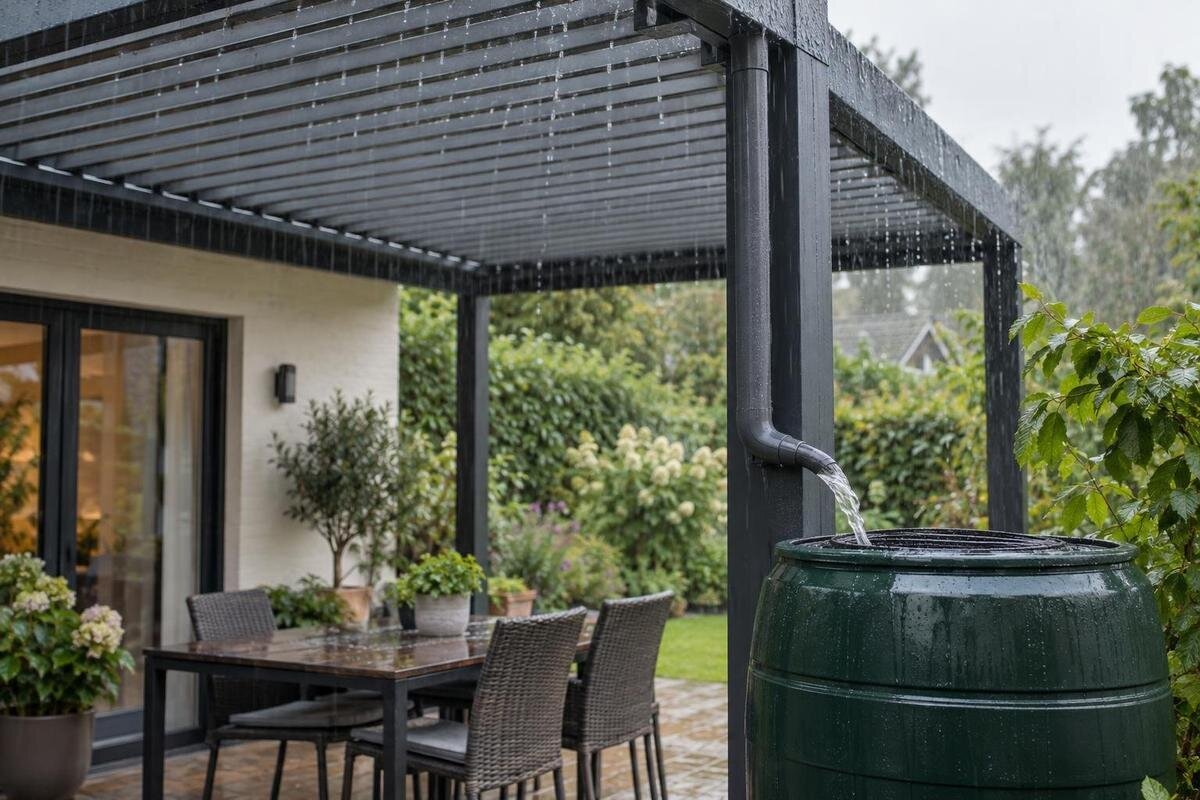
Pergola rainwater planning
Rainwater can be routed from a pergola into a garden tank, but only if the roof arrangement actually gathers it and the water has a compatible, documented outlet. A pergola is not automatically a rainwater catchment, and even a roof that sheds water may release it at points that cannot connect neatly to a tank. Plan the route from the roof to the outlet, into storage and then through a safe overflow before choosing tank capacity.

When a pergola can supply a garden tank
Rainwater can be sent to a garden tank only if a roof or canopy surface gathers it and guides it to a defined outlet. Being sheltered by a pergola is not the same as having a catchment: water may pass between open slats, blow past the roof or fall at several unconnected edges. A tank beneath a convenient corner collects only the portion that lands in its opening, not all runoff from the structure. Establish whether the chosen roof, in the position you expect to use during rain, directs water to a controllable discharge point. Some designs shed water away from the frame rather than channel it for storage, so confirm which behaviour applies and whether that outlet can accept pipework.
Separate this question from whether the pergola provides cover or keeps runoff away from a seating area. Neither a product name nor a photograph confirms a gutter, downpipe, outlet diameter or permitted tank connection. Request the exact model’s drainage diagram and installation instructions before designing the tank route. The Bloomcabin Wall-Mounted Pergola page identifies a model to discuss, but its name alone does not establish collection yield, tank compatibility or weather limits. Do not add a gutter, drill a channel or clamp a hose onto the structure unless its instructions allow it; an improvised change can interfere with intended drainage. Ask for written confirmation if a non-standard connection is proposed.
How the roof configuration affects collection
Roof shape and its position during rain determine what part of a surface can contribute. A fixed cover may funnel runoff only if it has a designed channel; open slats can let rain fall through; adjustable louvres may collect water only in a specified position. These are design possibilities, not guarantees for any named pergola. Read the operating instructions to learn whether the roof should be open or closed in rain, whether movement is restricted during wet weather, and where water leaves. Do not assume that closing louvres makes a structure watertight or that every drop from the roof reaches a gutter. Ask which operating position the drainage drawing represents.
Wind-driven rain, splash, changing roof positions and debris can make actual collection differ from the roof’s apparent area. Rain passing through gaps will not arrive at the outlet, and runoff may overshoot or spill if the outlet is not aligned with the channel. If you are considering the Bloomcabin Bioclimatic Pergola, ask for a drawing that shows its collection surfaces, operating position and discharge points. Check these details together: the catchment shown on the drawing needs to correspond to the roof position you intend to use. If controlled observations are provided, check that they relate to the same configuration; they explain observed behaviour, not a guarantee for every storm or wind direction.
Trace the route from roof to tank
Follow the water from the collection surface to the tank inlet, rather than checking only that both ends appear close. Identify the channel or gutter, the outlet, and any downpipe, channel through a post or external pipe between them. A structure may release water at one point, at several corners or along an edge; each arrangement changes where a tank could sit. Mark the route on a simple site sketch alongside walls, paving, doors and the proposed tank. This can reveal conflicts early, such as a discharge point on the wrong side of the patio or a pipe that would cross a doorway.
Check that the route can be supported and accessed for inspection, leaf removal and cleaning. Note every bend and level change: rainwater may not travel reliably through a pipe without suitable fall, so a competent installer should confirm the proposed arrangement. A tank need not be directly under the outlet if a properly planned line can carry the water to it, but distance and exposed joints add places for leaks or blockages. When planning a layout around the Bloomcabin Pergola, compare its drainage drawing with your site sketch to see where the pipe would run and which parts would remain accessible. Do not alter posts or channels to make a route fit without manufacturer approval.
Match the outlet to the tank inlet
The pergola outlet and tank inlet are two separate interfaces, so compare their actual specifications before buying fittings. Ask for the outlet’s shape, dimensions, position and intended direction of discharge, then check the tank’s inlet opening and the connectors it accepts. A structure may drain through a shaped or narrow outlet rather than a standard round downpipe; do not assume a universal gutter adaptor will fit. Also ask whether there is more than one discharge point and whether each has a prescribed route. Written dimensions and a drawing are more useful than a photograph or a verbal description.
Choose adaptors that preserve the designed outlet and do not obstruct the flow. Avoid squeezing a smaller hose over an outlet simply because it is available, or drilling and cutting the structure to make unlike parts meet. Ask whether an adaptor is approved and how it should be secured, especially if the pipe could be bumped during garden use. For the exact wall-mounted Bloomcabin model, request outlet details from the supplier and compare them with the tank manufacturer’s inlet specification. If an installer proposes a custom transition, have the supplier confirm that it will not compromise the pergola’s drainage arrangement.

Estimate how much water you can collect
Capacity depends on both catchment and rainfall. As a simple theoretical guide, 1 mm of rain over 1 m² of catchment represents 1 litre before losses. Use only the roof area whose runoff actually reaches the outlet, not the whole patio or the pergola’s nominal footprint. Then allow for rain that falls through open sections, blows off the roof, splashes outside the channel, or is diverted by a filter or first-flush device. This conversion is an upper-bound planning aid, not a promise of water in the tank; establish the effective catchment for the actual roof arrangement.
Compare that supply with the way you will use water and the rainfall pattern at your site. Monthly records are more useful than annual totals alone: a tank may not bridge a long dry period if it is sized around one large shower, while a small tank may fill early in a wet spell. Include the amount you can realistically draw down, not just a theoretical maximum. When comparing sizes on the Bloomcabin pergola product page, distinguish the listed footprint from the area that actually drains to the outlet. Choose storage after checking actual drainage and demand, and plan an overflow even when the tank seems generously sized.
Plan where excess tank water will go
Overflow is part of the storage system, not an optional extra. Every tank has finite capacity; once full, incoming water needs a route that does not back up into the pergola outlet or spill beside the tank. Decide where the overflow ends before installation, and check the route against walls, foundations, paths, planted beds and existing drainage on site. A discharge that looks harmless in dry weather can create standing water, wash soil away or make paving slippery during rain. Keep the destination visible and accessible so problems are not hidden behind the tank.
Ask the tank supplier or drainage installer what overflow fitting is provided and whether the route suits water arriving from the pergola outlet. Do not assume that a short flexible hose, a soakaway or a nearby stormwater connection will suit every site; ground conditions and local requirements vary. If overflow must cross paving or connect to a drainage system, have a competent local professional confirm the arrangement. Keep the outlet clear and inspectable, and avoid placing it where discharge will cause damage or a nuisance. The tank overflow route is a separate consideration from the pergola’s own drainage design.
Keep debris out and consider water quality
Roof runoff is not automatically clean because it looks clear. Dust, leaves, bird droppings, pollen and residue from surrounding trees or the roof surface can enter storage; the first water after a dry spell may carry a heavier wash of loose material. Fit a removable leaf screen or inlet filter suited to the tank and pergola outlet, and keep the tank closed as its manufacturer specifies. Screens catch larger debris, not dissolved substances or microbes, so they do not make collected water potable. If the roof or gutter has recently been cleaned, painted or treated, ask when it is appropriate to collect runoff again.
A first-flush diverter can route some initial runoff away from the tank, but the arrangement should suit the catchment and product instructions. It also needs to remain accessible for emptying and maintenance. Include access to gutters, screens, the diverter and tank opening in the layout, rather than hiding fittings behind a post or tight against a wall. Ask what roof and drainage materials contact the water and which cleaning products are compatible. This is particularly relevant if you plan to use the water on edible plants, around pets or on equipment; suitability depends on the materials and intended use, not simply on the fact that the water came from a pergola.
Choose a practical tank position
Position the tank close enough to keep the pipe run practical while leaving room to open its lid, inspect filters, reach the tap and remove sediment. Check that the tap and hose can reach the beds you intend to water, and that a gate, furniture or planting will not block access. Consider how the overflow route exits as well as how water enters. A tank tucked neatly beside the pergola can be inconvenient if it cannot be cleaned, if the hose cannot reach the garden, or if overflow falls where people walk. Leave enough clearance for delivery and future maintenance too.
A full tank is heavy and needs a firm, level base suited to the tank and site; do not use a pergola roof, beam or post as a stand, or assume existing paving is adequate. Have the tank manufacturer or a qualified installer specify the base requirements. If water is to reach a tap by gravity, check that the tank outlet can provide the height needed for the route; otherwise, ask an installer about a suitable pump rather than improvising one. For a layout incorporating Bloomcabin’s wall-mounted pergola, mark the tank base and maintenance clearances separately on your site sketch so that both structures have the space they need.

Decide what the collected water will be used for
Choose the tank outlet and location around an actual use. For garden watering, think about which beds need water, whether a hose or watering can is practical and how often you expect to draw from storage between rain events. This helps set a realistic capacity and shows whether the tank is worth the space. A tank that cannot be reached or emptied conveniently may stay full through later rainfall, sending water to overflow. Confirm that the intended use is compatible with both the collected water and the surfaces it has contacted; clarity and lack of smell do not establish water quality.
Treat untreated pergola runoff as non-potable. Do not drink it or use it for cooking on the strength of a clear appearance; potable use would require a suitably designed treatment and testing system for the catchment, with advice from qualified water professionals. Keep any system separate from drinking-water plumbing unless a plumbing professional designs and verifies an appropriate connection. If you are considering the model shown on the bioclimatic pergola product page, request written information about the roof and drainage surfaces that contact collected water. Use that information when discussing your intended use with the supplier or a water professional, rather than judging suitability from the water’s appearance.
What to confirm before buying
Before committing to a tank, assemble model-specific information: a roof or drainage diagram; the operating position for rainfall; the outlet location, shape and dimensions; permitted pipe connections; and maintenance or weather limits relevant to collection. Confirm what the tank inlet accepts, what overflow fitting it has and where that overflow can discharge. If the pergola has more than one outlet, ask whether all should be collected or left to their prescribed route. A clear written answer is more useful than a sales image, which can show a product but not the path water takes inside it.
Then mark the tank footprint, pipe route, filter access, tap and overflow destination on site. Have the connection and base reviewed before buying fittings or a tank, especially if the proposed pipe would require a modification to the pergola. Use Bloomcabin’s pergola listing to identify the model under discussion, then compare its drainage drawing and the tank’s specifications with your proposed layout. If the route is documented, compatible and maintainable, a tank can make use of the water that reaches the outlet. If not, treat collection as uncertain and choose a different documented catchment or drainage approach.
Frequently asked questions
Can I simply put a tank beneath the pergola’s edge?
Only if the outlet is directed into the tank inlet and the connection and overflow have been planned. A tank beneath a drip edge catches only the water that happens to fall into its opening; it does not collect runoff from the whole roof and may splash or spill. Treat that as incidental collection, not a dependable supply.
Will closing louvres make a pergola watertight?
Not necessarily. A particular roof’s behaviour in different positions and the route its runoff takes depend on its design and instructions. Ask for the model-specific drainage diagram and operating guidance. Do not assume that a closed position guarantees watertightness or that all water will reach an outlet.
How large should the garden tank be?
Base the choice on the area that actually drains to the outlet, local rainfall patterns, likely losses and how much water your garden can use. As a theoretical guide, 1 mm of rain over 1 m² represents 1 litre before losses. It is not a yield guarantee; plan an overflow even if the tank seems ample.
Is pergola rainwater safe to drink?
Do not treat untreated roof runoff as drinking water. Dust, leaves, animal droppings and roof or drainage materials can affect its quality, even when it looks clear. Potable use needs a treatment and testing system designed for the catchment, with advice from qualified water professionals.
What should I ask the pergola supplier for?
Request a drainage drawing, the roof position covered by it, outlet location and dimensions, permitted connections, and any maintenance or weather limits relevant to collection. Also check that the tank accepts the proposed inlet and has a suitable overflow fitting. A product photograph cannot show the route water takes inside the structure.
A pergola can feed a garden tank when its roof has a documented route to an outlet, that outlet can be connected as intended, and excess water has somewhere suitable to go. The useful amount depends on effective catchment, rainfall and garden demand, while the tank also needs a suitable base and access for maintenance. Treat untreated runoff as non-potable. The key question is whether the complete route can be installed, used and maintained—not simply whether a tank fits beside the pergola.
