
To improve the quality of the content of this website and to adapt it to the needs of users, cookies are used - including third-party cookies. By continuing to use this website, you agree to the use of cookies and to possible communication when you enter your contact information in one of the forms on the site.

Elegant wall-mounted pyramid greenhouse

Pyramid Greenhouse for Masonry Bases

  • Foundation of your choice
  • Durable premium construction
  • Ideal climate for your plants
  • Stylish architectural design
The greater the purchase, the bigger discounts you get.
Estimated delivery:
We offer the opportunity to CHOOSE A SUITABLE DELIVERY WEEK, which you will find in the last step of the shopping cart.
The greater the purchase, the bigger discounts you get.
Personal Bloomcabin consultation
Personal consultation?
We are happy to help with questions about models, prices and delivery.
+49 152 28196712

Elegant Pyramid Greenhouse for Masonry Bases

Bring natural harmony to your garden

Discover a distinctive approach to modern greenhouse design – the Bloomcabin Pyramid Greenhouse. Designed specifically for installation on a masonry plinth or another solid base, it combines timeless aesthetics with practical design. The result is a welcoming, natural setting that enhances any outdoor space. Ideal for gardeners who value quality, style and individuality.

Why choose the Bloomcabin Pyramid Greenhouse?

Designed for masonry bases:
This greenhouse is made for installation on a masonry plinth or a stable base of your choice. Whether natural stone, concrete or a custom-built wall, you determine the foundation and give the greenhouse a personal character.

Strong, durable construction:
Made with premium aluminium profiles and available with glass or polycarbonate glazing, the Pyramid Greenhouse delivers excellent stability and weather resistance for years of enjoyment in the garden.

Harmonious architectural design:
Its crisp pyramid-shaped architecture sits elegantly in any setting. Combined with a masonry base, it becomes an architectural focal point that complements patios, garden walls and timber features.

Ideal climate for healthy plant growth:
Its distinctive shape encourages natural air circulation and even temperature distribution, creating ideal conditions for vigorous, healthy plants throughout the year.

Straightforward, quick assembly:
Precisely pre-fabricated components and clear instructions make assembly uncomplicated, so you can soon start growing.

Direct from manufacturer – excellent value:
Buy direct from Bloomcabin and benefit from premium quality, durable materials and fair value without middlemen.

What our customers say 

“The greenhouse sits on a masonry base and looks fantastic—strong, elegant and perfectly integrated!” – Emily Clark
“A real garden highlight. The pyramid shape feels both modern and natural.” – Ethan Davies
“Very good quality and easy to assemble. Highly recommended!” – Chloe Brown

Convenient, secure payment options

Choose from several secure payment methods for a smooth ordering process.

Order now

Give your garden timeless elegance with the Bloomcabin Pyramid Greenhouse for Masonry Bases.
Order now for high-quality craftsmanship, reliable delivery and an architectural focal point for your garden.
More information
SPECIFICATION

Dimensions:

Greenhouse 235x235:

Roof apex: 270 cm

Wall height: 194 cm

Door height: 185 cm

Greenhouse 310x310:

Roof apex: 265 cm

Wall height: 194 cm

Door height: 185 cm

Greenhouse 310x385:

Roof apex: 269 cm

Wall height: 194 cm

Door height: 185 cm

Greenhouse 310x460:

Roof apex: 270 cm

Wall height: 194 cm

Door height: 185 cm

Materials:

High-quality aluminium profiles

Polycarbonate or 4 mm toughened safety glass

Doors:

Single or double sliding doors (walls at least 310 cm wide)

Features:

Strong profiles for maximum stability

Integrated gutters for efficient drainage

Integrated aluminium base for easy assembly

Warranty:

12-year extended warranty

Benefits:

Durability: Made from high-quality aluminium and toughened glass for a long service life.

Safety: Toughened safety glass helps create a safer environment.

Adaptability: Available in 6 sizes and various RAL catalogue colours.

Functionality: Integrated gutters and durable profiles suit all weather conditions.

Reliability: A 12-year warranty provides confidence and reassurance.

Bloomcabin Pyramid Greenhouse on a Masonry Base

Freestanding pyramid greenhouse on a masonry base of brick, natural stone or concrete

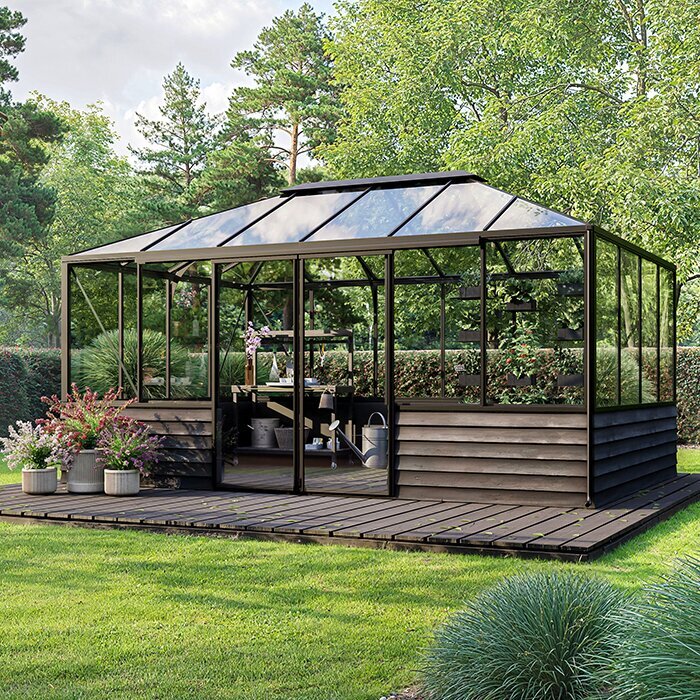
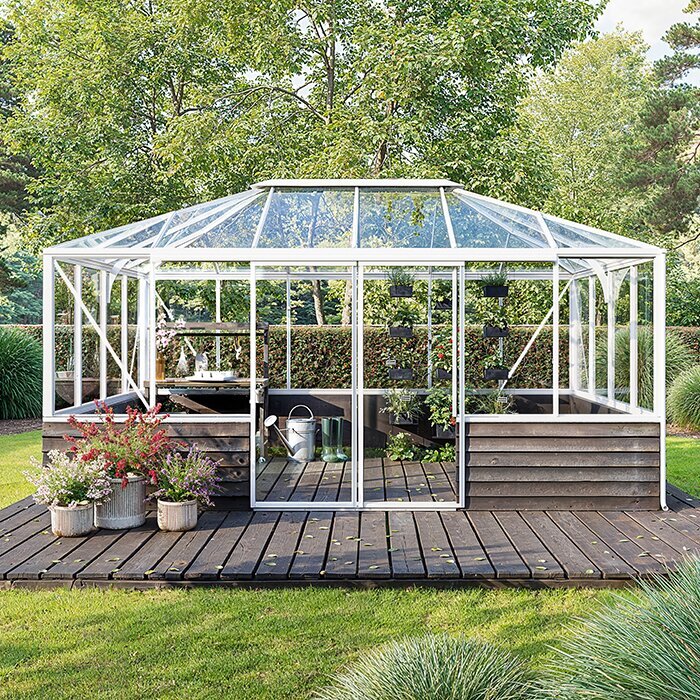
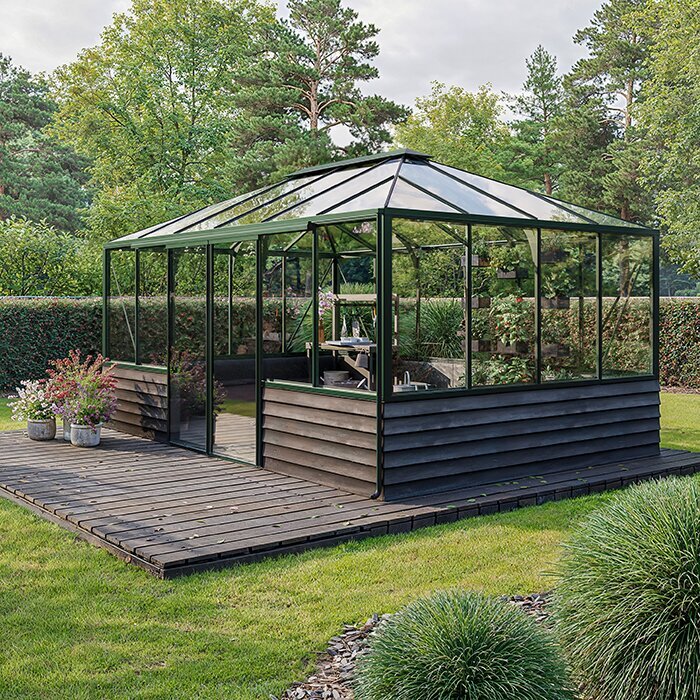
The Bloomcabin pyramid greenhouse on a brick base combines the striking form of a pyramid roof with a low, site-built base of brick, natural stone, concrete or another suitable material. The solid base visually frames the glazed aluminium structure and can echo materials already used on the house, patio or garden walls. As the masonry and greenhouse must fit exactly, the model, dimensions and door position must be confirmed before the base is built.

The current product configuration includes 6 sizes with an area of approximately 5.6–14.2 m². Choose from square footprints of around 2.35 × 2.35 m and 3.10 × 3.10 m, plus extended versions of approximately 3.10 × 3.85 m or 3.10 × 4.60 m. Powder-coated aluminium profiles are available with polycarbonate or 4 mm toughened safety glass. When choosing a size, consider walkways, planting tables, the door area and clear ventilation routes as well as floor area.

This model is entirely freestanding. The wall forms a low base for the independent roof, side and frame structure; no building wall is needed as support or enclosure. All sides should therefore remain accessible at the chosen site for light, installation and future care. Discover Bloomcabin South Africa.

Freestanding Bloomcabin pyramid greenhouse on a masonry base
Freestanding architecture with a bespoke base

The masonry base defines the proportions – the greenhouse remains freestanding

The symmetrical pyramid roof shapes every view of the greenhouse. Assess its position not only from the house, but also from the patio, garden paths and regularly used outdoor areas. This helps you judge how the door side, frame colour and base material will work within the garden.

The masonry base creates the lower, permanently visible level. Brick can reflect the house façade, natural stone can continue existing garden walls, while rendered masonry or concrete offers a restrained, contemporary appearance. As well as colour, brick format, bond pattern, joint finish, wall capping and path junctions shape the overall result.

The substantial base makes this version feel more like a compact orangery than a greenhouse glazed down to ground level. Its enclosed lower section also creates a calmer appearance, with plant pots, tools and watering equipment less visible from outside while the upper area remains light and open.

Made-to-measure masonry base

Choose brick, natural stone, concrete or render to suit house and garden

Striking pyramid roof

Roof apex approximately 2.64–2.69 m, depending on footprint

Flexible glazing

Polycarbonate or 4 mm toughened safety glass

RAL colour choice

Match the frame colour to masonry and façade

Coordinate material and colour

Choose the masonry base first, then frame colour and interior layout

The masonry base is built on site to the confirmed dimensions of the chosen greenhouse. The model, door position and finished floor build-up must therefore be fixed before work starts. Preliminary catalogue dimensions are insufficient: even small deviations can mean that the doorway, outer edges or fixing points do not fit the delivered structure.

For brickwork, assess brick format, bond, joint colour and frame colour together using samples. Natural stone can continue existing garden walls, but its uneven surface requires an especially carefully made, level wall top. Rendered masonry or concrete suits modern architecture. As colours and finishes can look different in daylight than indoors, view material samples at the intended site wherever possible.

Whatever visible material is selected, the wall top must be level, dimensionally accurate, continuous and load-bearing. Only then can the aluminium construction sit without distortion. Agree the width, capping and connection details before cutting bricks or building formwork; do not attempt to correct unevenness during greenhouse installation.

Pyramid greenhouse with masonry base
Four points before masonry work begins

Set out the footprint, door, bearing surface and water drainage first

The base fixes the final position of the greenhouse, door and internal paths. Set out the footprint at the site before excavation and masonry work. This reveals whether there is enough room for access with a wheelbarrow, plant containers or work materials, and for maintaining the outside faces.

01

Exact footprint

Transfer the confirmed external dimensions to the site and check right angles and diagonals. Mark the door side, nearby paths, beds and drainage areas at the same time. This lets you check space requirements and connections before excavation begins.

02

Door opening

Allow a clear, straight movement area in front of the door. A wheelbarrow, plant containers and work materials must move in and out easily; side shelving or beds must not restrict the passage or sliding area of the door.

03

Corners and junctions

Plan corners, door reveals and wall capping continuously so that no projecting edges hinder installation or later cleaning.

04

Drainage

When setting out, check where rainwater flows across the property. Arrange the door side, adjoining surfaces and any proposed storage tank so that the base is not in a low point and maintenance routes remain clear.

Key technical data

Technical data for the structure above the masonry base

Model overview

Square and extended footprints

Compact square models

Roof apex approx. 2.69 m; wall height approx. 1.93 m; door height approx. 1.85 m

Large square model

Roof apex approx. 2.64 m; wall height approx. 1.93 m; door height approx. 1.85 m

Extended models

Roof apex approx. 2.69 m; wall height approx. 1.93 m; door height approx. 1.85 m

Glazing

Polycarbonate or 4 mm toughened safety glass

Construction

Powder-coated aluminium frame with sliding doors, integrated gutters and a precisely planned connection to the site-built masonry base. The construction is designed for a wind speed of 30 m/s and a snow load of 210 kg/m². It requires a suitable load-bearing substructure and professional installation; foundations and masonry must be planned for the site.

Bloomcabin pyramid greenhouse on a low wall
Light and plant climate

Solid base below, light-transmitting structure above

The masonry base replaces part of the transparent area immediately above ground level. Above it, side glazing and sloping roof surfaces bring daylight into the interior from different directions. Low crops directly behind the wall may therefore experience different light conditions from taller plants in the centre.

Raised stands or shallow planting tables along the base suit low plants. To avoid additional shade in the base zone, arrange tall pots and densely foliaged plants closer to the brighter centre. Leaves should not rest permanently against glass or polycarbonate.

Orientation, season, plant height and base material affect conditions in different parts of the interior. Especially after introducing new crops, observe which areas dry out sooner or receive more shade, then adjust plant positions and watering accordingly.

Four typical uses

Four ideas for using the pyramid greenhouse on a masonry base

01

Kitchen-garden greenhouse

Coordinate the base material with vegetable beds and garden paths.

02

Flower house

Present seasonal flowers and selected ornamental plants attractively.

03

Space for tall plants

Arrange larger plants and climbing crops in the high roof space.

04

Green retreat

Depending on the chosen size, place a bench or a small table among the plants.

Masonry and architecture

The masonry base, door connection and interior arrangement should be shown in one coordinated plan. Along with the outside outline, include wall thickness, door area, paths, planting areas, water drainage and planned services. This exposes unsuitable junctions before the masonry and floor are completed.

Brick, natural stone, render or exposed concrete

Also consider how easily visible surfaces can be cleaned and repaired if necessary. Workmanship at door reveals, corners and wall caps should suit the selected material so that these highly visible areas continue to look neat over time.

Several visible edges meet at external corners and door reveals. Consistent joint lines, neatly finished caps and coordinated surface junctions are especially important there. Treat these areas as design focal points.

The height and lines of adjoining paths and beds influence how prominent the base appears. Continuous paving edges and clearly defined planting areas frame the structure; deliberate spacing lets masonry and frame remain recognisable as a coherent piece of architecture.

Door opening and floor junction

The masonry opening must fit the confirmed sliding door exactly. Set the width, height, side masonry connections and frame position before work begins. For double sliding doors, first confirm that wall width and chosen model are compatible. Later widening can damage the wall bond, finish and floor connection.

Internal floor, threshold and external path should meet without unexpected level changes. The finished build-up height, including base layers and surface finish, is decisive. Any structurally required threshold must be considered from the outset. A straight, adequately wide approach is especially practical for heavy pots or a wheelbarrow.

At the doorway, finish joints, edges and paving connections so that no unevenness projects into the sliding zone. Fixed fittings should remain sufficiently clear of the door track.

Internal floor and usable area

A robust, easy-care internal floor makes watering, potting and cleaning easier. Materials, substructure and joints must suit regularly damp use and should not encourage uncontrolled water pooling. Loose soil is easier to remove from a continuous surface than from hard-to-reach voids. Smooth finishes should still provide adequate grip for work in wet shoes.

Stone, paving or other suitable finishes can be coordinated visually with the masonry base. Do not fill the usable area entirely with fixed fittings: a clear central zone helps you turn with plant containers, clean the glazing inside and reach beneath roof surfaces. For direct planting in the ground, clearly separate growing areas and firm paths from the start.

Place frequently used work areas close to the door, water point and material storage where possible. This shortens routes for potting and watering without permanently occupying the open centre.

Foundation, water management and site

Foundation, drainage and ground conditions must be considered together. Before excavation, also plan access, storage areas and transport of the greenhouse parts. Narrow, already finished garden paths may be unsuitable for building materials or long aluminium profiles. A coordinated work sequence helps protect beds and finished surfaces during construction.

Frost and foundations

The low wall needs a load-bearing substructure suited to soil conditions and local frost depth. Made ground, slopes, clay soils or previous building work can affect the foundation. The construction must therefore be planned for the specific property; generic solutions are not enough.

Movement from frost or uneven settlement can alter the level bearing surface for the aluminium structure. Plan foundation and wall as connected elements. Where soil conditions are uncertain, obtain professional assessment before permanent masonry is built.

When planning the foundation, also allow for final levels of ground, paths and beds so that connections around the base can be made as intended.

Rainwater

Integrated gutters direct rainwater away from the masonry base. Their outlets must remain accessible and must not disappear behind dense planting or fixed fittings. Decide in the external layout whether water will be directed onward, collected or led to suitable drainage. Short, accessible pipe runs make cleaning easier.

A rain barrel or suitable tank can make collected water available for watering plants. The container needs a stable location without blocking maintenance routes. A lid keeps debris out, while a planned overflow prevents a full tank from spilling directly beside the base or door. Follow the tank manufacturer's instructions for frost periods.

Overflowing water must not collect against the masonry or in lower paved areas. A controlled outfall protects adjoining components.

Tall plants in the roof space

Climbing plants and larger specimens have room beneath the high centre of the pyramid roof. Plan supports early, without using the frame, vents or glazing as support. Freestanding or purpose-designed climbing structures guide shoots and can be removed when crops change.

A scale interior sketch shows where mature plants have sufficient height without narrowing paths. Include containers, saucers, planting tables and climbing supports. Compact crops usually suit edge areas, while upright plants can use the higher space in the middle.

Position tall plants so their containers remain accessible for turning, watering and removal. Available height alone does not determine whether an interior location is practical.

Interior and plants

Create separate layouts for summer and winter occupancy. In summer, spreading crops need more space; in cooler months, decide which containers need protection and where temporarily removed furniture will be stored. This lets you adapt the interior seasonally without starting from scratch each time.

Summer ventilation

The high pyramid roof provides substantial air volume but cannot prevent overheating on sunny days. Warm air must be able to escape through the intended openings while cooler air enters through the door and other ventilation routes. When and for how long to ventilate depends on weather and the plants inside.

Roof vents and sliding door should allow unrestricted air exchange. Climbing shoots, tall plants and fittings must not block these routes. Leave enough space between shelving and transparent surfaces for air to circulate and for condensation or plant debris to remain visible and accessible.

In strong sunshine, temporary shading can protect sensitive plants and make the space more comfortable. It must not interfere with vents, sliding doors or frame. An adjustable solution is more practical than permanent shading because light requirements change with season and planting.

Who is the masonry-base version for?

This version suits a long-term fixed location where the base is intended as part of the garden design. If the greenhouse is likely to be moved later, take the permanent substructure carefully into account.

Mark the proposed top level of the base at the site as a trial. This helps you assess before construction which garden areas will be screened, how the proportions look from seated height and whether the enclosed zone suits the intended use.

The project includes planning and construction of the foundation, masonry and floor connections as well as the greenhouse. The base version therefore suits projects where these trades can be coordinated in timing and expertise.

Electricity and water

It is best to prepare water supply, irrigation and lighting before the wall and floor are complete. First decide which connections are genuinely required and where they will be easy to use. A tap behind a raised bed or socket in a narrow doorway would later be impractical. Service routes must not interrupt the greenhouse bearing surface.

Conduits allow concealed service routes and easier future additions without opening finished masonry. Their endpoints should be marked, accessible and protected against soil or water. Record route and purpose on a sketch so concealed services are not damaged during later drilling or fixing work.

Water installations must be completed professionally, and electrical work should be handled by a registered local electrical contractor who confirms equipment suitability, protection, inspection, testing and any applicable Certificate of Compliance documentation. Electrical components must suit the location and be protected while watering or cleaning. Extension leads across walkways are unsuitable as a permanent solution. Water pipes should be isolatable and accessible for seasonal use.

Interior fitting, care and seasonal use

Divide the interior into circulation, work and planting zones. Provide fixed fittings only where they do not obstruct cleaning or seasonal rearrangement; keep other areas adaptable with movable furniture.

Shelves, worktables and raised beds

Worktables, shelving and raised planting areas can be arranged neatly along the masonry base. Match their dimensions to the door opening, paths and reach when watering. Excessively deep surfaces make rear pots and cleaning difficult; working height depends on whether the area is used for sowing, potting or simply placing plants.

Avoid creating a permanently damp, inaccessible zone between furniture and wall. Open bases make inspection and cleaning easier. Heavy supplies can be stored on stable lower levels, while frequently used tools can remain readily accessible.

Tall or heavily loaded fittings must stand securely on the intended floor and must not lean against glazing or frame. Position them so that the area behind can still be checked and cleaned.

Care of frame, glazing and masonry

Clean from top to bottom so loosened deposits do not fall onto areas already cleaned. Keep gutter outlets clear while working, then remove debris from wall caps and floor junctions as well. Follow the care advice for each material.

Keep the sliding-door track free of soil, leaves and plant debris so the door can operate without obstruction.

Check wall joints, surfaces and transitions regularly for cracks, loose material or persistently damp areas. Use gentle cleaning methods that do not attack the coating, glazing or joints. Remove deposits from gutters before they obstruct water flow.

Use through the seasons

In spring, the interior offers space for sowing and young plants. Clean tables and shelving before moving plants in so old plant matter does not remain in hard-to-reach niches. Even at low outdoor temperatures, clear days can warm the space quickly; ventilation and water supply should therefore already be working.

In summer, many crops take up more space than in spring. Harvesting, tying in and pruning should be possible without continually placing containers in the doorway. Keep a small work zone clear for these ongoing tasks and remove plant debris promptly.

In autumn, more room is often needed for sensitive container plants. Before moving them in, check light needs, plant condition and possible pest infestation. Movable containers and shelving make rearrangement easier. Gutters, door track and glazing can also be checked before wet weather makes work harder.

Preparing for greenhouse installation

The masonry base must be completely finished and checked before installation

Once model, footprint and door position are confirmed, the masonry base can be completed. Before delivery, remove loose building materials, scaffolding and unnecessary tools from the installation area. Protect finished paths and masonry surfaces so components can be unloaded safely and brought to the site.

At final inspection, measure length, width, height and both diagonals carefully. Because the roof surfaces meet above the centre, errors at the base can affect alignment of the entire frame. Deviations must not be corrected by forcing fixings into place. Record the measurements before installation begins.

Foundations, frost protection and drainage depend on the property and location. Before ordering materials or excavating, ask the relevant municipality whether plans or approvals are required for the greenhouse, base and intended use, and check boundary lines, existing services, level changes, title or estate conditions, and access for construction and maintenance. Use appropriately qualified professionals for specialist work.

The three construction types at a glance

Pyramid greenhouse on masonry base, standard version or lean-to greenhouse

Pyramid greenhouse on masonry base

A fully freestanding greenhouse on a low wall built on site. This version suits projects where the base material, garden paths and frame colour are deliberately coordinated, and where the additional work for foundation and dimensionally accurate masonry is planned.

Standard pyramid greenhouse

In this version, aluminium profiles and glazing extend to the lower area. It therefore appears lighter and more transparent; an individually built masonry base is not included. Choose the base version instead if you want an enclosed lower zone or a visual continuation of existing masonry materials.

Lean-to greenhouse

A lean-to greenhouse uses an existing building wall and has a one-sided roof form. Its location, connection and light are influenced by the house wall. It is not another name for the freestanding pyramid model on a masonry base, but a different greenhouse type.

Recommended sequence from selection to installation
1

Document the configuration

Record the chosen size, glazing, frame colour and door position in one agreed plan revision. Give this revision to everyone involved and do not replace it with older drawings for the foundation, masonry or installation.

2

Define responsibilities

Decide who will plan, carry out and inspect the foundation, masonry, floor, drainage and, where needed, services. Also identify interfaces with greenhouse installation so responsibility for wall top, door opening and gutter outlets is clear.

3

Approve interfaces

Before work begins, check together that levels, connections, service routes and accessibility match the same plan revision. Existing underground services must also be considered. Resolve open points before excavation or masonry creates irreversible constraints.

4

Prepare installation

After the completed base has been inspected, coordinate delivery, storage and installation sequence. Assemble the frame in line with the installation instructions; keep glazing and roof components protected until fitting and handle them carefully.

Frequently asked questions

FAQ – pyramid greenhouse on a masonry base

How much clear space should remain around the greenhouse?

There is no universal minimum dimension. Every side must remain accessible for installation, cleaning and inspection; the door, gutter outlets and work at roof edges also need sufficient room to move.

Who plans and builds the wall and foundation?

The wall and foundation are planned and built on site to the confirmed dimensions of the selected model. Those carrying out the work must be able to assess soil conditions, load-bearing capacity, frost protection and the required dimensional accuracy professionally. A universal base solution for every property is not part of the greenhouse construction.

Can the base material be matched to house and garden?

Yes. The essential point is that the selected construction is load-bearing and forms a level, dimensionally accurate wall top for the greenhouse structure. With irregular facing materials, the bearing surface must be made with corresponding care.

How do I find the right size?

Mark out the footprint of each version under consideration at the intended site. Allow not only for planting space, but also for the door area, paths, worktables and access to the glazing. This gives a more realistic view of usable interior space than external dimensions alone.

When must the glazing be chosen?

Choose between polycarbonate and 4 mm toughened safety glass together with size, frame colour and door position before final construction planning. For the masonry base, only the confirmed documents for the selected configuration are then authoritative.

Do the stated heights include the masonry base?

No. The wall and ridge heights in the technical data refer to the structure above the site-built masonry base. Overall height at the site is therefore determined only together with the base and final ground level.

Are double sliding doors possible?

Yes, with compatible walls from approximately 3.10 m wide. Confirm that the desired door configuration suits the selected size before building the opening. Then construct door width, side wall sections, threshold and floor junction as one coordinated detail.

How long is the greenhouse construction warranty?

The greenhouse construction has a 12-year warranty subject to the applicable warranty terms. Site-built elements such as foundation, masonry base, floor and external installations are separate and must be professionally planned, built and maintained for their respective purpose.

Bloomcabin Pyramid Greenhouse

Next step: coordinate configuration and base planning

Coordinate the selected configuration with the contractor and use the same confirmed plan revision for every trade. The following document list helps identify open interfaces before contracts are placed and work begins.

Bloomcabin South Africa

Keep these documents ready for coordination

✓ confirmed model drawing with footprint, glazing and door position

✓ foundation and masonry plan with build-up, facing material and wall top

✓ level plan for door opening, threshold, external path and finished internal floor

✓ measured survey of the finished base with length, width, height and diagonals

✓ drainage plan with gutter outlets, pipe route and overflow

✓ interior plan with paths, planting areas, shelving and connections

Close x
10 year warranty
Bloomcabin takes pride in its high-quality products and maintains these standards every day through a range of production and quality-control processes. This commitment is backed by a 20-year warranty against wood rot in timber structures and a 10-year warranty against functional defects.
45% BETTER PRICES WHEN YOU BUY ONLINE
Shopping online is convenient and cost-effective
Ask us!
Get in touch
Email:
This email address is being protected from spambots. You need JavaScript enabled to view it.
Reg. No.:
38944924
Address:
Thriges Plads 6, 5000 Odense C, Denmark
Social media
Follow us on Instagram, Facebook and Twitter to find out about news and offers from Bloomcabin:
X
Have questions and want us to call you back?
+27
−
✖