
Attaching a Pergola to an Externally Insulated Wall
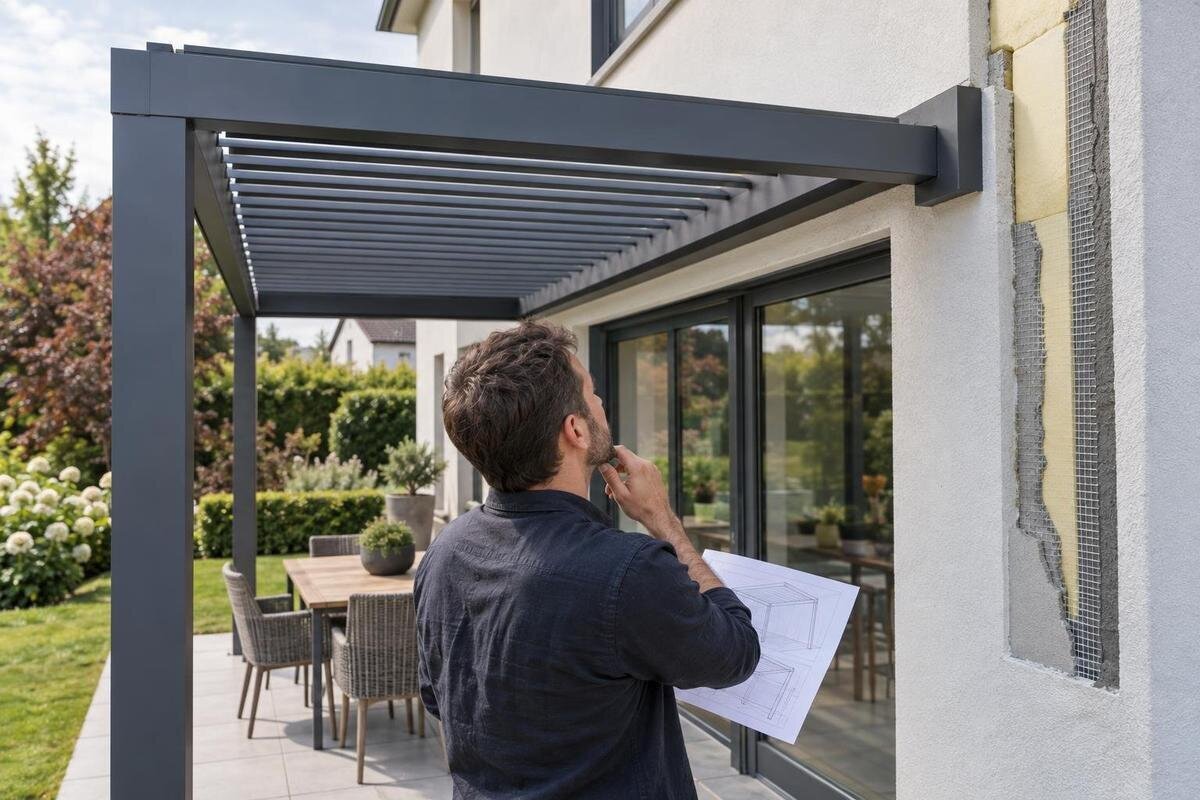
Pergola installation guide
External insulation changes how a pergola can be connected to a house. The insulation, render or cladding is not automatically a structural fixing surface, so the connection needs to reach a verified part of the wall while preserving the facade’s weather protection. The essential work is to identify the full wall build-up and obtain a connection design for the chosen pergola and the actual site—not to copy a generic drilling detail.

Why external insulation changes the connection
External insulation is part of a wall’s thermal and weather-protection build-up, not proof of a structural anchor point. It may sit behind render, boards or other cladding, and some insulation layers can compress under concentrated pressure. A pergola bracket can sit outside the finished wall, but its forces need to pass through the build-up into suitable structural material rather than relying on the insulation or finish. Rendered insulation, insulated cladding and a cavity build-up are not interchangeable details. The visible surface tells you little about the backing, cavity depth or bearing arrangement, so the appearance of a solid wall is not evidence that a fixing point is suitable.
A wall-mounted pergola also puts more than its own weight on the house. Its frame, and any roof or covering, can impose downward, pull-out, sideways and wind-related forces at the wall connection. Their effect depends on the product’s projection and support layout, the building’s structure and the site conditions. A sound design follows the load path from pergola to wall and onward through the building; it does not stop at the outer finish. This is why the question is not simply whether a bolt can pass through the insulation. A detail for plain masonry or another property cannot automatically be reused on an insulated facade, and a longer fixing alone does not prove the connection is adequate.
Identify the full wall build-up
Investigate the wall from outside in: render or cladding, insulation type and thickness, any battens or cavity, sheathing, and the masonry or frame behind it. The material and condition at each proposed fixing position matter, not just the insulation depth. A framed wall may have structural members behind a lining or sheathing; a brick-veneer wall has an outer leaf and a separate frame behind it. Renovations can also mean the current facade differs from the original plans. A front elevation or a note saying the wall is insulated usually will not show enough detail to select a connection.
Gather construction plans, renovation records and information about later insulation or recladding, then arrange for a qualified professional to confirm the wall build-up on site. Photos and records can narrow the search, but they may not confirm hidden layers, the exact location of structural members or the condition of the fixing zone. Do not use a guess based on the house’s age or a tapping test as proof. Give the exact pergola model to the assessor. The Bloomcabin Wall-Mounted Pergola listing identifies the product being considered; request its current mounting information and compare it with the verified wall assembly. Its name alone cannot confirm compatibility.
Trace the load path into the building
Trace a continuous load path from the pergola frame into its wall brackets, across any space occupied by insulation, and into verified structure. The structural wall must then transfer those forces through the building; the finish is not a substitute for this chain. Fixing locations matter because the supporting material may not be continuous where the pergola layout would ideally place its brackets. On a framed wall, for example, proposed positions need to be assessed against the actual structural members and backing. If those zones do not coincide with the chosen layout, they may constrain the mounting position or model configuration.
Different wall types require different evidence. For masonry, a professional needs to assess the relevant material, thickness, joints and condition; in a framed wall, the location and nature of the structural members and their relationship to the outer skin matter. With brick veneer, the outside leaf and the supporting frame are separate parts of the wall, so do not assume the outer brick alone is the right place to transfer a pergola load. If you are asking about the Bloomcabin Pergola, include its exact model and configuration in the design brief so the connection is assessed for that product rather than for a generic pergola.
Request a model- and site-specific connection design
A structural engineer or suitably qualified building designer can assess the wall evidence and specify the connection. The pergola installer can provide information for the chosen model, while a facade specialist can explain the existing wall system. Share the site location, proposed size and projection, support layout, roof configuration and position of each attachment, as well as the wall layers and substrate. The design also needs to take account of relevant site exposure and the condition of the building, not just a catalogue drawing. Clarify who is responsible for the structural assessment and who confirms the facade detail before work is booked.
Request a written, model- and site-specific connection drawing, not a generic sketch showing a bolt through a thick wall. It should identify the structural substrate, the proposed connection and its position, how the insulation layer is crossed without being treated as the anchor, and how the facade will be weather-sealed. It needs to correspond to the exact pergola configuration and state which assumptions must be checked on site. For the Bloomcabin Bioclimatic Pergola, request the relevant current model documentation, then have the responsible designer assess its connection against your actual wall. Keep the final approved drawing with the installation information.

Allow for stand-off distance and insulation compression
The stand-off is the distance the connection must bridge between the pergola support and the structural backing. External insulation places the support farther from that backing, which can change the leverage on the connection. The effect depends on the pergola geometry, the forces and the supporting material; insulation thickness alone does not determine a suitable fixing. When discussing the wall-mounted model listing with the designer, make sure the proposed support position is shown in relation to the wall layers. A longer bolt is not automatically an adequate stand-off system, and moving a bracket to a convenient spot may miss the structural zone.
The design also needs to prevent concentrated pressure from crushing the insulation or damaging render and cladding as the connection is tightened or loaded. A sleeve, spacer or another engineered component may form part of some wall systems, but the correct detail depends on the assembly and the pergola; it should be specified, not improvised with loose packing or whatever fixings are on hand. A conductive connection can create a local thermal bridge, so the designer should consider insulation continuity as well as structural performance. The wall finish must remain intact around the connection, with movement and material compatibility considered where relevant. Compression, rigidity and thermal effects need to be considered together.
Protect the facade’s weatherproofing
Every attachment passes through part of the facade, so weatherproofing matters alongside structural capacity. Depending on the wall system, render or cladding may be only the outer layer over a drainage space, membrane, flashing or seal. A penetration can interrupt those layers or create a path for water behind the finish if the interface is not detailed for that assembly. A bead of sealant on the outside is not a complete connection design by itself. The solution needs to suit the actual facade materials, shed water at the bracket and preserve any drainage routes the wall system relies on.
Coordinate the structural designer, pergola installer and facade or insulation contractor so each understands their part of the interface. Confirm who specifies the seal or flashing detail, who reinstates the wall finish, and who checks the completed work against the drawing. Ask whether future facade maintenance or removal of the pergola would affect the attachment detail. Keep the relevant product information, wall records and final drawings together. If the installer uncovers a cavity, membrane or cladding layer that differs from the assessment, the design should be reviewed before the connection is changed; an on-site guess can compromise both load transfer and water management.
Check the pergola layout against the wall
Wall construction is only half of the fit check. Map the proposed pergola position against doors and windows, eaves, gutters, downpipes, lights, vents and visible services. The designed bracket and beam positions need to work with usable structural zones while leaving openings, access and water drainage clear. The strongest wall zone may not line up with the preferred roof layout. Check the finished height and projection against the house, including window operation and external doors, and consider whether future access to gutters, service equipment or the wall will be obstructed. These are layout inputs for the designer, not details to resolve by shifting a bracket during installation.
Use model drawings rather than a product name or gallery image to understand the intended footprint and wall interface. The Bloomcabin pergola listing gives an area range from 9 to 24 m², but that figure does not show how a selected configuration will meet your wall or where its fixing positions fall. Request drawings for the exact model and compare them with measured site conditions, including openings, fascia and gutter locations. If the proposed mounting points conflict with a structural zone or an opening, the design may need another approved arrangement; do not assume that shifting a bracket keeps the original connection valid.
Consider an independently supported arrangement
If the structural backing cannot be confirmed, or the facade cannot accept a suitable connection detail, consider whether an independently supported pergola is possible. That avoids asking the insulated wall to carry the pergola, but it does not remove the need to verify that the chosen model permits the intended arrangement and that its post supports suit the site. A freestanding layout can change clear floor area, door access and the relationship to paths or other structures. Treat it as an option to assess alongside wall attachment, not a quick workaround for an unknown substrate. A wall-mounted product name does not mean the product can be installed independently.
For an independently supported option, establish the permitted support layout before comparing how it would fit beside the house. If you are considering the bioclimatic model listing, use its own documentation to confirm whether the intended arrangement is permitted. A qualified designer can compare that layout with a verified wall connection, including the space needed for supports and the effect on access. The choice depends on the product’s approved configuration, the available structure and the site layout, not on a general rule that wall-mounted or freestanding is always preferable. Avoid ordering on the assumption that a model can later be converted to a different support arrangement.

Coordinate the site assessment and installation
A coordinated assessment is easier when the owner, product supplier, installer and relevant building professionals are working from the same information. Provide wall plans and renovation records, photos showing the whole facade and proposed mounting area, known insulation details, and the exact model and configuration. Arrange for the person responsible for structural design to confirm the substrate evidence and prepare the connection detail. A facade specialist can address the weatherproofing interface, while the installer can confirm practical sequencing and access needs. Agree in advance which drawing governs the work and who must be contacted if the inspected wall differs from the assumptions.
For an installation enquiry about the Bloomcabin wall-mounted model, state that the house has external insulation and ask what wall evidence and model drawings are needed for an assessment. Include the insulation depth if known, but do not present it as a complete description of the wall. Before installation, compare the approved connection drawing with the inspected substrate and agreed pergola layout. If the cavity, backing, thickness or fixing position differs, pause for a revised detail. This hold point prevents an unplanned site adjustment, such as relocating a bracket or bridging a gap with an improvised component, from becoming an undocumented structural or weatherproofing change.
Questions to settle before attachment work begins
Before attachment work is booked, settle four practical questions: what structural material will support each connection, what evidence confirms that material and its condition, which drawing covers the exact model and configuration, and how the insulation and facade weatherproofing will be protected. Establish who signs off the connection and who reviews any unexpected conditions uncovered during the work. The design should make clear how the connection bridges the insulation and where the load is transferred. If these answers are missing, arrange a wall assessment rather than choosing a fastener based on insulation depth.
Keep a project file with the product identification, current model documentation, wall and renovation records, site photographs, structural assessment, approved anchoring drawings and agreed facade detail. Include the product listing for Bloomcabin Pergola as the model reference, alongside the drawings that define the selected configuration and connection. Record changes agreed after the wall is inspected, and make sure the installer has the final version of the connection drawing rather than an earlier proposal. Clear records help distinguish confirmed details from assumptions and resolve a mismatch before it is built into the wall.
Frequently asked questions
Can a pergola be attached directly to external insulation?
No. Insulation and the outer finish should not be treated as structural support. The connection needs to transfer loads into a verified part of the building through a detail designed for that wall, with compression and weatherproofing addressed. Whether that is practical depends on the wall assembly and the pergola.
Will longer fixings solve the problem?
Not by themselves. Length does not confirm what material the fixing engages, whether the connection can bridge the insulation, how pressure affects the wall layers or how the facade will remain weatherproof. A suitable designer needs to specify the complete connection for the verified substrate; guessing from insulation depth is not enough.
Can any wall-mounted pergola be installed on any insulated wall?
No. Compatibility depends on the wall build-up and condition, the location of structural backing, the exact model and configuration, and the site. A product label or generic installation drawing cannot confirm a suitable connection. Have the wall assessed and match it to a model-specific, site-specific detail.
What if I cannot tell what is behind the render?
Gather construction and renovation records, then arrange for a suitable professional to confirm the wall assembly on site. If the evidence is incomplete, they can advise what further investigation is appropriate. Surface appearance or a trial opening should not be treated as proof of the structural substrate.
Is a freestanding pergola automatically a safer alternative?
No. It can avoid loading the insulated facade, but only if the selected model permits an independent arrangement and its supports are designed for the actual site. It can also affect access and layout. Treat it as an alternative to assess, not a universal workaround.
An externally insulated wall can form part of a pergola installation only when the connection is designed around the complete wall assembly. Establish what lies behind the finish, identify the chosen model and obtain a site-specific detail that transfers loads into verified structure while protecting the facade. If those facts cannot be confirmed, pause the wall attachment and assess an appropriately designed alternative. The visible insulation finish, on its own, is never proof of a suitable fixing point.
