
Designing a Cohesive Minimalist Garden with a Pergola
Garden design guide
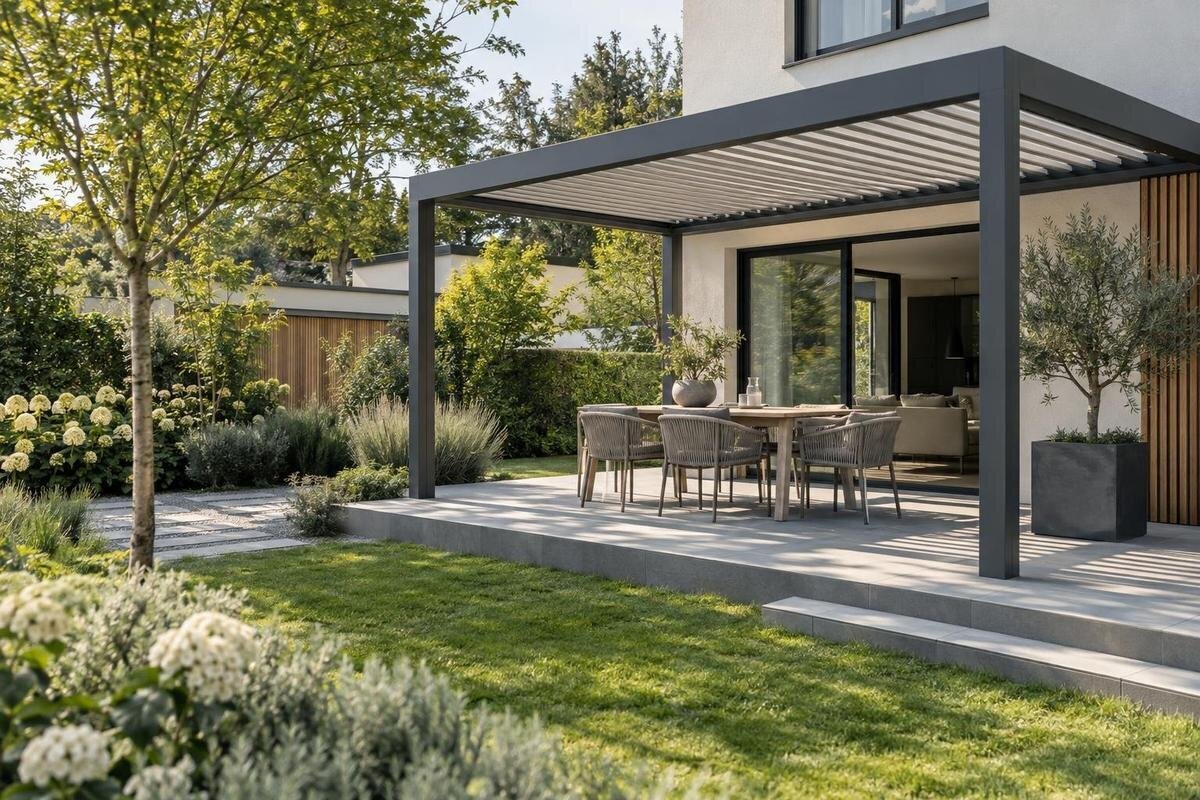
A minimalist garden with a pergola feels coherent when the structure, paving, planting and boundaries read as parts of one composition. That does not mean stripping the garden bare or repeating one finish everywhere. It means deciding which lines lead, leaving useful open space and resolving the points where materials meet. Plan the pergola alongside the paths, furniture, garden beds and views, then refine the surface and planting details around that arrangement. A dimensioned landscape drawing is more useful than choosing a frame from an image and trying to make the finished garden accommodate it.

Key checks before choosing 1
Choose an organising line for the garden
A minimalist garden is not simply a garden with fewer objects. With fewer competing forms, the main lines become more visible, so begin by identifying the strongest reference already present: the edge of the house, the view from a back door, or the route from the patio to a lawn or gate. Decide what should hold attention first. The pergola may define an outdoor sitting area, but it need not compete with a distinctive tree, doorway or view beyond. Check the proposed relationship from the rooms as well as from the garden; a composition that looks balanced from one spot can feel disconnected from another.
Use that primary line to organise supporting elements rather than forcing every feature into a rigid grid. The pergola might run parallel to the house while a path turns towards the lawn; the change in direction then needs to read as an intentional route. Repeat one or two lines in paving, a bed edge or a boundary detail, and leave other areas visually quiet. An offset can work when it responds to movement or a view, but a series of unexplained offsets may make a spare layout feel unresolved. Record the intended hierarchy on the plan so decisions about surfaces and planting can be tested against it.
Draw the full layout before choosing a pergola
Draw the garden as a whole before deciding on a model. A dimensioned landscape plan should show house openings, existing paving, boundaries, changes in level, trees to retain, service covers and the routes people already use. Add footprints for furniture, then allow for the space needed to move between a door, seating, lawn and gate. A simple elevation or section can reveal how the frame relates to windows, eaves and boundaries. This is a planning tool rather than a construction drawing: its value is that it exposes conflicts while the layout is still flexible, before paving and planting are set.
Plot the full proposed pergola outline and each support position, rather than a rectangle labelled only with its area. The Bloomcabin Pergola listing gives a range from 9 to 24 m², but area alone cannot show whether a chosen configuration leaves a clear route, usable threshold or enough space for planting. Check the exact configuration's current dimensions and layout information, then mark them on the landscape plan. Compare the footprint with door openings and furniture, and note anything still to be confirmed. Distinguish existing features from proposed work so you can see which parts of the layout are flexible. If two positions seem plausible, draw both over the same base plan rather than comparing separate sketches at different scales. This lets you judge what each option changes elsewhere in the garden, including the shape of the space left outside the pergola.
Key checks before choosing 2
Decide whether the pergola belongs against the house
Choose between a wall-mounted and a freestanding format by considering the relationship to the house, not by assuming one will look more minimal. A wall-mounted pergola places the building face within the composition and may sit close to a main opening. That makes the position of windows, doors, eaves and existing services relevant to the plan. A freestanding structure can define a separate garden area, but it still needs a clear visual or physical connection back to the house, perhaps through a path, a paving direction or a view. Neither format automatically creates a coherent arrangement.
For a wall-mounted proposal, record the relevant wall face, openings, gutters and external services so the design and installation can be assessed properly. Compare the Bloomcabin Wall-Mounted Pergola with this part of the plan, and confirm the selected model's dimensions and fixing requirements with current product information and a suitably qualified professional. Then consider how the area reads from indoors: does the pergola relate to one opening, span several, or sit noticeably to one side? An off-centre position can still feel deliberate when it follows the main route or seating area. For a freestanding alternative, examine the gap between house and structure as a usable part of the layout, rather than treating it as leftover space. Check that support positions do not interrupt routes, garden edges or a view you want to keep open.
Set the pergola's position and proportions
Judge proportion in both plan and elevation. In plan, consider the size of the covered area beside adjoining paving, paths and open lawn. In elevation, compare the frame's outline with eaves, windows, fences and mature planting. A pergola that reads as an isolated rectangle can look disconnected even when its finish is restrained. Carrying a line too far may instead crowd a window or compress a route. There is no universal ratio that resolves every garden; the useful test is whether the structure defines the intended area while leaving the rest of the landscape legible.
Mark support positions precisely enough to see what each one meets. In a pared-back design, a post near a paving joint, bed corner or window jamb can make a small mismatch conspicuous. Aligning a post with a joint may simplify the composition, but do not distort the paving pattern to force it. When considering the Bloomcabin Bioclimatic Pergola, use confirmed dimensions and support positions for the selected configuration to draw these relationships accurately. Choose which alignment matters most: a doorway, the outer paving edge or the centre of the seating area may each suggest a different position. Resolve that choice before adjusting smaller details. Where exact alignment is impractical, compare a clear separation with a near-match that might look accidental. Have site-specific structural and installation questions assessed by an appropriate professional before setting adjoining surfaces.

Key checks before choosing 3
Keep paving patterns connected to the structure
Paving can do much of the visual organising, so keep its pattern and boundaries legible. Select a principal direction or joint rhythm that supports the main route, then decide where a change of direction genuinely signals a threshold or separate use. Repeating every shape in the pergola across the ground is unnecessary; one clear relationship may be enough. Too many contrasting borders, inset bands and changes of joint pattern create competing lines. The aim is not a blank expanse, but a continuous surface that makes the sitting area, path and planted areas easy to read.
Set the paving module and edge with the pergola positions in mind. Check cuts around supports and thresholds on the plan so narrow leftover strips do not become an afterthought. Where the frame meets paving, a garden bed or lawn, decide what each line should do and make the transition deliberate. Record any level or water-management questions for the landscape designer or installer to resolve with the site details. Coordinating these decisions early avoids asking a paving pattern to disguise a layout that has not yet been settled.
Build a limited, repeatable material palette
A restrained palette still needs enough variation to distinguish planes. Begin with finishes that are already fixed, such as house cladding, brickwork, window trim, fences and existing paving, then choose a small set of supporting tones. One main ground surface, one structural finish and a limited accent can be a useful working method, not a rule. Repeating a finish in a few purposeful places helps the pergola feel related to the garden rather than like a sample chosen in isolation. Avoid making every planter, pot, accessory and border a separate statement.
Evaluate actual finish samples beside the house and paving, especially where two surfaces will meet. A small sample may look different from a large area, so check whether the intended contrast will remain clear across the composition. Consider texture as well as colour: two similarly coloured finishes need not look identical to belong together. Decide which surface should form the background and where a stronger contrast would help define an edge or structural outline. Keep that contrast selective rather than repeating it around every feature. Once your palette is defined, compare it with the confirmed finish details for shortlisted structures, including Bloomcabin's bioclimatic pergola option. Product photography can suggest a style, but it does not establish the exact finish or what is included. Record the chosen finishes together so later furniture and planter selections can follow the same palette.
Key checks before choosing 4
Plan planting by mature shape and clearance
Treat planting as part of the garden's structure, not a collection of separate specimens added after the pergola is positioned. A limited number of plant forms, repeated in considered groups, can make the space feel connected while leaving the main lines visible. Decide where a taller plant, lower planting or open area belongs in relation to the frame and the views from the house. Use documented mature dimensions for the plants you select; a young plant's current size is not a reliable guide to its eventual clearance. Record planting requirements and spacing on the landscape plan.
A crisp bed edge beside a pergola can preserve the geometry, but leave room for the documented planting requirements and future maintenance. Consider the bed as a whole shape, including its narrowest points, rather than checking only the space beside each post. Planting that fits along one side may need a different arrangement at a corner or beside an access route. If a wall-mounted layout is being considered, compare the confirmed dimensions from the wall-mounted pergola listing with the proposed bed depth and access space on the plan. Decide where planting should soften an edge and where a gap should keep a doorway or structural line visible. Do not assume a structure is intended to carry climbing plants; check that possibility with the supplier and a suitably qualified professional before specifying them.
Make garden edges and junctions deliberate
Edges are especially noticeable when the overall palette is simple. Draw where paving meets a bed, lawn or boundary, and decide which lines should continue and which should end. A consistent geometry for the main edges can help the garden read as one composition, while a carefully placed change can mark a threshold or a shift in use. If every bed has a different outline or the same border is repeated in too many places, the boundaries can compete with the pergola rather than support it.
Pay close attention where paving meets supports, a step, the house or a planted area. Check that the selected pergola footprint leaves practical access around these junctions, and keep service covers or other access points clear on the plan. Use the configuration information on the Bloomcabin Pergola product page to develop these details alongside the proposed boundaries. An enlarged sketch of a crowded corner can be more useful than adding detail to the whole garden plan. Show where each surface ends, whether an edging line continues past the post and how the adjoining bed or path begins. This helps avoid several small, unrelated shapes gathering around one support. Have levels and water-management details coordinated by the relevant designer or installer rather than leaving them until the paving is complete.

Key checks before choosing 5
Coordinate furniture, lighting and access
Plan for the way the pergola area will be used, not just how it looks when empty. Draw the table, chairs or other furniture at their intended scale, and check the space needed to move around them and reach doors, paths or a gate. A pared-back layout does not need perfectly symmetrical furniture around every support; comfortable circulation matters more than visual symmetry. Keep permanent fixtures to a considered set and avoid filling every spare corner with an extra object. The result should have a clear use and enough open space to move through it.
Consider lighting and other fittings as part of the layout rather than as finishing touches added after the frame is chosen. Mark where light is needed for a path or sitting area, and check how fittings might appear in views from inside the house. For a layout beside the house, compare Bloomcabin's wall-mounted model with the exact proposed arrangement, but do not assume it includes or supports additional fittings. Confirm any mounting, service routing and electrical details with the relevant qualified professionals; the design drawing should also keep access for maintenance in view.
Check the composition from the main views
Before finalising the layout, test it from the places where the garden will be seen and used: the main indoor windows, the door, likely seated positions and the approach from a path or gate. A plan can look tidy from above while a support blocks a view or makes an entrance feel tight at eye level. Review the outline, paving joints, bed edges and furniture together. If practical, use a simple visual mock-up of the footprint to help judge the scale, then adjust the plan rather than relying on memory or a product image.
Keep a final drawing that shows the selected format, confirmed dimensions, support positions, paving set-out, routes and documented planting requirements. Compare the Bloomcabin bioclimatic model with that resolved arrangement, rather than judging it separately from the garden. At this stage, review additions as carefully as omissions. A border, extra pot or second paving finish may be attractive on its own but unnecessary within the whole composition. Ask what each element contributes: a usable route, a defined sitting area, a planting space or a clear visual connection. Remove details that duplicate another element's role without improving the layout. If product information or site constraints require a change, a design consultation can help reconcile it with the landscape plan. Revise the affected relationships together rather than shifting one feature and leaving awkward gaps around it.
Frequently asked questions
How do I make a pergola fit a minimalist garden?
Give it a clear role in the overall layout. Relate its position to the house, main path or a key view, then coordinate its footprint with paving, planting and boundaries. A limited, repeated palette helps, but the garden does not need to be bare or monochrome.
Should pergola posts line up with paving joints?
They can, if the alignment works with the garden plan. Mark post positions and paving joints together before setting out the surface. Do not force a joint pattern that creates awkward cuts or interrupts a route just to align every line.
Is a wall-mounted pergola better for a minimalist look?
Not automatically. It may suit a layout that relates closely to the house, while a freestanding structure can define a separate garden area. Compare each format with the openings, routes and views on your plan, and have wall attachment requirements assessed by a suitably qualified professional.
How many materials should a minimalist pergola garden use?
There is no fixed number. A useful approach is to choose a main paving finish, a structural finish and perhaps one accent, then repeat them selectively. Take existing house and boundary materials into account so the new choices feel connected rather than competing.
What should I document before choosing a pergola?
Prepare a dimensioned plan showing openings, boundaries, levels, paths, furniture, existing features, proposed post positions and planting areas. Record documented planting requirements as well. Confirm the selected pergola's dimensions and installation requirements before finalising adjoining paving or beds.
A coherent minimalist garden comes from connecting the pergola's position with the routes, paving, planting and boundaries around it. Keep the hierarchy clear, repeat a limited range of finishes and resolve the junctions that will be seen every day. Leave open space where it supports movement or a view, and give planting enough room to meet its documented requirements. When an alignment conflicts with access or a site condition, resolve the practical detail first, then adjust the composition so the change still feels intentional.
