
Designing a Pergola for a Traditional Brick Home
Pergola design guide
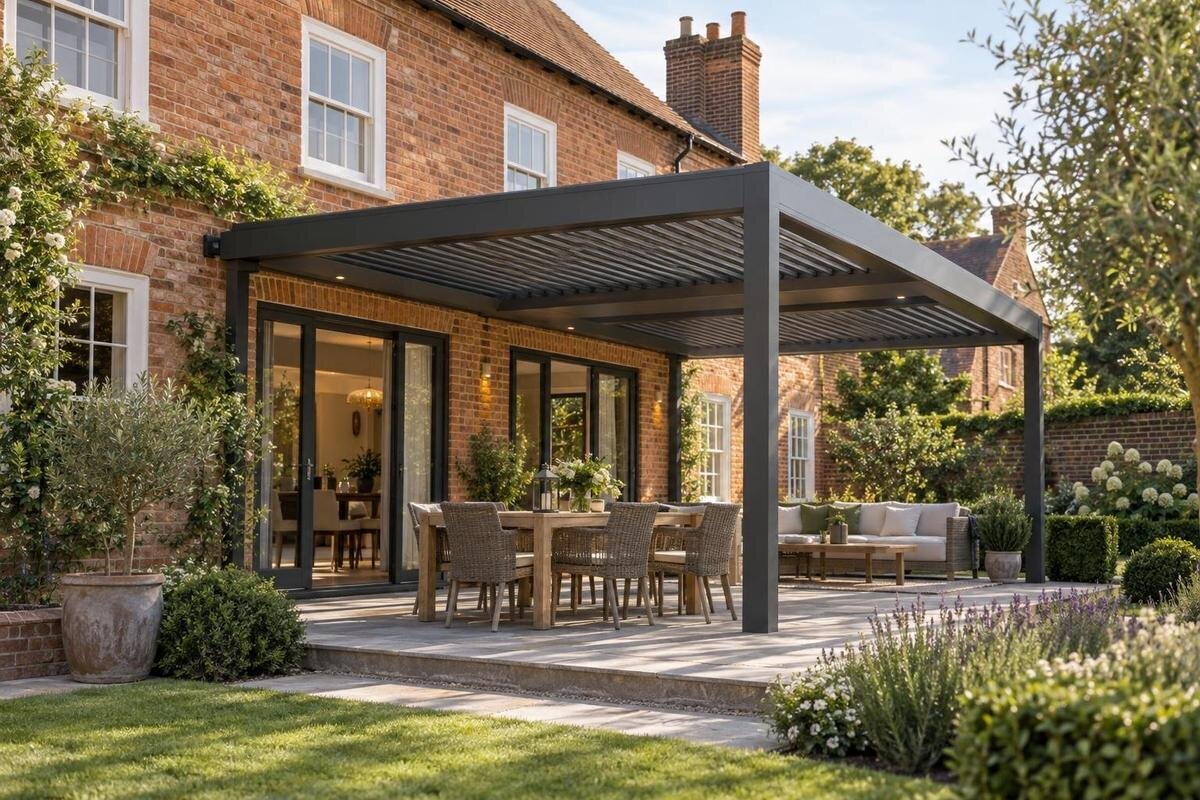
A pergola can give the outdoor area of a traditional brick home a clear purpose, but it will look settled only when its scale and details relate to the house. Brickwork is more than a colour backdrop: mortar joints, openings, lintels, eaves and the terrace edge all contribute to the façade’s rhythm. This guide shows how to read those cues, place a structure, choose its visual weight, resolve the connection and plan planting around it. The aim is a complementary outdoor room, not a replica of the original architecture.

Read the brickwork and façade as a whole
Traditional brick homes are not one visual type. A façade may be regular and symmetrical, or include an addition, an offset back door, a verandah or a mix of brick and render. Before choosing a pergola, photograph the side of the house facing the terrace and note its strongest lines: eaves, window heads and sills, door openings, lintels, piers, downpipes and the paving edge. Also note where the rear elevation differs from the street façade; the two may have different materials and proportions. Include the approach from the garden and the view through the main room, not only the wall straight on. Those are often the views in which the pergola will be seen most.
Look closely at how the bricks are laid and pointed. A consistent bond and fine mortar joints can give a quiet, even texture; decorative brickwork, recessed joints or contrasting mortar may make the wall more active. Record colour variation across the wall instead of matching to one brick at random. A pergola need not copy arches, caps or traditional trim to belong. Often it is enough for the frame to respect the house’s scale and repeat one simple cue, such as a window-frame tone, a straight lintel line or the rhythm between openings. Stand back at normal viewing distance as well as examining details close up: the structure will be read as an overall silhouette before its smaller finishes are noticed.
Set the footprint against the façade
Measure the usable terrace and draw the house elevation and ground plan at a consistent scale. Mark doors as they open, windows and their sills, steps, paths, drains, garden edges and the furniture arrangement you expect to use. Then draw the pergola’s outside dimensions, not only the roofed area. This makes it easier to judge whether the proposed width sits comfortably beside the brick façade and whether its depth creates a usable outdoor room rather than a narrow strip. A footprint that looks balanced on a product image can feel oversized on a shallow terrace, while one that is too small may seem detached from the house. Include dimensions to nearby openings and the route between the door and garden.
Compare the proposed top and bottom lines with visible reference lines on the house. For example, a beam line that sits close to a lintel or verandah edge may feel deliberate, while a line that cuts across several unrelated window heads can look arbitrary. This is a visual test, not a rule that every beam must line up; the elevation and the view from the garden may give different impressions. The Bloomcabin Pergola listing gives an area range from 9 to 24 m², which provides a starting point for comparison but does not establish whether a particular layout suits your site. Check the selected configuration’s dimensions, overhangs and surrounding clearances on a scaled drawing before settling on it.
Choose between a freestanding and wall-mounted layout
A freestanding pergola gives you more freedom to position the frame as a distinct garden element, but its posts still need to make sense with the door, paving grid and path of travel. Put the proposed post centres on the plan, then check the clear route from indoors, the view from the main window and space for chairs to be moved. Do not treat brick piers or window mullions as convenient post markers unless the full layout works at scale. A repeated post rhythm can sit calmly beside patterned brick; irregular gaps may be harder to reconcile with openings, although the site may justify them. Include access for carrying items outdoors and tending nearby garden beds.
A wall-mounted arrangement can make a terrace read as an extension of the house, but visual closeness is not evidence that the wall can support a connection. Brick veneer, cavity walls and other constructions may conceal different structural conditions. A suitably qualified building professional should verify the wall build-up, fixing design and how loads would be transferred for the actual property. The Bloomcabin Wall-Mounted Pergola is a catalogue option to examine, not proof that any brick façade is an appropriate attachment surface. If the connection cannot be confirmed, compare a freestanding layout instead. Keeping both ideas on the first drawing prevents visual preference from being mistaken for structural suitability.
Keep the roof outline in proportion
The roof edge is often the part seen most clearly from the garden and from inside the house, so compare its outline with the existing eaves, verandah roof and window heads. A low, wide frame can read as a horizontal layer; a taller, narrower one can draw attention to vertical posts. Neither is inherently right. The useful question is whether the new shape competes with a prominent roofline or gives the terrace a clear boundary. Sketch it from the main approach, the living-room window and the garden side. The views may call for different balances, so let the one that matters most for daily use guide the first version.
Roof construction changes how much visual structure sits overhead. An open framework shows more sky and leaves the house’s upper wall visible; a denser or more enclosed arrangement forms a stronger ceiling and may change the light reaching nearby rooms. A design with adjustable components should be assessed in each intended position, rather than only in the view that looks most appealing. When comparing the Bloomcabin Bioclimatic Pergola, check its actual roof form and operation in the current product information. Assess shade and rain control separately from appearance: a style label alone does not establish performance, and orientation, product details and the site all matter.

Choose materials and frame profiles
Material choice affects more than colour. A timber frame makes grain, end treatment and the scale of each member part of the view; a painted metal frame can present a more consistent surface and a different kind of edge. Within either category, a broad beam, fine post, rounded corner or visible connector changes the visual weight. Compare samples outdoors against the actual brick and mortar, and inspect them in different light; a glossy surface can draw attention differently from a low-sheen finish. Ask for profile drawings as well, because a finish swatch cannot show how thick a beam appears above a window or how a post meets the terrace.
Use one or two existing details as a reference rather than trying to echo every feature. If the house has painted timber windows, a nearby metal balustrade or a restrained fascia, one may inform the frame finish or line. If the brickwork is the dominant feature, a simpler profile can let its texture remain central. When considering the regular Bloomcabin Pergola, request dimensioned frame profiles and finish details rather than judging them from the product name or photograph. Compare the proportions with the façade, then look closely at visible fasteners, end plates and joins: these small elements can appear conspicuous against textured masonry.
Resolve the junctions with the brick wall
Where the frame approaches the house, draw the junction at a larger scale as well as on the overall elevation. Show the eave, gutter and downpipe, nearby windows, lintels, mortar joints and existing trim. This helps identify awkward gaps, blocked access and lines that appear to collide without prescribing how the structure should be fixed. Show windows and doors in their open positions, as well as access needed to inspect the wall and drainage points. A photograph may help explain the intended appearance, but it cannot resolve the fixing detail or show every obstruction around the junction.
Separate the visual connection from the technical one. A neat-looking beam line may suit a wall-mounted concept, while a freestanding layout may give more control over the gap beside the old façade. When assessing the wall-mounted model, have a qualified professional confirm whether that particular wall can take the proposed connection and how the detail relates to the eaves and drainage. Keep the dimensions of the brickwork and pergola in the same drawing, with clearances, weatherproofing and maintenance access resolved by the responsible designer or installer. The detail should explain how the junction works, not simply make it look tidy in elevation.
Tie the terrace surface to the structure
Treat paving, posts and the threshold as one composition. A pergola can look carefully proportioned above but disconnected below if its post positions cut across a prominent paving border or leave awkward slivers at the edge. On the plan, show paving joints, steps, garden beds, the door threshold and post bases together. Then review where chairs sit, how people pass between the house and garden, and whether the terrace edge remains legible. If the terrace meets a sloping or uneven area, record the actual levels rather than smoothing them away in a concept sketch. This is a layout exercise, not a foundation detail: it identifies visual and circulation conflicts, while the support beneath the selected structure must be checked separately.
Choose whether the terrace should continue the house’s existing material or form a clear transition to the garden. Repeating a paving tone can make the outdoor room feel connected; a contrasting border can define its edge, provided it does not create a busy strip beside patterned brick. Consider texture and joint scale as well as colour: fine joints beside small-format paving create a different rhythm from large slabs with broad joints. If Bloomcabin’s regular model is under consideration, plot the chosen footprint and post positions from the product dimensions rather than estimating from a photograph. Use this plan to compare how the post bases sit within the paving pattern, keeping foundation requirements separate from the surface layout.
Plan planting and open views around the frame
Planting can soften the transition between an established brick façade and a new outdoor structure, but it belongs in the layout rather than as an afterthought. Mark the expected mature height and spread of selected plants, the beds they need, routes for pruning and any windows or downpipes they could obscure. A narrow planter tucked between a post and wall may look neat on a concept sketch yet leave little room for access later. Document planting requirements and show bed edges and plant positions on the landscape drawing, noting any assumptions about mature size. The point is not to fill every gap: leaving a section of brick and a view through the pergola can make the frame easier to read.
Review the composition from the rooms that open onto the terrace as well as from outside. Check whether the upper frame masks a valued tree, whether dense planting hides a window, and whether a post interrupts the view along the garden. If a roof system has moving or variable components, confirm the operating envelope for the exact model and keep planting clear of any moving parts. For the Bioclimatic Pergola option, use the model information to establish those functions and clearances rather than inferring them from its name. Include these clearances on the planting plan alongside the mature plant sizes, so access and roof operation are considered together.

Prepare a dimensioned concept for review
Prepare a simple set of drawings before asking for a final design decision: a measured site plan, an elevation of the brick wall and a side view showing the roof edge and terrace level. Include the pergola footprint, post positions, nearby openings, eaves, paving joints, steps and proposed planting. Label dimensions rather than relying on an unscaled sketch or perspective image alone. Mark known levels and note any assumptions that still need confirmation, such as an unclear wall build-up or an exact product configuration. A designer or installer can then identify what needs further measurement and which details require professional checking. The drawing becomes a shared reference, not a promise about performance.
Keep appearance and technical questions on the same page but distinguish them. A design review can address sightlines, proportions and how the frame sits with the brick; a suitably qualified professional should separately verify structural support, any proposed wall connection, drainage interfaces and site-specific requirements. Check local approval questions with the relevant council or a building professional rather than assuming a style or a neighbour’s pergola answers them. For Bloomcabin’s bioclimatic model, make sure the drawings correspond to the chosen configuration. Dimensioned landscape drawings and documented planting requirements explain the proposal in context, while clearly marked assumptions show which details remain unresolved.
A worked example for a brick terrace
Imagine a brick home whose rear elevation has a broad window, a back door offset to one side and a simple eave. As an initial concept, draw a rectangular pergola over the part of the terrace intended for seating, setting its boundary from the actual door and window clearances rather than from a standard composition. Test the outer beam against the eave and lintel lines, then move the posts on the plan until they stay clear of the route and do not visually crowd the window. This is a design exercise, not a template: a shallower terrace, a different roofline or an existing verandah would change the proportions. Record the chosen dimensions beside each view.
Give the frame a deliberately simple profile so the brickwork remains legible, then choose a finish using a sample beside both brick and mortar. Draw the paving joints and a modest planting bed, showing mature plant size and a route for ongoing access. Compare freestanding and wall-mounted versions on the drawing, with any proposed wall connection subject to professional assessment. If neither outline sits comfortably, revise the footprint or post positions rather than adding decorative trim to force a match. The finished concept should explain its scale, edge details, planting and junctions in the same set of drawings. That is a more useful basis for review than a colour board or an attractive perspective alone.
Frequently asked questions
Does a pergola need to match the brick colour?
No. It needs to sit comfortably beside the brick, mortar and existing trim. A deliberate contrast can work as well as a close tonal relationship; compare samples outdoors and assess the frame profile, sheen and visual weight. Colour alone will not resolve a mismatched height, bulky beam or awkward post position.
Can I attach a pergola to any brick wall?
No. The visible brick does not show how the wall is built or whether it can support a connection. Have a qualified building professional assess the construction and proposed fixing design for your property. If that cannot be confirmed, compare a freestanding concept rather than assuming the brick is a suitable fixing point.
How do I work out a suitable pergola footprint?
Measure the terrace, door and window locations, paths, furniture area, paving edges and house elevation. Draw the pergola’s outside dimensions and posts to scale, then check the views from indoors and the garden. Treat any catalogue area range as an initial comparison; the right fit depends on the selected configuration and site layout.
Should the posts line up with brick piers or windows?
Alignment can create a deliberate rhythm, but it is not a rule. Test post positions against openings, circulation and terrace joints on a measured plan. Do not put a post in an inconvenient spot simply to line it up with a façade detail; the whole elevation and the way you use the terrace need to work.
What drawings are useful before choosing a pergola?
Prepare a dimensioned site plan, a façade elevation and a side view showing the roof edge and terrace level. Mark posts, openings, paving, planting and clearances, and note any unknowns. Have structural support, proposed wall connections, drainage and other site-specific technical matters checked by an appropriately qualified professional.
A successful pergola beside a traditional brick home complements its architecture without copying it. Its footprint, roof edge, frame profile, terrace connection and planting should work with the house’s existing proportions. Begin with measured drawings of the house and terrace, test the structure from key viewpoints, and distinguish visual decisions from checks that need a qualified professional. When those pieces are resolved together, the pergola can give the terrace a coherent identity while leaving the brickwork recognisable.
