
Making a Pergola a Focal Point in a Long Garden
Long garden design guide
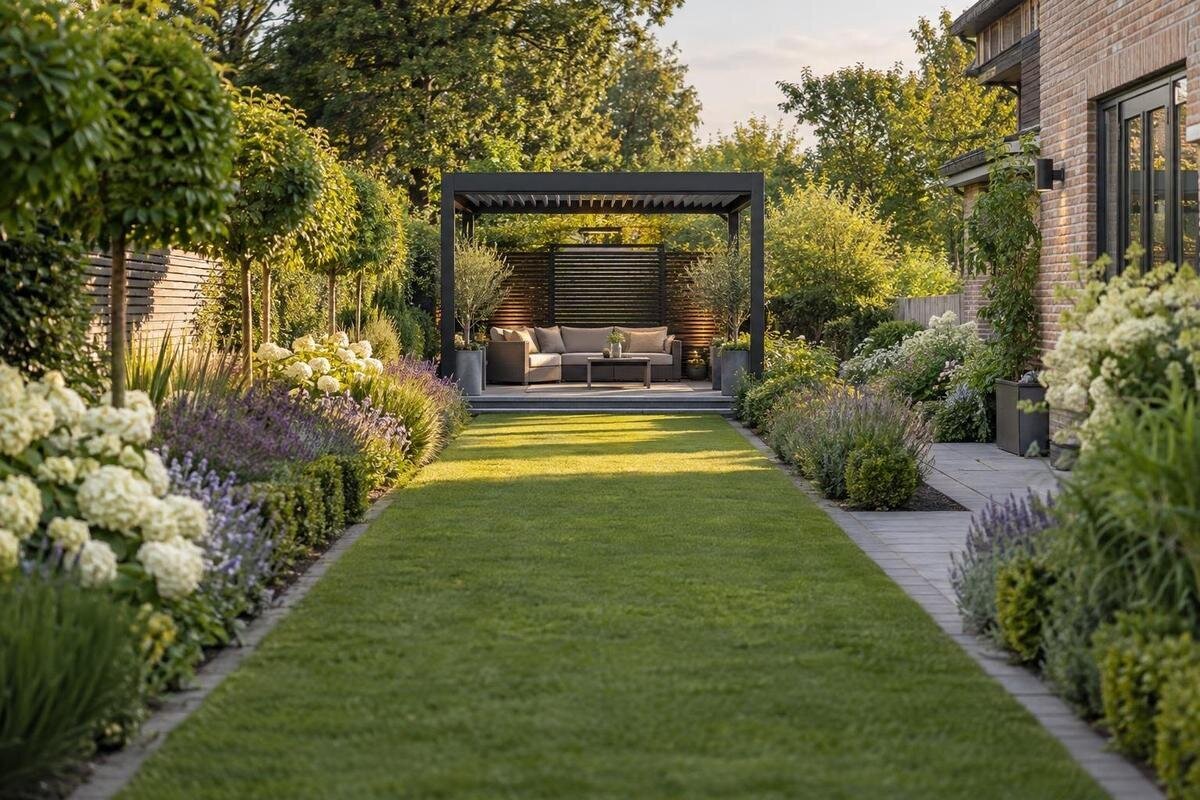
A long garden can draw the eye straight towards its far boundary, leaving the space between the house and the back fence feeling like a passage rather than a sequence of places. A pergola can create a clear destination, but its position alone will not give the garden depth. The approach path, views from the house and planting at different distances all affect whether it feels connected to the rest of the garden. Plan these elements together: map where you look and walk, test the structure’s footprint, then use planting to lead the eye without hiding the destination.

Planning checklist 1
What a focal point does in a long garden
A focal point gives a long garden a visual destination and helps make its layout legible from the house. A pergola can mark where a path leads, frame a view or signal a change from open lawn to a place for sitting. Its value is not simply that it occupies the far end; it should connect with the views people already have and the way they move outdoors. When those connections are clear, the structure feels like a purposeful part of the garden. If there is no readable route or usable space around it, the pergola may look isolated, while the long stretch leading to it still feels unresolved.
Think of the garden in layers: the foreground near the house, the middle stretch and the background where the pergola may sit. A path, tree or planting group can help the view travel through those layers, so the structure feels connected to the whole space. Leave enough visual breathing room for each part to be read; filling every section with a separate feature can make the garden feel busy rather than deep. The layers do not need to be equal or symmetrical. Their purpose is to give the eye a clear sequence, with the pergola providing a destination rather than competing with everything along the way.
Map the views from the house and garden
Start by checking the views from rooms and doorways that look out to the garden. Mark the main windows, doors and regular seating positions on a simple plan, then note what is visible from each. A pergola might be clear from the kitchen but partly hidden from a living-room seat by a tree, or it may seem too close to a window from inside. These differences matter: a feature that works as an endpoint from one place may sit awkwardly in another view. Identify the viewpoint you most want to organise before settling on a position, rather than assuming the garden’s centre line is the only sightline that counts.
Walk the garden as well as viewing it from indoors. Look back towards the house, pause at changes in the path and notice whether other features already draw attention. A pergola can align with a doorway or a favourite view without sitting precisely in the centre; a slight offset may be more natural if it avoids an existing tree or keeps a route open. Consider what will change as plants grow or lose their leaves, too. Sketching the main views on a dimensioned plan helps distinguish a useful alignment from one that only looks convincing from a single standing position.
Planning checklist 2
Choose a destination that suits how you use the garden
The end of the garden is an obvious place to consider, but it is not automatically the best one. Think about whether the pergola is meant to be a quiet retreat, a place to sit during everyday outdoor time or a destination for occasional gatherings. A distant position can make a walk through the garden feel worthwhile; it can also be less convenient if you expect to use the space often. A middle position may work better when it links the house to a separate garden area. Compare at least two possible locations, including the route to each, before deciding that the back boundary is the answer.
Once you have a likely position, plot the structure against the garden’s actual measurements rather than relying on a rough visual estimate. The Bloomcabin Pergola listing gives an area range of 9–24 m², but an area figure alone does not show the exact footprint or how it relates to the available space. Record the boundary, existing trees, paths and doors, then compare the confirmed dimensions for the selected option with that plan. This helps you see whether the pergola leaves a useful passage through the garden and whether its position makes sense from the views you marked.
Shape the approach without creating a corridor
The route to a pergola contributes to the sense of depth. A straight path can give a long garden a clear visual line, especially when the destination is visible from the house. A gentle change of direction can create a more gradual reveal, or allow a path to pass an existing tree or bed. Neither approach is right for every layout: a bend that hides the pergola completely may make the destination feel disconnected, while an uninterrupted straight line can emphasise the garden’s full length. Sketch both options and check what each one does to the view, not just to the path on paper.
Vary the planting along the path while keeping the route clearly visible. Where the approach begins beside the house, consider how a nearby structure would affect the longer view towards the garden’s destination. The wall-mounted pergola option is one choice to compare in that setting, rather than an automatic choice because the path starts at a wall. Draw the path and structure together, including the beds between them. Check whether the route leads naturally into the pergola or passes alongside it, and avoid squeezing the approach between planting and the structure. The connection should be clear without making both sides of the path feel enclosed.

Planning checklist 3
Check the pergola’s scale and outline
A pergola that looks balanced in a product image may feel different against the width and length of a particular garden. Consider its outline from the house, from the path and from the area where you expect to use it. On a plan, compare the structure with the garden’s boundaries and the open space around it; in an elevation or drawn view, check how much of the background it would cover. This is more useful than choosing by area alone. A dimensioned drawing can show whether the structure reads as a clear destination or takes up so much of the view that it dominates the garden.
For example, the Bloomcabin Bioclimatic Pergola page lists an area range of 9–24 m². Use the dimensions of the particular option you are considering to explore its proportions, rather than judging by area alone. Compare the width of its outline with the garden’s width at the proposed position, and look at how much open space remains on either side. Then consider its height in a drawn view from the house. These checks address different aspects of scale: how the structure occupies the ground and how prominently it appears in the view. Together, they help you assess whether its size suits the intended focal point.
Plan the walking route and arrival space
A path should do more than point towards the pergola; it needs to work for the way people will use the space. Consider where someone will approach from, whether they need to turn or pause, and how the route connects with other parts of the garden. If outdoor furniture is planned, allow for people to move around it without blocking the approach. Also consider ordinary tasks such as carrying items to the seating area or getting past it to reach the rest of the garden. These practical details help the pergola feel like part of the layout instead of an isolated stop at the end of a long walk.
Place the confirmed outline of your chosen structure on the plan before arranging the arrival area. If you are comparing the regular Bloomcabin pergola listing, consider where the path would meet that outline and where people would go once they arrive. A route that leads directly towards a table may need a different arrangement from one that reaches an open side of the seating area. Draw the intended furniture as well as the path, leaving the approach distinct from the space people occupy while seated. Check any onward route too, so reaching another part of the garden does not depend on walking through the seating arrangement.
Planning checklist 4
Layer planting without hiding the pergola
Planting can guide the eye through a long garden, but the mature height and spread of each plant matter. Lower planting in the foreground can keep a view open, while medium-height groups can give the middle section definition. Taller plants can frame the pergola or provide a backdrop, as long as they do not conceal the structure from the viewpoints that matter. Repeating a few plant forms at intervals can give the garden a sense of continuity without turning each side into a solid screen. Think about the view from the house as well as the view while walking; planting that looks balanced up close may cover the destination from indoors.
Draw planting beds using mature plant dimensions rather than the size of young plants in pots. Leave room for maintenance and for the route to remain clear as the planting fills out. Consider each plant’s growing requirements alongside its visual role: a plant chosen to frame the pergola still needs a suitable position. If you are considering the Bloomcabin Wall-Mounted Pergola, show the proposed planting in relation to both the structure and the adjoining wall. Check where the beds end, how they can be reached for maintenance and which views they should leave open. This gives the planting a defined role without allowing it to overwhelm the destination.
Give the pergola a clear backdrop
What sits behind the pergola affects how clearly it reads from a distance. A busy backdrop, a line of competing features or a tall mass of foliage may make the structure hard to distinguish. A quieter area of planting or a simpler view can help it stand out, while plants placed to the sides can frame it without closing off the garden. Consider the pergola from the main windows and along the path, because a backdrop that works from one direction may merge with the structure from another. The aim is not to make the rest of the garden plain, but to give the destination enough visual definition to be noticed.
Compare the outline of each shortlisted option against the same background, rather than judging separate product photographs. Use the confirmed dimensions for an option from the bioclimatic model listing to sketch it among the existing trees, boundaries and proposed planting. Pay attention to where the edges overlap: a clear outline in one view may become difficult to distinguish in another. Look at the spaces beside and above the structure as well as the structure itself. This comparison helps you decide whether to adjust its position or the surrounding planting, while retaining other worthwhile views rather than making the pergola the garden’s only point of interest.

Planning checklist 5
Test the composition on site
Before committing to a position, mark the proposed outline temporarily and view it from the places you identified earlier. Use the confirmed dimensions to mark the corners, then walk from the house towards the pergola and back again. Check whether the path is easy to follow, whether the structure interrupts a view you want to keep and whether the arrival area feels connected to the rest of the garden. A second possible position is worth testing if the first one seems too close to a boundary or too far from everyday use. A temporary mark-out lets you compare these choices without relying on memory or a small plan alone.
Repeat the view check from seated and standing positions, and at different times. Note where seasonal planting could change the result: a pergola visible through bare branches may be obscured when foliage is full. For a model such as the Bloomcabin Pergola, use the confirmed dimensions for the ground outline, but remember that corner markers alone cannot show its full height or appearance. Compare the mark-out with your drawn views, recording what each reveals about the proposed position. If the ground, access or planting arrangement raises technical questions, have those specific details reviewed by a qualified professional before treating the layout as settled.
Bring the plan together before choosing a model
A useful landscape plan should show the house and its main doors and windows, garden boundaries, existing trees, proposed path, pergola outline and planting at mature size. Mark the key views and dimension the route, arrival area and surrounding beds. Bring the observations from your on-site test back to this drawing, particularly where the approach felt tight or planting interrupted a view. Record the plants’ growing requirements alongside the proposed beds so they remain part of the design decisions. The completed plan should explain how the pergola, route and planting work together, rather than simply showing where a structure will fit.
When reviewing the wall-mounted pergola details, compare the selected option with this complete garden layout. A wall-mounted model needs a suitable wall and position; its name alone does not establish that either is appropriate. Have site-specific installation questions checked by a qualified professional, keeping them separate from your assessment of the garden’s composition. Your shortlist can then reflect both the intended arrangement and the details that still need confirmation. The design goal remains specific: a pergola that is clear in the main views, reached by a practical route and framed by planting that connects it with the rest of the long garden.
Frequently asked questions
Does a pergola always belong at the far end of a long garden?
No. The far boundary can make a natural endpoint, but that position may be inconvenient or leave a more useful middle section underused. Compare a couple of locations on a plan, taking into account the views, how often you would use the pergola and how people would reach it.
Should the pergola sit on the garden’s centre line?
Not necessarily. A central position can create a direct view, while an offset may relate better to a path, tree or window. Check the main views from the house and along the garden before deciding which alignment gives the clearest composition.
How much space should I allow for the path to the pergola?
There is no single width that suits every garden or use. Draw the route beside the pergola’s confirmed footprint, then consider how people will walk, turn and move around any furniture. Marking the route on site can help reveal tight spots before planting.
How can planting add depth without hiding the pergola?
Use plants of different heights and place them at different distances, keeping the key view open. Plan for mature plant size rather than the size of a new plant, and check each plant’s growing requirements before fixing bed edges around the structure.
When should I ask a landscape designer or qualified installer for help?
Seek advice when the layout involves a wall-mounted option, uncertain ground conditions, drainage concerns or planting close to the structure. A professional can help check the site-specific design and installation details; a product name or appearance alone cannot establish suitability.
Treat the pergola, path and planting as one composition rather than separate features. A dimensioned plan and a simple on-site test reveal whether the structure sits naturally in the view, whether the walk to it is easy to follow and whether planting adds depth without obscuring it. When the destination works from the house and along the garden path, the long space reads as a sequence of places rather than one unbroken strip.
