
A Minimalist Garden Designed Around a Pergola
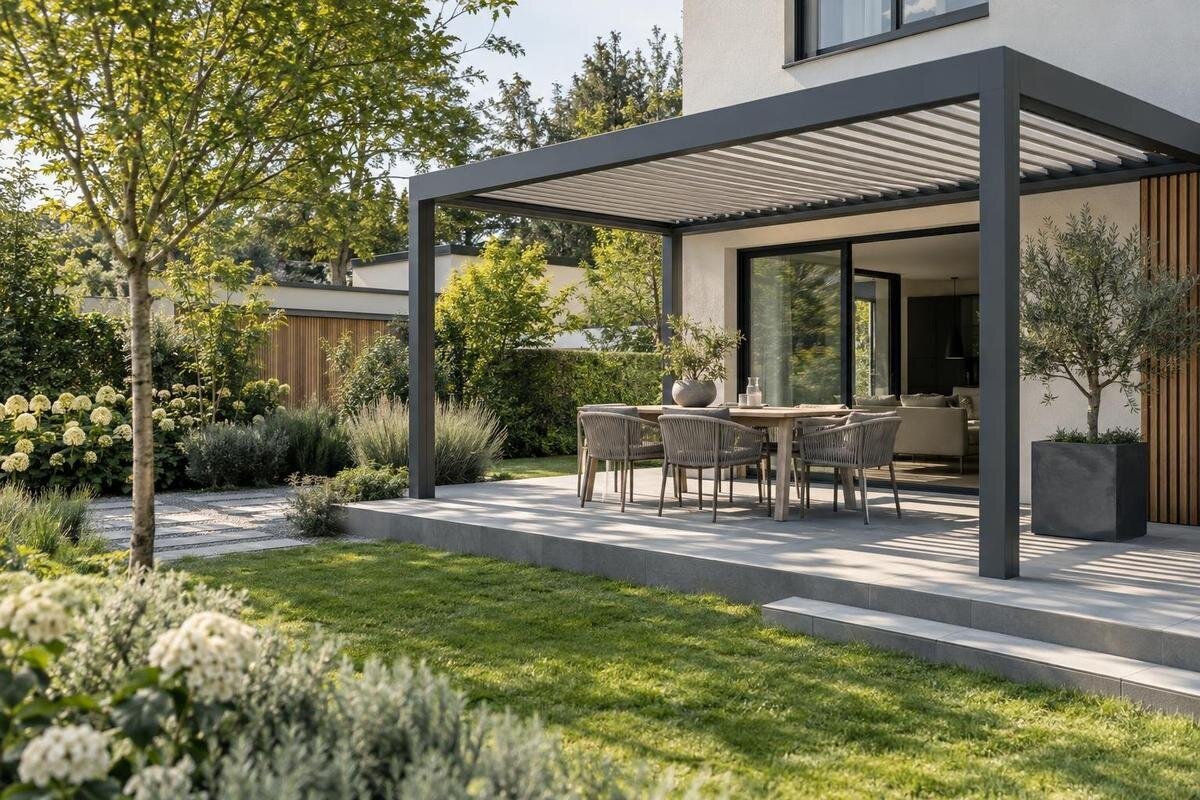
Garden design
Minimalist garden design is less about leaving the yard empty than about deciding which lines and materials deserve attention. A pergola can organize an outdoor room, but it looks integrated only when its footprint, paving, planting and route to the rest of the garden are planned together. This guide works through one simple composition: a rectangular patio beside a house, a pergola over the main seating or dining area and one continuous planting edge. The arrangement is illustrative, not a formula; existing doors, trees, boundaries and services should shape the final plan. The goal is a calm layout with clear movement and carefully resolved edges.

Before you choose 1
Give the pergola one clear role
Minimalism is about hierarchy, not removing every plant or object. Give the pergola one main job, such as defining an outdoor dining area, and let other garden elements support that use. If seating, a fire feature, several planters and a separate sculpture all compete for attention, the frame loses its purpose and the layout becomes a series of focal points. Decide what should be noticed first from the house and what can remain in the background. That ranking guides the size of the paved zone, the location of planting and the amount of open ground you keep. It also gives proposed extras a test: do they support the main use, frame a view or mark a useful transition?
For one resolved composition, picture a rectangular patio beside the house, with the pergola over the table, a continuous planting bed along the garden-side edge and a clear route around it to the gate. Leave the approach side visually open so the frame defines a room without closing off the whole patio. The open ground beyond the bed can remain plain, with planting framing the structure instead of surrounding it. This is a starting arrangement, not a template: an existing tree, window, side door or narrow lot may change the best orientation. Keep the same hierarchy even if the geometry bends around the site; a deliberate open area can give the eye a place to rest.
Draw the site before settling on a footprint
Begin with a measured base plan rather than a mood board. Mark the house wall, windows, doors and their opening arcs; record boundaries, gates, existing trees, steps, downspouts and fixed services that affect movement. Then draw the patio, pergola, furniture and proposed beds to a consistent scale. Show the route from a commonly used door to the gate or lawn instead of assuming people will thread around obstacles. A dimensioned landscape drawing reveals proportion problems early: a layout may look balanced in a sketch but leave little usable room when chairs are pulled out or a door is open. Measure between fixed reference points and keep those measurements with the plan so later revisions do not quietly change clearances.
A product's total area does not tell you its exact footprint. The Bloomcabin Pergola listing gives an area range of 9 to 24 m², but that figure alone does not show the length, depth or support positions of the model you select. Put the exact model outline on the drawing using current product information; do not estimate post locations from a promotional image. This matters if a support could interrupt a route, fall near a paving joint or leave a narrow strip along the patio edge. Resolve these relationships before finalizing the paving pattern, and verify any revised dimensions again before work begins.
Before you choose 2
Relate the pergola to the house
Decide whether the pergola should read as an extension of the house or as a separate garden room. A wall-mounted form can create a direct visual connection to the façade, but its placement still has to respect doors, windows, trim and the main indoor sightline. The model name does not establish that a particular wall is suitable for attachment. If you are considering the Bloomcabin Wall-Mounted Pergola, compare its current product information with a measured view of the house, then have wall suitability and attachment conditions assessed by a qualified professional. This keeps visual planning separate from structural approval.
A freestanding pergola can be positioned independently, yet it still needs a deliberate relationship to the building. Align one edge with a façade line, patio border or principal doorway; avoid a near-parallel angle that looks accidental. Review the frame from inside the house and from the approach through the garden, because the strongest view may not be the seating view. If the building is asymmetrical or the patio is angled, one purposeful offset can be more coherent than several competing alignments. Do not force the frame to match every house feature when those lines do not agree. The goal is a clear reference line and enough open space around the structure.
Carry paving lines through the composition
Choose a principal direction for the paving before selecting a pattern. Lines that run parallel to the house can make the patio feel connected to the façade; a line that continues towards the garden can draw the eye beyond the pergola. Either can work, but use one as the dominant order. The pergola's long edges, the patio boundary and the route into the garden should not all point in different directions without a site-based reason. A simple plan with one strong axis and one clear cross-edge often reads more quietly than several decorative borders, diagonal insets and changes in direction.
Check how paving joints meet the support locations and the perimeter. If the support positions fall within a modular grid, the cut pattern can be planned in advance; if they do not, consider a deliberate border or adjusted module rather than leaving tiny, irregular pieces to be solved on site. An inconsistent cut can draw attention to the structure's feet. Show the paving edge, pergola outline and planting-bed boundary together on the drawing, then review them at close scale. The aim is a clean junction, not a requirement that every surface use the same material. Use the border to manage the transition rather than adding another competing strip.

Before you choose 3
Limit the palette to a few connected tones
A restrained palette can include contrast; it simply needs a clear order. Treat paving as the visual base, the pergola and house trim as smaller accents, and foliage as the softer, changing layer. Choose one principal surface colour and repeat a secondary tone only where it has a reason, such as at an edge or in outdoor furniture. When considering the Bloomcabin Bioclimatic Pergola, compare its confirmed finish with the paving and house trim. Check the available colour and material options in current product information rather than assuming them from the model name or a single image.
Look at samples beside the actual siding, brick, concrete, wood or stone that will remain, not just against a white screen or catalogue images. Check them in the patio's light at more than one time of day, since shadow can change how adjacent tones read. A colour that is close to the house does not need to match exactly, but its contrast should feel intentional. Where samples are available, compare the frame finish alongside the paving and trim. Foliage changes through the seasons, while the hardscape palette should remain legible when beds are sparse. If in doubt, reduce competing finishes before adding another accent.
Coordinate planting with the patio
Planting is most coherent when it follows a bed shape already established by the patio rather than creating a second layout beneath it. In the rectangular example, one continuous bed along the outer edge softens the paving and gives a long line to balance the pergola. Repeat a small number of plant forms in groups instead of using a different specimen at every support. One taller plant near the bed's end can mark a transition without turning each corner into a separate focal point. Leave access to the frame, wall, taps and maintenance points visible; planting should not hide details that may need attention.
Choose plants by their documented mature width and height and by their site requirements, not just their appearance at purchase. Note observed sun and shade, soil and moisture, then check each plant's needs with a reliable local source. Conditions within the pergola's footprint can vary through the day and season, so do not assume a plant will thrive simply because its palette looks right. If you are comparing the wall-mounted pergola option, place its verified outline on the planting plan before selecting climbers or shrubs near the façade. Record plant identities and requirements alongside the drawing so bed spacing is not left to guesswork.
Before you choose 4
Keep everyday routes open
An uncluttered plan still needs to show how people move through it. Draw the main route from the door to the garden gate, then add the table with chairs pulled out, any lounge seating and the door swings. The remaining open area is not wasted space: it lets the patio function without making the pergola an obstacle. Do not squeeze a path between a support and a raised bed simply because the plan looks symmetrical. A slightly offset table or a wider approach on one side may preserve the garden's quiet geometry and make movement more direct. Consider the route for carrying chairs, tools or groceries as well as the usual walk to the gate.
Check usable space both inside and around the frame. The area shown for a product is not the same as the room left for circulation once supports, furniture and bed edges are placed. When reviewing the Bloomcabin Pergola product page, use verified dimensions for the exact model and overlay them on the site plan; keep routes suited to the household's needs rather than relying on a generic diagram. Where there is not enough room for a full loop around the pergola, make the intended entrance obvious. Keep it free of pots, lighting stands and seasonal storage so that the route stays usable when the patio is in everyday use.
Resolve the edges where materials meet
Much of a minimalist finish is decided at the junctions: where a support meets paving, paving meets a planting bed, and patio meets lawn or gravel. Draw each edge deliberately. A continuous border can make the patio read as one plane; a clear break can separate the bed and help keep soil or mulch off the walking surface. Avoid a collection of thin leftover strips around posts or at the far edge. Coordinate the support footprint, paving module and bed line on the same drawing, then check that the chosen edging remains maintainable and does not block access to the structure. Repeating an edge treatment can connect the patio to the rest of the garden.
At the house, include details that are easy to overlook in a clean concept sketch: cladding, trim, vents, exterior taps, downspouts, doors and maintenance access. Do not let a new edge or planting hide a drain outlet or make routine repairs difficult. For the wall-mounted model, include the junction between the frame and façade in this review. Ask the installer or another qualified professional to assess wall suitability and confirm the connection and related water-management details for the property. Keep those practical needs visible in the final design rather than trying to disguise them after installation.

Before you choose 5
Plan lighting as a separate layer
Outdoor lighting should support the same hierarchy as the daytime layout. Identify the table, the route and any step that needs to be seen, then avoid adding a fixture at every post simply to make the pergola stand out. When comparing the bioclimatic pergola listing with your lighting plan, check the current product information for included components. Do not assume that lighting or wiring is supplied with the pergola. Plan any separate fixtures around the selected footprint and intended use, with a qualified electrician handling electrical design and installation.
Check the view after dark from the house as well as from the patio. A bright exposed point can dominate a quiet scheme or shine into a neighbour's windows, while a carefully aimed source can make a table or route legible without lighting every planted area. Consider whether a fitting creates glare from indoor seating or silhouettes the plants. Keep fixtures visually consistent with the limited material palette rather than scattering different styles across posts, walls and beds. Show their locations and any visible equipment on the drawing; resolve mounting points and wiring professionally before surfaces are finished, not as an afterthought.
Review the composition before ordering
Before ordering materials, review the plan from several viewpoints: standing at the main door, sitting at the table and approaching from the gate. A layout that reads neatly overhead can hide a crowded edge or a post in a window's main view. Check the pergola's outline against the home's roofline and patio border, and compare proposed planting at documented mature size rather than nursery-pot size. A quick elevation or simple perspective can reveal whether the structure feels too dominant, whether the open area is still useful and whether a long bed guides the eye towards the garden. Review the drawing at seated eye height as well as from a standing viewpoint.
Make the final drawing a record of decisions, not just a coloured presentation: label the chosen model, exact dimensions, support positions, surface edges, plant identities and documented planting requirements. If Bloomcabin's bioclimatic option remains on the shortlist, use current product information to confirm the exact configuration before coordinating the landscape around it. Review wall connections, surfaces, drainage, lighting and access with the relevant qualified professionals where site conditions require it. A coherent design does not depend on a pergola's style alone; it comes from resolving the relationships between structure, house, hardscape, planting and movement.
Frequently asked questions
What makes a garden around a pergola feel coherent?
Give the structure one main use, repeat a small number of materials and plant forms, and keep a clear route through the space. Aligning the pergola, paving edge and planting bed creates continuity. Leaving some ground open also prevents the layout from becoming a set of competing features.
Does the pergola need to align with the house?
Not necessarily. Choose the relationship that best suits the measured house and garden. A wall-mounted design creates a close visual connection to the façade, while a freestanding one can sit as a separate garden room. Either benefits from a clear reference line, such as a doorway or patio edge. Have wall suitability and attachment reviewed professionally if considering wall mounting.
How many colours and materials should I use?
There is no fixed number, but a dominant paving tone, a structural colour that relates to the house and a restrained set of plant forms are a useful starting point. Repeat those choices instead of giving each object a new accent. Compare samples in the actual outdoor light and confirm product finishes from current information.
Can I grow climbing plants on a pergola?
Do not assume every pergola is suitable for climbing plants. Check the product guidance and confirm suitability with a qualified installer before planning a climber. Also consider the plant's documented mature size, site requirements and maintenance needs so it will not obstruct routes or access as it grows.
When should I decide on the paving pattern?
After you have confirmed the pergola's exact footprint and support positions, but before finalizing the paving layout. Mark the posts, doors, routes, drainage features and planting-bed edges together. A product's area range or image cannot replace exact dimensions; review site-specific surface and installation details with the relevant professional.
A restrained garden comes together when the pergola, paving, planting and open route follow a small number of clear decisions. In a rectangular patio, the structure, surface lines and continuous bed can share a direction without filling every available space. The details that make the composition convincing often sit at the edges: around supports, against the house and where paving meets planting. When those junctions are considered alongside the view from inside and the routes used every day, the pergola feels integrated rather than added on.
