
Using a Pergola as a Focal Point in a Long Garden
Garden planning
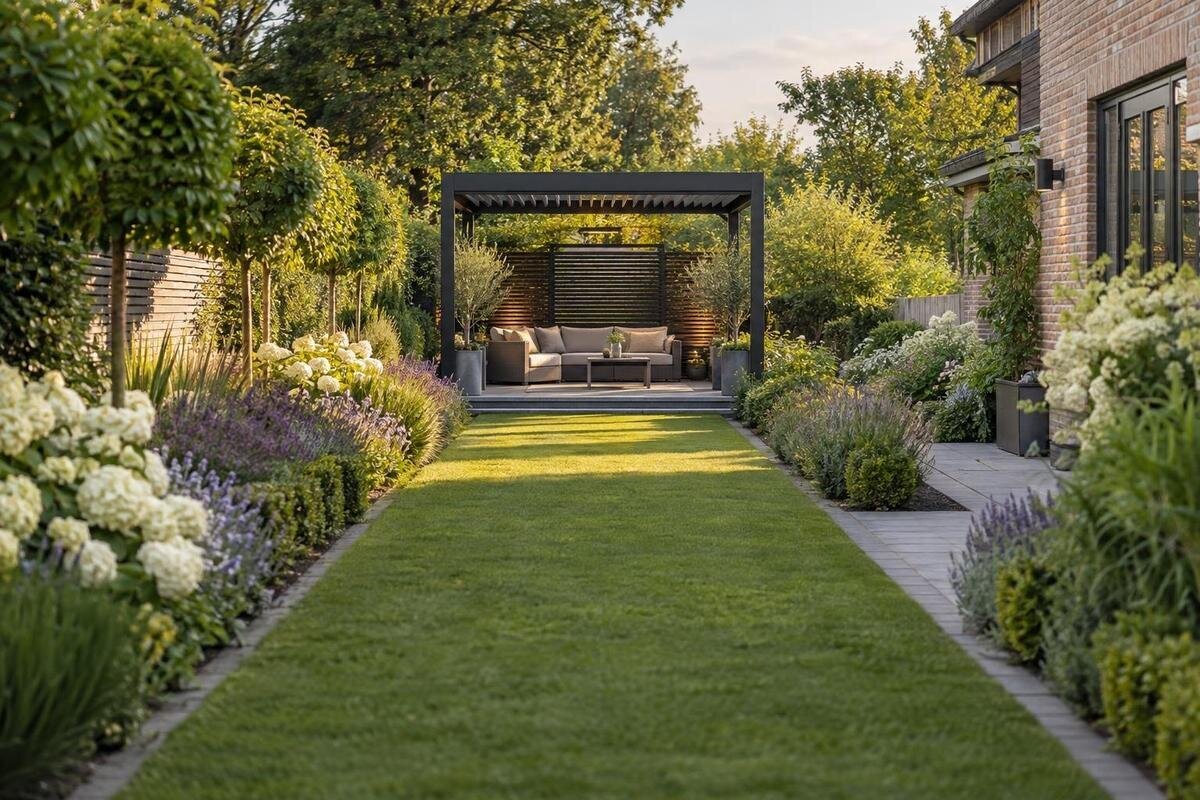
In a long garden, a pergola can give the eye a clear place to land and make the route through the space feel intentional. Its position matters as much as its appearance: at the far end it may close the view, while partway down it can create a pause and reveal another layer beyond. Plan from the viewpoints you actually use, then connect the structure to an approach path and planting that preserves depth. The aim is to make the pergola part of the garden’s sequence, not a feature considered in isolation.

Planning considerations 1
Views from the house and garden
Begin with the view you experience most often, rather than a plan viewed only from above. Stand at the rear doors, a kitchen window, the patio or the garden gate and note where your eye travels. In a long lot, a straight lawn and parallel boundaries can pull attention toward the back fence, while a mature tree, shed or change in paving may already interrupt the line. A pergola can anchor that view only if its outline is visible from everyday positions; hidden by foliage or seen edge-on, it may read as background. Record two or three real viewpoints, including one where people sit.
On a simple sketch, mark the foreground, middle ground and far boundary, then add trees, buildings and fences that interrupt the view. Note whether the pergola would be seen face-on, at an angle or mostly through its posts; these views can change its apparent scale. A plan that looks balanced from above can feel blocked from the house, so relate the drawing to actual sightlines rather than symmetry on paper. Look back from the proposed seating area too: a focal point should make sense from within the garden, not only from the house. Where views change through the year, note which trees lose their leaves and which buildings remain visible.
Choose a position along the garden’s length
Do not assume the back fence is the only place a pergola can anchor a long garden. At the far end, it can provide a visual stop, but a straight, open strip leading directly to it may make the lot seem even longer. Set partway along, the structure can divide the view into a nearer garden room and a visible area beyond. An offset position may preserve a route or relate to an existing tree, but it should look intentional from the main windows rather than like an obstacle. Compare how much open ground remains in front, beside and beyond each position: the balance changes the perceived depth. Decide whether an existing tree should remain a separate focal point or frame the pergola.
Compare the end, middle and one deliberate offset position on the same plan. Mark boundary lines, existing trees, outbuildings and main openings, then draw each pergola outline at its proposed location. When considering the Bloomcabin Pergola, use the exact footprint of the configuration under consideration on a dimensioned garden drawing, and note what remains visible beyond it. If every view ends at the structure, it acts as a visual stop; if a gap in the planting or a path carries the eye past it, the garden retains a second destination. Choose the composition that matches the intended use.
Planning considerations 2
Make the approach part of the design
Treat the approach as part of the focal point, not as a route added after its position is fixed. Draw how someone gets there from the house, gate or another frequently used area. A path aimed straight at the pergola makes the destination obvious; a gently changing route can reveal it in stages and create more depth. Neither is automatically better. The route should suit the way people carry food, garden tools or outdoor cushions, without a post, sharp turn or bed edge obstructing the approach. Show where the route begins and where it arrives.
Decide whether the path ends at the pergola or continues past it. A path that ends there makes the structure a clear destination; a through-route links garden zones and keeps the far end accessible. Check arrival from both directions if the path passes through, and leave room to approach the intended opening without stepping across planting. Include turns, gates and existing paving on the drawing rather than simplifying them away. When comparing a model from the Bloomcabin Pergola product page, plot its confirmed dimensions alongside the approach route. Show any change in paving or surface at the entrance, and check that it does not create a pinch point.
Scale the pergola to the whole garden
Judge the pergola against the whole garden, not only the path or a nearby seating set. A footprint that looks generous beside a narrow walk may appear small across a broad lawn; a large outline can dominate a garden already divided by mature trees, sheds or beds. Trace the proposed footprint on a dimensioned landscape drawing and look at its relationship to the garden’s width, the length of open space on each side and the view beyond. Add a simple side view as well: the frame’s proportions affect how much of the background remains visible. Show the neighbouring beds and open lawn too, since a bare product outline can make a crowded arrangement look deceptively simple.
Product area is only one part of that comparison. The Bloomcabin Wall-Mounted Pergola listing identifies a wall-mounted option and indicates an area range from 9 to 24 m²; this range is not a substitute for confirming the exact footprint, height and configuration. If a house connection is being considered, show nearby doors and windows and have a qualified professional assess whether the proposed wall and attachment arrangement are appropriate. For a freestanding scheme, account for the space around all sides, not just the furnished portion. On a long, narrow plot, check views from the side as well as the centre. Do not choose by a single area figure: a scaled plan shows whether the structure anchors or overwhelms the garden.

Planning considerations 3
Build planting in layers
Planting can frame a pergola and make the walk toward it feel layered, but the arrangement needs visible gaps. Work from front to back: use lower planting or a simple edge in the foreground, a fuller middle layer beside or near the structure, and a quieter background beyond. The layers need not form a dense screen. Repeating a small number of plant forms or colours can guide the eye, while an opening around the pergola keeps its outline legible. If every bed reaches the same height, the garden can read as one flat band; if each layer is a solid wall, it can hide the space you meant to reveal.
Use mature dimensions, not nursery-pot size, when drawing the planting. Check each plant’s expected spread, light requirements and maintenance needs for the actual site, and leave access for pruning and ordinary garden care. Place taller elements where they frame rather than mask the view from key windows and paths; a tree in the wrong line can obscure the structure as it grows. Seasonal change matters too: deciduous planting may open a sightline when leafless, while evergreen forms remain visible year-round. Mark the planting bands on the same drawing as the pergola, path and existing trees so their eventual overlap is clear before work begins. Separate plant groups can leave glimpses of lawn beyond and make distance easier to read.
Framing the pergola with planting
Allow the pergola to stand out without making it look detached from its setting. Its posts and upper outline need enough contrast against the planting behind them, but strong colour contrast is not the only way to create a focal point: a gap in foliage, a change in paving or repeated planting groups can also make the shape easier to distinguish. Test the view from several points, because a backdrop that makes the frame stand out from the house may obscure it from a side path. Keep some open space around its outline rather than surrounding every post with foliage. Compare the outline against different backdrops in the garden before settling on its position.
Keep the area around supports accessible for inspection and maintenance, and do not assume a pergola frame is a planting support. If a Bloomcabin Bioclimatic Pergola is on the shortlist, ask for dimensioned drawings and documented planting requirements before planning plants around it or attaching anything to the frame. Where a plant needs a separate support or more room, show that separately on the landscape plan. This lets the planting and pergola form a coherent composition while accounting for allowable attachments and clearances, rather than relying on appearance alone to judge suitability.
Planning considerations 4
Alignment with the house and garden features
Connect the pergola visually to something already in the garden. It may echo a line in the house façade, an existing path, a fence or the edge of a planting bed; the goal is a coherent relationship, not a perfect geometric axis. Compare the view with the structure centred and slightly offset. A centred position can make a formal layout feel settled, while an offset may preserve a view of a mature tree or draw attention through a planted opening. Decide from actual sightlines and use, not symmetry on the drawing alone. Look from the opposite end too, so the structure does not leave an awkward blank strip or hide a feature you value.
Colour and visual weight affect how strongly the focal point stands out, so compare the proposed look with the house, paving and dominant garden colours rather than choosing in isolation. Include a wall-mounted Bloomcabin model in the elevation drawing if a connection to the house is part of the intended layout, using confirmed dimensions and attachment details. For any model, do not assume a finish or frame will disappear into foliage. Establish the position and alignment first, then choose surrounding materials and planting that support the view instead of competing with it. Repeating one or two existing lines can relate the pergola to the garden without making every element line up.
Plan the destination around how you will use it
Give the destination a real purpose, because a pergola that is only visible from afar can feel like an object at the end of a corridor. Decide whether it is meant for a dining table, a pair of seats, reading or a place to pause while gardening. The choice changes where the path should arrive, how much clear space is needed around furniture and whether the main view is from inside the structure or from beyond it. Sketch furniture at realistic scale and show doors, gates and the route around it; do not let seating become an unintended barrier. Leave enough space for the activity, not simply for the frame to fit.
Consider how the destination looks when occupied as well as empty. A table, people or stored garden items can fill the visual opening, so preserve a secondary glimpse through or beside the pergola if seeing the far garden matters. Keep the most direct route clear of furniture and allow room to pull chairs back and pass them without stepping into beds. To assess the regular Bloomcabin Pergola option, draw the furniture within its confirmed footprint, including the space needed to use and move around it. Decide where movable chairs or other items will go when not in use, since they can alter the view from the house. Let the intended use shape the path and planting.

Planning considerations 5
Account for levels, drainage and existing services
Site conditions can rule out an attractive position before visual design is complete. Note slopes, low spots, downspouts, drains, paving edges, overhead obstructions and known underground services on the landscape drawing. A path should not direct runoff toward the pergola or leave a low point where access becomes inconvenient; drainage and changes in level need site-specific review, not a guess based on the garden’s overall direction. Mark existing trees and root zones for discussion too, because excavation near them can affect both the planting plan and the structure’s position. Keep drainage and the approach route visible together on the plan.
Before settling on a wall-mounted pergola option, confirm where the structure meets the building, how nearby doors and windows are used, and whether the position preserves the intended view. Have a qualified professional review the wall, supports, site levels and construction details. Identify underground services through the appropriate local locating process before excavation, and resolve access for maintenance and planting care on the same plan. Dimensioned drawings let the designer, installer and gardener refer to one consistent position rather than working from a rough impression. Confirm the drawing against current site conditions, since older plans may omit later changes.
Test the full-size composition on site
Before ordering plants or committing to a position, mark the proposed outline at full size on the ground using string, removable markers or another temporary method. Walk the approach, stand at the main windows, sit where the future seating will be and look back toward the house. Check whether the pergola is visible at the intended angle, whether the path feels direct enough, and whether open ground beyond it still reads as garden rather than leftover space. Try the test from more than one viewpoint; one excellent view should not come at the cost of every other route. Invite someone else to walk through while you notice where the composition feels crowded or unclear.
Compare the temporary outline with a dimensioned drawing for the exact configuration under consideration; if the Bloomcabin Bioclimatic Pergola listing is relevant, confirm its specific dimensions and requirements rather than estimating from a photograph. Review the composition at different times of day and, where practical, imagine it with mature planting and without leaves on deciduous trees. Notice what remains visible from a seated position as well as while standing. A measured sketch should show the structure, path, furniture, planting depth and remaining open lawn together. If those parts still work when tested in place, the pergola can function as a destination and visual anchor rather than an isolated feature.
Frequently asked questions
Should the pergola always sit at the far end of a long garden?
No. A pergola at the far end can provide a clear visual stop, but an uninterrupted path leading straight to it may reinforce the garden’s length. A mid-garden position can create a pause while leaving a view beyond. Compare both options from the house, gate and intended seating area.
Should I centre a pergola on the garden?
Not necessarily. A centred position may suit a formal layout, while an offset position can preserve a view of a tree or keep a route open. Check how each arrangement looks from the viewpoints you use, and whether the approach makes the chosen position feel intentional.
How can planting create depth without hiding the pergola?
Use lower planting in the foreground, a fuller middle layer near the pergola and a quieter backdrop beyond it. Leave a clear opening around the structure, and plan for mature plant sizes so foliage does not eventually block the views you want to keep.
What should a dimensioned landscape drawing show?
Include the pergola’s proposed footprint, the approach path, existing trees and buildings, house openings, seating, planting layers and changes in level. Marking these together makes it easier to assess sightlines, circulation and site constraints before fixing the position.
How do I tell whether the pergola is the right size?
Compare the exact proposed configuration on a dimensioned plan, then mark its outline at full size on site. View it from standing and seated positions, and consider how much garden remains visible around and beyond it.
A well-positioned pergola gives a long garden a clear focal point while preserving a sense of depth. The view from the house, the approach path, the seating area and the planting should work together, with space beyond the structure where the layout allows. Compare positions on a dimensioned plan and test the outline outdoors, letting the site’s levels, existing features and intended use shape the arrangement. The result is a destination that belongs within the garden, rather than an isolated feature at its end.
